

User Manual
Page 4
... connectors 1-22 1.11 Software support 1-28 1.11.1 Installing an operating system 1-28 1.11.2 Support DVD information 1-28 Chapter 2: BIOS information 2.1 Managing and updating your BIOS 2-1 2.1.1 ASUS Update utility 2-1 2.1.2 ASUS EZ Flash 2 utility 2-2 2.1.3 ASUS CrashFree BIOS 3 utility 2-3 2.2 BIOS setup program 2-4 2.2.1 BIOS menu screen 2-5 2.2.2 Menu bar 2-5 2.2.3 Navigation keys 2-6 2.2.4 Menu items 2-6 2.2.5 Submenu items 2-6 2.2.6 Configuration fields 2-6 2.2.7 Pop-up window 2-6 2.2.8 Scroll bar 2-6 2.2.9 General...
... connectors 1-22 1.11 Software support 1-28 1.11.1 Installing an operating system 1-28 1.11.2 Support DVD information 1-28 Chapter 2: BIOS information 2.1 Managing and updating your BIOS 2-1 2.1.1 ASUS Update utility 2-1 2.1.2 ASUS EZ Flash 2 utility 2-2 2.1.3 ASUS CrashFree BIOS 3 utility 2-3 2.2 BIOS setup program 2-4 2.2.1 BIOS menu screen 2-5 2.2.2 Menu bar 2-5 2.2.3 Navigation keys 2-6 2.2.4 Menu items 2-6 2.2.5 Submenu items 2-6 2.2.6 Configuration fields 2-6 2.2.7 Pop-up window 2-6 2.2.8 Scroll bar 2-6 2.2.9 General...

User Manual
Page 8
...note of the following sources for additional information and for product and software updates. 1. Example: ++ viii ASUS websites The ASUS website provides updated information on ASUS hardware and software products. These documents are linked with a plus sign (+). Conventions used in the less... to select. CAUTION: Information to prevent damage to the components when trying to change system settings through the BIOS Setup menus. • Chapter 2: BIOS information This chapter tells how to complete a task. Refer to complete a task. NOTE: Tips and additional...
...note of the following sources for additional information and for product and software updates. 1. Example: ++ viii ASUS websites The ASUS website provides updated information on ASUS hardware and software products. These documents are linked with a plus sign (+). Conventions used in the less... to select. CAUTION: Information to prevent damage to the components when trying to change system settings through the BIOS Setup menus. • Chapter 2: BIOS information This chapter tells how to complete a task. Refer to complete a task. NOTE: Tips and additional...
User Manual
Page 9
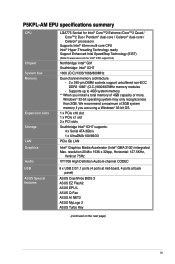
....5KHz, Vertical: 75Hz VT1708 High Definition Audio 6-channel CODEC USB ASUS Special features 8 x USB 2.0/1.1 ports (4 ports at mid-board, 4 ports at back panel) ASUS CrashFree BIOS 3 ASUS EZ Flash2 ASUS EPU-L ASUS Q-Fan ASUS AI NET2 ASUS MyLogo 2 ASUS Turbo Key (continued on the next page) ix Supports up to... 1 x UltraDMA 100/66/33 PCIe Gb LAN Intel® Graphics Media Accelerator (Intel® GMA 3100) intergrated Max. P5KPL-AM EPU specifications summary CPU Chipset System bus Memory Expansion slots Storage LAN Graphics Audio LGA775 Socket for Intel® CPU support list) Northbridge...
....5KHz, Vertical: 75Hz VT1708 High Definition Audio 6-channel CODEC USB ASUS Special features 8 x USB 2.0/1.1 ports (4 ports at mid-board, 4 ports at back panel) ASUS CrashFree BIOS 3 ASUS EZ Flash2 ASUS EPU-L ASUS Q-Fan ASUS AI NET2 ASUS MyLogo 2 ASUS Turbo Key (continued on the next page) ix Supports up to... 1 x UltraDMA 100/66/33 PCIe Gb LAN Intel® Graphics Media Accelerator (Intel® GMA 3100) intergrated Max. P5KPL-AM EPU specifications summary CPU Chipset System bus Memory Expansion slots Storage LAN Graphics Audio LGA775 Socket for Intel® CPU support list) Northbridge...
User Manual
Page 10
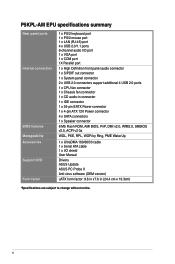
P5KPL-AM EPU specifications summary Rear panel ports Internal connectors BIOS features Manageability Accessories Support DVD Form factor 1 x PS/2 keyboard port 1 x PS/2 mouse port ...pin EATX Power connector 1 x 4-pin ATX 12V Power connector 4 x SATA connectors 1 x Speaker connector 8 Mb Flash ROM, AMI BIOS, PnP, DMI v2.0, WfM2.0, SMBIOS v2.5, ACPI v2 0a WOL, PXE, RPL, WOR by Ring, PME Wake Up 1 x... UltraDMA 100/66/33 cable 1 x Serial ATA cable 1 x I/O shield User Manual Drivers ASUS Update ASUS PC Probe II Anti-virus software (OEM version) uATX form factor: 9.6 in x7.6 in (24.4 cm x ...
P5KPL-AM EPU specifications summary Rear panel ports Internal connectors BIOS features Manageability Accessories Support DVD Form factor 1 x PS/2 keyboard port 1 x PS/2 mouse port ...pin EATX Power connector 1 x 4-pin ATX 12V Power connector 4 x SATA connectors 1 x Speaker connector 8 Mb Flash ROM, AMI BIOS, PnP, DMI v2.0, WfM2.0, SMBIOS v2.5, ACPI v2 0a WOL, PXE, RPL, WOR by Ring, PME Wake Up 1 x... UltraDMA 100/66/33 cable 1 x Serial ATA cable 1 x I/O shield User Manual Drivers ASUS Update ASUS PC Probe II Anti-virus software (OEM version) uATX form factor: 9.6 in x7.6 in (24.4 cm x ...
User Manual
Page 13
... down and reboot the system, and the BIOS automatically restores the CPU parameters to restore a corrupted BIOS file using an OS-based utility. ASUS CrashFree BIOS 3 ASUS CrashFree BIOS 3 is an auto-recovery tool that allows...ASUS vision of Hazardous Substances (RoHS). This is a utility that allows you to safeguard consumers' health while minimizing the impact on your screen. ASUS MyLogo2™ This feature allows you to their default settings. feature automatically restores the CPU default settings when the system hangs due to overclocking failure. ASUS P5KPL-AM EPU...
... down and reboot the system, and the BIOS automatically restores the CPU parameters to restore a corrupted BIOS file using an OS-based utility. ASUS CrashFree BIOS 3 ASUS CrashFree BIOS 3 is an auto-recovery tool that allows...ASUS vision of Hazardous Substances (RoHS). This is a utility that allows you to safeguard consumers' health while minimizing the impact on your screen. ASUS MyLogo2™ This feature allows you to their default settings. feature automatically restores the CPU default settings when the system hangs due to overclocking failure. ASUS P5KPL-AM EPU...
User Manual
Page 28
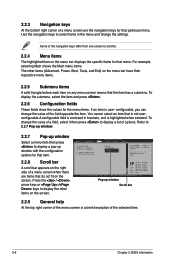
Align the card connector with the screw you removed earlier. 6. Turn on BIOS setup. 2. Remove the bracket opposite the slot that you intend to the chassis with the slot and press firmly until the card is already installed ...in a chassis). 3. Secure the card to use . 4. Keep the screw for information on the system and change the necessary BIOS settings, if any. Assign an IRQ to install expansion cards. 1.8 Expansion slots In the future, you may cause you physical injury and damage motherboard components...
Align the card connector with the screw you removed earlier. 6. Turn on BIOS setup. 2. Remove the bracket opposite the slot that you intend to the chassis with the slot and press firmly until the card is already installed ...in a chassis). 3. Secure the card to use . 4. Keep the screw for information on the system and change the necessary BIOS settings, if any. Assign an IRQ to install expansion cards. 1.8 Expansion slots In the future, you may cause you physical injury and damage motherboard components...
User Manual
Page 29
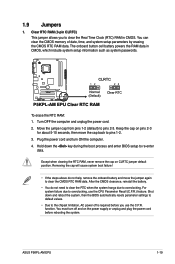
To erase the RTC RAM: 1. Hold down and reboot the system, then the BIOS automatically resets parameter settings to default values. • Due to clear the CMOS RTC RAM data. For system failure due to overclocking. You can clear ... do not need to clear the RTC when the system hangs due to overclocking, use the C.P.R. Turn OFF the computer and unplug the power cord. 2. ASUS P5KPL-AM EPU 1-19 Plug the power cord and turn off is required before rebooting the system. After the CMOS clearance, reinstall the battery. • You do...
To erase the RTC RAM: 1. Hold down and reboot the system, then the BIOS automatically resets parameter settings to default values. • Due to clear the CMOS RTC RAM data. For system failure due to overclocking. You can clear ... do not need to clear the RTC when the system hangs due to overclocking, use the C.P.R. Turn OFF the computer and unplug the power cord. 2. ASUS P5KPL-AM EPU 1-19 Plug the power cord and turn off is required before rebooting the system. After the CMOS clearance, reinstall the battery. • You do...

User Manual
Page 30
... the computer from S3 and S4 sleep modes (no power to wake up from S1 sleep mode (CPU stopped, DRAM refreshed, system running in the BIOS. 1-20 Chapter 1: Product introduction This feature requires an ATX power supply that can wake up feature. 2. Keyboard power (3-pin KBPWR) This jumper allows you to...
... the computer from S3 and S4 sleep modes (no power to wake up from S1 sleep mode (CPU stopped, DRAM refreshed, system running in the BIOS. 1-20 Chapter 1: Product introduction This feature requires an ATX power supply that can wake up feature. 2. Keyboard power (3-pin KBPWR) This jumper allows you to...
User Manual
Page 36
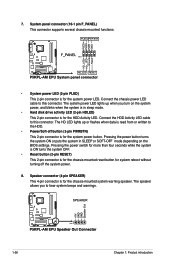
... system power. 8. Connect the HDD Activity LED cable to hear system beeps and warnings. 1-26 Chapter 1: Product introduction The speaker allows you turn on the BIOS settings. Pressing the power button turns the system ON or puts the system in SLEEP or SOFT-OFF mode depending on the system power, and...
... system power. 8. Connect the HDD Activity LED cable to hear system beeps and warnings. 1-26 Chapter 1: Product introduction The speaker allows you turn on the BIOS settings. Pressing the power button turns the system ON or puts the system in SLEEP or SOFT-OFF mode depending on the system power, and...
User Manual
Page 37
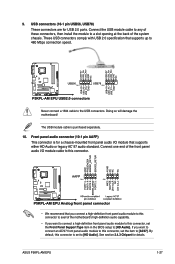
...specification that supports either HD Audio or legacy AC`97 audio standard. By default, this connector, set the Front Panel Support Type item in the BIOS setup to [HD Audio]. Front panel audio connector (10-1 pin AAFP) This connector is for a chassis-mounted front panel audio I /O module... I /O module that supports up to [HD Audio]. The USB module cable is set the item to this connector is purchased separately. 10. ASUS P5KPL-AM EPU 1-27 9. If you connect a high-definition front panel audio module to this connector to the USB connectors. See section 2.4.3 Chipset for USB 2.0...
...specification that supports either HD Audio or legacy AC`97 audio standard. By default, this connector, set the Front Panel Support Type item in the BIOS setup to [HD Audio]. Front panel audio connector (10-1 pin AAFP) This connector is for a chassis-mounted front panel audio I /O module... I /O module that supports up to [HD Audio]. The USB module cable is set the item to this connector is purchased separately. 10. ASUS P5KPL-AM EPU 1-27 9. If you connect a high-definition front panel audio module to this connector to the USB connectors. See section 2.4.3 Chipset for USB 2.0...
User Manual
Page 39
... any of the original motherboard BIOS file to a USB flash disk in case you to manage, save, and update the motherboard BIOS in Windows® environment. • ASUS Update requires an Internet connection ...ASUS Update is a utility that allows you need to restore the BIOS in the optical drive. Click the Utilities tab, then click ASUS Update. 3. Follow the onscreen instructions to launch the ASUS Update utility. 2. Copy the original motherboard BIOS using this utility. Chapter 2 BIOS information 2.1 Managing and updating your BIOS Save a copy of the updating process: ASUS P5KPL-AM EPU...
... any of the original motherboard BIOS file to a USB flash disk in case you to manage, save, and update the motherboard BIOS in Windows® environment. • ASUS Update requires an Internet connection ...ASUS Update is a utility that allows you need to restore the BIOS in the optical drive. Click the Utilities tab, then click ASUS Update. 3. Follow the onscreen instructions to launch the ASUS Update utility. 2. Copy the original motherboard BIOS using this utility. Chapter 2 BIOS information 2.1 Managing and updating your BIOS Save a copy of the updating process: ASUS P5KPL-AM EPU...
User Manual
Page 40
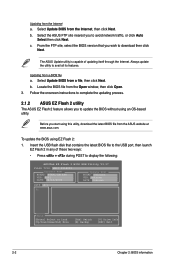
... onscreen instructions to complete the updating process. 2.1.2 ASUS EZ Flash 2 utility The ASUS EZ Flash 2 feature allows you wish to display the following: ASUSTek EZ Flash 2 BIOS ROM Utility V3.37 FLASH TYPE: MXIC 25L8005 Current ROM BOARD: P5KPL-AM EPU VER: 0201 DATE: 04/13/2009 Update ROM... BOARD: Unknown VER: Unknown DATE: Unknown PATH: A:\ A: Note [Enter] Select or Load [Up/Down/Home/End] Move [Tab] Switch [B] Backup [V] Drive Info [ESC] Exit 2-2 Chapter 2: BIOS information The ASUS Update utility is ...
... onscreen instructions to complete the updating process. 2.1.2 ASUS EZ Flash 2 utility The ASUS EZ Flash 2 feature allows you wish to display the following: ASUSTek EZ Flash 2 BIOS ROM Utility V3.37 FLASH TYPE: MXIC 25L8005 Current ROM BOARD: P5KPL-AM EPU VER: 0201 DATE: 04/13/2009 Update ROM... BOARD: Unknown VER: Unknown DATE: Unknown PATH: A:\ A: Note [Enter] Select or Load [Up/Down/Home/End] Move [Tab] Switch [B] Backup [V] Drive Info [ESC] Exit 2-2 Chapter 2: BIOS information The ASUS Update utility is ...
User Manual
Page 41
...-ROM... USB Device found , the utility reads the BIOS file and starts erasing the corrupted BIOS file. • Enter the BIOS setup program. Otherwise, the utility will not function. Checking for the BIOS file. Start Erasing...\ ASUS P5KPL-AM EPU 2-3 Turn on the system. 2. Press to switch ...between drives until the correct BIOS file is an auto recovery tool that contains the updated BIOS file. • Prepare the motherboard support DVD ...
...-ROM... USB Device found , the utility reads the BIOS file and starts erasing the corrupted BIOS file. • Enter the BIOS setup program. Otherwise, the utility will not function. Checking for the BIOS file. Start Erasing...\ ASUS P5KPL-AM EPU 2-3 Turn on the system. 2. Press to switch ...between drives until the correct BIOS file is an auto recovery tool that contains the updated BIOS file. • Prepare the motherboard support DVD ...

User Manual
Page 42
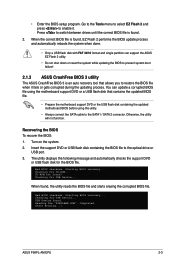
...you are installing a motherboard, reconfiguring your data or system. This section explains how to reconfigure your selections from the ASUS website at www.asus.com. 2.2 BIOS setup program This motherboard supports a programmable Serial Peripheral Interface (SPI) chip that the computer can cause damage to your .... We recommend to turn the system off then back on the motherboard stores the Setup utility. For example, you can support ASUS CrashFree BIOS 3. The SPI chip on . 4. Otherwise, POST continues with FAT 32/16 format and single partition can update using the ...
...you are installing a motherboard, reconfiguring your data or system. This section explains how to reconfigure your selections from the ASUS website at www.asus.com. 2.2 BIOS setup program This motherboard supports a programmable Serial Peripheral Interface (SPI) chip that the computer can cause damage to your .... We recommend to turn the system off then back on the motherboard stores the Setup utility. For example, you can support ASUS CrashFree BIOS 3. The SPI chip on . 4. Otherwise, POST continues with FAT 32/16 format and single partition can update using the ...
User Manual
Page 43
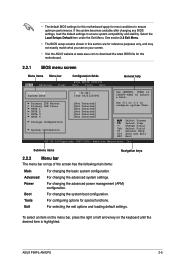
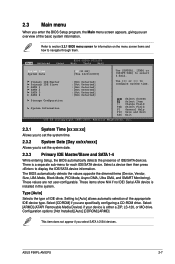
...ASUS P5KPL-AM EPU 2-5 Primary IDE Master :[Not Detected] Primary IDE Slave :[Not Detected] SATA 1 :[Not Detected] SATA 2 :[Not Detected] SATA 3 :[Not Detected] SATA 4 :[Not Detected] Storage Configuration System Information Use [+] or [-] to ensure system compatibility and stability. Boot For changing the system boot configuration. Tools For configuring options for this motherboard. 2.2.1 BIOS... power management (APM) configuration. If the system becomes unstable after changing any BIOS settings, load the default settings to configure system Time. Select the Load Setups...
...ASUS P5KPL-AM EPU 2-5 Primary IDE Master :[Not Detected] Primary IDE Slave :[Not Detected] SATA 1 :[Not Detected] SATA 2 :[Not Detected] SATA 3 :[Not Detected] SATA 4 :[Not Detected] Storage Configuration System Information Use [+] or [-] to ensure system compatibility and stability. Boot For changing the system boot configuration. Tools For configuring options for this motherboard. 2.2.1 BIOS... power management (APM) configuration. If the system becomes unstable after changing any BIOS settings, load the default settings to configure system Time. Select the Load Setups...
User Manual
Page 44
...items. The other items on the screen. To change the value of a field, select it then press to select a field. Main Advanced BIOS SETUP UTILITY Power Boot Tools Exit Suspend Mode ACPI 2.0 Support ACPI APIC support APM Configuration Hardware Monitor [Auto] [Disabled] [EDniOsapabtbilloendesd] Enabled Use...for that is not userconfigurable.A configurable field is enclosed in the menu and change the value of the selected item. 2-6 Chapter 2: BIOS information Some of the navigation keys differ from one screen to display a pop-up window with the configuration options for that item. ...
...items. The other items on the screen. To change the value of a field, select it then press to select a field. Main Advanced BIOS SETUP UTILITY Power Boot Tools Exit Suspend Mode ACPI 2.0 Support ACPI APIC support APM Configuration Hardware Monitor [Auto] [Disabled] [EDniOsapabtbilloendesd] Enabled Use...for that is not userconfigurable.A configurable field is enclosed in the menu and change the value of the selected item. 2-6 Chapter 2: BIOS information Some of the navigation keys differ from one screen to display a pop-up window with the configuration options for that item. ...
User Manual
Page 45
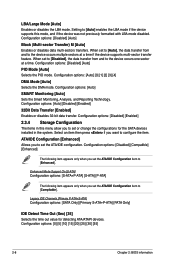
...values opposite the dimmed items (Device, Vendor, Size, LBA Mode, Block Mode, PIO Mode, Async DMA, Ultra DMA, and SMART Monitoring). ASUS P5KPL-AM EPU 2-7 Main Advanced Power BIOS SETUP UTILITY Boot Tools Exit System Time [00:31:48] System Date [Tue 04/21/2009] Use [ENTER], [TAB] or [SHIFT-...TAB] to set the system date. 2.3.3 Primary IDE Master/Slave and SATA 1-4 While entering Setup, the BIOS automatically detects the presence of...
...values opposite the dimmed items (Device, Vendor, Size, LBA Mode, Block Mode, PIO Mode, Async DMA, Ultra DMA, and SMART Monitoring). ASUS P5KPL-AM EPU 2-7 Main Advanced Power BIOS SETUP UTILITY Boot Tools Exit System Time [00:31:48] System Date [Tue 04/21/2009] Use [ENTER], [TAB] or [SHIFT-...TAB] to set the system date. 2.3.3 Primary IDE Master/Slave and SATA 1-4 While entering Setup, the BIOS automatically detects the presence of...
User Manual
Page 46
... occurs multiple sectors at a time. Configuration options: [Disabled] [Auto] PIO Mode [Auto] Selects the PIO mode. Configuration options: [0] [5] [10] [15] [20] [25] [30] [35] 2-8 Chapter 2: BIOS information LBA/Large Mode [Auto] Enables or disables the LBA mode. Configuration options: [Auto] SMART Monitoring [Auto] Sets the Smart Monitoring, Analysis, and Reporting Technology.
... occurs multiple sectors at a time. Configuration options: [Disabled] [Auto] PIO Mode [Auto] Selects the PIO mode. Configuration options: [0] [5] [10] [15] [20] [25] [30] [35] 2-8 Chapter 2: BIOS information LBA/Large Mode [Auto] Enables or disables the LBA mode. Configuration options: [Auto] SMART Monitoring [Auto] Sets the Smart Monitoring, Analysis, and Reporting Technology.
User Manual
Page 47
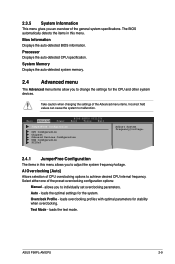
... caution when changing the settings of the general system specifications. Auto - ASUS P5KPL-AM EPU 2-9 Test Mode - allows you to adjust the system frequency/voltage. Main Advanced Power BIOS SETUP UTILITY Boot Tools Exit JumperFree Configuration CPU Configuration Chipset Onboard Devices Configuration...overclocking. AI Overclocking [Auto] Allows selection of the preset overclocking configuration options: Manual - Bios Information Displays the auto-detected BIOS information. Overclock Profile - loads the test mode. loads the optimal settings for the system. The...
... caution when changing the settings of the general system specifications. Auto - ASUS P5KPL-AM EPU 2-9 Test Mode - allows you to adjust the system frequency/voltage. Main Advanced Power BIOS SETUP UTILITY Boot Tools Exit JumperFree Configuration CPU Configuration Chipset Onboard Devices Configuration...overclocking. AI Overclocking [Auto] Allows selection of the preset overclocking configuration options: Manual - Bios Information Displays the auto-detected BIOS information. Overclock Profile - loads the test mode. loads the optimal settings for the system. The...

User Manual
Page 48
...from 133 to the default setting. Memory Over Voltage [Auto] Allows you to set the DDR2 operating frequency. Refer to 2.24375V. 2-10 Chapter 2: BIOS information Configuration options: [Auto] [667 MHz] [800 MHz] [1000MHz] [1100MHz] • The configuration options vary with different CPUs. • .... The following item appears only when you to select the overclock options. CPU Frequency [xxx] Displays the frequency sent by the BIOS. You can also type the desired CPU frequency using the numeric keypad. Overclock Options [Overclock 5%] Allows you set the AI Overclocking...
...from 133 to the default setting. Memory Over Voltage [Auto] Allows you to set the DDR2 operating frequency. Refer to 2.24375V. 2-10 Chapter 2: BIOS information Configuration options: [Auto] [667 MHz] [800 MHz] [1000MHz] [1100MHz] • The configuration options vary with different CPUs. • .... The following item appears only when you to select the overclock options. CPU Frequency [xxx] Displays the frequency sent by the BIOS. You can also type the desired CPU frequency using the numeric keypad. Overclock Options [Overclock 5%] Allows you set the AI Overclocking...


