User Manual
Page 11
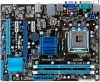
... the following items. Motherboard Cables Accessories Application DVD Documentation ASUS P5G41T-M LX3 motherboard 2 x Serial ATA 3.0Gb/s cables 1 x I/O shield ASUS motherboard support DVD User Manual If any of ASUS quality motherboards! ASUS P5G41T-M LX3 1-1 This motherboard also supports Intel® CPUs in the...8482; 2 Extreme / Core™ 2 Quad/ Core™ 2 Duo processors, which are excellent for buying an ASUS® P5G41T-M LX3 motherboard! Thank you start installing the motherboard, and hardware devices on it another standout in the 45nm manufacturing process. ...
... the following items. Motherboard Cables Accessories Application DVD Documentation ASUS P5G41T-M LX3 motherboard 2 x Serial ATA 3.0Gb/s cables 1 x I/O shield ASUS motherboard support DVD User Manual If any of ASUS quality motherboards! ASUS P5G41T-M LX3 1-1 This motherboard also supports Intel® CPUs in the...8482; 2 Extreme / Core™ 2 Quad/ Core™ 2 Duo processors, which are excellent for buying an ASUS® P5G41T-M LX3 motherboard! Thank you start installing the motherboard, and hardware devices on it another standout in the 45nm manufacturing process. ...
User Manual
Page 13
...-related Products (ErP) ready, and ErP requires products to meet certain energy efficiency requirements in line with ASUS vision of the product and thus mitigate environmental impacts. eliminates the need to their default settings. ASUS P5G41T-M LX3 1-3 C.P.R. feature automatically restores the CPU default settings when the system hangs due to reduce carbon footprint of...
...-related Products (ErP) ready, and ErP requires products to meet certain energy efficiency requirements in line with ASUS vision of the product and thus mitigate environmental impacts. eliminates the need to their default settings. ASUS P5G41T-M LX3 1-3 C.P.R. feature automatically restores the CPU default settings when the system hangs due to reduce carbon footprint of...
User Manual
Page 15
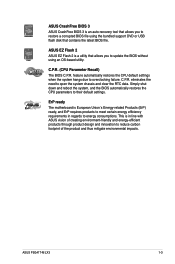
... the power cord before installing or removing the motherboard. Ensure that you place it into it. Place this side towards the rear of the chassis P5G41T-M LX3 ASUS P5G41T-M LX3 1-5 Do not overtighten the screws! 1.5 Motherboard overview Before you install the motherboard, study the configuration of your chassis to the chassis.
... the power cord before installing or removing the motherboard. Ensure that you place it into it. Place this side towards the rear of the chassis P5G41T-M LX3 ASUS P5G41T-M LX3 1-5 Do not overtighten the screws! 1.5 Motherboard overview Before you install the motherboard, study the configuration of your chassis to the chassis.
User Manual
Page 17
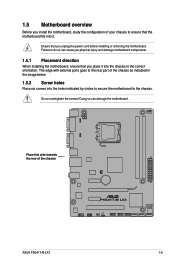
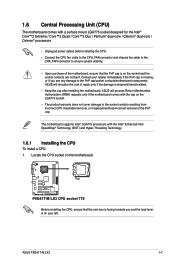
P5G41T-M LX3 P5G41T-M LX3 CPU socket 775 Before installing the CPU, ensure that the PnP cap is on the socket and the socket contacts are not bent. ASUS will shoulder the cost of the PnP cap. The motherboard supports Intel...LGA775 socket. • The product warranty does not cover damage to the PnP cap/socket contacts/motherboard components. ASUS will process Return Merchandise Authorization (RMA) requests only if the motherboard comes with the Intel® Enhanced Intel ... motherboard. Locate the CPU socket on the motherboard. Contact your left. ASUS P5G41T-M LX3 1-7
P5G41T-M LX3 P5G41T-M LX3 CPU socket 775 Before installing the CPU, ensure that the PnP cap is on the socket and the socket contacts are not bent. ASUS will shoulder the cost of the PnP cap. The motherboard supports Intel...LGA775 socket. • The product warranty does not cover damage to the PnP cap/socket contacts/motherboard components. ASUS will process Return Merchandise Authorization (RMA) requests only if the motherboard comes with the Intel® Enhanced Intel ... motherboard. Locate the CPU socket on the motherboard. Contact your left. ASUS P5G41T-M LX3 1-7

User Manual
Page 19
... finger directly. 7. Apply some Thermal Interface Material to the exposed area of the CPU that you wash it off immediately, and seek professional medical help. B ASUS P5G41T-M LX3 1-9 If it gets into the A retention tab. DO NOT eat the Thermal Interface Material. 6. If so, skip this step. Some heatsinks come with your skin...
... finger directly. 7. Apply some Thermal Interface Material to the exposed area of the CPU that you wash it off immediately, and seek professional medical help. B ASUS P5G41T-M LX3 1-9 If it gets into the A retention tab. DO NOT eat the Thermal Interface Material. 6. If so, skip this step. Some heatsinks come with your skin...

User Manual
Page 21
... fan connector Do not forget to plug this connector. 1.6.3 Uninstalling the CPU heatsink and fan To uninstall the CPU heatsink and fan: 1. A A B B B A B A ASUS P5G41T-M LX3 1-11 3. Disconnect the CPU fan cable from the motherboard. Rotate each fastener counterclockwise. 3. Connect the CPU fan cable to disengage the heatsink and fan assembly ...
... fan connector Do not forget to plug this connector. 1.6.3 Uninstalling the CPU heatsink and fan To uninstall the CPU heatsink and fan: 1. A A B B B A B A ASUS P5G41T-M LX3 1-11 3. Disconnect the CPU fan cable from the motherboard. Rotate each fastener counterclockwise. 3. Connect the CPU fan cable to disengage the heatsink and fan assembly ...
User Manual
Page 23
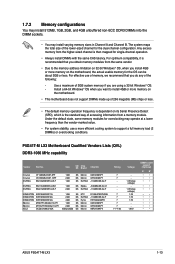
...; • • • • • • • • • • • • • • • • • • ASUS P5G41T-M LX3 1-13 Use a maximum of 3GB system memory if you do any of the following: - Install a 64-bit Windows® OS when you want to the...are using a 32-bit Windows® OS. - Under the default state, some memory modules for the dual-channel configuration. P5G41T-M LX3 Motherboard Qualified Vendors Lists (QVL) DDR3-1066 MHz capability Vendor Part No. 1.7.2 Memory configurations You may install 512MB, 1GB,...
...; • • • • • • • • • • • • • • • • • • ASUS P5G41T-M LX3 1-13 Use a maximum of 3GB system memory if you do any of the following: - Install a 64-bit Windows® OS when you want to the...are using a 32-bit Windows® OS. - Under the default state, some memory modules for the dual-channel configuration. P5G41T-M LX3 Motherboard Qualified Vendors Lists (QVL) DDR3-1066 MHz capability Vendor Part No. 1.7.2 Memory configurations You may install 512MB, 1GB,...
User Manual
Page 25
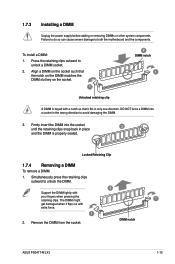
.... 3. The DIMM might 1 get damaged when it fits in the wrong direction to unlock the DIMM. 2 Support the DIMM lightly with extra force. 1 2. DIMM notch ASUS P5G41T-M LX3 1-15 Press the retaining clips outward to both the motherboard and the components. Locked Retaining Clip 1.7.4 Removing a DIMM To remove a DIMM: 1. Remove the DIMM from...
.... 3. The DIMM might 1 get damaged when it fits in the wrong direction to unlock the DIMM. 2 Support the DIMM lightly with extra force. 1 2. DIMM notch ASUS P5G41T-M LX3 1-15 Press the retaining clips outward to both the motherboard and the components. Locked Retaining Clip 1.7.4 Removing a DIMM To remove a DIMM: 1. Remove the DIMM from...
User Manual
Page 27
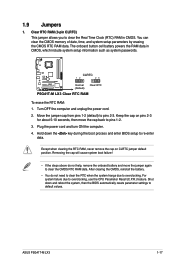
...down the key during the boot process and enter BIOS setup to default values. The onboard button cell battery powers the RAM data in CMOS. ASUS P5G41T-M LX3 1-17 For system failure due to pins 2-3. Except when clearing the RTC RAM, never remove the cap on pins 2-3 for about 5-10 seconds...to clear the Real Time Clock (RTC) RAM in CMOS, which include system setup information such as system passwords. CLRTC 12 23 P5G41T-M LX3 Normal (Default) Clear RTC P5G41T-M LX3 Clear RTC RAM To erase the RTC RAM: 1. You can clear the CMOS memory of date, time, and system setup parameters ...
...down the key during the boot process and enter BIOS setup to default values. The onboard button cell battery powers the RAM data in CMOS. ASUS P5G41T-M LX3 1-17 For system failure due to pins 2-3. Except when clearing the RTC RAM, never remove the cap on pins 2-3 for about 5-10 seconds...to clear the Real Time Clock (RTC) RAM in CMOS, which include system setup information such as system passwords. CLRTC 12 23 P5G41T-M LX3 Normal (Default) Clear RTC P5G41T-M LX3 Clear RTC RAM To erase the RTC RAM: 1. You can clear the CMOS memory of date, time, and system setup parameters ...

User Manual
Page 29
... table below for the LAN port LED indications. Line Out port (lime). This port is for the function of this port becomes Front Speaker Out. 5. ASUS P5G41T-M LX3 1-19 Microphone port (pink).
... table below for the LAN port LED indications. Line Out port (lime). This port is for the function of this port becomes Front Speaker Out. 5. ASUS P5G41T-M LX3 1-19 Microphone port (pink).
User Manual
Page 31
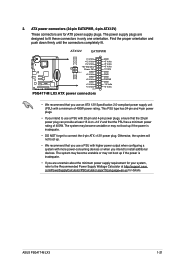
... to connect the 4-pin ATX +12V power plug. ATX12V EATXPWR +12V DC +12V DC P5G41T-M LX3 GND GND +3 Volts +12 Volts +12 Volts +5V Standby Power OK PIN 1 GND +5 Volts GND +5 Volts GND +3 Volts +3 Volts PIN 1 P5G41T-M LX3 ATX power connectors GND +5 Volts +5 Volts +5 Volts -5 Volts GND GND GND PSON# ... when you use a PSU with 20-pin and 4-pin power plugs, ensure that the 20-pin power plug can provide at http://support.asus. ASUS P5G41T-M LX3 1-21 The system may become unstable or may not boot up if the power is inadequate. • If you intend to the Recommended ...
... to connect the 4-pin ATX +12V power plug. ATX12V EATXPWR +12V DC +12V DC P5G41T-M LX3 GND GND +3 Volts +12 Volts +12 Volts +5V Standby Power OK PIN 1 GND +5 Volts GND +5 Volts GND +3 Volts +3 Volts PIN 1 P5G41T-M LX3 ATX power connectors GND +5 Volts +5 Volts +5 Volts -5 Volts GND GND GND PSON# ... when you use a PSU with 20-pin and 4-pin power plugs, ensure that the 20-pin power plug can provide at http://support.asus. ASUS P5G41T-M LX3 1-21 The system may become unstable or may not boot up if the power is inadequate. • If you intend to the Recommended ...
User Manual
Page 33
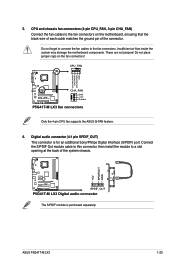
...the motherboard, ensuring that the black wire of each cable matches the ground pin of the system chassis. +5V SPDIFOUT GND P5G41T-M LX3 SPDIF_OUT P5G41T-M LX3 Digital audio connector The S/PDIF module is for an additional Sony/Philips Digital Interface (S/PDIF) port. Insufficient air flow inside... motherboard components. CPU_FAN CPU FAN PWM CPU FAN IN CPU FAN PWR GND P5G41T-M LX3 CHA_FAN GND +12V Rotation P5G41T-M LX3 fan connectors Only the 4-pin CPU fan supports the ASUS Q-FAN feature. 6. ASUS P5G41T-M LX3 1-23 Do not forget to connect the fan cables to the fan connectors ...
...the motherboard, ensuring that the black wire of each cable matches the ground pin of the system chassis. +5V SPDIFOUT GND P5G41T-M LX3 SPDIF_OUT P5G41T-M LX3 Digital audio connector The S/PDIF module is for an additional Sony/Philips Digital Interface (S/PDIF) port. Insufficient air flow inside... motherboard components. CPU_FAN CPU FAN PWM CPU FAN IN CPU FAN PWR GND P5G41T-M LX3 CHA_FAN GND +12V Rotation P5G41T-M LX3 fan connectors Only the 4-pin CPU fan supports the ASUS Q-FAN feature. 6. ASUS P5G41T-M LX3 1-23 Do not forget to connect the fan cables to the fan connectors ...
User Manual
Page 35
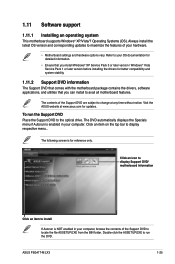
...for reference only. 1.11 Software support 1.11.1 Installing an operating system This motherboard supports Windows® XP/Vista/7 Operating Systems (OS). Visit the ASUS website at any time without notice. The following screen is NOT enabled in your OS documentation for detailed information. • Ensure that you install ...DVD. Click an icon to display Support DVD/ motherboard information Click an item to locate the file ASSETUP.EXE from the BIN folder. ASUS P5G41T-M LX3 1-25 Refer to your computer. Click an item on the top bar to avail all motherboard features.
...for reference only. 1.11 Software support 1.11.1 Installing an operating system This motherboard supports Windows® XP/Vista/7 Operating Systems (OS). Visit the ASUS website at any time without notice. The following screen is NOT enabled in your OS documentation for detailed information. • Ensure that you install ...DVD. Click an icon to display Support DVD/ motherboard information Click an item to locate the file ASSETUP.EXE from the BIN folder. ASUS P5G41T-M LX3 1-25 Refer to your computer. Click an item on the top bar to avail all motherboard features.
User Manual
Page 37
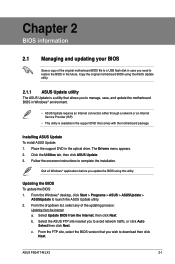
...traffic, or click Auto Select then click Next. c. Quit all Windows® applications before you update the BIOS using the ASUS Update utility. 2.1.1 ASUS Update utility The ASUS Update is a utility that allows you need to complete the installation. From the dropdown list, select any of the original... the BIOS To update the BIOS: 1. From the FTP site, select the BIOS version that comes with the motherboard package. ASUS P5G41T-M LX3 2-1 Copy the original motherboard BIOS using this utility. b. Place the support DVD in the support DVD that you to launch the...
...traffic, or click Auto Select then click Next. c. Quit all Windows® applications before you update the BIOS using the ASUS Update utility. 2.1.1 ASUS Update utility The ASUS Update is a utility that allows you need to complete the installation. From the dropdown list, select any of the original... the BIOS To update the BIOS: 1. From the FTP site, select the BIOS version that comes with the motherboard package. ASUS P5G41T-M LX3 2-1 Copy the original motherboard BIOS using this utility. b. Place the support DVD in the support DVD that you to launch the...

User Manual
Page 39
... or gets corrupted during the updating process. 2.1.3 ASUS CrashFree BIOS The ASUS CrashFree BIOS is an auto recovery tool that ASUS CrashFree BIOS support vary with motherboard models. Download the latest BIOS file from the ASUS website at www.asus.com. • The removable devices that allows ...flashing the corrupted BIOS file. 4. You can cause system boot failure! Doing so can restore a corrupted BIOS file using this utility. ASUS P5G41T-M LX3 2-3 Insert the support DVD to the optical drive or the removable device that contains the updated BIOS file. • Before using ...
... or gets corrupted during the updating process. 2.1.3 ASUS CrashFree BIOS The ASUS CrashFree BIOS is an auto recovery tool that ASUS CrashFree BIOS support vary with motherboard models. Download the latest BIOS file from the ASUS website at www.asus.com. • The removable devices that allows ...flashing the corrupted BIOS file. 4. You can cause system boot failure! Doing so can restore a corrupted BIOS file using this utility. ASUS P5G41T-M LX3 2-3 Insert the support DVD to the optical drive or the removable device that contains the updated BIOS file. • Before using ...

User Manual
Page 41
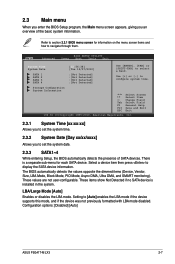
... bar, press the right or left arrow key on top of the screen has the following main items: Main For changing the basic system configuration. ASUS P5G41T-M LX3 2-5 2.2.1 BIOS menu screen Menu items Menu bar Main Advanced Power Configuration fields BIOS SETUP UTILITY Boot Tools Exit System Time [00:31:48] System Date...
... bar, press the right or left arrow key on top of the screen has the following main items: Main For changing the basic system configuration. ASUS P5G41T-M LX3 2-5 2.2.1 BIOS menu screen Menu items Menu bar Main Advanced Power Configuration fields BIOS SETUP UTILITY Boot Tools Exit System Time [00:31:48] System Date...
User Manual
Page 43
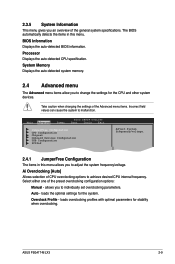
... item then press to set the system time. 2.3.2 System Date [Day xx/xx/xxxx] Allows you an overview of SATA devices. Configuration options: [Disabled] [Auto] ASUS P5G41T-M LX3 2-7 These values are not user-configurable. 2.3 Main menu When you enter the BIOS Setup program, the Main menu screen appears, giving you to display the...
... item then press to set the system time. 2.3.2 System Date [Day xx/xx/xxxx] Allows you an overview of SATA devices. Configuration options: [Disabled] [Auto] ASUS P5G41T-M LX3 2-7 These values are not user-configurable. 2.3 Main menu When you enter the BIOS Setup program, the Main menu screen appears, giving you to display the...
User Manual
Page 45
... and other system devices. BIOS Information Displays the auto-detected BIOS information. Take caution when changing the settings of the preset overclocking configuration options: Manual - ASUS P5G41T-M LX3 2-9 Ai Overclocking [Auto] Allows selection of the general system specifications. Auto - allows you to adjust the system frequency/voltage. Processor Displays the auto-detected CPU...
... and other system devices. BIOS Information Displays the auto-detected BIOS information. Take caution when changing the settings of the preset overclocking configuration options: Manual - ASUS P5G41T-M LX3 2-9 Ai Overclocking [Auto] Allows selection of the general system specifications. Auto - allows you to adjust the system frequency/voltage. Processor Displays the auto-detected CPU...
User Manual
Page 47
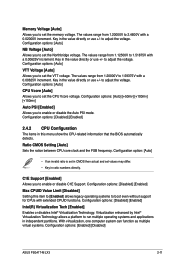
...] Allows you to enable or disable the Auto PSI mode. With virtualization, one computer system can function as multiple virtual systems. Configuration options: [Enabled] [Disabled] ASUS P5G41T-M LX3 2-11 Configuration option: [Auto] • If an invalid ratio is set in CMOS then actual and set the Northbridge voltage. Key in the value directly...
...] Allows you to enable or disable the Auto PSI mode. With virtualization, one computer system can function as multiple virtual systems. Configuration options: [Enabled] [Disabled] ASUS P5G41T-M LX3 2-11 Configuration option: [Auto] • If an invalid ratio is set in CMOS then actual and set the Northbridge voltage. Key in the value directly...

User Manual
Page 49
...] Allows you to enable or disable the boot ROM in the onboard LAN controller. Configuration options: [Disabled] [3F8/IRQ4] [2F8/IRQ3] [3E8/IRQ4] [2E8/IRQ3] ASUS P5G41T-M LX3 2-13 Configuration options: [Enabled] [Disabled] Onboard LAN Boot ROM [Disabled] Allows you to select the Serial Port1 base address. If High Definition Audio Front Panel...
...] Allows you to enable or disable the boot ROM in the onboard LAN controller. Configuration options: [Disabled] [3F8/IRQ4] [2F8/IRQ3] [3E8/IRQ4] [2E8/IRQ3] ASUS P5G41T-M LX3 2-13 Configuration options: [Enabled] [Disabled] Onboard LAN Boot ROM [Disabled] Allows you to select the Serial Port1 base address. If High Definition Audio Front Panel...


