

User Manual
Page 2
... APPEAR IN THIS MANUAL, INCLUDING THE PRODUCTS AND SOFTWARE DESCRIBED IN IT. Copies of these licenses are used only for the cost of this email address). If however you want to have it from http://support.asus.com/download; SPECIFICATIONS AND INFORMATION CONTAINED IN THIS MANUAL ARE FURNISHED FOR INFORMATIONAL USE ONLY, AND ARE SUBJECT TO CHANGE AT ANY TIME...
... APPEAR IN THIS MANUAL, INCLUDING THE PRODUCTS AND SOFTWARE DESCRIBED IN IT. Copies of these licenses are used only for the cost of this email address). If however you want to have it from http://support.asus.com/download; SPECIFICATIONS AND INFORMATION CONTAINED IN THIS MANUAL ARE FURNISHED FOR INFORMATIONAL USE ONLY, AND ARE SUBJECT TO CHANGE AT ANY TIME...
User Manual
Page 12
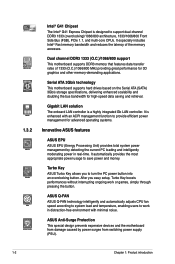
... rates of the memory accesses. It automatically provides the most appropriate power usage to support dual-channel DDR3 1333 (overclocking)/1066/800 architecture, 1333/1066/800 Front Side Bus (FSB), PCIe 1.1, and mutli-core CPUs. ASUS Anti-Surge Protection This special design prevents expensive devices and the motherboard from switching power supply (PSU). 1-2 Chapter 1: Product introduction Serial ATA 3Gb/s technology This motherboard supports hard drives based on the Serial ATA (SATA) 3Gb/s storage specifications, delivering enhanced...
... rates of the memory accesses. It automatically provides the most appropriate power usage to support dual-channel DDR3 1333 (overclocking)/1066/800 architecture, 1333/1066/800 Front Side Bus (FSB), PCIe 1.1, and mutli-core CPUs. ASUS Anti-Surge Protection This special design prevents expensive devices and the motherboard from switching power supply (PSU). 1-2 Chapter 1: Product introduction Serial ATA 3Gb/s technology This motherboard supports hard drives based on the Serial ATA (SATA) 3Gb/s storage specifications, delivering enhanced...
User Manual
Page 13
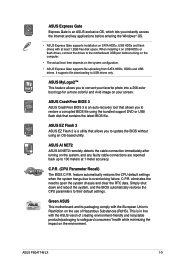
... cable connections are reported back up to restore a corrupted BIOS file using an OS-based utility. ASUS MyLogo2™ This feature allows you to 100 meters at least 1.2GB free disk space. eliminates the need to overclocking failure. ASUS EZ Flash 2 ASUS EZ Flash 2 is a utility that allows you to update the BIOS without using the bundled support DVD or USB flash disk that allows you to the motherboard USB port before entering the Windows® OS. • ASUS Express Gate supports installation...
... cable connections are reported back up to restore a corrupted BIOS file using an OS-based utility. ASUS MyLogo2™ This feature allows you to 100 meters at least 1.2GB free disk space. eliminates the need to overclocking failure. ASUS EZ Flash 2 ASUS EZ Flash 2 is a utility that allows you to update the BIOS without using the bundled support DVD or USB flash disk that allows you to the motherboard USB port before entering the Windows® OS. • ASUS Express Gate supports installation...

User Manual
Page 23
... efficient cooling system to the memory address limitation on 32-bit Windows® OS, when you install 4GB or more memory on its Serial Presence Detect (SPD), which is then mapped for overclocking may install varying memory sizes in Channel A and Channel B. P5G41T-M LX Motherboard Qualified Vendors Lists (QVL) DDR3-1066 MHz capability Vendor Part No. Size SS/ Chip DS Brand Chip NO. Timing Voltage DIMM socket support (Optional) A* B* Crucial CT12864BA1067.8FF 1024MB...
... efficient cooling system to the memory address limitation on 32-bit Windows® OS, when you install 4GB or more memory on its Serial Presence Detect (SPD), which is then mapped for overclocking may install varying memory sizes in Channel A and Channel B. P5G41T-M LX Motherboard Qualified Vendors Lists (QVL) DDR3-1066 MHz capability Vendor Part No. Size SS/ Chip DS Brand Chip NO. Timing Voltage DIMM socket support (Optional) A* B* Crucial CT12864BA1067.8FF 1024MB...

User Manual
Page 27
... the slot that came with the PCI Express specifications. 1.8.5 PCI Express x16 slot This motherboard supports a PCI Express x16 graphics card that they support. Turn on BIOS setup. 2. Keep the screw for information on the system and change the necessary BIOS settings, if any. 1.8 Expansion slots In the future, you may cause you physical injury and damage motherboard components. 1.8.1 Installing an expansion card To install an expansion card: 1. Unplug the power cord before adding or removing expansion cards. Failure to...
... the slot that came with the PCI Express specifications. 1.8.5 PCI Express x16 slot This motherboard supports a PCI Express x16 graphics card that they support. Turn on BIOS setup. 2. Keep the screw for information on the system and change the necessary BIOS settings, if any. 1.8 Expansion slots In the future, you may cause you physical injury and damage motherboard components. 1.8.1 Installing an expansion card To install an expansion card: 1. Unplug the power cord before adding or removing expansion cards. Failure to...
User Manual
Page 29
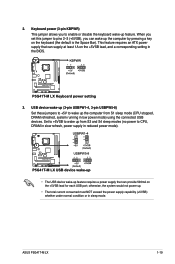
... the BIOS. 3. ASUS P5G41T-M LX 1-19 2. This feature requires an ATX power supply that can provide 500mA on the +5VSB lead, and a corresponding setting in low power mode) using the connected USB devices. When you set this jumper to pins 2-3 (+5VSB), you to CPU, DRAM in slow refresh, power supply in sleep mode. USB device wake-up (3-pin USBPW1-4, 3-pin USBPW5-8) Set these jumpers to +5V to wake up the computer from S3 and S4 sleep modes (no power to enable or disable the keyboard wake-up...
... the BIOS. 3. ASUS P5G41T-M LX 1-19 2. This feature requires an ATX power supply that can provide 500mA on the +5VSB lead, and a corresponding setting in low power mode) using the connected USB devices. When you set this jumper to pins 2-3 (+5VSB), you to CPU, DRAM in slow refresh, power supply in sleep mode. USB device wake-up (3-pin USBPW1-4, 3-pin USBPW5-8) Set these jumpers to +5V to wake up the computer from S3 and S4 sleep modes (no power to enable or disable the keyboard wake-up...

User Manual
Page 37
... later version / Windows® Vista Service Pack 1 or later version before installing the drivers for reference only. ASUS P5G41T-M LX 1-27 Visit the ASUS website at any time without notice. To run the DVD. Click an icon to display Support DVD/ motherboard information Click an item to locate the file ASSETUP.EXE from the BIN folder. The following screen is enabled in your hardware. • Motherboard settings and hardware options vary...
... later version / Windows® Vista Service Pack 1 or later version before installing the drivers for reference only. ASUS P5G41T-M LX 1-27 Visit the ASUS website at any time without notice. To run the DVD. Click an icon to display Support DVD/ motherboard information Click an item to locate the file ASSETUP.EXE from the BIN folder. The following screen is enabled in your hardware. • Motherboard settings and hardware options vary...
User Manual
Page 39
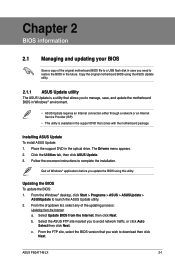
... a. ASUS P5G41T-M LX 2-1 The Drivers menu appears. 2. c. Updating the BIOS To update the BIOS: 1. Click the Utilities tab, then click ASUS Update. 3. From the Windows® desktop, click Start > Programs > ASUS > ASUSUpdate > ASUSUpdate to complete the installation. Copy the original motherboard BIOS using this utility. Place the support DVD in the support DVD that allows you to manage, save, and update the motherboard BIOS in Windows® environment. • ASUS Update requires an Internet connection either through a network or an Internet Service Provider...
... a. ASUS P5G41T-M LX 2-1 The Drivers menu appears. 2. c. Updating the BIOS To update the BIOS: 1. Click the Utilities tab, then click ASUS Update. 3. From the Windows® desktop, click Start > Programs > ASUS > ASUSUpdate > ASUSUpdate to complete the installation. Copy the original motherboard BIOS using this utility. Place the support DVD in the support DVD that allows you to manage, save, and update the motherboard BIOS in Windows® environment. • ASUS Update requires an Internet connection either through a network or an Internet Service Provider...
User Manual
Page 40
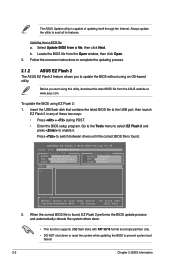
... the updating process. 2.1.2 ASUS EZ Flash 2 The ASUS EZ Flash 2 feature allows you start using this utility, download the latest BIOS file from a BIOS file a. Insert the USB flash disk that contains the latest BIOS file to prevent system boot failure! 2-2 Chapter 2: BIOS information ASUSTek EZ Flash 2 BIOS ROM Utility V3.36 FLASH TYPE: WINBOND W25X80 Current ROM BOARD: P5G41T-M LX VER: 0201 (H:00 B:02) DATE: 11/04/2009 Update ROM BOARD: Unknown VER: Unknown DATE: Unknown PATH: A:\ A: Note [Enter] Select or Load [Tab] Switch [Up...
... the updating process. 2.1.2 ASUS EZ Flash 2 The ASUS EZ Flash 2 feature allows you start using this utility, download the latest BIOS file from a BIOS file a. Insert the USB flash disk that contains the latest BIOS file to prevent system boot failure! 2-2 Chapter 2: BIOS information ASUSTek EZ Flash 2 BIOS ROM Utility V3.36 FLASH TYPE: WINBOND W25X80 Current ROM BOARD: P5G41T-M LX VER: 0201 (H:00 B:02) DATE: 11/04/2009 Update ROM BOARD: Unknown VER: Unknown DATE: Unknown PATH: A:\ A: Note [Enter] Select or Load [Tab] Switch [Up...
User Manual
Page 41
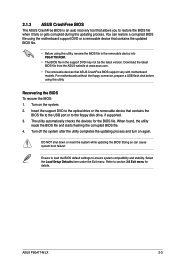
... Load Setup Defaults item under the Exit menu. ASUS P5G41T-M LX 2-3 You can cause system boot failure! Refer to section 2.8 Exit menu for the BIOS file. For motherboards without the floppy connector, prepare a USB flash disk before using this utility. When found, the utility reads the BIOS file and starts flashing the corrupted BIOS file. 4. Doing so can restore a corrupted BIOS file using the motherboard support DVD or a removable device that contains the BIOS file to the USB port or to the optical drive or the removable device that contains the updated BIOS file...
... Load Setup Defaults item under the Exit menu. ASUS P5G41T-M LX 2-3 You can cause system boot failure! Refer to section 2.8 Exit menu for the BIOS file. For motherboards without the floppy connector, prepare a USB flash disk before using this utility. When found, the utility reads the BIOS file and starts flashing the corrupted BIOS file. 4. Doing so can restore a corrupted BIOS file using the motherboard support DVD or a removable device that contains the BIOS file to the USB port or to the optical drive or the removable device that contains the updated BIOS file...

User Manual
Page 44
... item has a submenu. Some of the selected item. 2-6 Chapter 2: BIOS information configurable, you can change the value of options. To change the settings. Main Advanced BIOS SETUP UTILITY Power Boot Tools Exit Suspend Mode ACPI 2.0 Support ACPI APIC support APM Configuration Hardware Monitor [Auto] [Disabled] [EDniOsapabtbilloendesd] Enabled Use [ENTER], [TAB] or [SHIFT-TAB] to display a pop-up window screen. To display the submenu, select the item and press . 2.2.6 Configuration fields These fields show the values for that is not...
... item has a submenu. Some of the selected item. 2-6 Chapter 2: BIOS information configurable, you can change the value of options. To change the settings. Main Advanced BIOS SETUP UTILITY Power Boot Tools Exit Suspend Mode ACPI 2.0 Support ACPI APIC support APM Configuration Hardware Monitor [Auto] [Disabled] [EDniOsapabtbilloendesd] Enabled Use [ENTER], [TAB] or [SHIFT-TAB] to display a pop-up window screen. To display the submenu, select the item and press . 2.2.6 Configuration fields These fields show the values for that is not...
User Manual
Page 45
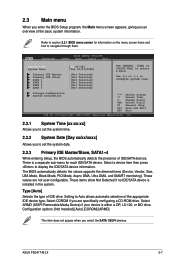
... of the basic system information. 2.3 Main menu When you enter the BIOS Setup program, the Main menu screen appears, giving you select the SATA 1/2/3/4 devices. These values are specifically configuring a CD-ROM drive. Setting to select a field. Select CDROM if you to section 2.2.1 BIOS menu screen for each IDE/SATA device. Type [Auto] Selects the type of the appropriate IDE device type. Main Advanced BIOS SETUP UTILITY Power Boot Tools Exit System Time System Date Primary IDE Master Primary IDE Slave SATA 1 SATA 2 SATA 3 SATA 4 [12:56:38] [Tue...
... of the basic system information. 2.3 Main menu When you enter the BIOS Setup program, the Main menu screen appears, giving you select the SATA 1/2/3/4 devices. These values are specifically configuring a CD-ROM drive. Setting to select a field. Select CDROM if you to section 2.2.1 BIOS menu screen for each IDE/SATA device. Type [Auto] Selects the type of the appropriate IDE device type. Main Advanced BIOS SETUP UTILITY Power Boot Tools Exit System Time System Date Primary IDE Master Primary IDE Slave SATA 1 SATA 2 SATA 3 SATA 4 [12:56:38] [Tue...

User Manual
Page 46
... [Enabled] Enables or disables 32-bit data transfer. Configuration options: [Disabled] [Enabled] 2.3.4 Storage Configuration The items in the system. Configuration options: [S-ATA+P-ATA] [S-ATA] [P-ATA]. Configuration options: [Auto] [0] [1] [2] [3] [4] DMA Mode [Auto] Selects the DMA mode. Configuration options: [Auto] SMART Monitoring [Auto] Sets the Smart Monitoring, Analysis, and Reporting Technology. Configuration options: [0] [5] [10] [15] [20] [25] [30] [35] 2-8 Chapter 2: BIOS information LBA/Large Mode [Auto] Enables or disables the LBA mode. Configuration options: [Disabled...
... [Enabled] Enables or disables 32-bit data transfer. Configuration options: [Disabled] [Enabled] 2.3.4 Storage Configuration The items in the system. Configuration options: [S-ATA+P-ATA] [S-ATA] [P-ATA]. Configuration options: [Auto] [0] [1] [2] [3] [4] DMA Mode [Auto] Selects the DMA mode. Configuration options: [Auto] SMART Monitoring [Auto] Sets the Smart Monitoring, Analysis, and Reporting Technology. Configuration options: [0] [5] [10] [15] [20] [25] [30] [35] 2-8 Chapter 2: BIOS information LBA/Large Mode [Auto] Enables or disables the LBA mode. Configuration options: [Disabled...
User Manual
Page 47
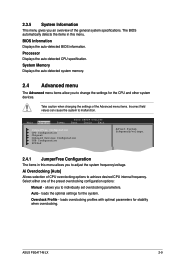
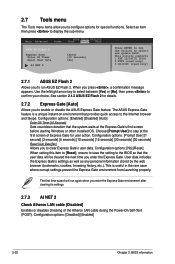
... system specifications. ASUS P5G41T-M LX 2-9 Take caution when changing the settings of CPU overclocking options to individually set overclocking parameters. Overclock Profile - The BIOS automatically detects the items in this menu. Main Advanced Power BIOS SETUP UTILITY Boot Tools Exit JumperFree Configuration CPU Configuration Chipset Onboard Devices Configuration USB Configuration PCIPnP Adjust System frequency/voltage. 2.4.1 JumperFree Configuration The items in this menu allows you to achieve desired CPU internal frequency. loads the optimal settings for stability...
... system specifications. ASUS P5G41T-M LX 2-9 Take caution when changing the settings of CPU overclocking options to individually set overclocking parameters. Overclock Profile - The BIOS automatically detects the items in this menu. Main Advanced Power BIOS SETUP UTILITY Boot Tools Exit JumperFree Configuration CPU Configuration Chipset Onboard Devices Configuration USB Configuration PCIPnP Adjust System frequency/voltage. 2.4.1 JumperFree Configuration The items in this menu allows you to achieve desired CPU internal frequency. loads the optimal settings for stability...

User Manual
Page 50
When enabled, the CPU core frequency and voltage are reduced when the CPU overheats. Configuration options: [Disabled] [Enabled] Execute-Disable Bit Capability [Enabled] Allows you to enable or disable the remapping of system memory used by SPD. North Bridge Configuration Memory Remap Feature [Enabled] Allows you to select the graphics controller as the primary boot device. Configuration options: [Disabled] [Enabled] The following item appears only when you to enable or disable the No-Execution Page Protection Technology. CPU TM Function [Enabled] Enables or disables Intel&#...
When enabled, the CPU core frequency and voltage are reduced when the CPU overheats. Configuration options: [Disabled] [Enabled] Execute-Disable Bit Capability [Enabled] Allows you to enable or disable the remapping of system memory used by SPD. North Bridge Configuration Memory Remap Feature [Enabled] Allows you to select the graphics controller as the primary boot device. Configuration options: [Disabled] [Enabled] The following item appears only when you to enable or disable the No-Execution Page Protection Technology. CPU TM Function [Enabled] Enables or disables Intel&#...
User Manual
Page 51
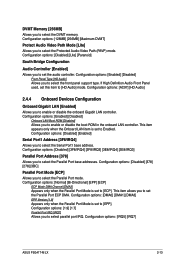
...Parallel Port Mode is set this item to [ECP]. Configuration options: [Disabled] [Enabled] Serial Port1 Address [3F8/IRQ4] Allows you to select the Protected Audio-Video Path (PAVP) mode. Configuration options: [IRQ5] [IRQ7] ASUS P5G41T-M LX 2-13 Configuration options: [1.9] [1.7] Parallel Port IRQ [IRQ7] Allows you to enable or disable the onboard Gigabit LAN controller. If High Definition Audio Front Panel used, set to Enabled. Configuration options: [DMA0] [DMA1] [DMA3] EPP Version [1.9] Appears only when the Parallel Port Mode is set to [EPP]. Configuration options...
...Parallel Port Mode is set this item to [ECP]. Configuration options: [Disabled] [Enabled] Serial Port1 Address [3F8/IRQ4] Allows you to select the Protected Audio-Video Path (PAVP) mode. Configuration options: [IRQ5] [IRQ7] ASUS P5G41T-M LX 2-13 Configuration options: [1.9] [1.7] Parallel Port IRQ [IRQ7] Allows you to enable or disable the onboard Gigabit LAN controller. If High Definition Audio Front Panel used, set to Enabled. Configuration options: [DMA0] [DMA1] [DMA3] EPP Version [1.9] Appears only when the Parallel Port Mode is set to [EPP]. Configuration options...

User Manual
Page 52
..., the USB controller legacy mode is plugged. If no USB device is disabled. USB Mass Storage Device Configuration USB Mass Storage Reset Delay [20 Sec] Allows you to detect the presence of USB devices at startup. Configuration options: [Disabled] [Enabled] USB 2.0 Controller [Enabled] Allows you to configure the USB 2.0 controller in this menu allows you to set the maximum time that the BIOS waits for Legacy USB storage devices, including USB flash drives and USB hard drives. Configuration options: [Disabled] [Enabled] [Auto] USB 2.0 Controller Mode [HiSpeed] Allows...
..., the USB controller legacy mode is plugged. If no USB device is disabled. USB Mass Storage Device Configuration USB Mass Storage Reset Delay [20 Sec] Allows you to detect the presence of USB devices at startup. Configuration options: [Disabled] [Enabled] USB 2.0 Controller [Enabled] Allows you to configure the USB 2.0 controller in this menu allows you to set the maximum time that the BIOS waits for Legacy USB storage devices, including USB flash drives and USB hard drives. Configuration options: [Disabled] [Enabled] [Auto] USB 2.0 Controller Mode [HiSpeed] Allows...
User Manual
Page 53
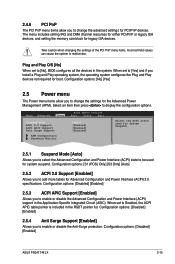
... the system to display the configuration options. Main Advanced Power BIOS SETUP UTILITY Boot Tools Exit Suspend Mode ACPI 2.0 Support ACPI APIC Support Anti Surge Support [Auto] [Enabled] [Enabled] [Enabled] APM Configuration Hardware Monitor Select the ACPI state used for Advanced Configuration and Power Interface (ACPI) 2.0 specifications. Configuration options: [Disabled] [Enabled] 2.5.4 Anti Surge Support [Enabled] Allows you to add more tables for system suspend. Configuration options: [No] [Yes] 2.5 Power menu The Power menu items allow you install a Plug and Play...
... the system to display the configuration options. Main Advanced Power BIOS SETUP UTILITY Boot Tools Exit Suspend Mode ACPI 2.0 Support ACPI APIC Support Anti Surge Support [Auto] [Enabled] [Enabled] [Enabled] APM Configuration Hardware Monitor Select the ACPI state used for Advanced Configuration and Power Interface (ACPI) 2.0 specifications. Configuration options: [Disabled] [Enabled] 2.5.4 Anti Surge Support [Enabled] Allows you to add more tables for system suspend. Configuration options: [No] [Yes] 2.5 Power menu The Power menu items allow you install a Plug and Play...

User Manual
Page 56
... run Setup during POST. Select an item then press to use the ASUS MyLogo2™ feature. To clear the supervisor password, select the Change Supervisor Password then press twice. Configuration options: [Off] [On] Wait For 'F1' If Error [Enabled] When set to [Enabled], the system displays the message Press DEL to select the power-on state for the F1 key to enable or disable the full screen logo display feature. Configuration options: [Disabled] [Enabled] Hit...
... run Setup during POST. Select an item then press to use the ASUS MyLogo2™ feature. To clear the supervisor password, select the Change Supervisor Password then press twice. Configuration options: [Off] [On] Wait For 'F1' If Error [Enabled] When set to [Enabled], the system displays the message Press DEL to select the power-on state for the F1 key to enable or disable the full screen logo display feature. Configuration options: [Disabled] [Enabled] Hit...
User Manual
Page 58
... quick access to enable or disable the ASUS Express Gate feature. Use the left/right arrow key to select between [Yes] or [No], then press to clear Express Gate's user data. Configuration options: [No] [Reset] When setting this item to [Reset], ensure to save the setting to run ASUS EZ Flash 2. Configuration options: [Enabled] [Disabled] [Auto] Enter OS Timer [10 Seconds] Sets countdown duration that the user data will run the utility to configure options for details. 2.7.2 Express Gate [Auto] Allows...
... quick access to enable or disable the ASUS Express Gate feature. Use the left/right arrow key to select between [Yes] or [No], then press to clear Express Gate's user data. Configuration options: [No] [Reset] When setting this item to [Reset], ensure to save the setting to run ASUS EZ Flash 2. Configuration options: [Enabled] [Disabled] [Auto] Enter OS Timer [10 Seconds] Sets countdown duration that the user data will run the utility to configure options for details. 2.7.2 Express Gate [Auto] Allows...


