
P4V533-MX User Manual
Page 12
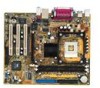
... graphics via integrated VIA ProSavage8 graphics and an AGP 4X slot, USB 2.0, and 6-channel audio features, the P4V533-MX is damaged or missing, contact your affordable vehicle to set a new benchmark for the following items. ASUS P4V533-MX motherboard ASUS P4V533-MX series support CD 1 x UltraDMA 133/100/66/33 cable 1 x Floppy disk cable I/O shield Bag of extra...
... graphics via integrated VIA ProSavage8 graphics and an AGP 4X slot, USB 2.0, and 6-channel audio features, the P4V533-MX is damaged or missing, contact your affordable vehicle to set a new benchmark for the following items. ASUS P4V533-MX motherboard ASUS P4V533-MX series support CD 1 x UltraDMA 133/100/66/33 cable 1 x Floppy disk cable I/O shield Bag of extra...

P4V533-MX User Manual
Page 13
...; chipset integrates the VIA® ProSavage8 Graphics architecture to 4.2GB/s data transfer rates. Free bundled TrendMIcro™ PC-cillin 2002 anti-virus software (OEM version) ASUS P4V533-MX motherboard user guide 1-3 Integrated 10/100 LAN The VIA® VT8235 SouthBridge integrated MAC with sharp images, fast rendering, smooth motion, and clearly defined details...
...; chipset integrates the VIA® ProSavage8 Graphics architecture to 4.2GB/s data transfer rates. Free bundled TrendMIcro™ PC-cillin 2002 anti-virus software (OEM version) ASUS P4V533-MX motherboard user guide 1-3 Integrated 10/100 LAN The VIA® VT8235 SouthBridge integrated MAC with sharp images, fast rendering, smooth motion, and clearly defined details...

P4V533-MX User Manual
Page 15
... cards for Intel® Hyper-Threading Technology, system memory interface at 266MHz operation, and 1.5V AGP interface that allows 6-channel audio playback. 11 Super I /O functionality. ASUS P4V533-MX motherboard user guide 1-5
... cards for Intel® Hyper-Threading Technology, system memory interface at 266MHz operation, and 1.5V AGP interface that allows 6-channel audio playback. 11 Super I /O functionality. ASUS P4V533-MX motherboard user guide 1-5
P4V533-MX User Manual
Page 17
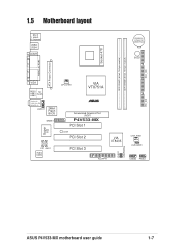
... In Center:Line Out Below:Mic In AUDIO1 2Mbit Flash BIOS GAME1 Super I/O CD1 AUX1 Audio Codec CPU_FAN1 VIA VT8751A ® Accelerated Graphics Port (AGP) P4V533-MX PCI Slot 1 LED1 PCI Slot 2 PCI Slot 3 01 23 VIA VT8235 CHA_FAN1 CLRCMOS1 PLED1 USBPWR56 FLOPPY1 USB56 PANEL1 PRI_IDE ASUS P4V533-MX motherboard user guide 1-7
... In Center:Line Out Below:Mic In AUDIO1 2Mbit Flash BIOS GAME1 Super I/O CD1 AUX1 Audio Codec CPU_FAN1 VIA VT8751A ® Accelerated Graphics Port (AGP) P4V533-MX PCI Slot 1 LED1 PCI Slot 2 PCI Slot 3 01 23 VIA VT8235 CHA_FAN1 CLRCMOS1 PLED1 USBPWR56 FLOPPY1 USB56 PANEL1 PRI_IDE ASUS P4V533-MX motherboard user guide 1-7
P4V533-MX User Manual
Page 19
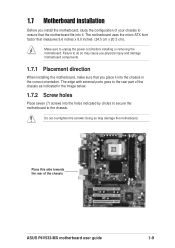
... in the correct orientation. Failure to unplug the power cord before installing or removing the motherboard. Place this side towards the rear of the chassis ASUS P4V533-MX motherboard user guide 1-9 Do not overtighten the screws! Make sure to do so may damage the motherboard.
... in the correct orientation. Failure to unplug the power cord before installing or removing the motherboard. Place this side towards the rear of the chassis ASUS P4V533-MX motherboard user guide 1-9 Do not overtighten the screws! Make sure to do so may damage the motherboard.
P4V533-MX User Manual
Page 21
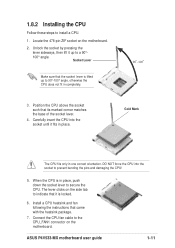
... CPU does not fit in place, push down the socket lever to a 90°- 100° angle. Gold Mark The CPU fits only in place. ASUS P4V533-MX motherboard user guide 1-11 1.8.2 Installing the CPU Follow these steps to prevent bending the pins and damaging the CPU! 5. Carefully insert the CPU into the...
... CPU does not fit in place, push down the socket lever to a 90°- 100° angle. Gold Mark The CPU fits only in place. ASUS P4V533-MX motherboard user guide 1-11 1.8.2 Installing the CPU Follow these steps to prevent bending the pins and damaging the CPU! 5. Carefully insert the CPU into the...
P4V533-MX User Manual
Page 23
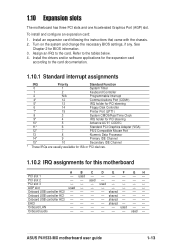
... for BIOS information. 3. shared - - - shared - - - used Onboard USB controller HC0 - - - - PCI slot 3 - - - AGP slot used - See Chapter 2 for this motherboard A B C D E F GH PCI slot 1 - used - - - - - used - - - - - - ASUS P4V533-MX motherboard user guide 1-13 used - - - - shared - - - used - - shared - - - Onboard LAN - - - - - Turn on the system and change the necessary BIOS settings, if any. Install an expansion...
... for BIOS information. 3. shared - - - shared - - - used Onboard USB controller HC0 - - - - PCI slot 3 - - - AGP slot used - See Chapter 2 for this motherboard A B C D E F GH PCI slot 1 - used - - - - - used - - - - - - ASUS P4V533-MX motherboard user guide 1-13 used - - - - shared - - - used - - shared - - - Onboard LAN - - - - - Turn on the system and change the necessary BIOS settings, if any. Install an expansion...

P4V533-MX User Manual
Page 25
To erase the RTC RAM: 1. Removing the cap will cause system boot failure! ® P4V533-MX CLRCMOS1 12 23 Normal (Default) Clear CMOS P4V533-MX Clear RTC RAM Setting ASUS P4V533-MX motherboard user guide 1-15 1.11 Jumper 1. Hold down the key during the boot process and enter BIOS setup to pins 1-2. 3. Clear RTC RAM (CLRCMOS1) This ...
To erase the RTC RAM: 1. Removing the cap will cause system boot failure! ® P4V533-MX CLRCMOS1 12 23 Normal (Default) Clear CMOS P4V533-MX Clear RTC RAM Setting ASUS P4V533-MX motherboard user guide 1-15 1.11 Jumper 1. Hold down the key during the boot process and enter BIOS setup to pins 1-2. 3. Clear RTC RAM (CLRCMOS1) This ...
P4V533-MX User Manual
Page 27
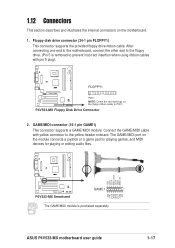
...(Pin 5 is purchased separately. +5V J1B1 J1CX GND GND J1CY J1B2 +5V ASUS P4V533-MX motherboard user guide 1-17 P4V533-MX Floppy Disk Drive Connector 2. Connect the GAME/MIDI cable with pin 5 plug). ® FLOPPY1 P4V533-MX PIN 1 NOTE: Orient the red markings on the motherboard. 1. GAME/MIDI connector...playing games, and MIDI devices for playing or editing audio files. +5V J2B1 J2CX MIDI_OUT J2CY J2B2 MIDI_IN ® P4V533-MX P4V533-MX Smartcard GAME1 The GAME/MIDI module is removed to prevent incorrect insertion when using ribbon cables with yellow connector to the yellow ...
...(Pin 5 is purchased separately. +5V J1B1 J1CX GND GND J1CY J1B2 +5V ASUS P4V533-MX motherboard user guide 1-17 P4V533-MX Floppy Disk Drive Connector 2. Connect the GAME/MIDI cable with pin 5 plug). ® FLOPPY1 P4V533-MX PIN 1 NOTE: Orient the red markings on the motherboard. 1. GAME/MIDI connector...playing games, and MIDI devices for playing or editing audio files. +5V J2B1 J2CX MIDI_OUT J2CY J2B2 MIDI_IN ® P4V533-MX P4V533-MX Smartcard GAME1 The GAME/MIDI module is removed to prevent incorrect insertion when using ribbon cables with yellow connector to the yellow ...
P4V533-MX User Manual
Page 29
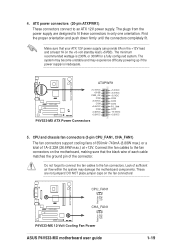
...lead and at +12V. ATX power connectors (20-pin ATXPWR1) These connectors connect to the fan connectors. ATXPWR1 ® P4V533-MX +12.0VDC +5VSB PWR_OK COM +5.0VDC COM +5.0VDC COM +3.3VDC +3.3VDC P4V533-MX ATX Power Connectors +5.0VDC +5.0VDC -5.0VDC COM COM COM PS_ON# COM -12.0VDC +3.3VDC 5. Do not forget to...to the fan connectors on the motherboard, making sure that your ATX 12V power supply can provide 8A on the fan connectors! ® P4V533-MX Rotation +12V GND CPU_FAN1 CHA_FAN1 Rotation +12V GND P4V533-MX 12-Volt Cooling Fan Power ASUS P4V533-MX motherboard user guide 1-19
...lead and at +12V. ATX power connectors (20-pin ATXPWR1) These connectors connect to the fan connectors. ATXPWR1 ® P4V533-MX +12.0VDC +5VSB PWR_OK COM +5.0VDC COM +5.0VDC COM +3.3VDC +3.3VDC P4V533-MX ATX Power Connectors +5.0VDC +5.0VDC -5.0VDC COM COM COM PS_ON# COM -12.0VDC +3.3VDC 5. Do not forget to...to the fan connectors on the motherboard, making sure that your ATX 12V power supply can provide 8A on the fan connectors! ® P4V533-MX Rotation +12V GND CPU_FAN1 CHA_FAN1 Rotation +12V GND P4V533-MX 12-Volt Cooling Fan Power ASUS P4V533-MX motherboard user guide 1-19
P4V533-MX User Manual
Page 31
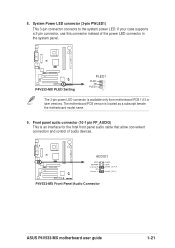
...your case supports a 3-pin connector, use this connector instead of audio devices. ® P4V533-MX AUDIO1 MIC2 MICPWR Line out_R NC Line out_L AGND +5VA BLINE_OUT_R BLINE_OUT_L P4V533-MX Front Panel Audio Connector ASUS P4V533-MX motherboard user guide 1-21 The motherboard PCB version is available only from motherboard PCB 1.03... that allow convenient connection and control of the power LED connector in the system panel. ® P4V533-MX P4V533-MX PLED Setting PLED1 PLEDNC PLED+ 1 The 3-pin power LED connector is located as a subscript beside the motherboard model name. 9.
...your case supports a 3-pin connector, use this connector instead of audio devices. ® P4V533-MX AUDIO1 MIC2 MICPWR Line out_R NC Line out_L AGND +5VA BLINE_OUT_R BLINE_OUT_L P4V533-MX Front Panel Audio Connector ASUS P4V533-MX motherboard user guide 1-21 The motherboard PCB version is available only from motherboard PCB 1.03... that allow convenient connection and control of the power LED connector in the system panel. ® P4V533-MX P4V533-MX PLED Setting PLED1 PLEDNC PLED+ 1 The 3-pin power LED connector is located as a subscript beside the motherboard model name. 9.
P4V533-MX User Manual
Page 35
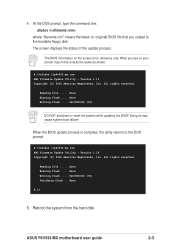
The screen displays the status of the update process. A:\>afudos /ip4v533-mx.rom AMI Firmware Update Utility - done Erasing flash .... done Writing flash .... 0x0008CC00 (9%) DO NOT shutdown or reset the system while updating the BIOS...hard disk. The BIOS information on your screen may cause system boot failure! Reading file ..... Reading file ..... A:\>afudos /ip4v533-mx.rom AMI Firmware Update Utility - All rights reserved. 4. All rights reserved. ASUS P4V533-MX motherboard user guide 2-3 At the DOS prompt, type the command line: afudos /i where "filename.rom" means the latest ...
The screen displays the status of the update process. A:\>afudos /ip4v533-mx.rom AMI Firmware Update Utility - done Erasing flash .... done Writing flash .... 0x0008CC00 (9%) DO NOT shutdown or reset the system while updating the BIOS...hard disk. The BIOS information on your screen may cause system boot failure! Reading file ..... Reading file ..... A:\>afudos /ip4v533-mx.rom AMI Firmware Update Utility - All rights reserved. 4. All rights reserved. ASUS P4V533-MX motherboard user guide 2-3 At the DOS prompt, type the command line: afudos /i where "filename.rom" means the latest ...
P4V533-MX User Manual
Page 37
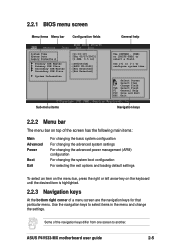
...-S340] :[Not Detected] :[Not Detected] Sub-menu items Use [ENTER], [TAB] or [SHIFT-TAB] to configure system time. Use the navigation keys to another. ASUS P4V533-MX motherboard user guide 2-5 Use [+] or [-] to select a field. Select Screen Select Item +- 2.2.1 BIOS menu screen Menu items Menu bar Configuration fields General help System Time ...
...-S340] :[Not Detected] :[Not Detected] Sub-menu items Use [ENTER], [TAB] or [SHIFT-TAB] to configure system time. Use the navigation keys to another. ASUS P4V533-MX motherboard user guide 2-5 Use [+] or [-] to select a field. Select Screen Select Item +- 2.2.1 BIOS menu screen Menu items Menu bar Configuration fields General help System Time ...
P4V533-MX User Manual
Page 39
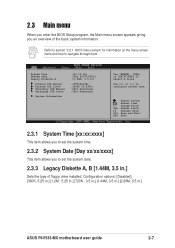
... Legacy Diskette A Primary IDE Master Primary IDE Slave Secondary IDE Master Secondary IDE Slave System Information [11:10:19] [Thu 05/27/2003] [1.44M, 3.5 in .] ASUS P4V533-MX motherboard user guide 2-7 Change Field Tab Select Field F1 General Help F10 Save and Exit ESC Exit 2.3.1 System Time [xx:xx:xxxx] This item allows...
... Legacy Diskette A Primary IDE Master Primary IDE Slave Secondary IDE Master Secondary IDE Slave System Information [11:10:19] [Thu 05/27/2003] [1.44M, 3.5 in .] ASUS P4V533-MX motherboard user guide 2-7 Change Field Tab Select Field F1 General Help F10 Save and Exit ESC Exit 2.3.1 System Time [xx:xx:xxxx] This item allows...
P4V533-MX User Manual
Page 41
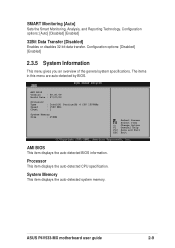
... Count : Intel(R) Pentium(R) 4 CPU 1500MHz : 1500 MHz : 1 System Memory Size : 256MB Select Screen Select Item +- The items in this menu are auto-detected by BIOS. ASUS P4V533-MX motherboard user guide 2-9 Change Option F1 General Help F10 Save and Exit ESC Exit AMI BIOS This item displays the auto-detected BIOS information. Configuration...
... Count : Intel(R) Pentium(R) 4 CPU 1500MHz : 1500 MHz : 1 System Memory Size : 256MB Select Screen Select Item +- The items in this menu are auto-detected by BIOS. ASUS P4V533-MX motherboard user guide 2-9 Change Option F1 General Help F10 Save and Exit ESC Exit AMI BIOS This item displays the auto-detected BIOS information. Configuration...

P4V533-MX User Manual
Page 43
Select an item then press Enter to Precharge (Tras) [6T] Configuration options: [5T] [6T] ASUS P4V533-MX motherboard user guide 2-11 Configuration options: [Auto] [200Mhz] [266Mhz] Configure DRAM Timing by SPD [Enabled] When this item is set to Disabled. CAS# Latency [2.5] This ...
Select an item then press Enter to Precharge (Tras) [6T] Configuration options: [5T] [6T] ASUS P4V533-MX motherboard user guide 2-11 Configuration options: [Auto] [200Mhz] [266Mhz] Configure DRAM Timing by SPD [Enabled] When this item is set to Disabled. CAS# Latency [2.5] This ...
P4V533-MX User Manual
Page 45
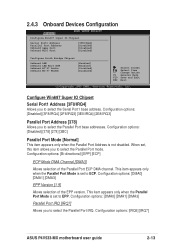
...] [3F8/IRQ4] [2F8/IRQ3] [3E8/IRQ4] [2E8/IRQ3] Parallel Port Address [378] Allows you to select the Parallel Port base addresses. Configuration options: [IRQ5] [IRQ7] ASUS P4V533-MX motherboard user guide 2-13
...] [3F8/IRQ4] [2F8/IRQ3] [3E8/IRQ4] [2E8/IRQ3] Parallel Port Address [378] Allows you to select the Parallel Port base addresses. Configuration options: [IRQ5] [IRQ7] ASUS P4V533-MX motherboard user guide 2-13

P4V533-MX User Manual
Page 47
...] [192] [224] [248] Allocate IRQ to PCI VGA [Yes] When set to [No], BIOS configures all the devices in the system. Configuration options: [Available] [Reserved] ASUS P4V533-MX motherboard user guide 2-15 Advanced PCI/PnP settings WARNING: Setting wrong values in the sections below may cause the system to malfunction. Configuration options: [Yes...
...] [192] [224] [248] Allocate IRQ to PCI VGA [Yes] When set to [No], BIOS configures all the devices in the system. Configuration options: [Available] [Reserved] ASUS P4V533-MX motherboard user guide 2-15 Advanced PCI/PnP settings WARNING: Setting wrong values in the sections below may cause the system to malfunction. Configuration options: [Yes...
P4V533-MX User Manual
Page 49
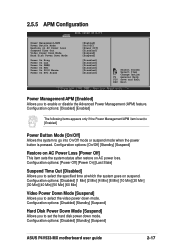
...] [Standby] [Suspend] Hard Disk Power Down Mode [Suspend] Allows you to enable or disable the Advanced Power Management (APM) feature. Configuration options: [Disabled] [Standby] [Suspend] ASUS P4V533-MX motherboard user guide 2-17 Change Option F1 General Help F10 Save and Exit ESC Exit Power Management/APM [Enabled] Allows you to go into On...
...] [Standby] [Suspend] Hard Disk Power Down Mode [Suspend] Allows you to enable or disable the Advanced Power Management (APM) feature. Configuration options: [Disabled] [Standby] [Suspend] ASUS P4V533-MX motherboard user guide 2-17 Change Option F1 General Help F10 Save and Exit ESC Exit Power Management/APM [Enabled] Allows you to go into On...
P4V533-MX User Manual
Page 51
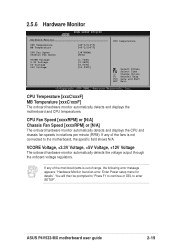
VCORE Voltage, +3.3V Voltage, +5V Voltage, +12V Voltage The onboard hardware monitor automatically detects the voltage output through the onboard voltage regulators. ASUS P4V533-MX motherboard user guide 2-19 You will then be prompted to "Press F1 to continue or DEL to the motherboard, the specific field shows N/A. Enter Power ...
VCORE Voltage, +3.3V Voltage, +5V Voltage, +12V Voltage The onboard hardware monitor automatically detects the voltage output through the onboard voltage regulators. ASUS P4V533-MX motherboard user guide 2-19 You will then be prompted to "Press F1 to continue or DEL to the motherboard, the specific field shows N/A. Enter Power ...


