User Guide
Page 9
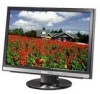
...brighter display, plus a host of the above items is damaged or missing, contact your viewing experience. ASUS LCD Monitor MW221/MW201 Series 1-1 1.1 Welcome! The ASUS® MW221/MW201 Series LCD monitor gives you a full view of documents and web pages, and saving you the trouble of having ...to scroll the bar while you ! 1.2 Package contents Check your MW221/MW201 Series LCD package for purchasing the ASUS® MW221/MW201 Series LCD monitor! Thank you for the following items: LCD monitor User manual CD Quick start guide 1 x Power cord 1 x VGA cable 1 x DVI ...
...brighter display, plus a host of the above items is damaged or missing, contact your viewing experience. ASUS LCD Monitor MW221/MW201 Series 1-1 1.1 Welcome! The ASUS® MW221/MW201 Series LCD monitor gives you a full view of documents and web pages, and saving you the trouble of having ...to scroll the bar while you ! 1.2 Package contents Check your MW221/MW201 Series LCD package for purchasing the ASUS® MW221/MW201 Series LCD monitor! Thank you for the following items: LCD monitor User manual CD Quick start guide 1 x Power cord 1 x VGA cable 1 x DVI ...
User Guide
Page 11
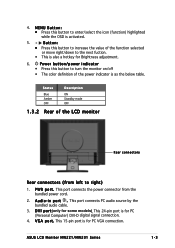
... connectors Rear connectors (from the bundled power cord. 2. This 24-pin port is for some models). A u d i o - P W R p o r t . D V I p o r t(only for PC VGA connection. ASUS LCD Monitor MW221/MW201 Series 1-3 This 15-pin port is for Brightness adjustment. 6. This port connects the power connector from left to enter/select the icon (function) highlighted while ...
... connectors Rear connectors (from the bundled power cord. 2. This 24-pin port is for some models). A u d i o - P W R p o r t . D V I p o r t(only for PC VGA connection. ASUS LCD Monitor MW221/MW201 Series 1-3 This 15-pin port is for Brightness adjustment. 6. This port connects the power connector from left to enter/select the icon (function) highlighted while ...
User Guide
Page 13
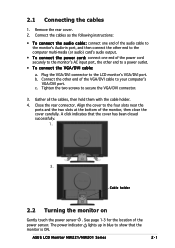
... close the cover carefully. Tighten the two screws to the LCD monitor's VGA/DVI port. Align the cover to the four slots near the ports and the two slots at the bottom of the VGA/DVI cable ... audio) card's audio output. • To connect the power cord: connect one end of the power sensor. A click indicates that the monitor is ON. Close the rear connector. ASUS LCD Monitor MW221/MW201 Series 2-1 2.1 Connecting the cables 1. The power indicator lights up in port, and then connect the other end to your computer's VGA/DVI...
... close the cover carefully. Tighten the two screws to the LCD monitor's VGA/DVI port. Align the cover to the four slots near the ports and the two slots at the bottom of the VGA/DVI cable ... audio) card's audio output. • To connect the power cord: connect one end of the power sensor. A click indicates that the monitor is ON. Close the rear connector. ASUS LCD Monitor MW221/MW201 Series 2-1 2.1 Connecting the cables 1. The power indicator lights up in port, and then connect the other end to your computer's VGA/DVI...
User Guide
Page 15
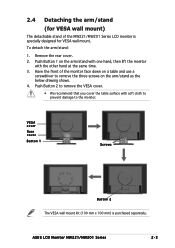
... soft cloth to prevent damage to remove the three screws on a table and use a screwdriver to the monitor. To detach the arm/stand: 1. Have the front of the MW221/MW201 Series LCD monitor is purchased separately. Push Button 2 to remove the VESA cover. • We recommend that you cover the table surface ...with the other hand at the same time. 3. 2.4 Detaching the arm/stand (for VESA wall mount) The detachable stand of the monitor face down on the arm/stand as the below drawing shows. 4. Remove the rear cover. 2. ASUS LCD Monitor MW221/MW201 Series 2-3
... soft cloth to prevent damage to remove the three screws on a table and use a screwdriver to the monitor. To detach the arm/stand: 1. Have the front of the MW221/MW201 Series LCD monitor is purchased separately. Push Button 2 to remove the VESA cover. • We recommend that you cover the table surface ...with the other hand at the same time. 3. 2.4 Detaching the arm/stand (for VESA wall mount) The detachable stand of the monitor face down on the arm/stand as the below drawing shows. 4. Remove the rear cover. 2. ASUS LCD Monitor MW221/MW201 Series 2-3
User Guide
Page 17
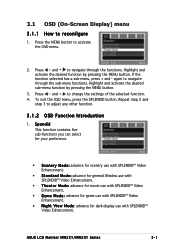
... desired function by pressing the MENU button. 3. Press and to reconfigure 1. 3.1 OSD (On-Screen Display) menu 3.1.1 How to change the settings of the selected function. 4. ASUS LCD Monitor MW221/MW201 Series 3-1 Press and to navigate through the functions. Highlight and activate the desired sub-menu function by pressing the MENU button. S p e n d i d This function contains...
... desired function by pressing the MENU button. 3. Press and to reconfigure 1. 3.1 OSD (On-Screen Display) menu 3.1.1 How to change the settings of the selected function. 4. ASUS LCD Monitor MW221/MW201 Series 3-1 Press and to navigate through the functions. Highlight and activate the desired sub-menu function by pressing the MENU button. S p e n d i d This function contains...
User Guide
Page 19
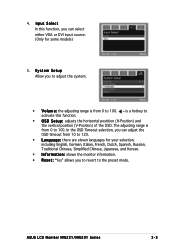
S y s t e m S e t u p Allow you to adjust the system. • V o l u m e : the adjusting range is from 0 to 100. The adjusting range is a hotkey to the preset mode. ASUS LCD Monitor MW221/MW201 Series 3-3 activate this function, you can select either VGA or DVI input source. (Only for your selection, including English, German, Italian, French, Dutch, Spanish, Russian, ...
S y s t e m S e t u p Allow you to adjust the system. • V o l u m e : the adjusting range is from 0 to 100. The adjusting range is a hotkey to the preset mode. ASUS LCD Monitor MW221/MW201 Series 3-3 activate this function, you can select either VGA or DVI input source. (Only for your selection, including English, German, Italian, French, Dutch, Spanish, Russian, ...
User Guide
Page 21
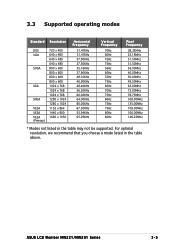
For optimal resolution, we recommend that you choose a mode listed in the table may not be supported. ASUS LCD Monitor MW221/MW201 Series 3-5 3.3 Supported operating modes Standard Resolution DOS VGA SVGA XGA SXGA VESA VESA VESA (Primary) 720 x 400 640 x 480 640 x 480 640 x 480 800 x 600 ...
For optimal resolution, we recommend that you choose a mode listed in the table may not be supported. ASUS LCD Monitor MW221/MW201 Series 3-5 3.3 Supported operating modes Standard Resolution DOS VGA SVGA XGA SXGA VESA VESA VESA (Primary) 720 x 400 640 x 480 640 x 480 640 x 480 800 x 600 ...