M5A99X EVO R2.0 User's Manual
Page 5
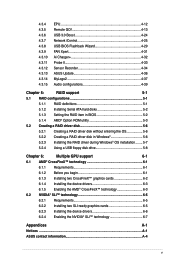
...iControl 4-25 USB BIOS Flashback Wizard 4-29 FAN Xpert 4-31 Ai Charger 4-32 Probe II 4-33 Sensor Recorder 4-34 ASUS Update 4-36 MyLogo2 4-37 Audio configurations 4-39 Chapter 5: RAID support 5-1 5.1 RAID configurations 5-1 5.1.1 RAID definitions 5-1 ...in BIOS 5-2 5.1.4 AMD® Option ROM utility 5-3 5.2 Creating a RAID driver disk 5-6 5.2.1 Creating a RAID driver disk without entering the OS 5-6 5.2.2 Creating a RAID driver disk in Windows 5-6 5.2.3 Installing the RAID driver during Windows® OS installation......... 5-7 5.2.4 Using a USB floppy disk drive ...
...iControl 4-25 USB BIOS Flashback Wizard 4-29 FAN Xpert 4-31 Ai Charger 4-32 Probe II 4-33 Sensor Recorder 4-34 ASUS Update 4-36 MyLogo2 4-37 Audio configurations 4-39 Chapter 5: RAID support 5-1 5.1 RAID configurations 5-1 5.1.1 RAID definitions 5-1 ...in BIOS 5-2 5.1.4 AMD® Option ROM utility 5-3 5.2 Creating a RAID driver disk 5-6 5.2.1 Creating a RAID driver disk without entering the OS 5-6 5.2.2 Creating a RAID driver disk in Windows 5-6 5.2.3 Installing the RAID driver during Windows® OS installation......... 5-7 5.2.4 Using a USB floppy disk drive ...
M5A99X EVO R2.0 User's Manual
Page 12
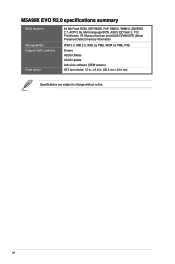
x 9.6 in . xii M5A99X EVO R2.0 specifications summary BIOS features Manageability Support DVD contents Form factor 64 Mb Flash ROM, UEFI BIOS, PnP, DMI2.0, WfM2.0, SM BIOS 2.7, ACPI 2.0a, Multi-language BIOS, ASUS EZ Flash 2, F12 PrintScreen, F3 Shortcut function and ASUS DRAM SPD (Serial Presence Detect) memory information WfM 2.0, DMI 2.0, WOL by PME, WOR by PME, PXE Drivers ASUS Utilities ASUS Update Anti-virus software (OEM version) ATX form factor: 12 in . (30.5 cm x 24.4 cm) Specifications are subject to change without notice.
x 9.6 in . xii M5A99X EVO R2.0 specifications summary BIOS features Manageability Support DVD contents Form factor 64 Mb Flash ROM, UEFI BIOS, PnP, DMI2.0, WfM2.0, SM BIOS 2.7, ACPI 2.0a, Multi-language BIOS, ASUS EZ Flash 2, F12 PrintScreen, F3 Shortcut function and ASUS DRAM SPD (Serial Presence Detect) memory information WfM 2.0, DMI 2.0, WOL by PME, WOR by PME, PXE Drivers ASUS Utilities ASUS Update Anti-virus software (OEM version) ATX form factor: 12 in . (30.5 cm x 24.4 cm) Specifications are subject to change without notice.
M5A99X EVO R2.0 User's Manual
Page 68
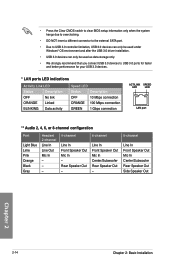
... the external SATA port. • Due to USB 3.0 controller limitation, USB 3.0 devices can only be used under Windows® OS environment and after the USB 3.0 driver installation. • USB 3.0 devices can only be used as data storage only. • We strongly recommend that you connect USB 3.0 devices to USB 3.0 ports for...
... the external SATA port. • Due to USB 3.0 controller limitation, USB 3.0 devices can only be used under Windows® OS environment and after the USB 3.0 driver installation. • USB 3.0 devices can only be used as data storage only. • We strongly recommend that you connect USB 3.0 devices to USB 3.0 ports for...
M5A99X EVO R2.0 User's Manual
Page 93
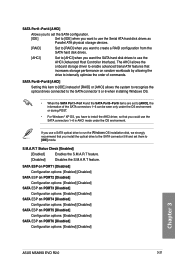
... internally optimize the order of commands. The AHCI allows the onboard storage driver to enable advanced Serial ATA features that increases storage performance on PORT6 [Disabled] Configuration options: [Enabled] [Disabled] Chapter 3 ASUS M5A99X EVO R2.0 3-21 If you use a SATA optical drive to run the Windows...ESP on PORT5 [Disabled] Configuration options: [Enabled] [Disabled] SATA ESP on random workloads by allowing the drive to install the AHCI driver, so that you install the optical drive to the SATA connector 5/6 and set them to use the AHCI (Advanced Host Controller Interface)....
... internally optimize the order of commands. The AHCI allows the onboard storage driver to enable advanced Serial ATA features that increases storage performance on PORT6 [Disabled] Configuration options: [Enabled] [Disabled] Chapter 3 ASUS M5A99X EVO R2.0 3-21 If you use a SATA optical drive to run the Windows...ESP on PORT5 [Disabled] Configuration options: [Enabled] [Disabled] SATA ESP on random workloads by allowing the drive to install the AHCI driver, so that you install the optical drive to the SATA connector 5/6 and set them to use the AHCI (Advanced Host Controller Interface)....
M5A99X EVO R2.0 User's Manual
Page 117
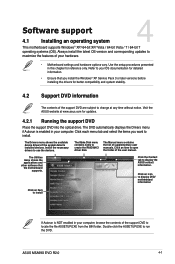
... ASSETUP.EXE from the BIN folder. ASUS M5A99X EVO R2.0 4-1 The Manual menu contains the list of your computer. Software support 4.1 Installing an operating system 4 This motherboard supports Windows® XP/ 64-bit XP/ Vista / 64-bit Vista / 7 / 64-bit 7 operating systems (OS). Install the necessary drivers to display the ASUS contact information. Click an item...
... ASSETUP.EXE from the BIN folder. ASUS M5A99X EVO R2.0 4-1 The Manual menu contains the list of your computer. Software support 4.1 Installing an operating system 4 This motherboard supports Windows® XP/ 64-bit XP/ Vista / 64-bit Vista / 7 / 64-bit 7 operating systems (OS). Install the necessary drivers to display the ASUS contact information. Click an item...
M5A99X EVO R2.0 User's Manual
Page 119
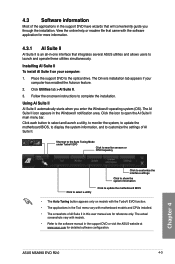
The Drivers installation tab appears if your computer: 1. The AI Suite II icon appears in the support DVD have wizards that integrates several ASUS utilities and allows users to the optical drive. View the online help or readme file that came with the software application for... information Click to the software manual in this user manual are for detailed software configuration. Chapter 4 ASUS M5A99X EVO R2.0 4-3 Installing AI Suite II To install AI Suite II on models with the TurboV EVO function. • The applications in the Tool menu vary with models. • Refer to update...
The Drivers installation tab appears if your computer: 1. The AI Suite II icon appears in the support DVD have wizards that integrates several ASUS utilities and allows users to the optical drive. View the online help or readme file that came with the software application for... information Click to the software manual in this user manual are for detailed software configuration. Chapter 4 ASUS M5A99X EVO R2.0 4-3 Installing AI Suite II To install AI Suite II on models with the TurboV EVO function. • The applications in the Tool menu vary with models. • Refer to update...
M5A99X EVO R2.0 User's Manual
Page 141
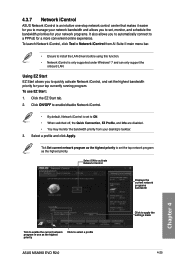
... iControl from your top currently running program. Click the EZ Start tab. 2. To use as the highest priority Click to select a profile ASUS M5A99X EVO R2.0 Click to quickly activate Network iControl, and set the top network program as the highest priority to ON. • When switched off, the... the onboard LAN. Select a profile and click Apply. Using EZ Start EZ Start allows you to automatically connect to install the LAN drivers before using this function. • Network iControl is set to set the highest bandwidth priority for a more convenient online experience. Select ...
... iControl from your top currently running program. Click the EZ Start tab. 2. To use as the highest priority Click to select a profile ASUS M5A99X EVO R2.0 Click to quickly activate Network iControl, and set the top network program as the highest priority to ON. • When switched off, the... the onboard LAN. Select a profile and click Apply. Using EZ Start EZ Start allows you to automatically connect to install the LAN drivers before using this function. • Network iControl is set to set the highest bandwidth priority for a more convenient online experience. Select ...
M5A99X EVO R2.0 User's Manual
Page 155
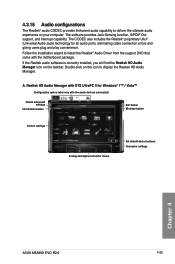
... The Realtek® audio CODEC provides 8-channel audio capability to install the Realtek® Audio Driver from the support DVD that came with the audio devices connected) Device advanced settings Information button Exit button Minimize button Control settings Analog and digital connector status Set default device buttons Connector settings Chapter 4 ASUS M5A99X EVO R2.0 4-39
... The Realtek® audio CODEC provides 8-channel audio capability to install the Realtek® Audio Driver from the support DVD that came with the audio devices connected) Device advanced settings Information button Exit button Minimize button Control settings Analog and digital connector status Set default device buttons Connector settings Chapter 4 ASUS M5A99X EVO R2.0 4-39
M5A99X EVO R2.0 User's Manual
Page 157
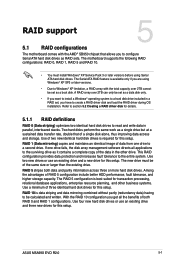
... parity (redundancy data) having to be of the same size or larger than the existing drive. Refer to section 5.2 Creating a RAID driver disk for transaction processing, relational database applications, enterprise resource planning, and other drive. A RAID array over 2TB cannot be set as a..., and higher storage capacity. Use four new hard disk drives or use an existing drive and a new drive for this setup. Chapter 5 ASUS M5A99X EVO R2.0 5-1 RAID 5 stripes both RAID 0 and RAID 1 configurations. Use of both data and parity information across three or more hard disk drives...
... parity (redundancy data) having to be of the same size or larger than the existing drive. Refer to section 5.2 Creating a RAID driver disk for transaction processing, relational database applications, enterprise resource planning, and other drive. A RAID array over 2TB cannot be set as a..., and higher storage capacity. Use four new hard disk drives or use an existing drive and a new drive for this setup. Chapter 5 ASUS M5A99X EVO R2.0 5-1 RAID 5 stripes both RAID 0 and RAID 1 configurations. Use of both data and parity information across three or more hard disk drives...
M5A99X EVO R2.0 User's Manual
Page 162
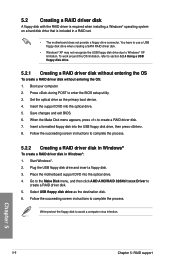
...optical drive. 5. Select USB floppy disk drive as the primary boot device. 4. You have to use a USB floppy disk drive when creating a SATA RAID driver disk. • Windows® XP may not recognize the USB floppy disk drive due to enter the BIOS setup utility. 3. Set the optical drive as... the destination disk. 6. To work around this OS limitation, refer to create a RAID driver disk. 5. Save changes and exit BIOS. 6. Start Windows®. 2. Plug the USB floppy disk drive and insert a floppy disk. 3. Go to the Make ...
...optical drive. 5. Select USB floppy disk drive as the primary boot device. 4. You have to use a USB floppy disk drive when creating a SATA RAID driver disk. • Windows® XP may not recognize the USB floppy disk drive due to enter the BIOS setup utility. 3. Set the optical drive as... the destination disk. 6. To work around this OS limitation, refer to create a RAID driver disk. 5. Save changes and exit BIOS. 6. Start Windows®. 2. Plug the USB floppy disk drive and insert a floppy disk. 3. Go to the Make ...
M5A99X EVO R2.0 User's Manual
Page 163
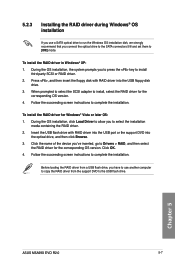
...OS installation disk, we strongly recommend that you to press the key to install third-party SCSI or RAID driver. 2. Press , and then insert the floppy disk with RAID driver into the USB port or the support DVD into the USB floppy disk drive. 3. Click OK. 4.... screen instructions to Drivers > RAID, and then select the RAID driver for Windows® Vista or later OS: 1. Insert the USB flash drive with RAID driver into the optical drive, and then click Browse. 3. Click the name of the device you've inserted, go to complete the installation. Chapter 5 ASUS M5A99X EVO R2.0 5-7
...OS installation disk, we strongly recommend that you to press the key to install third-party SCSI or RAID driver. 2. Press , and then insert the floppy disk with RAID driver into the USB port or the support DVD into the USB floppy disk drive. 3. Click OK. 4.... screen instructions to Drivers > RAID, and then select the RAID driver for Windows® Vista or later OS: 1. Insert the USB flash drive with RAID driver into the optical drive, and then click Browse. 3. Click the name of the device you've inserted, go to complete the installation. Chapter 5 ASUS M5A99X EVO R2.0 5-7

M5A99X EVO R2.0 User's Manual
Page 164
... RAID support Select Device Manager. The name of the RAID driver disk to the floppy disk containing the RAID driver. Click Details tab. Chapter 5 5. Double-click the file. or 3. A window appears, allowing you install the RAID driver from the pop-up window. From the Universal Serial Bus controllers... locate the file txtsetup.oem. 6. Using another computer, plug the USB floppy disk drive, and insert the floppy disk containing the RAID driver. 2. Right-click My Computer on the Windows® desktop or start menu, and then select Manage from a floppy disk during the OS...
... RAID support Select Device Manager. The name of the RAID driver disk to the floppy disk containing the RAID driver. Click Details tab. Chapter 5 5. Double-click the file. or 3. A window appears, allowing you install the RAID driver from the pop-up window. From the Universal Serial Bus controllers... locate the file txtsetup.oem. 6. Using another computer, plug the USB floppy disk drive, and insert the floppy disk containing the RAID driver. 2. Right-click My Computer on the Windows® desktop or start menu, and then select Manage from a floppy disk during the OS...
M5A99X EVO R2.0 User's Manual
Page 167
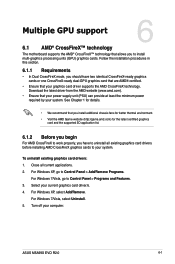
.... 2. For Windows 7/Vista, select Uninstall. 5. Chapter 6 ASUS M5A99X EVO R2.0 6-1 Multiple GPU support 6 6.1 AMD® CrossFireX™ technology The motherboard supports the AMD® CrossFireX™ technology that your graphics card driver supports the AMD CrossFireX technology. For Windows XP, select Add/...AMD CrossFireX to work properly, you to your system. Select your computer. Turn off your current graphics card driver/s. 4. Download the latest driver from the AMD website (www.amd.com). • Ensure that you install additional chassis fans for better thermal...
.... 2. For Windows 7/Vista, select Uninstall. 5. Chapter 6 ASUS M5A99X EVO R2.0 6-1 Multiple GPU support 6 6.1 AMD® CrossFireX™ technology The motherboard supports the AMD® CrossFireX™ technology that your graphics card driver supports the AMD CrossFireX technology. For Windows XP, select Add/...AMD CrossFireX to work properly, you to your system. Select your computer. Turn off your current graphics card driver/s. 4. Download the latest driver from the AMD website (www.amd.com). • Ensure that you install additional chassis fans for better thermal...

M5A99X EVO R2.0 User's Manual
Page 169
Connect a VGA or a DVI cable to the graphics card. 6.1.4 Installing the device drivers Refer to the documentation that your PCI Express graphics card driver supports the AMD® CrossFireX™ technology. Download the latest driver from the power supply to install the device drivers. Chapter 6 ASUS M5A99X EVO R2.0 6-3 Ensure that came with your graphics cards and the device...
Connect a VGA or a DVI cable to the graphics card. 6.1.4 Installing the device drivers Refer to the documentation that your PCI Express graphics card driver supports the AMD® CrossFireX™ technology. Download the latest driver from the power supply to install the device drivers. Chapter 6 ASUS M5A99X EVO R2.0 6-3 Ensure that came with your graphics cards and the device...
M5A99X EVO R2.0 User's Manual
Page 171
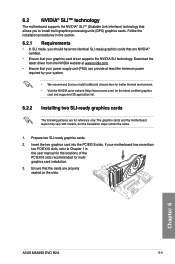
...If your motherboard has more than two PCIEX16 slots, refer to install multi-graphics processing units (GPU) graphics cards. Download the latest driver from the NVIDIA website at www.nvidia.com. • Ensure that your power supply unit (PSU) can provide at least the ...card and supported 3D application list. 6.2.2 Installing two SLI-ready graphics cards The following pictures are properly seated on the slots. Chapter 6 ASUS M5A99X EVO R2.0 6-5 Insert the two graphics card into the PCIEX16 slots. Follow the installation procedures in this section. 6.2.1 Requirements • In SLI mode...
...If your motherboard has more than two PCIEX16 slots, refer to install multi-graphics processing units (GPU) graphics cards. Download the latest driver from the NVIDIA website at www.nvidia.com. • Ensure that your power supply unit (PSU) can provide at least the ...card and supported 3D application list. 6.2.2 Installing two SLI-ready graphics cards The following pictures are properly seated on the slots. Chapter 6 ASUS M5A99X EVO R2.0 6-5 Insert the two graphics card into the PCIEX16 slots. Follow the installation procedures in this section. 6.2.1 Requirements • In SLI mode...
M5A99X EVO R2.0 User's Manual
Page 172
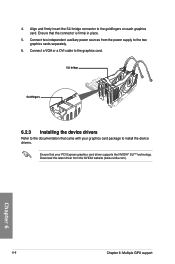
... the power supply to the graphics card. Align and firmly insert the SLI bridge connector to install the device drivers. SLI bridge Goldfingers 6.2.3 Installing the device drivers Refer to the documentation that the connector is firmly in place. 5. Chapter 6 6-6 Chapter 6: Multiple GPU support Connect a VGA or a DVI cable to the two graphics... cards separately. 6. Connect two independent auxiliary power sources from the NVIDIA website (www.nvidia.com). 4. Ensure that came with your PCI Express graphics card driver supports the NVIDIA® SLI™ technology.
... the power supply to the graphics card. Align and firmly insert the SLI bridge connector to install the device drivers. SLI bridge Goldfingers 6.2.3 Installing the device drivers Refer to the documentation that the connector is firmly in place. 5. Chapter 6 6-6 Chapter 6: Multiple GPU support Connect a VGA or a DVI cable to the two graphics... cards separately. 6. Connect two independent auxiliary power sources from the NVIDIA website (www.nvidia.com). 4. Ensure that came with your PCI Express graphics card driver supports the NVIDIA® SLI™ technology.
M5A99X EVO R2.0 User's Manual
Page 173
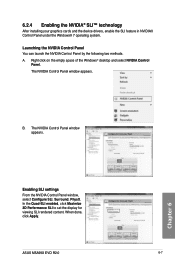
When done, click Apply. ASUS M5A99X EVO R2.0 6-7 The NVIDIA Control Panel window appears. The NVIDIA Control Panel window appears. 6.2.4 Enabling the NVIDIA® SLI™ technology After installing your graphics cards and the device drivers, enable the SLI feature in NVIDIA® Control Panel under the Windows® 7 operating system. In the Quad-SLI enabled...
When done, click Apply. ASUS M5A99X EVO R2.0 6-7 The NVIDIA Control Panel window appears. The NVIDIA Control Panel window appears. 6.2.4 Enabling the NVIDIA® SLI™ technology After installing your graphics cards and the device drivers, enable the SLI feature in NVIDIA® Control Panel under the Windows® 7 operating system. In the Quad-SLI enabled...


