User Manual
Page 11
...+ multi-core processors with unique L3 cache and delivers better overclocking capabilities with the list below. 1.2 Package contents Check your package with less power consumption. ASUS M5A78L/USB3 1-1 The motherboard delivers a host of new features and latest technologies, making it , check the items in your motherboard package for buying an...
...+ multi-core processors with unique L3 cache and delivers better overclocking capabilities with the list below. 1.2 Package contents Check your package with less power consumption. ASUS M5A78L/USB3 1-1 The motherboard delivers a host of new features and latest technologies, making it , check the items in your motherboard package for buying an...
User Manual
Page 13
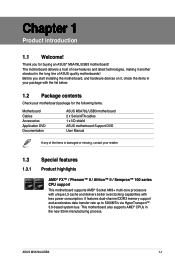
... work or games, simply through pressing the button. ASUS MyLogo2™ Turn your system. ASUS EPU ASUS EPU is an auto-recovery tool that contains the BIOS file. ASUS M5A78L/USB3 1-3 ASUS Turbo Key ASUS Turbo Key allows you to ensure a quiet, cool, and efficient operation. 1.3.2 Innovative ASUS features Core Unlocker ASUS Core Unlocker simplifies the activation of a latent AMD...
... work or games, simply through pressing the button. ASUS MyLogo2™ Turn your system. ASUS EPU ASUS EPU is an auto-recovery tool that contains the BIOS file. ASUS M5A78L/USB3 1-3 ASUS Turbo Key ASUS Turbo Key allows you to ensure a quiet, cool, and efficient operation. 1.3.2 Innovative ASUS features Core Unlocker ASUS Core Unlocker simplifies the activation of a latent AMD...

User Manual
Page 15
... the bag that came with the component. • Before you install or remove any motherboard component. 1.4 Before you proceed Take note of the onboard LED. M5A78L/USB3 SB_PWR ON OFF Standby Power Powered Off M5A78L/USB3 Onboard LED ASUS M5A78L/USB3 1-5
... the bag that came with the component. • Before you install or remove any motherboard component. 1.4 Before you proceed Take note of the onboard LED. M5A78L/USB3 SB_PWR ON OFF Standby Power Powered Off M5A78L/USB3 Onboard LED ASUS M5A78L/USB3 1-5

User Manual
Page 19
... completely. 3. The lever clicks on the motherboard. Small triangle 5. CPU_FAN GND CPU FAN PWR CPU FAN IN CPU FAN PWM M5A78L/USB3 M5A78L/USB3 CPU fan connector DO NOT forget to plug this connector. ASUS M5A78L/USB3 1-9 Carefully insert the CPU into the socket to secure the CPU. Install a CPU heatsink and fan following the instructions that...
... completely. 3. The lever clicks on the motherboard. Small triangle 5. CPU_FAN GND CPU FAN PWR CPU FAN IN CPU FAN PWM M5A78L/USB3 M5A78L/USB3 CPU fan connector DO NOT forget to plug this connector. ASUS M5A78L/USB3 1-9 Carefully insert the CPU into the socket to secure the CPU. Install a CPU heatsink and fan following the instructions that...
User Manual
Page 21
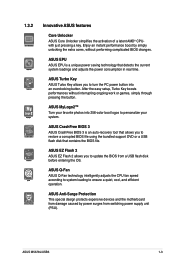
... assembly is in place. 4. Align the other end of the DDR3 DIMM sockets: DIMM_A1 DIMM_A2 DIMM_B1 DIMM_B2 M5A78L/USB3 Channel Channel A Channel B M5A78L/USB3 240-pin DDR3 DIMM sockets Sockets DIMM_A1 and DIMM_A2 DIMM_B1 and DIMM_B2 ASUS M5A78L/USB3 1-11 Ensure that the retention bracket is in place, connect the CPU fan cable to prevent installation on...
... assembly is in place. 4. Align the other end of the DDR3 DIMM sockets: DIMM_A1 DIMM_A2 DIMM_B1 DIMM_B2 M5A78L/USB3 Channel Channel A Channel B M5A78L/USB3 240-pin DDR3 DIMM sockets Sockets DIMM_A1 and DIMM_A2 DIMM_B1 and DIMM_B2 ASUS M5A78L/USB3 1-11 Ensure that the retention bracket is in place, connect the CPU fan cable to prevent installation on...

User Manual
Page 27
... the motherboard and the components. 1. Align a DIMM on the socket such that it flips out with your fingers when pressing the retaining 1 clips. DIMM notch ASUS M5A78L/USB3 1-17 Press the retaining clips outward to unlock the DIMM. 2 Support the DIMM lightly with extra force. 1 2. Locked Retaining Clip 1.7.4 Removing a DIMM To remove a DIMM...
... the motherboard and the components. 1. Align a DIMM on the socket such that it flips out with your fingers when pressing the retaining 1 clips. DIMM notch ASUS M5A78L/USB3 1-17 Press the retaining clips outward to unlock the DIMM. 2 Support the DIMM lightly with extra force. 1 2. Locked Retaining Clip 1.7.4 Removing a DIMM To remove a DIMM...
User Manual
Page 29
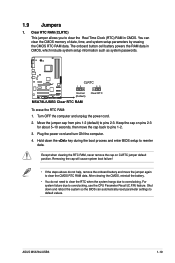
Plug the power cord and turn ON the computer. 4. M5A78L/USB3 CLRTC 12 23 Normal (Default) M5A78L/USB3 Clear RTC RAM Clear RTC To erase the RTC RAM: 1. Move the jumper cap from pins 1-2 (default) to overclocking, use the CPU Parameter Recall (C.P.R) feature. ... battery powers the RAM data in CMOS. You can automatically reset parameter settings to reenter data. Turn OFF the computer and unplug the power cord. 2. ASUS M5A78L/USB3 1-19
Plug the power cord and turn ON the computer. 4. M5A78L/USB3 CLRTC 12 23 Normal (Default) M5A78L/USB3 Clear RTC RAM Clear RTC To erase the RTC RAM: 1. Move the jumper cap from pins 1-2 (default) to overclocking, use the CPU Parameter Recall (C.P.R) feature. ... battery powers the RAM data in CMOS. You can automatically reset parameter settings to reenter data. Turn OFF the computer and unplug the power cord. 2. ASUS M5A78L/USB3 1-19

User Manual
Page 31
... 10Mbps connection 100Mbps connection 1Gbps connection ACT/LINK SPEED LED LED LAN port 4. This port connects to support 8-channel audio output. LAN (RJ-45) port. ASUS M5A78L/USB3 1-21
... 10Mbps connection 100Mbps connection 1Gbps connection ACT/LINK SPEED LED LED LAN port 4. This port connects to support 8-channel audio output. LAN (RJ-45) port. ASUS M5A78L/USB3 1-21

User Manual
Page 33
... 4-pin ATX12V power plug. Otherwise, the system will not boot up. • We recommend that you use a PSU with a minimum of 300W. ASUS M5A78L/USB3 1-23 The system may become unstable or may not boot up if the power is inadequate. • If you use an ATX 12V Specification 2.0‑... you are uncertain about the minimum power supply requirement for your system, refer to install additional devices. ATX12V EATXPWR +12V DC +12V DC M5A78L/USB3 GND GND +3 Volts +12 Volts +12 Volts +5V Standby Power OK PIN 1 GND +5 Volts GND +5 Volts GND +3 Volts +3 Volts PIN...
... 4-pin ATX12V power plug. Otherwise, the system will not boot up. • We recommend that you use a PSU with a minimum of 300W. ASUS M5A78L/USB3 1-23 The system may become unstable or may not boot up if the power is inadequate. • If you use an ATX 12V Specification 2.0‑... you are uncertain about the minimum power supply requirement for your system, refer to install additional devices. ATX12V EATXPWR +12V DC +12V DC M5A78L/USB3 GND GND +3 Volts +12 Volts +12 Volts +5V Standby Power OK PIN 1 GND +5 Volts GND +5 Volts GND +3 Volts +3 Volts PIN...
User Manual
Page 35
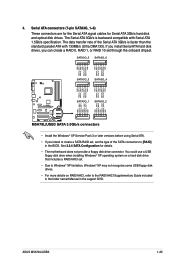
... drive connector. The data transfer rate of the SATA connectors to create a SATA RAID set, set through the onboard chipset. ASUS M5A78L/USB3 1-25 You could use a USB floppy disk drive when installing Windows® XP operating system on a hard disk drive that...GND RSATA_TXP3 RSATA_TXN3 GND RSATA_RXP3 RSATA_RXN3 GND GND RSATA_RXN2 RSATA_RXP2 GND RSATA_TXN2 RSATA_TXP2 GND GND RSATA_RXN1 RSATA_RXP1 GND RSATA_TXN1 RSATA_TXP1 GND M5A78L/USB3 SATA3G_1 SATA3G_2 M5A78L/USB3 SATA 3.0Gb/s connectors • Install the Windows® XP Service Pack 3 or later versions before using Serial...
... drive connector. The data transfer rate of the SATA connectors to create a SATA RAID set, set through the onboard chipset. ASUS M5A78L/USB3 1-25 You could use a USB floppy disk drive when installing Windows® XP operating system on a hard disk drive that...GND RSATA_TXP3 RSATA_TXN3 GND RSATA_RXP3 RSATA_RXN3 GND GND RSATA_RXN2 RSATA_RXP2 GND RSATA_TXN2 RSATA_TXP2 GND GND RSATA_RXN1 RSATA_RXP1 GND RSATA_TXN1 RSATA_TXP1 GND M5A78L/USB3 SATA3G_1 SATA3G_2 M5A78L/USB3 SATA 3.0Gb/s connectors • Install the Windows® XP Service Pack 3 or later versions before using Serial...

User Manual
Page 37
...5V USB_P10USB_P10+ GND NC USB+5V USB_P6USB_P6+ GND NC USB+5V USB_P8USB_P8+ GND NC M5A78L/USB3 PIN 1 PIN 1 PIN 1 USB+5V USB_P9USB_P9+ GND USB+5V USB_P5USB_P5+ GND USB+5V USB_P7USB_P7+ GND M5A78L/USB3 USB2.0 connectors Never connect a 1394 cable to 480Mbps connection speed. These USB connectors ...USB78, USB910) These connectors are for an additional Sony/Philips Digital Interface (S/PDIF) port. +5V SPDIFOUT GND M5A78L/USB3 SPDIF_OUT M5A78L/USB3 Digital audio connector Ensure that supports up to the USB connectors. Doing so will damage the motherboard! 6. ASUS M5A78L/USB3 1-27
...5V USB_P10USB_P10+ GND NC USB+5V USB_P6USB_P6+ GND NC USB+5V USB_P8USB_P8+ GND NC M5A78L/USB3 PIN 1 PIN 1 PIN 1 USB+5V USB_P9USB_P9+ GND USB+5V USB_P5USB_P5+ GND USB+5V USB_P7USB_P7+ GND M5A78L/USB3 USB2.0 connectors Never connect a 1394 cable to 480Mbps connection speed. These USB connectors ...USB78, USB910) These connectors are for an additional Sony/Philips Digital Interface (S/PDIF) port. +5V SPDIFOUT GND M5A78L/USB3 SPDIF_OUT M5A78L/USB3 Digital audio connector Ensure that supports up to the USB connectors. Doing so will damage the motherboard! 6. ASUS M5A78L/USB3 1-27
User Manual
Page 39
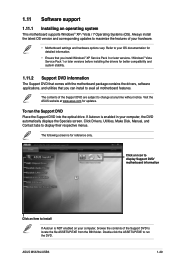
...software applications, and utilities that you can install to maximize the features of your hardware. • Motherboard settings and hardware options vary. ASUS M5A78L/USB3 1-29 Double-click the ASSETUP.EXE to change at www.asus.com for reference only. The contents of the Support DVD to display their respective menus. Visit the... ASUS website at any time without notice. Click Drivers, Utilities, Make Disk, Manual, and Contact tabs to locate the file ASSETUP.EXE from the ...
...software applications, and utilities that you can install to maximize the features of your hardware. • Motherboard settings and hardware options vary. ASUS M5A78L/USB3 1-29 Double-click the ASSETUP.EXE to change at www.asus.com for reference only. The contents of the Support DVD to display their respective menus. Visit the... ASUS website at any time without notice. Click Drivers, Utilities, Make Disk, Manual, and Contact tabs to locate the file ASSETUP.EXE from the ...
User Manual
Page 41
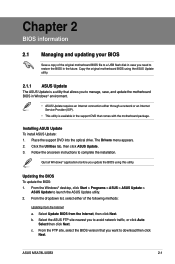
... motherboard BIOS file to a USB flash disk in case you want to download then click Next. Follow the onscreen instructions to launch the ASUS Update utility. 2. Place the support DVD into the optical drive. Chapter 2 BIOS information 2.1 Managing and updating your BIOS Save a copy... that you need to avoid network traffic, or click Auto Select then click Next. Copy the original motherboard BIOS using this utility. ASUS M5A78L/USB3 2-1 Quit all Windows® applications before you to restore the BIOS in the support DVD that comes with the motherboard package. The...
... motherboard BIOS file to a USB flash disk in case you want to download then click Next. Follow the onscreen instructions to launch the ASUS Update utility. 2. Place the support DVD into the optical drive. Chapter 2 BIOS information 2.1 Managing and updating your BIOS Save a copy... that you need to avoid network traffic, or click Auto Select then click Next. Copy the original motherboard BIOS using this utility. ASUS M5A78L/USB3 2-1 Quit all Windows® applications before you to restore the BIOS in the support DVD that comes with the motherboard package. The...

User Manual
Page 43
...process and turn on the system. 2. DO NOT shut down or reset the system while updating the BIOS to prevent system boot failure! 2.1.3 ASUS CrashFree BIOS 3 ASUS CrashFree BIOS 3 is an auto recovery tool that allows you to the floppy disk drive, if supported. 3. Refer to ensure system compatibility and...this utility, rename the BIOS file in the USB flash drive into M5A78LU.ROM. • Download the latest BIOS file from the ASUS website at www.asus.com. ASUS M5A78L/USB3 2-3 Turn on again. Insert the support DVD to the optical drive or the removable device that contains the BIOS file to the ...
...process and turn on the system. 2. DO NOT shut down or reset the system while updating the BIOS to prevent system boot failure! 2.1.3 ASUS CrashFree BIOS 3 ASUS CrashFree BIOS 3 is an auto recovery tool that allows you to the floppy disk drive, if supported. 3. Refer to ensure system compatibility and...this utility, rename the BIOS file in the USB flash drive into M5A78LU.ROM. • Download the latest BIOS file from the ASUS website at www.asus.com. ASUS M5A78L/USB3 2-3 Turn on again. Insert the support DVD to the optical drive or the removable device that contains the BIOS file to the ...

User Manual
Page 45
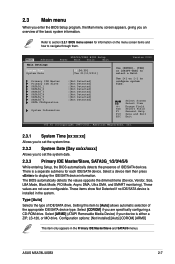
... the right or left arrow key on top of the navigation keys differ from one screen to configure system Time. ASUS M5A78L/USB3 2-5 2.2.1 BIOS menu screen Menu items Menu bar Configuration fields Main Advanced M5A78L/USB3 BIOS Setup Power Boot Tools Exit Main Settings System Time [16:34:30] System Date [Tue 01/11/2011...
... the right or left arrow key on top of the navigation keys differ from one screen to configure system Time. ASUS M5A78L/USB3 2-5 2.2.1 BIOS menu screen Menu items Menu bar Configuration fields Main Advanced M5A78L/USB3 BIOS Setup Power Boot Tools Exit Main Settings System Time [16:34:30] System Date [Tue 01/11/2011...
User Manual
Page 47
Main Advanced Main Settings M5A78L/USB3 BIOS Setup Power Boot Tools Exit System Time [16:34:30] System Date [Tue 01/11/2011] Primary IDE Master Primary IDE Slave SATA3G_1 SATA3G_2 ... the system date. 2.3.3 Primary IDE Master/Slave, SATA3G_1/2/3/4/5/6 While entering Setup, the BIOS automatically detects the presence of IDE/SATA drive. Select Screen Select Item +- ASUS M5A78L/USB3 2-7 Use [+] or [-] to display the IDE/SATA device information. Select a device item then press to configure system Time.
Main Advanced Main Settings M5A78L/USB3 BIOS Setup Power Boot Tools Exit System Time [16:34:30] System Date [Tue 01/11/2011] Primary IDE Master Primary IDE Slave SATA3G_1 SATA3G_2 ... the system date. 2.3.3 Primary IDE Master/Slave, SATA3G_1/2/3/4/5/6 While entering Setup, the BIOS automatically detects the presence of IDE/SATA drive. Select Screen Select Item +- ASUS M5A78L/USB3 2-7 Use [+] or [-] to display the IDE/SATA device information. Select a device item then press to configure system Time.

User Manual
Page 49
ASUS M5A78L/USB3 2-9 Port6 [IDE] Setting this menu. SATA Port5 - If you use a SATA optical drive to run the OS installation disk, we strongly recommend that you install ...
ASUS M5A78L/USB3 2-9 Port6 [IDE] Setting this menu. SATA Port5 - If you use a SATA optical drive to run the OS installation disk, we strongly recommend that you install ...
User Manual
Page 51
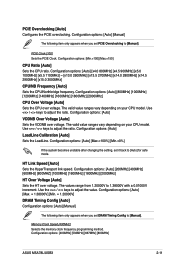
... voltage. HT Link Speed [Auto] Sets the HyperTransport link speed. The values range from 1.20000V to adjust the ratio. Configuration options: [400MHz] [533MHz] [667MHz] [800MHz] ASUS M5A78L/USB3 2-11 Configuration options: [Auto] [x4.0 800MHz] [x4.5 900MHz] [x5.0 1000MHz] [x5.5 1100MHz] ~ [x13.0 2600MHz] [x13.5 2700MHz] [x14.0 2800MHz] [x14.5 2900MHz] [x15.0 3000MHz] CPU/NB Frequency...
... voltage. HT Link Speed [Auto] Sets the HyperTransport link speed. The values range from 1.20000V to adjust the ratio. Configuration options: [400MHz] [533MHz] [667MHz] [800MHz] ASUS M5A78L/USB3 2-11 Configuration options: [Auto] [x4.0 800MHz] [x4.5 900MHz] [x5.0 1000MHz] [x5.5 1100MHz] ~ [x13.0 2600MHz] [x13.5 2700MHz] [x14.0 2800MHz] [x14.5 2900MHz] [x15.0 3000MHz] CPU/NB Frequency...
User Manual
Page 53
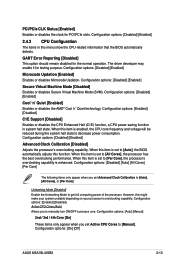
...]. When this item is set to decrease power consumption. Configuration options: [Disabled] [Enabled] Microcode Updation [Enabled] Enables or disables Microcode Updation. Configuration options: [On] [Off] ASUS M5A78L/USB3 2-13 Configuration options: [Enabled] [Disabled] C1E Support [Disabled] Enables or disables the CPU Enhanced Halt (C1E) function, a CPU power-saving function in this might make...
...]. When this item is set to decrease power consumption. Configuration options: [Disabled] [Enabled] Microcode Updation [Enabled] Enables or disables Microcode Updation. Configuration options: [On] [Off] ASUS M5A78L/USB3 2-13 Configuration options: [Enabled] [Disabled] C1E Support [Disabled] Enables or disables the CPU Enhanced Halt (C1E) function, a CPU power-saving function in this might make...

User Manual
Page 55
...: [Auto] [32MB] [64MB] [128MB] [256MB] [512MB] [1GB] • The [512MB] option only appears when you install 1GB system memory or more . Configuration options: [Disabled] [Enabled] ASUS M5A78L/USB3 2-15 Surround View [Auto] Disables or enables the Surround View function. Configuration options: [Disabled] [Enabled] OnBoard LAN Boot ROM [Disabled] Enables or disables the onboard...
...: [Auto] [32MB] [64MB] [128MB] [256MB] [512MB] [1GB] • The [512MB] option only appears when you install 1GB system memory or more . Configuration options: [Disabled] [Enabled] ASUS M5A78L/USB3 2-15 Surround View [Auto] Disables or enables the Surround View function. Configuration options: [Disabled] [Enabled] OnBoard LAN Boot ROM [Disabled] Enables or disables the onboard...


