
User Manual
Page 61
...BIOS file: 1. Follow the onscreen instructions to complete the update process. Follow the onscreen instructions to complete the update process. See section 3.10 Exit Menu for details. 3-3 Fom the Windows® desktop, click Start > Programs > ASUS > ASUSUpdate > ASUSUpdate. Always update the ...stability. The ASUS Update main window appears. 2. Locate the BIOS file from the dropdown menu, then click Next. 3. Select the ASUS FTP site nearest you wish to avoid network traffic, or click Auto Select. Click Next. M4A78E.ROM ASUS M4A78-E M4A78E Ensure to load...
...BIOS file: 1. Follow the onscreen instructions to complete the update process. Follow the onscreen instructions to complete the update process. See section 3.10 Exit Menu for details. 3-3 Fom the Windows® desktop, click Start > Programs > ASUS > ASUSUpdate > ASUSUpdate. Always update the ...stability. The ASUS Update main window appears. 2. Locate the BIOS file from the dropdown menu, then click Next. 3. Select the ASUS FTP site nearest you wish to avoid network traffic, or click Auto Select. Click Next. M4A78E.ROM ASUS M4A78-E M4A78E Ensure to load...

User Manual
Page 109
... disk drives or use an existing drive and a new drive for this setup. For Windows XP, If you want to boot the system from the support DVD to a floppy disk...it contains a complete copy of the data in the other business systems. Use a minimum of three identical hard disk drives for this setup. 4.4 RAID configurations The motherboard comes with the... work as RAID sets. Refer to section 4.5 Creating a RAID driver disk for this setup. Chapter 4 ASUS M4A78-E 4-13 The motherboard supports the following RAID configurations: RAID 0, RAID 1, RAID 5, and RAID 10. 4.4.1 RAID definitions RAID ...
... disk drives or use an existing drive and a new drive for this setup. For Windows XP, If you want to boot the system from the support DVD to a floppy disk...it contains a complete copy of the data in the other business systems. Use a minimum of three identical hard disk drives for this setup. 4.4 RAID configurations The motherboard comes with the... work as RAID sets. Refer to section 4.5 Creating a RAID driver disk for this setup. Chapter 4 ASUS M4A78-E 4-13 The motherboard supports the following RAID configurations: RAID 0, RAID 1, RAID 5, and RAID 10. 4.4.1 RAID definitions RAID ...
User Manual
Page 114
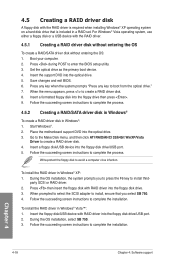
...: 1. When prompted to select the SCSI adapter to install, ensure that is included in Windows® Vista™: 1. Set the optical drive as the primary boot device. 4. Place the motherboard support DVD into the floppy disk drive/USB port. 5. During the OS installation, select ...OS installation, the system prompts you select SB 750. 4. To install the RAID driver in Windows®: 1. Boot your computer. 2. Follow the succeeding screen instructions to complete the installation. For Windows® Vista operating system, use either a floppy disk or a USB device with RAID driver...
...: 1. When prompted to select the SCSI adapter to install, ensure that is included in Windows® Vista™: 1. Set the optical drive as the primary boot device. 4. Place the motherboard support DVD into the floppy disk drive/USB port. 5. During the OS installation, select ...OS installation, the system prompts you select SB 750. 4. To install the RAID driver in Windows®: 1. Boot your computer. 2. Follow the succeeding screen instructions to complete the installation. For Windows® Vista operating system, use either a floppy disk or a USB device with RAID driver...
User Manual
Page 120
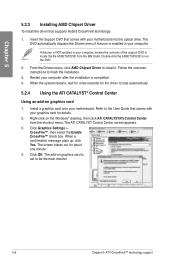
...card for details. 2. The DVD automatically displays the Drivers menu if Autorun is completed. 4. Follow the onscreen instructions to run the DVD. 2. The screen blacks ...Chipset Driver to be the main monitor. 5-6 Chapter 5: ATI® CrossFireX™ technology support Restart your motherboard. When a confirmation message pops up, click Yes. When the system restarts, wait for a few seconds for...load automatically. 5.2.4 Using the ATI CATALYST® Control Center Using an add-on the Windows® desktop, then click ATI CATALYST(R) Control Center from the BIN folder. Right-click ...
...card for details. 2. The DVD automatically displays the Drivers menu if Autorun is completed. 4. Follow the onscreen instructions to run the DVD. 2. The screen blacks ...Chipset Driver to be the main monitor. 5-6 Chapter 5: ATI® CrossFireX™ technology support Restart your motherboard. When a confirmation message pops up, click Yes. When the system restarts, wait for a few seconds for...load automatically. 5.2.4 Using the ATI CATALYST® Control Center Using an add-on the Windows® desktop, then click ATI CATALYST(R) Control Center from the BIN folder. Right-click ...

User Manual
Page 122
Follow steps 1 to 3 on Using the onboard graphics card to step 8 on Using the onboard graphics card. 2. From the ATI CATALYST(R) Control Center screen, click Display Manager > Graphics Adapter. Select ATI Radeon HD 3200 Graphics [Gabbs, G HW173]. Chapter 5 1. Click OK, and then Yes from the confirmation window. 3. Follow steps 6 to complete the process of setting up the onboard graphics card as your main monitor. 5-8 Chapter 5: ATI® CrossFireX™ technology support
Follow steps 1 to 3 on Using the onboard graphics card to step 8 on Using the onboard graphics card. 2. From the ATI CATALYST(R) Control Center screen, click Display Manager > Graphics Adapter. Select ATI Radeon HD 3200 Graphics [Gabbs, G HW173]. Chapter 5 1. Click OK, and then Yes from the confirmation window. 3. Follow steps 6 to complete the process of setting up the onboard graphics card as your main monitor. 5-8 Chapter 5: ATI® CrossFireX™ technology support


