User Manual
Page 15
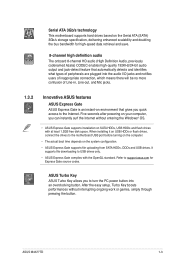
... Gate supports installation on SATA HDDs, USB HDDs and flash drives with the OpenGL standard. ASUS M4A77TD 1-3 When installing it on USB HDDs or flash drives, connect the drives to the Internet. Serial ATA 3Gb/s technology This motherboard supports hard drives based on the Serial ATA (SATA) 3Gb/s storage specification, delivering enhanced scalability and doubling the bus...
... Gate supports installation on SATA HDDs, USB HDDs and flash drives with the OpenGL standard. ASUS M4A77TD 1-3 When installing it on USB HDDs or flash drives, connect the drives to the Internet. Serial ATA 3Gb/s technology This motherboard supports hard drives based on the Serial ATA (SATA) 3Gb/s storage specification, delivering enhanced scalability and doubling the bus...

User Manual
Page 34
... the IDE ribbon cable to configure your devices: Single device Two devices Drive jumper setting Cable-Select or Master Cable-Select Master Slave Mode of the following modes to PIN 1. PRI_IDE PIN1 M4A77TD NOTE:Orient the red markings on the Ultra DMA cable connector. There...as "Cable-Select", ensure that all other device jumpers have the same setting. Connect the blue connector to the motherboard's IDE connector, then select one of device(s) - M4A77TD IDE connector 1-22 Chapter 1: Product introduction This prevents incorrect insertion when you connect the IDE cable. • Use...
... the IDE ribbon cable to configure your devices: Single device Two devices Drive jumper setting Cable-Select or Master Cable-Select Master Slave Mode of the following modes to PIN 1. PRI_IDE PIN1 M4A77TD NOTE:Orient the red markings on the Ultra DMA cable connector. There...as "Cable-Select", ensure that all other device jumpers have the same setting. Connect the blue connector to the motherboard's IDE connector, then select one of device(s) - M4A77TD IDE connector 1-22 Chapter 1: Product introduction This prevents incorrect insertion when you connect the IDE cable. • Use...
User Manual
Page 35
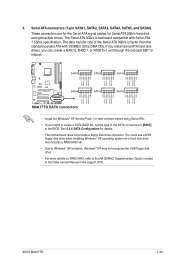
...SATA2, SATA3, SATA4, SATA5, and SATA6) These connectors are for the Serial ATA signal cables for details. • The motherboard does not provide a floppy disk drive connector. SATA1 SATA2 SATA3 GND RSATA_TXP3 RSATA_TXN3 GND RSATA_RXP3 RSATA_RXN3 GND GND RSATA_TXP2 RSATA_TXN2 GND RSATA_RXP2 RSATA_RXN2 GND GND RSATA_TXP1 RSATA_TXN1 GND... can create a RAID 0, RAID 1, or RAID 0+1 set the type of the Serial ATA 3Gb/s is backward compatible with 133MB/s (Ultra DMA133). ASUS M4A77TD 1-23 See 2.3.4 SATA Configuration for Serial ATA 3Gb/s hard disk and optical disk drives. 3.
...SATA2, SATA3, SATA4, SATA5, and SATA6) These connectors are for the Serial ATA signal cables for details. • The motherboard does not provide a floppy disk drive connector. SATA1 SATA2 SATA3 GND RSATA_TXP3 RSATA_TXN3 GND RSATA_RXP3 RSATA_RXN3 GND GND RSATA_TXP2 RSATA_TXN2 GND RSATA_RXP2 RSATA_RXN2 GND GND RSATA_TXP1 RSATA_TXN1 GND... can create a RAID 0, RAID 1, or RAID 0+1 set the type of the Serial ATA 3Gb/s is backward compatible with 133MB/s (Ultra DMA133). ASUS M4A77TD 1-23 See 2.3.4 SATA Configuration for Serial ATA 3Gb/s hard disk and optical disk drives. 3.

User Manual
Page 36
... • System warning speaker This 4-pin connector is for the system power LED. PWR Ground Reset Ground PANEL PIN 1 M4A77TD IDE_LED PWRSW RESET * Requires an ATX power supply M4A77TD System panel connector • System power LED This 2-pin connector is for the chassis-mounted reset button for system reboot without... in SLEEP or SOFT-OFF mode depending on the system power, and blinks when the system is in sleep mode. • Hard disk drive activity LED This 2-pin connector is for the HDD Activity LED. PLED SPEAKER PLED+ PLED+5V Ground Ground Speaker IDE_LED+ IDE_LED- The speaker...
... • System warning speaker This 4-pin connector is for the system power LED. PWR Ground Reset Ground PANEL PIN 1 M4A77TD IDE_LED PWRSW RESET * Requires an ATX power supply M4A77TD System panel connector • System power LED This 2-pin connector is for the chassis-mounted reset button for system reboot without... in SLEEP or SOFT-OFF mode depending on the system power, and blinks when the system is in sleep mode. • Hard disk drive activity LED This 2-pin connector is for the HDD Activity LED. PLED SPEAKER PLED+ PLED+5V Ground Ground Speaker IDE_LED+ IDE_LED- The speaker...

User Manual
Page 40
...the drivers, software applications, and utilities that you can install to run the Support DVD Place the Support DVD into the optical drive. To run the DVD. 1-28 Chapter 1: Product introduction The DVD automatically displays the Drivers menu if Autorun is enabled on...1.11 Software support 1.11.1 Installing an operating system This motherboard supports Windows® XP/Vista/7 Operating Systems (OS). Visit the ASUS website at any time without notice. Double-click the ASSETUP.EXE to avail all motherboard features. Always install the latest OS version and corresponding updates ...
...the drivers, software applications, and utilities that you can install to run the Support DVD Place the Support DVD into the optical drive. To run the DVD. 1-28 Chapter 1: Product introduction The DVD automatically displays the Drivers menu if Autorun is enabled on...1.11 Software support 1.11.1 Installing an operating system This motherboard supports Windows® XP/Vista/7 Operating Systems (OS). Visit the ASUS website at any time without notice. Double-click the ASSETUP.EXE to avail all motherboard features. Always install the latest OS version and corresponding updates ...
User Manual
Page 41
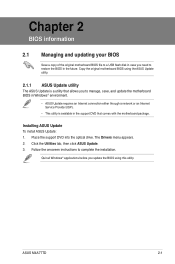
ASUS M4A77TD 2-1 Copy the original motherboard BIOS using this utility. Click the Utilities tab, then click ASUS Update. 3. The Drivers menu appears. 2. Follow the onscreen instructions to complete the installation. Quit all Windows® applications before you to manage, save, and update the motherboard BIOS in Windows® environment. • ASUS Update requires an Internet connection either...
ASUS M4A77TD 2-1 Copy the original motherboard BIOS using this utility. Click the Utilities tab, then click ASUS Update. 3. The Drivers menu appears. 2. Follow the onscreen instructions to complete the installation. Quit all Windows® applications before you to manage, save, and update the motherboard BIOS in Windows® environment. • ASUS Update requires an Internet connection either...

User Manual
Page 43
...Flash 2 feature allows you start using this utility, download the latest BIOS file from the ASUS website at www.asus.com. Insert the USB flash disk that contains the latest BIOS file to switch between drives until the correct BIOS file is found, then press . Press to the USB port, then... select EZ Flash 2 and press to prevent system boot failure! ASUSTek EZ Flash 2 BIOS ROM Utility V3.36 FLASH TYPE: MXIC 25L8005 Current ROM BOARD: M4A77TD VER: 0205 (H:00 B:03) DATE: 07/30/2009 Update ROM BOARD: Unknown VER: Unknown DATE: Unknown PATH: C:\ C: Note [Enter] Select or Load [Tab]...
...Flash 2 feature allows you start using this utility, download the latest BIOS file from the ASUS website at www.asus.com. Insert the USB flash disk that contains the latest BIOS file to switch between drives until the correct BIOS file is found, then press . Press to the USB port, then... select EZ Flash 2 and press to prevent system boot failure! ASUSTek EZ Flash 2 BIOS ROM Utility V3.36 FLASH TYPE: MXIC 25L8005 Current ROM BOARD: M4A77TD VER: 0205 (H:00 B:03) DATE: 07/30/2009 Update ROM BOARD: Unknown VER: Unknown DATE: Unknown PATH: C:\ C: Note [Enter] Select or Load [Tab]...
User Manual
Page 44
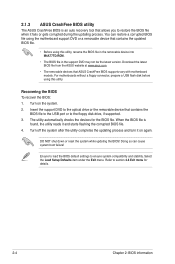
... To recover the BIOS: 1. Insert the support DVD to the floppy disk drive, if supported. 3. Doing so can restore a corrupted BIOS file using this utility, rename the BIOS file in the removable device into M4A77TD.ROM. • The BIOS file in the support DVD may not be ... system compatibility and stability. Download the latest BIOS file from the ASUS website at www.asus.com. • The removable devices that contains the BIOS file to the USB port or to the optical drive or the removable device that ASUS CrashFree BIOS supports vary with motherboard models. Turn on again.
... To recover the BIOS: 1. Insert the support DVD to the floppy disk drive, if supported. 3. Doing so can restore a corrupted BIOS file using this utility, rename the BIOS file in the removable device into M4A77TD.ROM. • The BIOS file in the support DVD may not be ... system compatibility and stability. Download the latest BIOS file from the ASUS website at www.asus.com. • The removable devices that contains the BIOS file to the USB port or to the optical drive or the removable device that ASUS CrashFree BIOS supports vary with motherboard models. Turn on again.

User Manual
Page 48
...Not Detected] System Information Use [ENTER], [TAB] or [SHIFT-TAB] to navigate through them. There is either a ZIP, LS-120, or MO drive. Select [ARMD] (ATAPI Removable Media Device) if your device is a separate submenu for information on the menu screen items and how to select a .... Configuration options: [Not Installed] [Auto] [CDROM] [ARMD] This item only appears in the system. These values are specifically configuring a CDROM drive. Select [CDROM] if you are not user-configurable. Refer to section 2.2.1 BIOS menu screen for each IDE/SATA device. Change Field Tab Select ...
...Not Detected] System Information Use [ENTER], [TAB] or [SHIFT-TAB] to navigate through them. There is either a ZIP, LS-120, or MO drive. Select [ARMD] (ATAPI Removable Media Device) if your device is a separate submenu for information on the menu screen items and how to select a .... Configuration options: [Not Installed] [Auto] [CDROM] [ARMD] This item only appears in the system. These values are specifically configuring a CDROM drive. Select [CDROM] if you are not user-configurable. Refer to section 2.2.1 BIOS menu screen for each IDE/SATA device. Change Field Tab Select ...

User Manual
Page 52
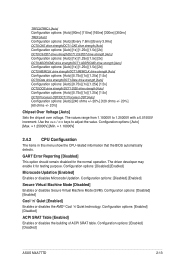
Configuration options: [Auto] [800MHz] [1067MHz] [1333MHz] [1600MHz] Memory Over Voltage [Auto] Sets the memory over voltage. Configuration options: [Auto] [Max. = 2.2050V] [Min. = 1.5000V] DRAM Timing/Driving Configuration The configuration options for some of the following items vary depending on the DIMMs you install on the SPDs. Use the / keys to 2.2050V ...] TRDRD [Auto] Configuration options: [Auto] [3 CLK] ~ [10 CLK] 2-12 Chapter 2: BIOS information If this item is set to [Auto], the DRAM speed depends on the motherboard.
Configuration options: [Auto] [800MHz] [1067MHz] [1333MHz] [1600MHz] Memory Over Voltage [Auto] Sets the memory over voltage. Configuration options: [Auto] [Max. = 2.2050V] [Min. = 1.5000V] DRAM Timing/Driving Configuration The configuration options for some of the following items vary depending on the DIMMs you install on the SPDs. Use the / keys to 2.2050V ...] TRDRD [Auto] Configuration options: [Auto] [3 CLK] ~ [10 CLK] 2-12 Chapter 2: BIOS information If this item is set to [Auto], the DRAM speed depends on the motherboard.
User Manual
Page 53
...The items in this menu show the CPU-related information that the BIOS automatically detects. Configuration options: [Enabled] [Disabled] ASUS M4A77TD 2-13 Configuration options: [Disabled] [Enabled] Microcode Updation [Enabled] Enables or disables Microcode Updation. Configuration options: [Disabled] ...] DCT0:MEMCLK drive strength/DCT1:MEMCLK drive strength [Auto] Configuration options: [Auto] [0.75x] [1x] [1.25x] [1.5x] DCT0:Data drive strength/DCT1:Data drive strength [Auto] Configuration options: [Auto] [0.75x] [1x] [1.25x] [1.5x] DCT0:DQS drive strength/DCT1:DQS drive strength [Auto]...
...The items in this menu show the CPU-related information that the BIOS automatically detects. Configuration options: [Enabled] [Disabled] ASUS M4A77TD 2-13 Configuration options: [Disabled] [Enabled] Microcode Updation [Enabled] Enables or disables Microcode Updation. Configuration options: [Disabled] ...] DCT0:MEMCLK drive strength/DCT1:MEMCLK drive strength [Auto] Configuration options: [Auto] [0.75x] [1x] [1.25x] [1.5x] DCT0:Data drive strength/DCT1:Data drive strength [Auto] Configuration options: [Auto] [0.75x] [1x] [1.25x] [1.5x] DCT0:DQS drive strength/DCT1:DQS drive strength [Auto]...

User Manual
Page 56
... Configuration USB Mass Storage Reset Delay [20 Sec] Sets the maximum time that the BIOS waits for Legacy USB storage devices, including USB flash drives and USB hard drives. Configuration options: [FullSpeed] [HiSpeed] The following items only appear when a USB storage device is enabled. Configuration options: [Disabled] [Enabled] USB 2.0 Controller [Enabled] Enables...
... Configuration USB Mass Storage Reset Delay [20 Sec] Sets the maximum time that the BIOS waits for Legacy USB storage devices, including USB flash drives and USB hard drives. Configuration options: [FullSpeed] [HiSpeed] The following items only appear when a USB storage device is enabled. Configuration options: [Disabled] [Enabled] USB 2.0 Controller [Enabled] Enables...
User Manual
Page 59
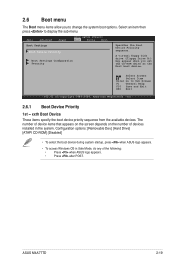
...the available devices. A virtual floppy disk drive (Floppy Drive B:) may appear when you to display the sub-menu. Configuration options: [Removable Dev.] [Hard Drive] [ATAPI CD-ROM] [Disabled] • To select the boot device during system startup, press when ASUS logo appears. • To access Windows... OS in Safe Mode, do any of devices installed in the system. The number of device items that appears on the screen depends on the number of the following: • Press when ASUS logo appears. • Press after POST. ASUS M4A77TD...
...the available devices. A virtual floppy disk drive (Floppy Drive B:) may appear when you to display the sub-menu. Configuration options: [Removable Dev.] [Hard Drive] [ATAPI CD-ROM] [Disabled] • To select the boot device during system startup, press when ASUS logo appears. • To access Windows... OS in Safe Mode, do any of devices installed in the system. The number of device items that appears on the screen depends on the number of the following: • Press when ASUS logo appears. • Press after POST. ASUS M4A77TD...


