User Manual
Page 13
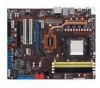
M3N72-D specifications summary Rear panel I/O ports 1 x PS/2 keyboard port (purple) 1 x S/PDIF Out (Coaxial) 1 x HDMI Out 1 x IEEE 1394a port 1 x LAN (RJ-45) 6 x USB 2.0/1.1 8-channel audio I/O Internal I/O connectors 3 ... Header 1 x Chassis Intrusion connector 1 x CD audio in 1 x 24-pin ATX Power connector 1 x 4-pin ATX 12V Power connector 1 x System Panel (Q-Connector) BIOS features 8 Mb Flash ROM, Award BIOS, PnP, DMI 2.0, WfM2.0, SM BIOS 2.5, ACPI 2.0, ASUS EZ Flash 2 Support DVD contents Drivers Express Gate ASUS PC Probe II ASUS Update Anti-virus Utility (OEM version) Form factor...
M3N72-D specifications summary Rear panel I/O ports 1 x PS/2 keyboard port (purple) 1 x S/PDIF Out (Coaxial) 1 x HDMI Out 1 x IEEE 1394a port 1 x LAN (RJ-45) 6 x USB 2.0/1.1 8-channel audio I/O Internal I/O connectors 3 ... Header 1 x Chassis Intrusion connector 1 x CD audio in 1 x 24-pin ATX Power connector 1 x 4-pin ATX 12V Power connector 1 x System Panel (Q-Connector) BIOS features 8 Mb Flash ROM, Award BIOS, PnP, DMI 2.0, WfM2.0, SM BIOS 2.5, ACPI 2.0, ASUS EZ Flash 2 Support DVD contents Drivers Express Gate ASUS PC Probe II ASUS Update Anti-virus Utility (OEM version) Form factor...

User Manual
Page 36
...Windows® Vista x64 Edition 2-12 Chapter 2: Hardware information Populated - - - Populated • You may install a maximum of 128 Mb chips. This limitation appears on Windows® XP/Vista 32-bit operation system which does not support Physical Address Extension (PAE). •... sizes in Channel A and Channel B. 2.4.2 Memory configurations You may only recognize less than 3GB is recommended. • This motherboard does not support memory modules made up to 16 GB on the operating systems listed below. Recommended Memory Configurations Mode Single-Channel Dual...
...Windows® Vista x64 Edition 2-12 Chapter 2: Hardware information Populated - - - Populated • You may install a maximum of 128 Mb chips. This limitation appears on Windows® XP/Vista 32-bit operation system which does not support Physical Address Extension (PAE). •... sizes in Channel A and Channel B. 2.4.2 Memory configurations You may only recognize less than 3GB is recommended. • This motherboard does not support memory modules made up to 16 GB on the operating systems listed below. Recommended Memory Configurations Mode Single-Channel Dual...

User Manual
Page 60
...Recommended Power Supply Wattage Calculator at http://support.asus.com/PowerSupplyCalculator/PSCalculator. 8. Find the proper orientation and push down firmly until the connectors completely fit. • For a fully configured system, we recommend that complies with ATX 12 V Specification 2.0 (or later version)... supply requirement for details. • The ATX 12 V Specification 2.0-compliant (500W) PSU has been tested to fit these connectors in only one orientation. The power supply plugs are designed to support the motherboard power requirements with more power-consuming devices.
...Recommended Power Supply Wattage Calculator at http://support.asus.com/PowerSupplyCalculator/PSCalculator. 8. Find the proper orientation and push down firmly until the connectors completely fit. • For a fully configured system, we recommend that complies with ATX 12 V Specification 2.0 (or later version)... supply requirement for details. • The ATX 12 V Specification 2.0-compliant (500W) PSU has been tested to fit these connectors in only one orientation. The power supply plugs are designed to support the motherboard power requirements with more power-consuming devices.
User Manual
Page 76
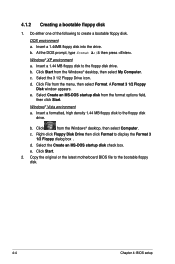
... format A:/S then press . Select the 3 1/2 Floppy Drive icon. d. Click Start. 2. 4.1.2 Creating a bootable floppy disk 1. b. Copy the original or the latest motherboard BIOS file to the floppy disk drive. Insert a 1.44 MB floppy disk to the bootable floppy disk. 4-4 Chapter 4: BIOS setup Windows® Vista environment a. Do either one of the following to... Disk Drive then click Format to create a bootable floppy disk. Select the Create an MS-DOS startup disk check box. e. b. Insert a formatted, high density 1.44 MB floppy disk to the floppy disk drive.
... format A:/S then press . Select the 3 1/2 Floppy Drive icon. d. Click Start. 2. 4.1.2 Creating a bootable floppy disk 1. b. Copy the original or the latest motherboard BIOS file to the floppy disk drive. Insert a 1.44 MB floppy disk to the bootable floppy disk. 4-4 Chapter 4: BIOS setup Windows® Vista environment a. Do either one of the following to... Disk Drive then click Format to create a bootable floppy disk. Select the Create an MS-DOS startup disk check box. e. b. Insert a formatted, high density 1.44 MB floppy disk to the floppy disk drive.
User Manual
Page 89
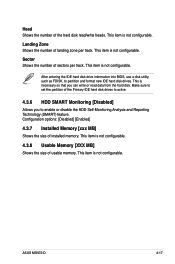
..., such as FDISK, to enable or disable the HDD Self-Monitoring Analysis and Reporting Technology (SMART) feature. This item is not configurable. ASUS M3N72-D 4-17 Make sure to set the partition of the Primary IDE hard disk drives to active. 4.3.6 HDD SMART Monitoring [Disabled] Allows you...to partition and format new IDE hard disk drives. This is not configurable. Configuration options: [Disabled] [Enabled] 4.3.7 Installed Memory [xxx MB] Shows the size of installed memory. Landing Zone Shows the number of landing zone per track. Head Shows the number of the hard...
..., such as FDISK, to enable or disable the HDD Self-Monitoring Analysis and Reporting Technology (SMART) feature. This item is not configurable. ASUS M3N72-D 4-17 Make sure to set the partition of the Primary IDE hard disk drives to active. 4.3.6 HDD SMART Monitoring [Disabled] Allows you...to partition and format new IDE hard disk drives. This is not configurable. Configuration options: [Disabled] [Enabled] 4.3.7 Installed Memory [xxx MB] Shows the size of installed memory. Landing Zone Shows the number of landing zone per track. Head Shows the number of the hard...
User Manual
Page 105
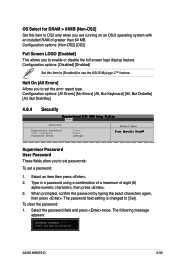
...to set passwords: To set the error report type. Select an item then press . 2. The password field setting is changed to use the ASUS MyLogo 2™ feature. When prompted, confirm the password by typing the exact characters again, then press . To clear the password: 1. Configuration... using a combination of a maximum of greater than 64 MB. The following message appears: PASSWORD DISABLED !!! Press any key to set a password: 1. OS Select for DRAM > 64MB [Non-OS2] Set this item to [Enabled] to [Set]. ASUS M3N72-D 4-33 Halt On [All Errors] Allows you to enable...
...to set passwords: To set the error report type. Select an item then press . 2. The password field setting is changed to use the ASUS MyLogo 2™ feature. When prompted, confirm the password by typing the exact characters again, then press . To clear the password: 1. Configuration... using a combination of a maximum of greater than 64 MB. The following message appears: PASSWORD DISABLED !!! Press any key to set a password: 1. OS Select for DRAM > 64MB [Non-OS2] Set this item to [Enabled] to [Set]. ASUS M3N72-D 4-33 Halt On [All Errors] Allows you to enable...


