
User Manual
Page 1
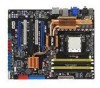
Motherboard M3N-HT Deluxe Series
Motherboard M3N-HT Deluxe Series
User Manual
Page 3
......vii Safety information viii About this guide ix M3N-HT Deluxe Series specifications summary xi Chapter 1: Product introduction 1.1 Welcome 1-1 1.2 Package contents 1-1 1.3 Special features 1-2 1.3.1 Product highlights 1-2 1.3.2 ASUS AI Lifestyle unique features 1-5 1.3.3 ASUS intelligent performance and overclocking features 1-8 Chapter 2: Hardware information 2.1 Before you proceed 2-1 2.2 Motherboard overview 2-2 2.2.1 Placement direction 2-2 2.2.2 Screw holes 2-2 2.2.3 Motherboard layout 2-3 2.2.4 Layout contents 2-4 2.3 Central Processing Unit (CPU 2-6 2.3.1 Installing...
......vii Safety information viii About this guide ix M3N-HT Deluxe Series specifications summary xi Chapter 1: Product introduction 1.1 Welcome 1-1 1.2 Package contents 1-1 1.3 Special features 1-2 1.3.1 Product highlights 1-2 1.3.2 ASUS AI Lifestyle unique features 1-5 1.3.3 ASUS intelligent performance and overclocking features 1-8 Chapter 2: Hardware information 2.1 Before you proceed 2-1 2.2 Motherboard overview 2-2 2.2.1 Placement direction 2-2 2.2.2 Screw holes 2-2 2.2.3 Motherboard layout 2-3 2.2.4 Layout contents 2-4 2.3 Central Processing Unit (CPU 2-6 2.3.1 Installing...

User Manual
Page 11
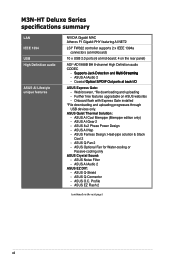
...Supports DVI with max. R���e�f�e�r��t�o� www.asus.com for AM2 CPU Dual-channel memory architecture - 4 x 240-pin DIMM sockets support ...HDMI/DVI/RGB support Supports Microsoft® DirectX® 10, O��p�en�G��L® 2.0, Pixel Shader 4.0 Support PCIe 2.0/1.0 architecture 3 x PCIe x16 support NVIDIA® 3-way SLI™ Tech @ dual x16 mode or triple x8 1 x PCIe x1 2 x PCI 2.2 Chipset: - 6 x SATA 3 Gb/s connectors (Use SATA 1-4 connectors for IDE mode) . - M3N-HT Deluxe...
...Supports DVI with max. R���e�f�e�r��t�o� www.asus.com for AM2 CPU Dual-channel memory architecture - 4 x 240-pin DIMM sockets support ...HDMI/DVI/RGB support Supports Microsoft® DirectX® 10, O��p�en�G��L® 2.0, Pixel Shader 4.0 Support PCIe 2.0/1.0 architecture 3 x PCIe x16 support NVIDIA® 3-way SLI™ Tech @ dual x16 mode or triple x8 1 x PCIe x1 2 x PCI 2.2 Chipset: - 6 x SATA 3 Gb/s connectors (Use SATA 1-4 connectors for IDE mode) . - M3N-HT Deluxe...
User Manual
Page 12
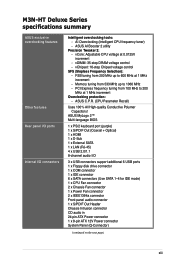
... downloading and uploading progresses through USB devices only. ASUS 8+2 Phase Power Design - ASUS AI Audio 2 ASUS EZ DIY: - ASUS AI Gear 2 - ASUS Fanless Design: Heat-pipe solution & Stack Cool 2 - ASUS Q-Fan 2 - ASUS Noise Filter - Further free features upgradable on the next page) xii ASUS EZ Flash 2 (continued on ASUS websites - M3N-HT Deluxe Series specifications summary LAN IEEE 1394 USB High Definition...
... downloading and uploading progresses through USB devices only. ASUS 8+2 Phase Power Design - ASUS AI Audio 2 ASUS EZ DIY: - ASUS AI Gear 2 - ASUS Fanless Design: Heat-pipe solution & Stack Cool 2 - ASUS Q-Fan 2 - ASUS Noise Filter - Further free features upgradable on the next page) xii ASUS EZ Flash 2 (continued on ASUS websites - M3N-HT Deluxe Series specifications summary LAN IEEE 1394 USB High Definition...
User Manual
Page 13
...Precision Tweaker 2: - vDIMM: 35-step DRAM voltage control - ASUS MyLogo 2™ Multi-language BIOS 1 x PS/2 keyboard port (purple) 1 x S/PDIF Out (Coaxial + Optical) 1 x HDMI 1 x D-Sub 1 x External SATA 1 x LAN ... Overclocking (Intelligent CPU frequency tuner) - vCore: Adjustable CPU voltage at 0.0125V increment - M3N-HT Deluxe Series specifications summary ASUS exclusive overclocking features Other features Rear panel I/O ports Internal I /O 3 x USB connectors ...-pin ATX Power connector 1 x 8-pin ATX 12V Power connector System Panel (Q-Connector) (continued on the next page) xiii
...Precision Tweaker 2: - vDIMM: 35-step DRAM voltage control - ASUS MyLogo 2™ Multi-language BIOS 1 x PS/2 keyboard port (purple) 1 x S/PDIF Out (Coaxial + Optical) 1 x HDMI 1 x D-Sub 1 x External SATA 1 x LAN ... Overclocking (Intelligent CPU frequency tuner) - vCore: Adjustable CPU voltage at 0.0125V increment - M3N-HT Deluxe Series specifications summary ASUS exclusive overclocking features Other features Rear panel I/O ports Internal I /O 3 x USB connectors ...-pin ATX Power connector 1 x 8-pin ATX 12V Power connector System Panel (Q-Connector) (continued on the next page) xiii
User Manual
Page 14
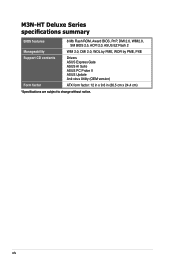
M3N-HT Deluxe Series specifications summary BIOS features 8 Mb Flash ROM, Award BIOS, PnP, DMI 2.0, WfM2.0, SM BIOS 2.5, ACPI 2.0, ASUS EZ Flash 2 Manageability WfM 2.0, DMI 2.0, WOL by PME, WOR by PME, PXE Support CD contents Drivers ASUS Express Gate ASUS AI Suite ASUS PC Probe II ASUS Update Anti-virus Utility (OEM version) Form factor ATX form factor: 12 in x 9.6 in (30.5 cm x 24.4 cm) *Specifications are subject to change without notice. xiv
M3N-HT Deluxe Series specifications summary BIOS features 8 Mb Flash ROM, Award BIOS, PnP, DMI 2.0, WfM2.0, SM BIOS 2.5, ACPI 2.0, ASUS EZ Flash 2 Manageability WfM 2.0, DMI 2.0, WOL by PME, WOR by PME, PXE Support CD contents Drivers ASUS Express Gate ASUS AI Suite ASUS PC Probe II ASUS Update Anti-virus Utility (OEM version) Form factor ATX form factor: 12 in x 9.6 in (30.5 cm x 24.4 cm) *Specifications are subject to change without notice. xiv
User Manual
Page 17
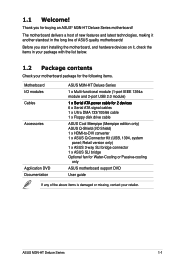
... 1 x Floppy disk drive cable Accessories ASUS Cool Mempipe (Mempipe edition only) ASUS Q-Shield (I/O Shield) 1 x HDMI-to-DVI converter 1 x ASUS Q-Connector Kit (USB, 1394, system panel; Thank you start installing the motherboard, and hardware devices on it another standout...below. 1.2 Package contents Check your motherboard package for Water-Cooling or Passive-cooling only Application DVD ASUS motherboard support DVD Documentation User guide If any of ASUS quality motherboards! ASUS M3N-HT Deluxe Series 1-1 1.1 Welcome! The motherboard delivers a host of new features...
... 1 x Floppy disk drive cable Accessories ASUS Cool Mempipe (Mempipe edition only) ASUS Q-Shield (I/O Shield) 1 x HDMI-to-DVI converter 1 x ASUS Q-Connector Kit (USB, 1394, system panel; Thank you start installing the motherboard, and hardware devices on it another standout...below. 1.2 Package contents Check your motherboard package for Water-Cooling or Passive-cooling only Application DVD ASUS motherboard support DVD Documentation User guide If any of ASUS quality motherboards! ASUS M3N-HT Deluxe Series 1-1 1.1 Welcome! The motherboard delivers a host of new features...
User Manual
Page 19
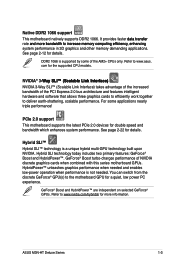
... features intelligent hardware and software that allows three graphics cards to efficiently work together to deliver earth-shattering, scalable performance. ASUS M3N-HT Deluxe Series 1-3 See page 2-22 for more information. Refer to the motherboard GPU for the supported CPU models. Refer to ��in��c�re��a�s�e�...
... features intelligent hardware and software that allows three graphics cards to efficiently work together to deliver earth-shattering, scalable performance. ASUS M3N-HT Deluxe Series 1-3 See page 2-22 for more information. Refer to the motherboard GPU for the supported CPU models. Refer to ��in��c�re��a�s�e�...
User Manual
Page 21
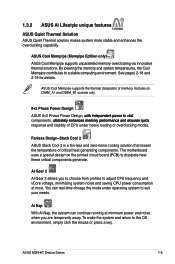
... lowers the temperature of CPU under operating system to suit your needs. You can continue running at most. The motherboard uses a special design on DIMM_A1 and DIMM_B1 sockets only. 8+2 Phase Power Design ASUS 8+2 Phase Power Design, �w�i�th��i�n�d�e��p�e�n��d�... CPU power consumption at minimum power and noise when you to choose from profiles to a stable computing environment. See pages 2-18 and 2-19 for details. ASUS M3N-HT Deluxe Series 1-5
... lowers the temperature of CPU under operating system to suit your needs. You can continue running at most. The motherboard uses a special design on DIMM_A1 and DIMM_B1 sockets only. 8+2 Phase Power Design ASUS 8+2 Phase Power Design, �w�i�th��i�n�d�e��p�e�n��d�... CPU power consumption at minimum power and noise when you to choose from profiles to a stable computing environment. See pages 2-18 and 2-19 for details. ASUS M3N-HT Deluxe Series 1-5
User Manual
Page 23
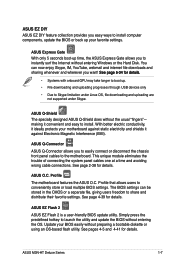
... multiple BIOS settings. See pages 4-5 and 4-41 for details. ASUS Q-Shield The specially designed ASUS Q-Shield does without entering the OS. Profile The motherboard features the ASUS O.C. ASUS EZ Flash 2 ASUS EZ Flash 2 is a user-friendly BIOS update utility. ASUS M3N-HT Deluxe Series 1-7 ASUS Q-Connector ASUS Q-Connector allows you to the motherboard. See page 2-38 for details. See page 4-39 for details...
... multiple BIOS settings. See pages 4-5 and 4-41 for details. ASUS Q-Shield The specially designed ASUS Q-Shield does without entering the OS. Profile The motherboard features the ASUS O.C. ASUS EZ Flash 2 ASUS EZ Flash 2 is a user-friendly BIOS update utility. ASUS M3N-HT Deluxe Series 1-7 ASUS Q-Connector ASUS Q-Connector allows you to the motherboard. See page 2-38 for details. See page 4-39 for details...
User Manual
Page 26
Chapter summary 2 2.1 Before you proceed 2-1 2.2 Motherboard overview 2-2 2.3 Central Processing Unit (CPU 2-6 2.4 System memory 2-12 2.5 Expansion slots 2-20 2.6 Jumper 2-24 2.7 Connectors 2-25 ASUS M3N-HT Deluxe Series
Chapter summary 2 2.1 Before you proceed 2-1 2.2 Motherboard overview 2-2 2.3 Central Processing Unit (CPU 2-6 2.4 System memory 2-12 2.5 Expansion slots 2-20 2.6 Jumper 2-24 2.7 Connectors 2-25 ASUS M3N-HT Deluxe Series
User Manual
Page 27
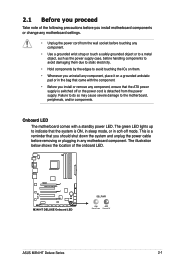
... ON OFF Standy Power Powered Off ASUS M3N-HT Deluxe Series 2-1 Onboard LED The motherboard comes with the component. • Before you install motherboard components or change any motherboard settings. • Unplug the power cord from the power supply. Failure to do so may cause severe damage to indicate that the ATX power supply is detached from the...
... ON OFF Standy Power Powered Off ASUS M3N-HT Deluxe Series 2-1 Onboard LED The motherboard comes with the component. • Before you install motherboard components or change any motherboard settings. • Unplug the power cord from the power supply. Failure to do so may cause severe damage to indicate that the ATX power supply is detached from the...
User Manual
Page 28
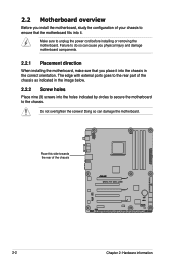
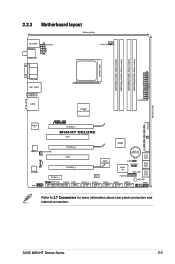
... chassis in the correct orientation. Failure to the chassis. The edge with external ports goes to unplug the power cord before installing or removing the motherboard. 2.2 Motherboard overview Before you place it . Make sure to the rear part of the chassis M3N-HT DELUXE 2-2 Chapter 2: Hardware information Do not overtighten the screws!
... chassis in the correct orientation. Failure to the chassis. The edge with external ports goes to unplug the power cord before installing or removing the motherboard. 2.2 Motherboard overview Before you place it . Make sure to the rear part of the chassis M3N-HT DELUXE 2-2 Chapter 2: Hardware information Do not overtighten the screws!
User Manual
Page 29
ASUS M3N-HT Deluxe Series 2-3 30.5cm (12.0in) 2.2.3 Motherboard layout 24.4cm (9.6in) KB_USB56 EATX12V CPU_FAN SPDIF_O12 DDR DIMM_A1 (64bit, 240-pin module) DDR DIMM_A2 (64bit, 240-pin module) DDR DIMM_B1 (64bit, 240-pin ...module) DDR DIMM_B2 (64bit, 240-pin module) SOCKET AM2+ VGA_HDMI LAN1_USB12 ESATA AUDIO nVidia® nForce 780a SLI EATXPWR PRI_IDE Attansic F1 PCIEX16_1 M3N-HT DELUXE PCI1...
ASUS M3N-HT Deluxe Series 2-3 30.5cm (12.0in) 2.2.3 Motherboard layout 24.4cm (9.6in) KB_USB56 EATX12V CPU_FAN SPDIF_O12 DDR DIMM_A1 (64bit, 240-pin module) DDR DIMM_A2 (64bit, 240-pin module) DDR DIMM_B1 (64bit, 240-pin ...module) DDR DIMM_B2 (64bit, 240-pin module) SOCKET AM2+ VGA_HDMI LAN1_USB12 ESATA AUDIO nVidia® nForce 780a SLI EATXPWR PRI_IDE Attansic F1 PCIEX16_1 M3N-HT DELUXE PCI1...
User Manual
Page 32
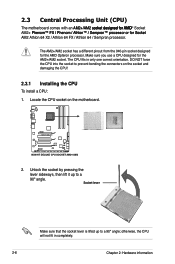
... a CPU: 1. M3N-HT DELUXE M3N-HT DELUXE CPU SOCKET AM2+/AM2 2. Socket lever Make sure that the socket lever is lifted up to a 90º angle. Unlock the socket by pressing the lever sideways, then lift it up to prevent bending the connectors on the motherboard. otherwise, the CPU... will not fit in only one correct orientation. 2.3 Central Processing Unit (CPU) The motherboard comes with an �A�M�2��+�/A��M�2&#...
... a CPU: 1. M3N-HT DELUXE M3N-HT DELUXE CPU SOCKET AM2+/AM2 2. Socket lever Make sure that the socket lever is lifted up to a 90º angle. Unlock the socket by pressing the lever sideways, then lift it up to prevent bending the connectors on the motherboard. otherwise, the CPU... will not fit in only one correct orientation. 2.3 Central Processing Unit (CPU) The motherboard comes with an �A�M�2��+�/A��M�2&#...
User Manual
Page 33
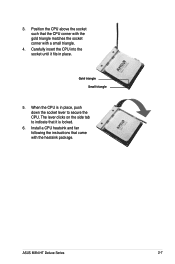
Gold triangle Small triangle 5. When the CPU is locked. 6. Install a CPU heatsink and fan following the instructions that the CPU corner with the gold triangle matches the socket corner with the heatsink package. ASUS M3N-HT Deluxe Series 2-7 Position the CPU above the socket such that came with a small triangle. 4. The lever clicks on the side tab to indicate that it fits in place, push down the socket lever to secure the CPU. 3. Carefully insert the CPU into the socket until it is in place.
Gold triangle Small triangle 5. When the CPU is locked. 6. Install a CPU heatsink and fan following the instructions that the CPU corner with the gold triangle matches the socket corner with the heatsink package. ASUS M3N-HT Deluxe Series 2-7 Position the CPU above the socket such that came with a small triangle. 4. The lever clicks on the side tab to indicate that it fits in place, push down the socket lever to secure the CPU. 3. Carefully insert the CPU into the socket until it is in place.
User Manual
Page 35
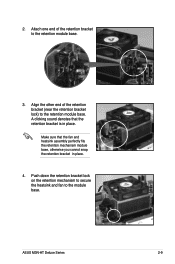
Align the other end of the retention bracket to the retention module base. 3. 2. A clicking sound denotes that the fan and heatsink assembly perfectly fits the retention mechanism module base, otherwise you cannot snap the retention bracket in place. Make sure that the retention bracket is in place. 4. Push down the retention bracket lock on the retention mechanism to secure the heatsink and fan to the retention module base. ASUS M3N-HT Deluxe Series 2-9 Attach one end of the retention bracket (near the retention bracket lock) to the module base.
Align the other end of the retention bracket to the retention module base. 3. 2. A clicking sound denotes that the fan and heatsink assembly perfectly fits the retention mechanism module base, otherwise you cannot snap the retention bracket in place. Make sure that the retention bracket is in place. 4. Push down the retention bracket lock on the retention mechanism to secure the heatsink and fan to the retention module base. ASUS M3N-HT Deluxe Series 2-9 Attach one end of the retention bracket (near the retention bracket lock) to the module base.
User Manual
Page 36
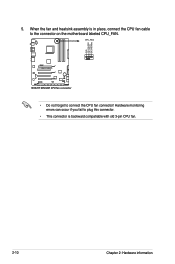
GND CPU FAN PWR CPU FAN IN CPU FAN PWM 5. Hardware monitoring errors can occur if you fail to the connector on the motherboard labeled CPU_FAN. When the fan and heatsink assembly is in place, connect the CPU fan cable to plug this connector. • This connector is backward compatiable with old 3-pin CPU fan. 2-10 Chapter 2: Hardware information CPU_FAN M3N-HT DELUXE M3N-HT DELUXE CPU fan connector • Do not forget to connect the CPU fan connector!
GND CPU FAN PWR CPU FAN IN CPU FAN PWM 5. Hardware monitoring errors can occur if you fail to the connector on the motherboard labeled CPU_FAN. When the fan and heatsink assembly is in place, connect the CPU fan cable to plug this connector. • This connector is backward compatiable with old 3-pin CPU fan. 2-10 Chapter 2: Hardware information CPU_FAN M3N-HT DELUXE M3N-HT DELUXE CPU fan connector • Do not forget to connect the CPU fan connector!

User Manual
Page 37
... the fan cable. 4. ASUS M3N-HT Deluxe Series 2-11 Position the fan above the pipe and heatsink assembly. 2. 2.3.3 Installing the optional fans Install the optional fan only if you are using a passive cooler or a water cooler. The photo shows the fan installed on the motherboard. • Plug the optional... fan cable to the CHA_FAN1/2 connector on the motherboard. • Make sure the optional fan is installed correctly to prevent damage to the fan and...
... the fan cable. 4. ASUS M3N-HT Deluxe Series 2-11 Position the fan above the pipe and heatsink assembly. 2. 2.3.3 Installing the optional fans Install the optional fan only if you are using a passive cooler or a water cooler. The photo shows the fan installed on the motherboard. • Plug the optional... fan cable to the CHA_FAN1/2 connector on the motherboard. • Make sure the optional fan is installed correctly to prevent damage to the fan and...
User Manual
Page 38
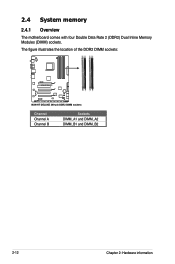
2.4 System memory 2.4.1 Overview The motherboard comes with four Double Data Rate 2 (DDR2) Dual Inline Memory Modules (DIMM) sockets. The figure illustrates the location of the DDR2 DIMM sockets: M3N-HT DELUXE M3N-HT DELUXE 240-pin DDR2 DIMM sockets Channel Channel A Channel B Sockets DIMM_A1 and DIMM_A2 DIMM_B1 and DIMM_B2 2-12 Chapter 2: Hardware information
2.4 System memory 2.4.1 Overview The motherboard comes with four Double Data Rate 2 (DDR2) Dual Inline Memory Modules (DIMM) sockets. The figure illustrates the location of the DDR2 DIMM sockets: M3N-HT DELUXE M3N-HT DELUXE 240-pin DDR2 DIMM sockets Channel Channel A Channel B Sockets DIMM_A1 and DIMM_A2 DIMM_B1 and DIMM_B2 2-12 Chapter 2: Hardware information


