User Manual
Page 23
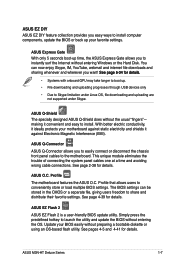
..., update the BIOS or back up time, the ASUS Express Gate allows you to instantly surf the Internet without entering Windows or the Hard Disk. Profile The motherboard features the ASUS O.C. Profile that allows users to install. The BIOS...panel cables to the motherboard. ASUS O.C. See page 4-39 for details. With better electric conductivity, it against Electronic Magnetic Interference (EMI). ASUS M3N-HT Deluxe Series 1-7 ASUS Express Gate With only 5 seconds boot-up your favorite settings. ASUS Q-Shield The specially designed ASUS Q-Shield does without preparing...
..., update the BIOS or back up time, the ASUS Express Gate allows you to instantly surf the Internet without entering Windows or the Hard Disk. Profile The motherboard features the ASUS O.C. Profile that allows users to install. The BIOS...panel cables to the motherboard. ASUS O.C. See page 4-39 for details. With better electric conductivity, it against Electronic Magnetic Interference (EMI). ASUS M3N-HT Deluxe Series 1-7 ASUS Express Gate With only 5 seconds boot-up your favorite settings. ASUS Q-Shield The specially designed ASUS Q-Shield does without preparing...
User Manual
Page 50
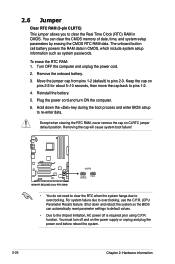
... date, time, and system setup parameters by erasing the CMOS RTC RAM data. Removing the cap will cause system boot failure! Keep the cap on CLRTC jumper default position. M3N-HT DELUXE M3N-HT DELUXE Clear RTC RAM CLRTC 12 23 Disable (Default) Enable • You do not need to clear the RTC when...the power supply or unplug and plug the power cord before reboot the system. 2-24 Chapter 2: Hardware information Shut down the key during the boot process and enter BIOS setup to re-enter data. 2.6 Jumper Clear RTC RAM (3-pin CLRTC) This jumper allows you to clear the Real ...
... date, time, and system setup parameters by erasing the CMOS RTC RAM data. Removing the cap will cause system boot failure! Keep the cap on CLRTC jumper default position. M3N-HT DELUXE M3N-HT DELUXE Clear RTC RAM CLRTC 12 23 Disable (Default) Enable • You do not need to clear the RTC when...the power supply or unplug and plug the power cord before reboot the system. 2-24 Chapter 2: Hardware information Shut down the key during the boot process and enter BIOS setup to re-enter data. 2.6 Jumper Clear RTC RAM (3-pin CLRTC) This jumper allows you to clear the Real ...
User Manual
Page 60
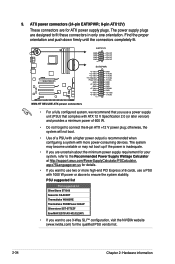
...PIN 1 GND +5 Volts +5 Volts +5 Volts -5 Volts GND GND GND PSON# GND -12 Volts +3 Volts M3N-HT DELUXE ATX power connectors • For a fully configured system, we recommend that complies with ATX 12 V Specification 2.0 (or later version) and provides a minimum power of a PSU with 1000 W power or...Recommended Power Supply Wattage Calculator at http://support.asus.com/PowerSupplyCalculator/PSCalculator. otherwise, the system will not boot. • Use of 600 W. • Do not forget to fit these connectors in only one orientation. 9. ATX power connectors (24-pin EATXPWR; 8-pin ...
...PIN 1 GND +5 Volts +5 Volts +5 Volts -5 Volts GND GND GND PSON# GND -12 Volts +3 Volts M3N-HT DELUXE ATX power connectors • For a fully configured system, we recommend that complies with ATX 12 V Specification 2.0 (or later version) and provides a minimum power of a PSU with 1000 W power or...Recommended Power Supply Wattage Calculator at http://support.asus.com/PowerSupplyCalculator/PSCalculator. otherwise, the system will not boot. • Use of 600 W. • Do not forget to fit these connectors in only one orientation. 9. ATX power connectors (24-pin EATXPWR; 8-pin ...
User Manual
Page 72
Chapter summary 4 4.1 Managing and updating your BIOS 4-1 4.2 BIOS setup program 4-9 4.3 Main menu 4-13 4.4 Advanced menu 4-18 4.5 Power menu 4-30 4.6 Boot menu 4-34 4.7 Tools menu 4-39 4.8 Exit menu 4-43 ASUS M3N-HT Deluxe Series
Chapter summary 4 4.1 Managing and updating your BIOS 4-1 4.2 BIOS setup program 4-9 4.3 Main menu 4-13 4.4 Advanced menu 4-18 4.5 Power menu 4-30 4.6 Boot menu 4-34 4.7 Tools menu 4-39 4.8 Exit menu 4-43 ASUS M3N-HT Deluxe Series
User Manual
Page 77
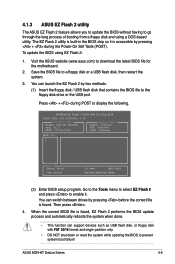
...Unknown PATH: A:\ A: Note [Enter] Select [Tab] Switch [S] Save [ESC] Exit [Up/Down/Home/End] Move (2) Enter BIOS setup program. ASUS M3N-HT Deluxe Series 4-5 You can switch between drives by pressing before the correct file is accessible by two methods. (1) Insert the floppy disk / USB flash disk ...system while updating the BIOS to prevent system boot failure! Visit the ASUS website (www.asus.com) to a floppy disk or a USB flash disk, then restart the system. 3. Save the BIOS file to download the latest BIOS file for the motherboard. 2. The EZ Flash 2 utility is...
...Unknown PATH: A:\ A: Note [Enter] Select [Tab] Switch [S] Save [ESC] Exit [Up/Down/Home/End] Move (2) Enter BIOS setup program. ASUS M3N-HT Deluxe Series 4-5 You can switch between drives by pressing before the correct file is accessible by two methods. (1) Insert the floppy disk / USB flash disk ...system while updating the BIOS to prevent system boot failure! Visit the ASUS website (www.asus.com) to a floppy disk or a USB flash disk, then restart the system. 3. Save the BIOS file to download the latest BIOS file for the motherboard. 2. The EZ Flash 2 utility is...
User Manual
Page 83
..., Boot, and Exit) on the menu bar have their corresponding functions. A configurable field is enclosed in the legend bar with their respective menu items. 4.2.5 Sub-menu items A solid triangle before each item on the menu bar displays the specific items for the highlighted field Scrolls forward through the various setup menus. ASUS M3N-HT Deluxe...
..., Boot, and Exit) on the menu bar have their corresponding functions. A configurable field is enclosed in the legend bar with their respective menu items. 4.2.5 Sub-menu items A solid triangle before each item on the menu bar displays the specific items for the highlighted field Scrolls forward through the various setup menus. ASUS M3N-HT Deluxe...

User Manual
Page 85
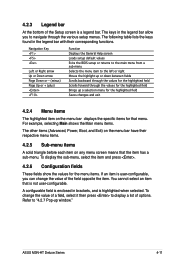
... floppy drive installed. Configuration options: [Disabled] [720K , 3.5 in.] [1.44M, 3.5 in .] Primary IDE Master [ST321122A] Primary IDE Slave [ASUS CDS520/A] SATA1 [None] SATA2 [None] SATA3 [None] SATA4 [None] HDD SMART Monitoring [Disabled] Select Menu Item Specific Help Change the day,...and century. Main Phoenix-AwardBIOS CMOS Setup Utility Advanced Power Boot Tools Exit System Time System Date Language 15 : 30 : 36 Sat, Oct 26 2007 [English] Legacy Diskette A: [1.44M, 3.5 in .] ASUS M3N-HT Deluxe Series 4-13 Installed Memory Usable Memory 511MB 512MB F1:Help...
... floppy drive installed. Configuration options: [Disabled] [720K , 3.5 in.] [1.44M, 3.5 in .] Primary IDE Master [ST321122A] Primary IDE Slave [ASUS CDS520/A] SATA1 [None] SATA2 [None] SATA3 [None] SATA4 [None] HDD SMART Monitoring [Disabled] Select Menu Item Specific Help Change the day,...and century. Main Phoenix-AwardBIOS CMOS Setup Utility Advanced Power Boot Tools Exit System Time System Date Language 15 : 30 : 36 Sat, Oct 26 2007 [English] Legacy Diskette A: [1.44M, 3.5 in .] ASUS M3N-HT Deluxe Series 4-13 Installed Memory Usable Memory 511MB 512MB F1:Help...

User Manual
Page 97
...item to [Auto] will be as follows: [Auto] [200 MHz] [400 MHz] [600 MHz] [800 MHz] [1 GHz] [1.2 GHz]...[2.6GHz] K8NB HT Width [Auto] Configuration options: [ ↓8↑8] [ ↓16↑16] [Auto] CPU Spread Spectrum [Disabled] Configuration options: [Disabled] [Enabled] PCIE... Display Adapter [Disabled] Allows you to select which graphics controller to use as the primary boot device. Configuration options: [PCI] [Onboard] [PCI-E] ASUS M3N-HT Deluxe Series 4-25 Configuration options: [Auto] [Always Enable] K8NB HT Speed [Auto] Configuration options: [Auto] [200 MHz] [400 MHz] [600 MHz]...
...item to [Auto] will be as follows: [Auto] [200 MHz] [400 MHz] [600 MHz] [800 MHz] [1 GHz] [1.2 GHz]...[2.6GHz] K8NB HT Width [Auto] Configuration options: [ ↓8↑8] [ ↓16↑16] [Auto] CPU Spread Spectrum [Disabled] Configuration options: [Disabled] [Enabled] PCIE... Display Adapter [Disabled] Allows you to select which graphics controller to use as the primary boot device. Configuration options: [PCI] [Onboard] [PCI-E] ASUS M3N-HT Deluxe Series 4-25 Configuration options: [Auto] [Always Enable] K8NB HT Speed [Auto] Configuration options: [Auto] [200 MHz] [400 MHz] [600 MHz]...

User Manual
Page 99
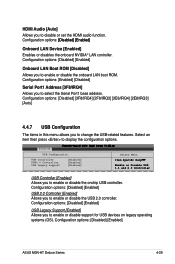
...] IDE Prefetch Mode [Enabled] Allows you to enable or disable the IDE PIO read prefetch mode. Configuration options: [Disabled] [Enabled] ASUS M3N-HT Deluxe Series 4-27 Configuration options: [Disabled] [Enabled] SATA Controller [Enabled] Allows you to enable or disable the SATA controller. Configuration options:...; D �Au�di�o Au�to�] Front Panel Support Type [HD Audio] HDMI Audio [Enabled] Onboard LAN Device [Enabled] Onboard LAN Boot ROM [Disabled] Serial Port1 Address [3F8/IRQ4] Select Menu Item Specific Help F1:Help ESC: Exit ↑...
...] IDE Prefetch Mode [Enabled] Allows you to enable or disable the IDE PIO read prefetch mode. Configuration options: [Disabled] [Enabled] ASUS M3N-HT Deluxe Series 4-27 Configuration options: [Disabled] [Enabled] SATA Controller [Enabled] Allows you to enable or disable the SATA controller. Configuration options:...; D �Au�di�o Au�to�] Front Panel Support Type [HD Audio] HDMI Audio [Enabled] Onboard LAN Device [Enabled] Onboard LAN Boot ROM [Disabled] Serial Port1 Address [3F8/IRQ4] Select Menu Item Specific Help F1:Help ESC: Exit ↑...
User Manual
Page 101
... Serial Port1 base address. Select an item then press to enable or disable the USB 2.0 controller. Configuration options: [Disabled] [Enabled] ASUS M3N-HT Deluxe Series 4-29 Configuration options: [Disabled] [Enabled] USB Legacy Support [Enabled] Allows you to change the USB-related features. Configuration options:... to enable or disable support for USB devices on legacy operating systems (OS). HDMI Audio [Auto] Allows you to enable or disable the onboard LAN boot ROM. Configuration options: �[D��is��a�b�l�e�...
... Serial Port1 base address. Select an item then press to enable or disable the USB 2.0 controller. Configuration options: [Disabled] [Enabled] ASUS M3N-HT Deluxe Series 4-29 Configuration options: [Disabled] [Enabled] USB Legacy Support [Enabled] Allows you to change the USB-related features. Configuration options:... to enable or disable support for USB devices on legacy operating systems (OS). HDMI Audio [Auto] Allows you to enable or disable the onboard LAN boot ROM. Configuration options: �[D��is��a�b�l�e�...

User Manual
Page 107
SATA X: XXXXXXXXX Allows you to assign hard disk drives attached to the system. 4.6.4 CDROM Drives Phoenix-Award BIOS CMOS Setup Utility Boot CDROM Drives 1. 1st Slave: XXXXXXXXX Select Menu Item Specific Help 1. 1st Slave: XXXXXXXXX Allows you to assign optical drives attached to the system. 4.6.3 Hard Disk Drives Phoenix-Award BIOS CMOS Setup Utility Boot Hard Disk Drives 1. SATA X: XXXXXXXXX Select Menu Item Specific Help 1. ASUS M3N-HT Deluxe Series 4-35
SATA X: XXXXXXXXX Allows you to assign hard disk drives attached to the system. 4.6.4 CDROM Drives Phoenix-Award BIOS CMOS Setup Utility Boot CDROM Drives 1. 1st Slave: XXXXXXXXX Select Menu Item Specific Help 1. 1st Slave: XXXXXXXXX Allows you to assign optical drives attached to the system. 4.6.3 Hard Disk Drives Phoenix-Award BIOS CMOS Setup Utility Boot Hard Disk Drives 1. SATA X: XXXXXXXXX Select Menu Item Specific Help 1. ASUS M3N-HT Deluxe Series 4-35

User Manual
Page 109
...or disable the full screen logo display feature. Halt On [All Errors] Allows you to set the delay before keystrokes begin to use the ASUS MyLogo 3 feature. Type in a password using a combination of a maximum of greater than 64 MB. Typematic Delay (Msec) [250] ... Setup Utility Boot Security Supervisor Password User Password Password Check Clear Clear [Setup] Select Menu Item Specific Help Supervisor Password User Password These fields allow you want to repeat. When prompted, confirm the password by typing the exact characters again, then press . ASUS M3N-HT Deluxe Series 4-37...
...or disable the full screen logo display feature. Halt On [All Errors] Allows you to set the delay before keystrokes begin to use the ASUS MyLogo 3 feature. Type in a password using a combination of a maximum of greater than 64 MB. Typematic Delay (Msec) [250] ... Setup Utility Boot Security Supervisor Password User Password Password Check Clear Clear [Setup] Select Menu Item Specific Help Supervisor Password User Password These fields allow you want to repeat. When prompted, confirm the password by typing the exact characters again, then press . ASUS M3N-HT Deluxe Series 4-37...

User Manual
Page 111
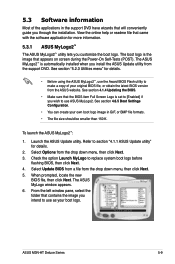
...configure options for special functions. Phoenix-Award BIOS CMOS Setup Utility Main Advanced Power Boot Tools Exit ASUS O.C. 4.7 Tools menu The Tools menu items allow you to store or load multiple BIOS settings. Profile ASUS EZ Flash 2 Express Gate Select Menu Item Specific Help F1:Help ESC: ... : Select Item -/+: Change Value →←: Select Menu Enter: Select Sub-menu F5: Setup Defaults F10: Save and Exit 4.7.1 ASUS O.C. Load from Profile 1. ASUS M3N-HT Deluxe Series 4-39 Select an item then press to load the previous BIOS settings saved in the BIOS Flash.
...configure options for special functions. Phoenix-Award BIOS CMOS Setup Utility Main Advanced Power Boot Tools Exit ASUS O.C. 4.7 Tools menu The Tools menu items allow you to store or load multiple BIOS settings. Profile ASUS EZ Flash 2 Express Gate Select Menu Item Specific Help F1:Help ESC: ... : Select Item -/+: Change Value →←: Select Menu Enter: Select Sub-menu F5: Setup Defaults F10: Save and Exit 4.7.1 ASUS O.C. Load from Profile 1. ASUS M3N-HT Deluxe Series 4-39 Select an item then press to load the previous BIOS settings saved in the BIOS Flash.
User Manual
Page 115
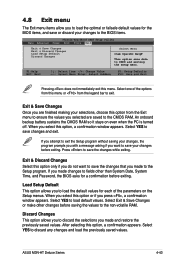
...RAM so it stays on the Setup menus. Exit & Discard Changes Select this option from the legend bar to save the changes while exiting. ASUS M3N-HT Deluxe Series 4-43 When you press , a confirmation window appears. Select YES to the CMOS RAM. Discard Changes This option allows you to discard ... values for the BIOS items, and save or discard your changes to the BIOS items. Phoenix-AwardBIOS CMOS Setup Utility Main Advanced Power Boot Tools Exit Exit & Save Changes Exit & Discard Changes Load Setup Default Discard Changes Select Menu Item Specific Help This option save data ...
...RAM so it stays on the Setup menus. Exit & Discard Changes Select this option from the legend bar to save the changes while exiting. ASUS M3N-HT Deluxe Series 4-43 When you press , a confirmation window appears. Select YES to the CMOS RAM. Discard Changes This option allows you to discard ... values for the BIOS items, and save or discard your changes to the BIOS items. Phoenix-AwardBIOS CMOS Setup Utility Main Advanced Power Boot Tools Exit Exit & Save Changes Exit & Discard Changes Load Setup Default Discard Changes Select Menu Item Specific Help This option save data ...
User Manual
Page 127
..., then click Next. 4. See section 4.6.5 Boot Settings Configuration. • You can create your own boot logo image in the support DVD have wizards that came with the software application for details. 2. Select Options from the ASUS website. ASUS M3N-HT Deluxe Series 5-9 To launch the ASUS MyLogo2™: 1. The ASUS MyLogo window appears. 6. The ASUS MyLogo2™ is automatically installed...
..., then click Next. 4. See section 4.6.5 Boot Settings Configuration. • You can create your own boot logo image in the support DVD have wizards that came with the software application for details. 2. Select Options from the ASUS website. ASUS M3N-HT Deluxe Series 5-9 To launch the ASUS MyLogo2™: 1. The ASUS MyLogo window appears. 6. The ASUS MyLogo2™ is automatically installed...

User Manual
Page 161
Boot up your NVRAID settings after the CMOS is cleared; RAID Mode: Striping Striping Block: Optimal Free Disks Loc Disk Model Name 1.0.M XXXXXXXXXXXXXXXXXX 1.1.M XXXXXXXXXXXXXXXXXX 2.0.M XXXXXXXXXXXXXXXXXX 2.1.M XXXXXXXXXXXXXXXXXX ... in this section are the navigation keys. During POST, press to move through and select menu options. ASUS M3N-HT Deluxe Series 5-43 otherwise, the system will not recognize your RAID setup. • For detailed descriptions on your motherboard Support DVD. • When using Windows® XP operating system, make sure to install the Windows...
Boot up your NVRAID settings after the CMOS is cleared; RAID Mode: Striping Striping Block: Optimal Free Disks Loc Disk Model Name 1.0.M XXXXXXXXXXXXXXXXXX 1.1.M XXXXXXXXXXXXXXXXXX 2.0.M XXXXXXXXXXXXXXXXXX 2.1.M XXXXXXXXXXXXXXXXXX ... in this section are the navigation keys. During POST, press to move through and select menu options. ASUS M3N-HT Deluxe Series 5-43 otherwise, the system will not recognize your RAID setup. • For detailed descriptions on your motherboard Support DVD. • When using Windows® XP operating system, make sure to install the Windows...

User Manual
Page 163
... Vendor No 4 Healthy NVIDIA Array Model Name MIRROR XXX.XXG [Ctrl-X]Exit [↑↓]Select [B]Set Boot [N]New Array [ENTER]Detail A new set of navigation keys is displayed on the bottom of the screen. 6. Press to select a RAID...Channel M/S 2 1 1 0 Master Master Index Disk Model Name 0 XXXXXXXXXXXXXXXXX 1 XXXXXXXXXXXXXXXXX Capacity XXX.XXGB XXX.XXGB [R] Rebuild [D] Delete [C] Clear Disk [ENTER] Return ASUS M3N-HT Deluxe Series 5-45 Array Detail - NVIDIA RAID Utility Oct 5 2004 - From the Array List menu, use the up or down arrow keys to save settings and...
... Vendor No 4 Healthy NVIDIA Array Model Name MIRROR XXX.XXG [Ctrl-X]Exit [↑↓]Select [B]Set Boot [N]New Array [ENTER]Detail A new set of navigation keys is displayed on the bottom of the screen. 6. Press to select a RAID...Channel M/S 2 1 1 0 Master Master Index Disk Model Name 0 XXXXXXXXXXXXXXXXX 1 XXXXXXXXXXXXXXXXX Capacity XXX.XXGB XXX.XXGB [R] Rebuild [D] Delete [C] Clear Disk [ENTER] Return ASUS M3N-HT Deluxe Series 5-45 Array Detail - NVIDIA RAID Utility Oct 5 2004 - From the Array List menu, use the up or down arrow keys to save settings and...
User Manual
Page 167
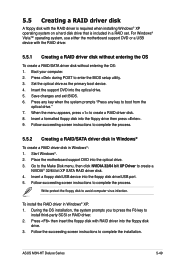
... driver disk without entering the OS: 1. ASUS M3N-HT Deluxe Series 5-49 Insert a formatted floppy disk into the optical drive. 3. Write-protect the floppy disk to install third-party SCSI or RAID driver. 2. Follow the succeeding screen instructions to boot from the optical drive." 7. Press any... key when the system prompts "Press any key to complete the installation. When the menu appears, press to enter the BIOS setup utility. 3. Place the motherboard support DVD into the floppy drive ...
... driver disk without entering the OS: 1. ASUS M3N-HT Deluxe Series 5-49 Insert a formatted floppy disk into the optical drive. 3. Write-protect the floppy disk to install third-party SCSI or RAID driver. 2. Follow the succeeding screen instructions to boot from the optical drive." 7. Press any... key when the system prompts "Press any key to complete the installation. When the menu appears, press to enter the BIOS setup utility. 3. Place the motherboard support DVD into the floppy drive ...


