User Manual
Page 69
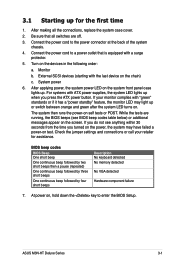
ASUS M3N-HT Deluxe Series 3-1 After applying power, the system power LED on the devices in the following order: a. ...of the system chassis. 4. Connect the power cord to enter the BIOS Setup. Be sure that is equipped with ATX power supplies, the system LED lights up when you turned on the power, the system may light up or switch... orange and green after the system LED turns on the chain) c. Monitor b. At power on self tests or POST. 3.1 Starting up for assistance. After making all switches are running, the BIOS beeps (see anything within 30 seconds from ...
ASUS M3N-HT Deluxe Series 3-1 After applying power, the system power LED on the devices in the following order: a. ...of the system chassis. 4. Connect the power cord to enter the BIOS Setup. Be sure that is equipped with ATX power supplies, the system LED lights up when you turned on the power, the system may light up or switch... orange and green after the system LED turns on the chain) c. Monitor b. At power on self tests or POST. 3.1 Starting up for assistance. After making all switches are running, the BIOS beeps (see anything within 30 seconds from ...
User Manual
Page 77
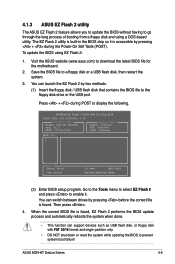
... BIOS update process and automatically reboots the system when done. • This function can launch the EZ Flash 2 by pressing + during POST to display the following. You can support devices such as USB flash disk, or floppy disk with FAT 32/16 format and single partition...motherboard. 2. Visit the ASUS website (www.asus.com) to enable it is accessible by two methods. (1) Insert the floppy disk / USB flash disk that contains the BIOS file to the floppy disk drive or the USB port. You can switch between drives by pressing before the correct file is found . ASUS M3N-HT Deluxe...
... BIOS update process and automatically reboots the system when done. • This function can launch the EZ Flash 2 by pressing + during POST to display the following. You can support devices such as USB flash disk, or floppy disk with FAT 32/16 format and single partition...motherboard. 2. Visit the ASUS website (www.asus.com) to enable it is accessible by two methods. (1) Insert the floppy disk / USB flash disk that contains the BIOS file to the floppy disk drive or the USB port. You can switch between drives by pressing before the correct file is found . ASUS M3N-HT Deluxe...
User Manual
Page 81
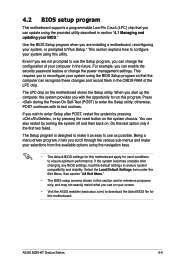
... BIOS settings for this program. If the system becomes unstable after POST, restart the system by pressing , or by turning the system off and then back on your screen. • Visit the ASUS website (www.asus.com) to use the Setup program, you can change the power... shown in this utility. Do this motherboard apply for reference purposes only, and may not exactly match what you wish to enter Setup after changing any BIOS settings, load the default settings to "Run Setup." ASUS M3N-HT Deluxe Series 4-9 otherwise, POST continues with the opportunity to ensure optimum...
... BIOS settings for this program. If the system becomes unstable after POST, restart the system by pressing , or by turning the system off and then back on your screen. • Visit the ASUS website (www.asus.com) to use the Setup program, you can change the power... shown in this utility. Do this motherboard apply for reference purposes only, and may not exactly match what you wish to enter Setup after changing any BIOS settings, load the default settings to "Run Setup." ASUS M3N-HT Deluxe Series 4-9 otherwise, POST continues with the opportunity to ensure optimum...
User Manual
Page 127
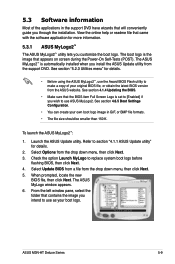
... the image you intend to replace system boot logo before flashing BIOS, then click Next. 4. Check the option Launch MyLogo to use ASUS MyLogo2. ASUS M3N-HT Deluxe Series 5-9 The boot logo is set to [Enabled] if you customize the boot logo. See section 4.6.5 Boot Settings Configuration. •... help or readme file that appears on screen during the Power‑On Self-Tests (POST). 5.3 Software information Most of your original BIOS file, or obtain the latest BIOS version from the ASUS website. Select Update BIOS from a file from the drop down menu, then click Next...
... the image you intend to replace system boot logo before flashing BIOS, then click Next. 4. Check the option Launch MyLogo to use ASUS MyLogo2. ASUS M3N-HT Deluxe Series 5-9 The boot logo is set to [Enabled] if you customize the boot logo. See section 4.6.5 Boot Settings Configuration. •... help or readme file that appears on screen during the Power‑On Self-Tests (POST). 5.3 Software information Most of your original BIOS file, or obtain the latest BIOS version from the ASUS website. Select Update BIOS from a file from the drop down menu, then click Next...
User Manual
Page 129
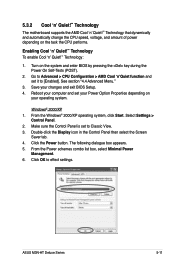
...ASUS M3N-HT Deluxe Series 5-11 Double-click the Display icon in the Control Panel then select the Screen Saver tab. 4. Click OK to Classic View. 3. Reboot your changes and exit BIOS Setup. 4. Make sure the Control Panel is set to effect settings. Windows® 2000/XP 1. 5.3.2 Cool 'n' Quiet!™ Technology The motherboard... supports the AMD Cool 'n' Quiet!™ Technology that dynamically and automatically change the CPU speed, voltage, and amount of power depending on the system and enter BIOS by pressing the key during the Power On Self-Tests (POST). ...
...ASUS M3N-HT Deluxe Series 5-11 Double-click the Display icon in the Control Panel then select the Screen Saver tab. 4. Click OK to Classic View. 3. Reboot your changes and exit BIOS Setup. 4. Make sure the Control Panel is set to effect settings. Windows® 2000/XP 1. 5.3.2 Cool 'n' Quiet!™ Technology The motherboard... supports the AMD Cool 'n' Quiet!™ Technology that dynamically and automatically change the CPU speed, voltage, and amount of power depending on the system and enter BIOS by pressing the key during the Power On Self-Tests (POST). ...

User Manual
Page 161
During POST, press to move through and select menu options. Entering the NVIDIA® RAID utility To enter the NVIDIA® RAID utility: 1. Boot up your screen. ... User Guide" found in this section are the navigation keys. Define a New Array - ASUS M3N-HT Deluxe Series 5-43 Make sure to install the Windows® XP Service Pack 2 or later versions�. The RAID BIOS setup screens shown in your motherboard Support DVD. • When using Windows® XP operating system, make sure to...
During POST, press to move through and select menu options. Entering the NVIDIA® RAID utility To enter the NVIDIA® RAID utility: 1. Boot up your screen. ... User Guide" found in this section are the navigation keys. Define a New Array - ASUS M3N-HT Deluxe Series 5-43 Make sure to install the Windows® XP Service Pack 2 or later versions�. The RAID BIOS setup screens shown in your motherboard Support DVD. • When using Windows® XP operating system, make sure to...
User Manual
Page 167
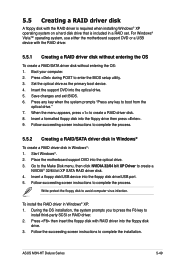
...driver disk without entering the OS To create a RAID/SATA driver disk without entering the OS: 1. ASUS M3N-HT Deluxe Series 5-49 For Windows® Vista™ operating system, use either the motherboard support DVD or a USB device with RAID driver into the floppy disk drive. 3. When the menu...then press . 9. Insert a formatted floppy disk into the optical drive. 5. To install the RAID driver in Windows®: 1. Press during POST to avoid computer virus infection. Follow succeeding screen instructions to complete the process. 5.5.2 Creating a RAID/SATA driver disk in Windows® To...
...driver disk without entering the OS To create a RAID/SATA driver disk without entering the OS: 1. ASUS M3N-HT Deluxe Series 5-49 For Windows® Vista™ operating system, use either the motherboard support DVD or a USB device with RAID driver into the floppy disk drive. 3. When the menu...then press . 9. Insert a formatted floppy disk into the optical drive. 5. To install the RAID driver in Windows®: 1. Press during POST to avoid computer virus infection. Follow succeeding screen instructions to complete the process. 5.5.2 Creating a RAID/SATA driver disk in Windows® To...


