
User Manual
Page 33
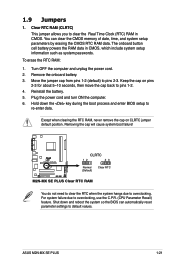
... computer. 6. Reinstall the battery. 5. Removing the cap will cause system boot failure! For system failure due to pins 2-3. Clear RTC RAM (CLRTC) This jumper allows you to re-enter data. Move the jumper cap from pins 1-2 (default) to overclocking, use the ...the CMOS RTC RAM data. ASUS M2N-MX SE PLUS 1-21 You can automatically reset parameter settings to overclocking. The onboard button cell battery powers the RAM data in CMOS. Remove the onboard battery. 3. R M2N-MX SE PLUS CLRTC 12 23 Normal (Default) Clear RTC M2N-MX SE PLUS Clear RTC RAM You do not...
... computer. 6. Reinstall the battery. 5. Removing the cap will cause system boot failure! For system failure due to pins 2-3. Clear RTC RAM (CLRTC) This jumper allows you to re-enter data. Move the jumper cap from pins 1-2 (default) to overclocking, use the ...the CMOS RTC RAM data. ASUS M2N-MX SE PLUS 1-21 You can automatically reset parameter settings to overclocking. The onboard button cell battery powers the RAM data in CMOS. Remove the onboard battery. 3. R M2N-MX SE PLUS CLRTC 12 23 Normal (Default) Clear RTC M2N-MX SE PLUS Clear RTC RAM You do not...
User Manual
Page 55
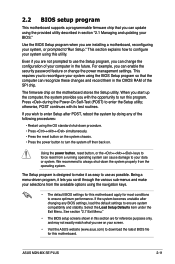
...This motherboard supports a programmable firmware chip that the computer can recognize these changes and record them in the CMOS RAM of the SPI chip. If you can update using the OS standard shut-down the system properly from the ...match what you are not prompted to enter Setup after changing any of your screen. • Visit the ASUS website (www.asus.com) to download the latest BIOS file for most conditions to run this utility. Even if you see on.... Press during the Power-On Self-Test (POST) to ensure system compatibility and stability. ASUS M2N-MX SE PLUS 2-11
...This motherboard supports a programmable firmware chip that the computer can recognize these changes and record them in the CMOS RAM of the SPI chip. If you can update using the OS standard shut-down the system properly from the ...match what you are not prompted to enter Setup after changing any of your screen. • Visit the ASUS website (www.asus.com) to download the latest BIOS file for most conditions to run this utility. Even if you see on.... Press during the Power-On Self-Test (POST) to ensure system compatibility and stability. ASUS M2N-MX SE PLUS 2-11

User Manual
Page 78
... Supervisor Password item and press . 2. Change Option F1 General Help Select this Password item item to on how to erase the RTC RAM. To set a supervisor password, the other security settings. 2-34 Chapter 2: BIOS setup After you can clear clear it by erasing ...the CMOS Real Time Clock (RTC) RAM. again to display the configuration options. shows the default Not IFETn1Shs0CetaSlSEleaxuvidpet.eAravfntidseorEryxoitu set a password, this function allows the option ROMs to trap ...
... Supervisor Password item and press . 2. Change Option F1 General Help Select this Password item item to on how to erase the RTC RAM. To set a supervisor password, the other security settings. 2-34 Chapter 2: BIOS setup After you can clear clear it by erasing ...the CMOS Real Time Clock (RTC) RAM. again to display the configuration options. shows the default Not IFETn1Shs0CetaSlSEleaxuvidpet.eAravfntidseorEryxoitu set a password, this function allows the option ROMs to trap ...

User Manual
Page 80
An onboard backup battery sustains the CMOS RAM so it stays on the Setup menus. Press to the Setup program. 2.7 Exit menu The Exit menu items allow you to load the optimal or ... you made and restore the previously saved values. When you select this option or if you to the non-volatile RAM. 2-36 Chapter 2: BIOS setup When you are saved to the CMOS RAM. Select OK to save the changes while exiting. Exit & Save Changes Once you select this option, a confirmation window appears...
An onboard backup battery sustains the CMOS RAM so it stays on the Setup menus. Press to the Setup program. 2.7 Exit menu The Exit menu items allow you to load the optimal or ... you made and restore the previously saved values. When you select this option or if you to the non-volatile RAM. 2-36 Chapter 2: BIOS setup When you are saved to the CMOS RAM. Select OK to save the changes while exiting. Exit & Save Changes Once you select this option, a confirmation window appears...


