
K8V-X user's manual
Page 23
Turn on the socket. 3. Assign an IRQ to the tables next page. 4. Install the drivers and/or software applications for the expansion card according to the card documentation. 1.8.1 Standard interrupt assignments IRQ Priority Standard Function 0 1 System Timer 1 2 Keyboard...and change the necessary BIOS settings, if any. See Chapter 2 for ISA or PCI devices. DDR DIMM Unlocked A DDR DIMM is properly seated. ASUS K8V-X motherboard 1-13 Refer to the card. Unlock a DIMM socket by pressing the retaining clips outward. 2. DO NOT force a DIMM into the socket until the...
Turn on the socket. 3. Assign an IRQ to the tables next page. 4. Install the drivers and/or software applications for the expansion card according to the card documentation. 1.8.1 Standard interrupt assignments IRQ Priority Standard Function 0 1 System Timer 1 2 Keyboard...and change the necessary BIOS settings, if any. See Chapter 2 for ISA or PCI devices. DDR DIMM Unlocked A DDR DIMM is properly seated. ASUS K8V-X motherboard 1-13 Refer to the card. Unlock a DIMM socket by pressing the retaining clips outward. 2. DO NOT force a DIMM into the socket until the...

K8V-X user's manual
Page 24
... assignments. INT C - - INT D - - - shared INT B - used - - - shared - - - When using PCI cards on shared slots, ensure that the drivers support "Share IRQ" or that comply with PCI specifications. 1-14 Chapter 1: Product introduction 1.8.2 IRQ assignments for this motherboard PCI slot 1 PCI slot 2 PCI slot 3 PCI slot 4 PCI slot 5 Gigabit LAN AGP slot INT A shared - - -
... assignments. INT C - - INT D - - - shared INT B - used - - - shared - - - When using PCI cards on shared slots, ensure that the drivers support "Share IRQ" or that comply with PCI specifications. 1-14 Chapter 1: Product introduction 1.8.2 IRQ assignments for this motherboard PCI slot 1 PCI slot 2 PCI slot 3 PCI slot 4 PCI slot 5 Gigabit LAN AGP slot INT A shared - - -

K8V-X user's manual
Page 32
... for additional USB ports. CPU_FAN Rotation +12V GND K8V-X ® K8V-X 12-Volt Fan Connectors CHA_FAN GND +12V Rotation 6. These are inadequate, a USB header is purchased separately. • Install the USB 2.0 driver before using the USB 2.0 feature. DO NOT place jumper caps on the motherboard, making sure that the black wire of each cable...
... for additional USB ports. CPU_FAN Rotation +12V GND K8V-X ® K8V-X 12-Volt Fan Connectors CHA_FAN GND +12V Rotation 6. These are inadequate, a USB header is purchased separately. • Install the USB 2.0 driver before using the USB 2.0 feature. DO NOT place jumper caps on the motherboard, making sure that the black wire of each cable...
K8V-X user's manual
Page 72
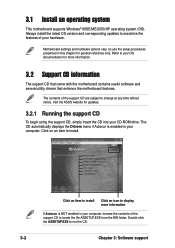
...presented in this chapter for more information If Autorun is enabled in your CD-ROM drive. The contents of your computer. Visit the ASUS website for updates. 3.2.1 Running the support CD To begin using the support CD, simply insert the CD into your computer, browse...contents of the support CD to display more information. 3.2 Support CD information The support CD that came with the motherboard contains useful software and several utility drivers that enhance the motherboard features. Click on an item to run the CD. 3-2 Chapter 3: Software support 3.1 Install an operating system This...
...presented in this chapter for more information If Autorun is enabled in your CD-ROM drive. The contents of your computer. Visit the ASUS website for updates. 3.2.1 Running the support CD To begin using the support CD, simply insert the CD into your computer, browse...contents of the support CD to display more information. 3.2 Support CD information The support CD that came with the motherboard contains useful software and several utility drivers that enhance the motherboard features. Click on an item to run the CD. 3-2 Chapter 3: Software support 3.1 Install an operating system This...
K8V-X user's manual
Page 73
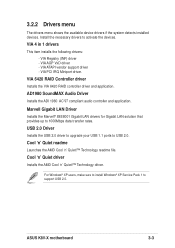
... 'n' Quiet!™ Technology readme file. ASUS K8V-X motherboard 3-3 VIA PCI IRQ Miniport driver. Install the necessary drivers to 1000Mbps data transfer rates. VIA AGP VxD driver - Marvell Gigabit LAN Driver Installs the Marvell® 88E8001 Gigabit LAN drivers for Gigabit LAN solution that provides up to activate the devices. USB 2.0 Driver Installs the USB 2.0 driver to upgrade your USB 1.1 ports...
... 'n' Quiet!™ Technology readme file. ASUS K8V-X motherboard 3-3 VIA PCI IRQ Miniport driver. Install the necessary drivers to 1000Mbps data transfer rates. VIA AGP VxD driver - Marvell Gigabit LAN Driver Installs the Marvell® 88E8001 Gigabit LAN drivers for Gigabit LAN solution that provides up to activate the devices. USB 2.0 Driver Installs the USB 2.0 driver to upgrade your USB 1.1 ports...

K8V-X user's manual
Page 74
..., make sure that the motherboard supports. Anti-virus Utility The anti-virus application scans, identifies, and removes computer viruses. 3.2.3 Utilities menu The Utilities menu shows the applications and other software that you have an Internet connection so you to the ASUS website. Microsoft DirectX Driver Installs the Microsoft DirectX™driver. Acrobat Reader Installs...
..., make sure that the motherboard supports. Anti-virus Utility The anti-virus application scans, identifies, and removes computer viruses. 3.2.3 Utilities menu The Utilities menu shows the applications and other software that you have an Internet connection so you to the ASUS website. Microsoft DirectX Driver Installs the Microsoft DirectX™driver. Acrobat Reader Installs...
K8V-X user's manual
Page 78
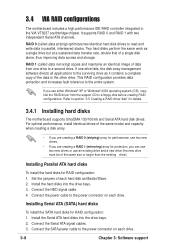
...array for performance, use two new drives. • If you are creating a RAID 1 (mirroring) array for details. 3.4.1 Installing hard disks The motherboard supports UltraDMA 133/100/66 and Serial ATA hard disk drives. This RAID configuration provides data protection and increases fault tolerance to a second drive. It...floppy disk before creating RAID configurations. Refer to the power connector on each drive. Connect the power cable to section "3.5 Creating a RAID driver disk" for protection, you use an existing drive and a new drive (the new drive must be of the data in the other ...
...array for performance, use two new drives. • If you are creating a RAID 1 (mirroring) array for details. 3.4.1 Installing hard disks The motherboard supports UltraDMA 133/100/66 and Serial ATA hard disk drives. This RAID configuration provides data protection and increases fault tolerance to a second drive. It...floppy disk before creating RAID configurations. Refer to the power connector on each drive. Connect the power cable to section "3.5 Creating a RAID driver disk" for protection, you use an existing drive and a new drive (the new drive must be of the data in the other ...
K8V-X user's manual
Page 80
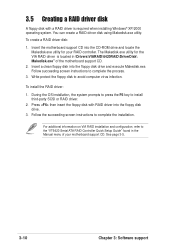
...Press then insert the floppy disk with a RAID driver is located in the Manual menu of the motherboard support CD. 2. Follow the succeeding screen instructions to complete the process. 3. 3.5 Creating a RAID driver disk A floppy disk with RAID driver into the CD-ROM drive and locate the Makedisk....exe utility for the VIA RAID driver is required when installing ...
...Press then insert the floppy disk with a RAID driver is located in the Manual menu of the motherboard support CD. 2. Follow the succeeding screen instructions to complete the process. 3. 3.5 Creating a RAID driver disk A floppy disk with RAID driver into the CD-ROM drive and locate the Makedisk....exe utility for the VIA RAID driver is required when installing ...
K8V-X user's manual
Page 81
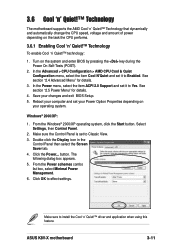
...menu, select the item Cool N'Quiet and set it to Enabled. Click OK to install the Cool 'n' Quiet!™ driver and application when using this feature. ASUS K8V-X motherboard 3-11 Select Settings, then Control Panel. 2. The following dialog box appears. 5. Make sure to effect settings. Turn...to Yes. button. From the Power schemes combo list box, select Minimal Power Management. 6. 3.6 Cool 'n' Quiet!™ Technology The motherboard supports the AMD Cool 'n' Quiet!™ Technology that dynamically and automatically change the CPU speed, voltage and amount of power depending on ...
...menu, select the item Cool N'Quiet and set it to Enabled. Click OK to install the Cool 'n' Quiet!™ driver and application when using this feature. ASUS K8V-X motherboard 3-11 Select Settings, then Control Panel. 2. The following dialog box appears. 5. Make sure to effect settings. Turn...to Yes. button. From the Power schemes combo list box, select Minimal Power Management. 6. 3.6 Cool 'n' Quiet!™ Technology The motherboard supports the AMD Cool 'n' Quiet!™ Technology that dynamically and automatically change the CPU speed, voltage and amount of power depending on ...


