
K8V-X user's manual
Page 2
... 2005 ASUSTeK COMPUTER INC. Products and corporate names appearing in writing by the purchaser for identification or explanation and to infringe. ASUS PROVIDES THIS MANUAL "AS IS" WITHOUT WARRANTY OF ANY KIND, EITHER EXPRESS OR IMPLIED, INCLUDING BUT NOT LIMITED TO THE IMPLIED WARRANTIES OR ...SHOULD NOT BE CONSTRUED AS A COMMITMENT BY ASUS. ASUS ASSUMES NO RESPONSIBILITY OR LIABILITY FOR ANY ERRORS OR INACCURACIES THAT MAY APPEAR IN THIS MANUAL, INCLUDING THE PRODUCTS AND SOFTWARE DESCRIBED IN IT. ii No part of this manual may or may be registered trademarks or copyrights ...
... 2005 ASUSTeK COMPUTER INC. Products and corporate names appearing in writing by the purchaser for identification or explanation and to infringe. ASUS PROVIDES THIS MANUAL "AS IS" WITHOUT WARRANTY OF ANY KIND, EITHER EXPRESS OR IMPLIED, INCLUDING BUT NOT LIMITED TO THE IMPLIED WARRANTIES OR ...SHOULD NOT BE CONSTRUED AS A COMMITMENT BY ASUS. ASUS ASSUMES NO RESPONSIBILITY OR LIABILITY FOR ANY ERRORS OR INACCURACIES THAT MAY APPEAR IN THIS MANUAL, INCLUDING THE PRODUCTS AND SOFTWARE DESCRIBED IN IT. ii No part of this manual may or may be registered trademarks or copyrights ...

K8V-X user's manual
Page 5
... Configuration 2-31 2.6.4 Security 2-32 2.7 Exit menu 2-34 Chapter 3: Software support 3.1 Install an operating system 3-2 3.2 Support CD information 3-2 3.2.1 Running the support CD 3-2 3.2.2 Drivers menu 3-3 3.2.3 Utilities menu 3-4 3.2.4 Manual menu 3-5 3.2.5 ASUS Contact Information 3-5 3.3 ASUS Instant Music Lite 3-6 3.4 VIA RAID configurations 3-8 3.4.1 Installing hard disks 3-8 3.4.2 VIA RAID configurations 3-9 3.5 Creating a RAID driver disk 3-10 3.6 Cool 'n' Quiet!™ Technology 3-11 v
... Configuration 2-31 2.6.4 Security 2-32 2.7 Exit menu 2-34 Chapter 3: Software support 3.1 Install an operating system 3-2 3.2 Support CD information 3-2 3.2.1 Running the support CD 3-2 3.2.2 Drivers menu 3-3 3.2.3 Utilities menu 3-4 3.2.4 Manual menu 3-5 3.2.5 ASUS Contact Information 3-5 3.3 ASUS Instant Music Lite 3-6 3.4 VIA RAID configurations 3-8 3.4.1 Installing hard disks 3-8 3.4.2 VIA RAID configurations 3-9 3.5 Creating a RAID driver disk 3-10 3.6 Cool 'n' Quiet!™ Technology 3-11 v

K8V-X user's manual
Page 7
... not sure about the voltage of the electrical outlet you encounter technical problems with the package. • Before using the product, make sure all the manuals that your power supply is broken, do not try to or from the system, ensure that all power cables from the existing system before you...
... not sure about the voltage of the electrical outlet you encounter technical problems with the package. • Before using the product, make sure all the manuals that your power supply is broken, do not try to or from the system, ensure that all power cables from the existing system before you...

K8V-X user's manual
Page 8
... or more keys simultaneously, the key names are linked with a plus sign (+). Example: At the DOS prompt, type the command line: afudos /i[filename] In this manual. Typography Bold text Italics Command Indicates a menu or an item to emphasize a word or a phrase. Example: Means that appear in completing a task. IMPORTANT: Information that...
... or more keys simultaneously, the key names are linked with a plus sign (+). Example: At the DOS prompt, type the command line: afudos /i[filename] In this manual. Typography Bold text Italics Command Indicates a menu or an item to emphasize a word or a phrase. Example: Means that appear in completing a task. IMPORTANT: Information that...
K8V-X user's manual
Page 51
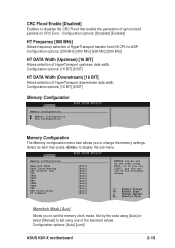
...press to set using one of HyperTransport transfer from K8 CPU to change the memory settings. Set by the code using [Auto] or select [Manual] to display the sub-menu. Memory Configuration Memclock Mode Bank Interleaving CAS Latency (CL) TRC TRFC TRCD TWR TRWT TRAS TRP DDR Clock .... CRC Flood Enable [Disabled] Enables or disables the CRC Flood that enable the generation of HyperTransport upstream data width. Configuration options: [Auto] [Limit] ASUS K8V-X motherboard 2-15 Memclock Mode [ Auto] Allows you can be set by the code using AUTO, or if you use LIMIT, you to set one ...
...press to set using one of HyperTransport transfer from K8 CPU to change the memory settings. Set by the code using [Auto] or select [Manual] to display the sub-menu. Memory Configuration Memclock Mode Bank Interleaving CAS Latency (CL) TRC TRFC TRCD TWR TRWT TRAS TRP DDR Clock .... CRC Flood Enable [Disabled] Enables or disables the CRC Flood that enable the generation of HyperTransport upstream data width. Configuration options: [Auto] [Limit] ASUS K8V-X motherboard 2-15 Memclock Mode [ Auto] Allows you can be set by the code using AUTO, or if you use LIMIT, you to set one ...
K8V-X user's manual
Page 60
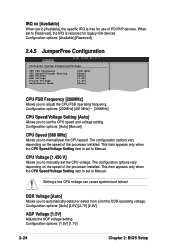
...AGP Voltage V-Link Voltage Performance Mode [200 MHz] [Auto] [Auto] [1.5V] [2.5V] [Auto] CPU FSB Frequency [200MHz] Allows you to Manual. When set to [Reserved], the IRQ is set to automatically detect or select from a list the DDR operating voltage. Configuration options: [1.5V] ...[1.7V] 2-24 Chapter 2: BIOS Setup Configuration options: [Auto] [Manual] CPU Speed [800 MHz] Allows you to manuallyset the CPU speed. CPU Voltage [1.450 V] Allows you to manually set the CPU speed and voltage setting. The configuration options vary depending on the speed ...
...AGP Voltage V-Link Voltage Performance Mode [200 MHz] [Auto] [Auto] [1.5V] [2.5V] [Auto] CPU FSB Frequency [200MHz] Allows you to Manual. When set to [Reserved], the IRQ is set to automatically detect or select from a list the DDR operating voltage. Configuration options: [1.5V] ...[1.7V] 2-24 Chapter 2: BIOS Setup Configuration options: [Auto] [Manual] CPU Speed [800 MHz] Allows you to manuallyset the CPU speed. CPU Voltage [1.450 V] Allows you to manually set the CPU speed and voltage setting. The configuration options vary depending on the speed ...

K8V-X user's manual
Page 75
3.2.4 Manual menu The Manual menu contains a list of this information on the inside front cover of supplementary user manuals. You may also find this user guide. Install the Adobe® Acrobat® Reader from the Utilities menu to open the manual files in PDF. 3.2.5 ASUS Contact Information Clicking the ASUS Contact Information tab displays as stated. Click an item to open the manual. ASUS K8V-X motherboard 3-5
3.2.4 Manual menu The Manual menu contains a list of this information on the inside front cover of supplementary user manuals. You may also find this user guide. Install the Adobe® Acrobat® Reader from the Utilities menu to open the manual files in PDF. 3.2.5 ASUS Contact Information Clicking the ASUS Contact Information tab displays as stated. Click an item to open the manual. ASUS K8V-X motherboard 3-5

K8V-X user's manual
Page 79
... descriptions on the VIA RAID configuration, refer to set the BIOS RAID items: 1. Entering VIA RAID BIOS Utility To enter the VIA RAID BIOS utility: 1. ASUS K8V-X motherboard 3-9 It supports RAID 0 and RAID 1 configurations. To set the necessary RAID items in the BIOS. 3. Go to configure a disk array. Save your motherboard support... configuration utility. During POST, press to enter the BIOS Setup Utility. 2. 3.4.2 VIA RAID configurations The motherboard includes a high performance IDE RAID controller integrated in the Manual menu of your changes and Exit Setup.
... descriptions on the VIA RAID configuration, refer to set the BIOS RAID items: 1. Entering VIA RAID BIOS Utility To enter the VIA RAID BIOS utility: 1. ASUS K8V-X motherboard 3-9 It supports RAID 0 and RAID 1 configurations. To set the necessary RAID items in the BIOS. 3. Go to configure a disk array. Save your motherboard support... configuration utility. During POST, press to enter the BIOS Setup Utility. 2. 3.4.2 VIA RAID configurations The motherboard includes a high performance IDE RAID controller integrated in the Manual menu of your changes and Exit Setup.
K8V-X user's manual
Page 80
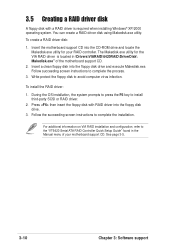
... system prompts to press the F6 key to avoid computer virus infection. Press then insert the floppy disk with a RAID driver is located in the Manual menu of the motherboard support CD. 2. Write-protect the floppy disk to install third-party SCSI or RAID driver. 2. 3.5 Creating a RAID driver disk A floppy disk...
... system prompts to press the F6 key to avoid computer virus infection. Press then insert the floppy disk with a RAID driver is located in the Manual menu of the motherboard support CD. 2. Write-protect the floppy disk to install third-party SCSI or RAID driver. 2. 3.5 Creating a RAID driver disk A floppy disk...


