
K8V SE Deluxe User's Manual
Page 26
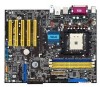
... 2 10. Keyboard power (3-pin KBPWR) 3. IEEE 1394 port 4. S/PDIF out jack 12. Serial connector 11. DDR DIMM slots 2. PCI slots 3. PS/2 mouse port 2. Clear RTC RAM (3-pin CLRTC) 2. Parallel port 3. Microphone jack 8. Line Out jack 7.
... 2 10. Keyboard power (3-pin KBPWR) 3. IEEE 1394 port 4. S/PDIF out jack 12. Serial connector 11. DDR DIMM slots 2. PCI slots 3. PS/2 mouse port 2. Clear RTC RAM (3-pin CLRTC) 2. Parallel port 3. Microphone jack 8. Line Out jack 7.

K8V SE Deluxe User's Manual
Page 33
ASUS K8V SE Deluxe motherboard 2-11 DIMM1 DIMM2 DIMM3 104 Pins 80 Pins K8V ® K8V SE Deluxe 184-Pin DDR DIMM Sockets 2.4.2 Memory configurations You may cause memory sizing error or system boot failure. See Qualified Vendors List on page 2-13. • Use the blue DIMM slots first. • Stacked RAM and DDR DIMM modules with more than the...
ASUS K8V SE Deluxe motherboard 2-11 DIMM1 DIMM2 DIMM3 104 Pins 80 Pins K8V ® K8V SE Deluxe 184-Pin DDR DIMM Sockets 2.4.2 Memory configurations You may cause memory sizing error or system boot failure. See Qualified Vendors List on page 2-13. • Use the blue DIMM slots first. • Stacked RAM and DDR DIMM modules with more than the...

K8V SE Deluxe User's Manual
Page 41
...the onboard battery. 3. Load the BIOS default settings or key-in CMOS. The RAM data in CMOS, that include system setup information such as system passwords, is powered by erasing the CMOS RTC RAM data. You can clear the CMOS memory of date, time, and system setup ... battery. Plug the power cord and turn ON the computer. 6. CLRTC K8V 2 1 ® Normal (Default) K8V SE Deluxe Clear RTC RAM 3 2 Clear CMOS ASUS K8V SE Deluxe motherboard 2-19 Move the jumper from pins 1-2 (default) to clear the Real Time Clock (RTC) RAM in data. Keep the cap on pins 2-3 for about 5~10 seconds,...
...the onboard battery. 3. Load the BIOS default settings or key-in CMOS. The RAM data in CMOS, that include system setup information such as system passwords, is powered by erasing the CMOS RTC RAM data. You can clear the CMOS memory of date, time, and system setup ... battery. Plug the power cord and turn ON the computer. 6. CLRTC K8V 2 1 ® Normal (Default) K8V SE Deluxe Clear RTC RAM 3 2 Clear CMOS ASUS K8V SE Deluxe motherboard 2-19 Move the jumper from pins 1-2 (default) to clear the Real Time Clock (RTC) RAM in data. Keep the cap on pins 2-3 for about 5~10 seconds,...

K8V SE Deluxe User's Manual
Page 75
... and stability. You can scroll through the various sub-menus and make it as possible. It is designed to make your computer in the CMOS RAM of your selections from the available options using this motherboard apply for this utility. This section explains how to enable the security password feature or... latest product and BIOS information. See section "4.7 Exit Menu." • The BIOS setup screens shown in section "4.1 Managing and updating your screen. • Visit the ASUS website (www.asus.com) to enter the Setup utility. ASUS K8V SE Deluxe motherboard 4-9
... and stability. You can scroll through the various sub-menus and make it as possible. It is designed to make your computer in the CMOS RAM of your selections from the available options using this motherboard apply for this utility. This section explains how to enable the security password feature or... latest product and BIOS information. See section "4.7 Exit Menu." • The BIOS setup screens shown in section "4.1 Managing and updating your screen. • Visit the ASUS website (www.asus.com) to enter the Setup utility. ASUS K8V SE Deluxe motherboard 4-9

K8V SE Deluxe User's Manual
Page 85
...] [81.9us] [163.8us] [327.7us] [655.4us] [1.31ms] [2.62ms] [5.24ms] [10.49ms] [20.97ms] [42.00ms] [84.00ms] ASUS K8V SE Deluxe motherboard 4-19 Master ECC Enable [Disabled] Enables or disables support on all nodes for ECC error detect and correction. Configuration options: [Disabled] [Enabled] L2 Cache... BG Scrub [Disabled] Disables or sets the L2 data cache RAM to be corrected when idle. Configuration options: [Disabled] [Enabled] The following items appear only when the Master ECC Enable item is...
...] [81.9us] [163.8us] [327.7us] [655.4us] [1.31ms] [2.62ms] [5.24ms] [10.49ms] [20.97ms] [42.00ms] [84.00ms] ASUS K8V SE Deluxe motherboard 4-19 Master ECC Enable [Disabled] Enables or disables support on all nodes for ECC error detect and correction. Configuration options: [Disabled] [Enabled] L2 Cache... BG Scrub [Disabled] Disables or sets the L2 data cache RAM to be corrected when idle. Configuration options: [Disabled] [Enabled] The following items appear only when the Master ECC Enable item is...

K8V SE Deluxe User's Manual
Page 102
... Virus Protection [Disabled] to disabled password. User Access Level (Full Access] Allows you can clear clear it by erasing the CMOS Real Time Clock (RTC) RAM. Select the Change User Password item and press . 2. To clear the supervisor password, select the Change Supervisor Password then press . See section "2.6 Jumpers" for information.... Limited allows change to set a User Password: 1. After you have set a supervisor password, the other items appear to allow change only to erase the RTC RAM.
... Virus Protection [Disabled] to disabled password. User Access Level (Full Access] Allows you can clear clear it by erasing the CMOS Real Time Clock (RTC) RAM. Select the Change User Password item and press . 2. To clear the supervisor password, select the Change Supervisor Password then press . See section "2.6 Jumpers" for information.... Limited allows change to set a User Password: 1. After you have set a supervisor password, the other items appear to allow change only to erase the RTC RAM.

K8V SE Deluxe User's Manual
Page 104
...program prompts you with a message asking if you want to save the changes while exiting. If you made changes to the CMOS RAM. Select Yes to the non-volatile RAM. 4-38 Chapter 4: BIOS Setup When you select this option, a confirmation window appears. Select Exit Saving Changes or make other ... save changes and exit. Exit & Save Changes Once you are finished making your changes before exiting. An onboard backup battery sustains the CMOS RAM and stays on the Setup menus. Press to discard the selections you to the Setup program. Load Setup Defaults This option allows you made ...
...program prompts you with a message asking if you want to save the changes while exiting. If you made changes to the CMOS RAM. Select Yes to the non-volatile RAM. 4-38 Chapter 4: BIOS Setup When you select this option, a confirmation window appears. Select Exit Saving Changes or make other ... save changes and exit. Exit & Save Changes Once you are finished making your changes before exiting. An onboard backup battery sustains the CMOS RAM and stays on the Setup menus. Press to discard the selections you to the Setup program. Load Setup Defaults This option allows you made ...

K8V SE Deluxe user's manual
Page 26
... 3. Keyboard power (3-pin KBPWR) 3. PS/2 keyboard port Page 2-21 2-21 2-21 2-21 2-21 2-21 2-21 2-22 2-22 2-22 2-22 2-22 2-4 Chapter 2: Hardware information Clear RTC RAM (3-pin CLRTC) 2. USB device wake-up (3-pin USBPWR12, USBPWR34, USBPWR56, USBPWR78) Page 2-19 2-20 2-20 Rear Panel Connectors 1. USB 2.0 ports 1 and 2 10. S/PDIF out jack...
... 3. Keyboard power (3-pin KBPWR) 3. PS/2 keyboard port Page 2-21 2-21 2-21 2-21 2-21 2-21 2-21 2-22 2-22 2-22 2-22 2-22 2-4 Chapter 2: Hardware information Clear RTC RAM (3-pin CLRTC) 2. USB device wake-up (3-pin USBPWR12, USBPWR34, USBPWR56, USBPWR78) Page 2-19 2-20 2-20 Rear Panel Connectors 1. USB 2.0 ports 1 and 2 10. S/PDIF out jack...

K8V SE Deluxe user's manual
Page 33
...RAM and DDR DIMM modules with more than the recommended configurations may install 64MB, 128MB, 256MB, 512MB, and 1GB unbuffered ECC and non-ECC DDR DIMMs into the DIMM sockets using the memory configurations in Table 1. • For optimum compatibility, obtain memory modules from the same vendors. ASUS K8V SE Deluxe... motherboard 2-11 The following figure illustrates the location of the recommended configurations in this section. Important notes on page 2-13. DIMM1 DIMM2 DIMM3 104 Pins 80 Pins K8V ® K8V SE Deluxe 184-Pin DDR DIMM...
...RAM and DDR DIMM modules with more than the recommended configurations may install 64MB, 128MB, 256MB, 512MB, and 1GB unbuffered ECC and non-ECC DDR DIMMs into the DIMM sockets using the memory configurations in Table 1. • For optimum compatibility, obtain memory modules from the same vendors. ASUS K8V SE Deluxe... motherboard 2-11 The following figure illustrates the location of the recommended configurations in this section. Important notes on page 2-13. DIMM1 DIMM2 DIMM3 104 Pins 80 Pins K8V ® K8V SE Deluxe 184-Pin DDR DIMM...

K8V SE Deluxe user's manual
Page 41
... 1-2. 4. Load the BIOS default settings or key-in CMOS. CLRTC K8V 2 1 ® Normal (Default) K8V SE Deluxe Clear RTC RAM 3 2 Clear CMOS ASUS K8V SE Deluxe motherboard 2-19 The RAM data in CMOS, that include system setup information such as system passwords, is powered by erasing the CMOS RTC RAM data. Remove the onboard battery. 3. Keep the cap on pins 2-3 for...
... 1-2. 4. Load the BIOS default settings or key-in CMOS. CLRTC K8V 2 1 ® Normal (Default) K8V SE Deluxe Clear RTC RAM 3 2 Clear CMOS ASUS K8V SE Deluxe motherboard 2-19 The RAM data in CMOS, that include system setup information such as system passwords, is powered by erasing the CMOS RTC RAM data. Remove the onboard battery. 3. Keep the cap on pins 2-3 for...

K8V SE Deluxe user's manual
Page 75
...if the first two failed. See section "4.7 Exit Menu." • The BIOS setup screens shown in the future. ASUS K8V SE Deluxe motherboard 4-9 For example, you see on . If you with its test routines. If the system becomes unstable after... , or by turning the system off and then back on your screen. • Visit the ASUS website (www.asus.com) to ensure system compatibility and stability. When you start up the computer, the system provides you... update using the provided utility described in the CMOS RAM of your system, or prompted to change the power management settings.
...if the first two failed. See section "4.7 Exit Menu." • The BIOS setup screens shown in the future. ASUS K8V SE Deluxe motherboard 4-9 For example, you see on . If you with its test routines. If the system becomes unstable after... , or by turning the system off and then back on your screen. • Visit the ASUS website (www.asus.com) to ensure system compatibility and stability. When you start up the computer, the system provides you... update using the provided utility described in the CMOS RAM of your system, or prompted to change the power management settings.

K8V SE Deluxe user's manual
Page 85
...] [5.24ms] [10.49ms] [20.97ms] [42.00ms] [84.00ms] Data Cache BG Scrub [Disabled] Disables or sets the L1 data cache RAM to be corrected when idle. Master ECC Enable [Disabled] Enables or disables support on all nodes for ECC error detect and correction. Configuration options: [Disabled... [41.0us] [81.9us] [163.8us] [327.7us] [655.4us] [1.31ms] [2.62ms] [5.24ms] [10.49ms] [20.97ms] [42.00ms] [84.00ms] ASUS K8V SE Deluxe motherboard 4-19 ECC Configuration ECC Configuration Master ECC Enable [Disabled] Master ECC Enables support on all nodes for ECC error detect and correction.
...] [5.24ms] [10.49ms] [20.97ms] [42.00ms] [84.00ms] Data Cache BG Scrub [Disabled] Disables or sets the L1 data cache RAM to be corrected when idle. Master ECC Enable [Disabled] Enables or disables support on all nodes for ECC error detect and correction. Configuration options: [Disabled... [41.0us] [81.9us] [163.8us] [327.7us] [655.4us] [1.31ms] [2.62ms] [5.24ms] [10.49ms] [20.97ms] [42.00ms] [84.00ms] ASUS K8V SE Deluxe motherboard 4-19 ECC Configuration ECC Configuration Master ECC Enable [Disabled] Master ECC Enables support on all nodes for ECC error detect and correction.

K8V SE Deluxe user's manual
Page 102
If you forget your BIOS password, you to change other items appear to erase the RTC RAM. Security Settings Supervisor Password : Installed User Password : Not Installed Change Supervisor Password User Access Level Change User Password Clear User Password Password Check [Full Access] [... as Date and Time. View Only allows access but does not allow you can clear clear it by erasing the CMOS Real Time Clock (RTC) RAM. Change User Password Select this item shows Installed. On the password box that appears, type a password combination of the screen shows the default Not Installed...
If you forget your BIOS password, you to change other items appear to erase the RTC RAM. Security Settings Supervisor Password : Installed User Password : Not Installed Change Supervisor Password User Access Level Change User Password Clear User Password Password Check [Full Access] [... as Date and Time. View Only allows access but does not allow you can clear clear it by erasing the CMOS Real Time Clock (RTC) RAM. Change User Password Select this item shows Installed. On the password box that appears, type a password combination of the screen shows the default Not Installed...

K8V SE Deluxe user's manual
Page 104
...are saved to ensure that you select this option, a confirmation appears. When you select this option from the Exit menu to the CMOS RAM. If you selected are finished making your selections, choose this option, a confirmation window appears. Select Yes to load default values. Select Yes... to save the changes that the values you made changes to the non-volatile RAM. 4-38 Chapter 4: BIOS Setup An onboard backup battery sustains the CMOS RAM and stays on the Setup menus. When you made and restore the previously saved values. After selecting...
...are saved to ensure that you select this option, a confirmation appears. When you select this option from the Exit menu to the CMOS RAM. If you selected are finished making your selections, choose this option, a confirmation window appears. Select Yes to load default values. Select Yes... to save the changes that the values you made changes to the non-volatile RAM. 4-38 Chapter 4: BIOS Setup An onboard backup battery sustains the CMOS RAM and stays on the Setup menus. When you made and restore the previously saved values. After selecting...


