
K8V SE Deluxe User's Manual
Page 4
... slot 2-18 2.6 Jumpers 2-19 2.7 Connectors 2-21 2.7.1 Rear panel connectors 2-21 2.7.2 Internal connectors 2-22 Chapter 3: Powering up 3.1 Starting up for the first time 3-1 3.2 Powering off the computer 3-2 3.2.1 Using the OS shut down function 3-2 3.2.2 Using the dual function power switch 3-2 3.3 ASUS POST Reporter 3-3 3.3.1 Vocal POST messages 3-3 3.3.2 Winbond Voice Editor 3-5 Chapter 4: BIOS setup 4.1 Managing and updating your...
... slot 2-18 2.6 Jumpers 2-19 2.7 Connectors 2-21 2.7.1 Rear panel connectors 2-21 2.7.2 Internal connectors 2-22 Chapter 3: Powering up 3.1 Starting up for the first time 3-1 3.2 Powering off the computer 3-2 3.2.1 Using the OS shut down function 3-2 3.2.2 Using the dual function power switch 3-2 3.3 ASUS POST Reporter 3-3 3.3.1 Vocal POST messages 3-3 3.3.2 Winbond Voice Editor 3-5 Chapter 4: BIOS setup 4.1 Managing and updating your...

K8V SE Deluxe User's Manual
Page 8
... about the voltage of the electrical outlet you detect any area where it , carefully read all cables are correctly connected and the power cables are connected. Do not place the product in your dealer immediately. • To avoid short circuits, keep paper clips, screws...staples away from connectors, slots, sockets and circuitry. • Avoid dust, humidity, and temperature extremes. Contact a qualified service technician or your power supply is broken, do not try to the correct voltage in any damage, contact your area. These devices could interrupt the grounding circuit. &#...
... about the voltage of the electrical outlet you detect any area where it , carefully read all cables are correctly connected and the power cables are connected. Do not place the product in your dealer immediately. • To avoid short circuits, keep paper clips, screws...staples away from connectors, slots, sockets and circuitry. • Avoid dust, humidity, and temperature extremes. Contact a qualified service technician or your power supply is broken, do not try to the correct voltage in any damage, contact your area. These devices could interrupt the grounding circuit. &#...

K8V SE Deluxe User's Manual
Page 9
...CD that may have to change system settings through the BIOS Setup menus. ASUS websites The ASUS website provides updated information on the motherboard. • Chapter 3: Powering up This chapter describes the power up sequence, the vocal POST messages, and ways of the jumpers and ...connectors on ASUS hardware and software products. ix How this guide This user guide contains the information ...
...CD that may have to change system settings through the BIOS Setup menus. ASUS websites The ASUS website provides updated information on the motherboard. • Chapter 3: Powering up This chapter describes the power up sequence, the vocal POST messages, and ways of the jumpers and ...connectors on ASUS hardware and software products. ix How this guide This user guide contains the information ...

K8V SE Deluxe User's Manual
Page 12
...K8V SE Deluxe specifications summary Back panel I/O Internal I/O BIOS features Industry standard Manageability Power Requirement Form Factor Support CD contents 1 x Parallel port 1 x Serial port 1 x PS/2 keyboard port 1 x PS/2 mouse port 4 x USB 2.0 ports 1 x IEEE 1394 port 1 x S/PDIF out 1 x RJ-45 port Line In/Line Out/Microphone ports 2 x USB 2.0 connector for 4 additional USB ports CPU/Chassis/Power..., PnP, DMI2.0, Green ASUS EZ Flash, ASUS MyLogo2, Q-Fan, SM BIOS 2.3, Multi-Language BIOS, CrashFree BIOS 2 PCI 2.2, USB 2.0/1.1 DMI 2.0, WOL by PME, WOR by PME ATX power supply (with 4-pin 12V...
...K8V SE Deluxe specifications summary Back panel I/O Internal I/O BIOS features Industry standard Manageability Power Requirement Form Factor Support CD contents 1 x Parallel port 1 x Serial port 1 x PS/2 keyboard port 1 x PS/2 mouse port 4 x USB 2.0 ports 1 x IEEE 1394 port 1 x S/PDIF out 1 x RJ-45 port Line In/Line Out/Microphone ports 2 x USB 2.0 connector for 4 additional USB ports CPU/Chassis/Power..., PnP, DMI2.0, Green ASUS EZ Flash, ASUS MyLogo2, Q-Fan, SM BIOS 2.3, Multi-Language BIOS, CrashFree BIOS 2 PCI 2.2, USB 2.0/1.1 DMI 2.0, WOL by PME, WOR by PME ATX power supply (with 4-pin 12V...

K8V SE Deluxe User's Manual
Page 15
... cable for buying the ASUS® K8V SE Deluxe motherboard! ASUS K8V SE Deluxe motherboard 1-1 1.1 Welcome! The motherboard delivers a host of new features and latest technologies making it , check the items in the long line of the above items is damaged or missing, contact your retailer. Before you for a 3.5-inch floppy drive 1 x Serial ATA power cable (Retail boxes only...
... cable for buying the ASUS® K8V SE Deluxe motherboard! ASUS K8V SE Deluxe motherboard 1-1 1.1 Welcome! The motherboard delivers a host of new features and latest technologies making it , check the items in the long line of the above items is damaged or missing, contact your retailer. Before you for a 3.5-inch floppy drive 1 x Serial ATA power cable (Retail boxes only...

K8V SE Deluxe User's Manual
Page 16
... Serial ATA RAID The motherboard provides two high-performance Serial ATA RAID controllers that dynamically and automatically changes the CPU speed, voltage and amount of power depending on AMD's 64-bit architecture, which represents the landmark introduction of the Parallel ATA storage interface. This processor provides a dramatic leap forward in computers...
... Serial ATA RAID The motherboard provides two high-performance Serial ATA RAID controllers that dynamically and automatically changes the CPU speed, voltage and amount of power depending on AMD's 64-bit architecture, which represents the landmark introduction of the Parallel ATA storage interface. This processor provides a dramatic leap forward in computers...

K8V SE Deluxe User's Manual
Page 17
supporting up to 2.12 GB/s. ASUS K8V SE Deluxe motherboard 1-3 The IEEE 1394 interface allows up to 400Mbps transfer rates through simple, low-cost, high-bandwidth asynchronous (real-time) data interfacing between computers, ... 3.0) is backward compatible with USB 1.1. 6-Channel Audio solution The motherboard uses an onboard audio Codec that enables enhanced graphics performance with digital connectivity to powerful speaker systems. IEEE 1394 support The IEEE 1394 interface provides high-speed and flexible PC connectivity to a wide range of peripherals and devices compliant to...
supporting up to 2.12 GB/s. ASUS K8V SE Deluxe motherboard 1-3 The IEEE 1394 interface allows up to 400Mbps transfer rates through simple, low-cost, high-bandwidth asynchronous (real-time) data interfacing between computers, ... 3.0) is backward compatible with USB 1.1. 6-Channel Audio solution The motherboard uses an onboard audio Codec that enables enhanced graphics performance with digital connectivity to powerful speaker systems. IEEE 1394 support The IEEE 1394 interface provides high-speed and flexible PC connectivity to a wide range of peripherals and devices compliant to...

K8V SE Deluxe User's Manual
Page 19
.... The localized BIOS menus allow you of the system boot status and causes of boot errors, if any. See page 4-12. ASUS K8V SE Deluxe motherboard 1-5 Through an added external speaker, you will hear the messages informing you to open the system chassis and clear the RTC ... hangs due to provide friendly voice messages and alerts during the Power-On Self-Tests (POST). feature of your system with customizable boot logos. ASUS POST Reporter™ The motherboard offers an exciting feature called the ASUS POST Reporter™ to overclocking, C.P.R. See page 3-3. Simply reboot...
.... The localized BIOS menus allow you of the system boot status and causes of boot errors, if any. See page 4-12. ASUS K8V SE Deluxe motherboard 1-5 Through an added external speaker, you will hear the messages informing you to open the system chassis and clear the RTC ... hangs due to provide friendly voice messages and alerts during the Power-On Self-Tests (POST). feature of your system with customizable boot logos. ASUS POST Reporter™ The motherboard offers an exciting feature called the ASUS POST Reporter™ to overclocking, C.P.R. See page 3-3. Simply reboot...

K8V SE Deluxe User's Manual
Page 23
... motherboard, peripherals, and/or components. When lit, this green LED indicates that came with a standby power LED. 2.1 Before you proceed Note of the onboard LED. Onboard LED The motherboard comes with the ...power cable before handling components to avoid damaging them due to static electricity. • Hold components by the edges to avoid touching the ICs on them. • Whenever you uninstall any component, place it on a grounded antistatic pad or in any motherboard component. SB_PWR K8V ® K8V SE Deluxe Onboard LED ON Standby Power OFF Powered Off ASUS K8V SE Deluxe...
... motherboard, peripherals, and/or components. When lit, this green LED indicates that came with a standby power LED. 2.1 Before you proceed Note of the onboard LED. Onboard LED The motherboard comes with the ...power cable before handling components to avoid damaging them due to static electricity. • Hold components by the edges to avoid touching the ICs on them. • Whenever you uninstall any component, place it on a grounded antistatic pad or in any motherboard component. SB_PWR K8V ® K8V SE Deluxe Onboard LED ON Standby Power OFF Powered Off ASUS K8V SE Deluxe...

K8V SE Deluxe User's Manual
Page 24
... do so may damage the motherboard. Place this side towards the rear of your chassis to the chassis. Do not overtighten the screws! Unplug the power cord before installing or removing the motherboard. Doing so may cause you physical injury and damage motherboard components. 2.2.1 Placement direction When installing the motherboard, make...
... do so may damage the motherboard. Place this side towards the rear of your chassis to the chassis. Do not overtighten the screws! Unplug the power cord before installing or removing the motherboard. Doing so may cause you physical injury and damage motherboard components. 2.2.1 Placement direction When installing the motherboard, make...

K8V SE Deluxe User's Manual
Page 25
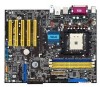
...DDR DIMM1 (64 bit,184-pin module) DDR DIMM2 (64 bit,184-pin module) DDR DIMM3 (64 bit,184-pin module) ATX Power Connector Socket 754 PARALLEL PORT COM1 USBPWR12 Bottom: USB1 USB2 Top: 1394 USBPWR34 PWR_FAN USB2.0 Top: T: USB4 RJ-45 B: USB3 ... Accelerated Graphics Port (AGP) K8V PCI1 CLRTC PCI2 PCI3 CR2032 3V Lithium Cell CMOS Power PCI4 PCI5 ® WIFI USBPWR56 USBPWR78 USB78 USB56 COM2 RAID Promise PDC20378 FLOPPY VIA VT8237 SATA2 PRI_RAID SATA1 SEC_SATA PRI_SATA Super 4Mbit I/O BIOS CHASSIS SB_PWR GAME PANEL CHA_FAN ASUS K8V SE Deluxe motherboard 2-3
...DDR DIMM1 (64 bit,184-pin module) DDR DIMM2 (64 bit,184-pin module) DDR DIMM3 (64 bit,184-pin module) ATX Power Connector Socket 754 PARALLEL PORT COM1 USBPWR12 Bottom: USB1 USB2 Top: 1394 USBPWR34 PWR_FAN USB2.0 Top: T: USB4 RJ-45 B: USB3 ... Accelerated Graphics Port (AGP) K8V PCI1 CLRTC PCI2 PCI3 CR2032 3V Lithium Cell CMOS Power PCI4 PCI5 ® WIFI USBPWR56 USBPWR78 USB78 USB56 COM2 RAID Promise PDC20378 FLOPPY VIA VT8237 SATA2 PRI_RAID SATA1 SEC_SATA PRI_SATA Super 4Mbit I/O BIOS CHASSIS SB_PWR GAME PANEL CHA_FAN ASUS K8V SE Deluxe motherboard 2-3

K8V SE Deluxe User's Manual
Page 26
... 11. Wi-Fi slot Page 2-11 2-17 2-17 2-18 Jumpers 1. S/PDIF out jack 12. AGP slot 4. Clear RTC RAM (3-pin CLRTC) 2. DDR DIMM slots 2. Keyboard power (3-pin KBPWR) 3. USB device wake-up (3-pin USBPWR12, USBPWR34, USBPWR56, USBPWR78) Page 2-19 2-20 2-20 Rear Panel Connectors 1. 2.2.4 Layout Contents Slots 1. Line In jack 6. Line...
... 11. Wi-Fi slot Page 2-11 2-17 2-17 2-18 Jumpers 1. S/PDIF out jack 12. AGP slot 4. Clear RTC RAM (3-pin CLRTC) 2. DDR DIMM slots 2. Keyboard power (3-pin KBPWR) 3. USB device wake-up (3-pin USBPWR12, USBPWR34, USBPWR56, USBPWR78) Page 2-19 2-20 2-20 Rear Panel Connectors 1. 2.2.4 Layout Contents Slots 1. Line In jack 6. Line...

K8V SE Deluxe User's Manual
Page 27
.../MIDI connector (16-1 pin GAME) 20. Reset Switch (Blue 2-pin RESET) - Floppy disk connector (34-1 pin FLOPPY) 4. ATX power connector (20-pin ATXPWR) 12. System Power LED Lead (Green 3-1 pin PLED) - CPU fan connector (3-pin CPU_FAN) 8. Chassis intrusion connector (4-1 pin CHASSIS) 21. Chassis fan ... (4-pin AUX) 16. ATA 12V power connector (4-pin ATX12V) 13. Hard Disk Activity LED (Red 2-pin IDE_LED) Page 2-22 2-22 2-23 2-23 2-24 2-25 2-26 2-26 2-26 2-26 2-27 2-27 2-28 2-29 2-29 2-29 2-30 2-30 2-31 2-31 2-32 ASUS K8V SE Deluxe motherboard 2-5 Secondary IDE connector (40...
.../MIDI connector (16-1 pin GAME) 20. Reset Switch (Blue 2-pin RESET) - Floppy disk connector (34-1 pin FLOPPY) 4. ATX power connector (20-pin ATXPWR) 12. System Power LED Lead (Green 3-1 pin PLED) - CPU fan connector (3-pin CPU_FAN) 8. Chassis intrusion connector (4-1 pin CHASSIS) 21. Chassis fan ... (4-pin AUX) 16. ATA 12V power connector (4-pin ATX12V) 13. Hard Disk Activity LED (Red 2-pin IDE_LED) Page 2-22 2-22 2-23 2-23 2-24 2-25 2-26 2-26 2-26 2-26 2-27 2-27 2-28 2-29 2-29 2-29 2-30 2-30 2-31 2-31 2-32 ASUS K8V SE Deluxe motherboard 2-5 Secondary IDE connector (40...

K8V SE Deluxe User's Manual
Page 35
...HYS64D6320HU-5-C Infineon DS 512M Samsung M368L6432ETM-CCC Samsung DS 256M ATP AG32L64T8SQC4S Samsung SS 256M Brain Power B6U808-256M-SAM-400 Samsung SS 512M Brain Power B6U808-512M-SAM-400 Samsung DS 512M Apacer 77.10736.464 Samsung DS 256M ADATA MDOSS6F3G31YK1EZZ ...D43 W942508CH-5 W942508BH-5 W942508BH-5 TMD7608F8E50D A2S56D30ATP KDL388P4EA-50 KDL388P4EA-50A Visit the ASUS website (www.asus.com) for the latest DDR 400 Qualified Vendor List for use with this motherboard. ASUS K8V SE Deluxe motherboard 2-13 DDR Qualified Vendors List The following table lists the PC3200 (...
...HYS64D6320HU-5-C Infineon DS 512M Samsung M368L6432ETM-CCC Samsung DS 256M ATP AG32L64T8SQC4S Samsung SS 256M Brain Power B6U808-256M-SAM-400 Samsung SS 512M Brain Power B6U808-512M-SAM-400 Samsung DS 512M Apacer 77.10736.464 Samsung DS 256M ADATA MDOSS6F3G31YK1EZZ ...D43 W942508CH-5 W942508BH-5 W942508BH-5 TMD7608F8E50D A2S56D30ATP KDL388P4EA-50 KDL388P4EA-50A Visit the ASUS website (www.asus.com) for the latest DDR 400 Qualified Vendor List for use with this motherboard. ASUS K8V SE Deluxe motherboard 2-13 DDR Qualified Vendors List The following table lists the PC3200 (...

K8V SE Deluxe User's Manual
Page 36
... the DIMM lightly with a notch so that the notch on the DIMM matches the break on the socket. 2.4.3 Installing a DIMM Make sure to unplug the power supply before adding or removing DIMMs or other system components.
... the DIMM lightly with a notch so that the notch on the DIMM matches the break on the socket. 2.4.3 Installing a DIMM Make sure to unplug the power supply before adding or removing DIMMs or other system components.
K8V SE Deluxe User's Manual
Page 37
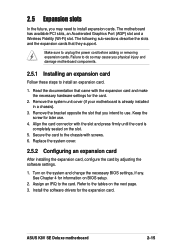
... to the chassis with the expansion card and make the necessary hardware settings for later use . Assign an IRQ to unplug the power cord before adding or removing expansion cards. ASUS K8V SE Deluxe motherboard 2-15 Failure to do so may cause you may need to install expansion cards. Replace the system cover. 2.5.2 Configuring an...
... to the chassis with the expansion card and make the necessary hardware settings for later use . Assign an IRQ to unplug the power cord before adding or removing expansion cards. ASUS K8V SE Deluxe motherboard 2-15 Failure to do so may cause you may need to install expansion cards. Replace the system cover. 2.5.2 Configuring an...

K8V SE Deluxe User's Manual
Page 41
To erase the RTC RAM: 1. Move the jumper from pins 1-2 (default) to pins 1-2. 4. CLRTC K8V 2 1 ® Normal (Default) K8V SE Deluxe Clear RTC RAM 3 2 Clear CMOS ASUS K8V SE Deluxe motherboard 2-19 You can clear the CMOS memory of date, time, and system setup parameters by the onboard button cell battery. Remove the onboard battery....clear the Real Time Clock (RTC) RAM in data. The RAM data in CMOS, that include system setup information such as system passwords, is powered by erasing the CMOS RTC RAM data. Replace the battery. 5. Turn OFF the computer and unplug the...
To erase the RTC RAM: 1. Move the jumper from pins 1-2 (default) to pins 1-2. 4. CLRTC K8V 2 1 ® Normal (Default) K8V SE Deluxe Clear RTC RAM 3 2 Clear CMOS ASUS K8V SE Deluxe motherboard 2-19 You can clear the CMOS memory of date, time, and system setup parameters by the onboard button cell battery. Remove the onboard battery....clear the Real Time Clock (RTC) RAM in data. The RAM data in CMOS, that include system setup information such as system passwords, is powered by erasing the CMOS RTC RAM data. Replace the battery. 5. Turn OFF the computer and unplug the...

K8V SE Deluxe User's Manual
Page 42
... in the BIOS (See section "4.5.5 APM Configuration"). Set to +5VSB to wake up feature. KBPWR 12 23 +5V +5VSB (Default) K8V ® K8V SE Deluxe Keyboard Power Setting 3. Otherwise, the system would not power up feature requires a power supply that can provide 500mA on the +5VSB lead for each USB port. USBPWR12 USBPWR34 2 1 +5V (Default) 3 2 +5VSB 12...
... in the BIOS (See section "4.5.5 APM Configuration"). Set to +5VSB to wake up feature. KBPWR 12 23 +5V +5VSB (Default) K8V ® K8V SE Deluxe Keyboard Power Setting 3. Otherwise, the system would not power up feature requires a power supply that can provide 500mA on the +5VSB lead for each USB port. USBPWR12 USBPWR34 2 1 +5V (Default) 3 2 +5VSB 12...

K8V SE Deluxe User's Manual
Page 48
...may damage the motherboard components. Connect the fan cables to the fan connectors on the fan connectors! These are not jumpers! CPU, Power and Chassis Fan Connectors (3-pin CPU_FAN, PWR_FAN, CHA_FAN) The fan connectors support cooling fans of 350mA~740mA (8.88W max.) or ...the bracket into a slot opening at +12V. CPU_FAN Rotation +12V GND PWR_FAN Rotation K8V +12V GND ® K8V SE Deluxe 12-Volt Fan Connectors CHA_FAN GND +12V Rotation 7. COM2 PIN 1 K8V ® K8V SE Deluxe Serial COM2 Bracket The serial port bracket is purchased separately. 2-26 Chapter 2: Hardware information...
...may damage the motherboard components. Connect the fan cables to the fan connectors on the fan connectors! These are not jumpers! CPU, Power and Chassis Fan Connectors (3-pin CPU_FAN, PWR_FAN, CHA_FAN) The fan connectors support cooling fans of 350mA~740mA (8.88W max.) or ...the bracket into a slot opening at +12V. CPU_FAN Rotation +12V GND PWR_FAN Rotation K8V +12V GND ® K8V SE Deluxe 12-Volt Fan Connectors CHA_FAN GND +12V Rotation 7. COM2 PIN 1 K8V ® K8V SE Deluxe Serial COM2 Bracket The serial port bracket is purchased separately. 2-26 Chapter 2: Hardware information...

K8V SE Deluxe User's Manual
Page 49
... COM +5.0VDC COM +3.3VDC +3.3VDC +5.0VDC +12V DC +5.0VDC -5.0VDC GND COM COM COM PS_ON# COM -12.0VDC +3.3VDC +12V DC GND K8V SE Deluxe ATX Power Connectors ASUS K8V SE Deluxe motherboard 2-27 ATX power connectors (20-pin ATXPWR, 4-pin ATX12V) These connectors connect to fit these connectors in only one orientation. Otherwise, the system does not boot...
... COM +5.0VDC COM +3.3VDC +3.3VDC +5.0VDC +12V DC +5.0VDC -5.0VDC GND COM COM COM PS_ON# COM -12.0VDC +3.3VDC +12V DC GND K8V SE Deluxe ATX Power Connectors ASUS K8V SE Deluxe motherboard 2-27 ATX power connectors (20-pin ATXPWR, 4-pin ATX12V) These connectors connect to fit these connectors in only one orientation. Otherwise, the system does not boot...


