
K8V SE Deluxe User's Manual
Page 1
Motherboard K8V SE Deluxe User Guide
Motherboard K8V SE Deluxe User Guide

K8V SE Deluxe User's Manual
Page 3
... Where to find more information ix Conventions used in this guide x Typography x K8V SE Deluxe specifications summary xi Chapter 1: Product introduction 1.1 Welcome 1-1 1.2 Package contents 1-1 1.3 Special features 1-2 1.3.1 Product Highlights 1-2 1.3.2 Unique ASUS features 1-4 Chapter 2: Hardware information 2.1 Before you proceed 2-1 2.2 Motherboard overview 2-2 2.2.1 Placement direction 2-2 2.2.2 Screw holes 2-2 2.2.3 Motherboard layout 2-3 2.2.4 Layout Contents 2-4 2.3 Central Processing Unit (CPU 2-6 2.3.1 Overview 2-6 2.3.2 Installing the CPU 2-6 2.3.3 Installing...
... Where to find more information ix Conventions used in this guide x Typography x K8V SE Deluxe specifications summary xi Chapter 1: Product introduction 1.1 Welcome 1-1 1.2 Package contents 1-1 1.3 Special features 1-2 1.3.1 Product Highlights 1-2 1.3.2 Unique ASUS features 1-4 Chapter 2: Hardware information 2.1 Before you proceed 2-1 2.2 Motherboard overview 2-2 2.2.1 Placement direction 2-2 2.2.2 Screw holes 2-2 2.2.3 Motherboard layout 2-3 2.2.4 Layout Contents 2-4 2.3 Central Processing Unit (CPU 2-6 2.3.1 Overview 2-6 2.3.2 Installing the CPU 2-6 2.3.3 Installing...

K8V SE Deluxe User's Manual
Page 8
... system before you encounter technical problems with the package. • Before using an adapter or extension cord. Operation safety • Before installing the motherboard and adding devices on it may become wet. • Place the product on a stable surface. • If you add a device. &#...8226; Before connecting or removing signal cables from the motherboard, ensure that all power cables are unplugged. • Seek professional assistance before using the product, make sure all the manuals that came with ...
... system before you encounter technical problems with the package. • Before using an adapter or extension cord. Operation safety • Before installing the motherboard and adding devices on it may become wet. • Place the product on a stable surface. • If you add a device. &#...8226; Before connecting or removing signal cables from the motherboard, ensure that all power cables are unplugged. • Seek professional assistance before using the product, make sure all the manuals that came with ...

K8V SE Deluxe User's Manual
Page 9
.... • Chapter 2: Hardware information This chapter lists the hardware setup procedures that comes with the motherboard package. ASUS websites The ASUS website provides updated information on the motherboard. • Chapter 3: Powering up This chapter describes the power up sequence, the vocal POST messages... information and for product and software updates. 1. It includes description of the support CD that you need when installing the motherboard. Where to find more information Refer to change system settings through the BIOS Setup menus. These documents are also provided. ...
.... • Chapter 2: Hardware information This chapter lists the hardware setup procedures that comes with the motherboard package. ASUS websites The ASUS website provides updated information on the motherboard. • Chapter 3: Powering up This chapter describes the power up sequence, the vocal POST messages... information and for product and software updates. 1. It includes description of the support CD that you need when installing the motherboard. Where to find more information Refer to change system settings through the BIOS Setup menus. These documents are also provided. ...

K8V SE Deluxe User's Manual
Page 13
Product introduction Chapter 1 This chapter describes the motherboard features and the new technologies it supports.
Product introduction Chapter 1 This chapter describes the motherboard features and the new technologies it supports.

K8V SE Deluxe User's Manual
Page 14
Chapter summary 1.1 Welcome 1-1 1.2 Package contents 1-1 1.3 Special features 1-2 ASUS K8V SE Deluxe motherboard
Chapter summary 1.1 Welcome 1-1 1.2 Package contents 1-1 1.3 Special features 1-2 ASUS K8V SE Deluxe motherboard

K8V SE Deluxe User's Manual
Page 15
...shield Bag of extra jumper caps User guide If any of ASUS quality motherboards! The motherboard combines the powers of the AMD Athlon™ 64 processor and the VIA K8T800 chipset to 3GB of power computing! ASUS K8V SE Deluxe motherboard 1-1 Supporting up to set a new benchmark for an effective... desktop platform solution. The motherboard delivers a host of new features and latest technologies making it , check the ...
...shield Bag of extra jumper caps User guide If any of ASUS quality motherboards! The motherboard combines the powers of the AMD Athlon™ 64 processor and the VIA K8T800 chipset to 3GB of power computing! ASUS K8V SE Deluxe motherboard 1-1 Supporting up to set a new benchmark for an effective... desktop platform solution. The motherboard delivers a host of new features and latest technologies making it , check the ...

K8V SE Deluxe User's Manual
Page 16
... the Serial ATA (SATA) specification, an evolutionary replacement of the Parallel ATA storage interface. Dual Serial ATA RAID The motherboard provides two high-performance Serial ATA RAID controllers that dynamically and automatically changes the CPU speed, voltage and amount of power...64-bit architecture, which represents the landmark introduction of the industry's first x86-64 technology. AMD Cool 'n' Quiet!™ Technology The motherboard supports the AMD Cool 'n' Quiet!™ Technology that enhance hard disk performance and data backup protection without the cost of additional RAID...
... the Serial ATA (SATA) specification, an evolutionary replacement of the Parallel ATA storage interface. Dual Serial ATA RAID The motherboard provides two high-performance Serial ATA RAID controllers that dynamically and automatically changes the CPU speed, voltage and amount of power...64-bit architecture, which represents the landmark introduction of the industry's first x86-64 technology. AMD Cool 'n' Quiet!™ Technology The motherboard supports the AMD Cool 'n' Quiet!™ Technology that enhance hard disk performance and data backup protection without the cost of additional RAID...

K8V SE Deluxe User's Manual
Page 17
...fast storage units. AGP 8X support AGP 8X (AGP 3.0) is backward compatible with USB 1.1. 6-Channel Audio solution The motherboard uses an onboard audio Codec that enables enhanced graphics performance with digital connectivity to powerful speaker systems. IEEE 1394 support ...is the VGA interface specification that lets you enjoy high-quality 6-channel audio without having to eight USB 2.0 ports. ASUS K8V SE Deluxe motherboard 1-3 S/PDIF out The motherboard's S/PDIF out function turns your computer into a high-end entertainment system with maximum bandwidth speed of devices such as...
...fast storage units. AGP 8X support AGP 8X (AGP 3.0) is backward compatible with USB 1.1. 6-Channel Audio solution The motherboard uses an onboard audio Codec that enables enhanced graphics performance with digital connectivity to powerful speaker systems. IEEE 1394 support ...is the VGA interface specification that lets you enjoy high-quality 6-channel audio without having to eight USB 2.0 ports. ASUS K8V SE Deluxe motherboard 1-3 S/PDIF out The motherboard's S/PDIF out function turns your computer into a high-end entertainment system with maximum bandwidth speed of devices such as...

K8V SE Deluxe User's Manual
Page 18
...) to save the extra cost of three ASUS intelligent solutions: Q-Fan, POST Reporter, and CrashFree BIOS 2. See page 5-12. ASUS Q-Fan technology The ASUS Q-Fan technology smartly adjusts the fan speeds according to the system loading to provide a single-chip solution for LAN on Motherboard (LOM) applications. See page 4-5. 1-4 Chapter...BIOS solution The AI BIOS is a combination of a stand-alone AP. See page 4-32. 1.3.2 Unique ASUS features ASUS Wi-Fi slot The ASUS Wi-Fi slot is designed for the ASUS WiFi-b™ add-on card to set up to 100 meters. In addition, the card comes with the ...
...) to save the extra cost of three ASUS intelligent solutions: Q-Fan, POST Reporter, and CrashFree BIOS 2. See page 5-12. ASUS Q-Fan technology The ASUS Q-Fan technology smartly adjusts the fan speeds according to the system loading to provide a single-chip solution for LAN on Motherboard (LOM) applications. See page 4-5. 1-4 Chapter...BIOS solution The AI BIOS is a combination of a stand-alone AP. See page 4-32. 1.3.2 Unique ASUS features ASUS Wi-Fi slot The ASUS Wi-Fi slot is designed for the ASUS WiFi-b™ add-on card to set up to 100 meters. In addition, the card comes with the ...

K8V SE Deluxe User's Manual
Page 19
... booting the system to select the language of boot errors, if any. Just press the ASUS Instant Music special function keys and enjoy the music! See pages 4-28, 5-9. ASUS K8V SE Deluxe motherboard 1-5 Simply reboot the system and the BIOS shows the previous setting so users can easily... voice messages and alerts during the Power-On Self-Tests (POST). eliminates the need to overclocking. ASUS POST Reporter™ The motherboard offers an exciting feature called the ASUS POST Reporter™ to customize the voice messages, and provides multi-language support. Through an added ...
... booting the system to select the language of boot errors, if any. Just press the ASUS Instant Music special function keys and enjoy the music! See pages 4-28, 5-9. ASUS K8V SE Deluxe motherboard 1-5 Simply reboot the system and the BIOS shows the previous setting so users can easily... voice messages and alerts during the Power-On Self-Tests (POST). eliminates the need to overclocking. ASUS POST Reporter™ The motherboard offers an exciting feature called the ASUS POST Reporter™ to customize the voice messages, and provides multi-language support. Through an added ...

K8V SE Deluxe User's Manual
Page 21
Chapter 2 This chapter lists the hardware setup procedures that you have to perform when installing system components. Hardware information It includes description of the jumpers and connectors on the motherboard.
Chapter 2 This chapter lists the hardware setup procedures that you have to perform when installing system components. Hardware information It includes description of the jumpers and connectors on the motherboard.

K8V SE Deluxe User's Manual
Page 22
Chapter summary 2.1 Before you proceed 2-1 2.2 Motherboard overview 2-2 2.3 Central Processing Unit (CPU 2-6 2.4 System memory 2-11 2.5 Expansion slots 2-15 2.6 Jumpers 2-19 2.7 Connectors 2-21 ASUS K8V SE Deluxe motherboard
Chapter summary 2.1 Before you proceed 2-1 2.2 Motherboard overview 2-2 2.3 Central Processing Unit (CPU 2-6 2.4 System memory 2-11 2.5 Expansion slots 2-15 2.6 Jumpers 2-19 2.7 Connectors 2-21 ASUS K8V SE Deluxe motherboard

K8V SE Deluxe User's Manual
Page 23
...8226; Hold components by the edges to the motherboard, peripherals, and/or components. SB_PWR K8V ® K8V SE Deluxe Onboard LED ON Standby Power OFF Powered Off ASUS K8V SE Deluxe motherboard 2-1 2.1 Before you proceed Note of the onboard LED. Onboard LED The motherboard comes with the component. • Before you... with a standby power LED. The illustration below shows the location of the following precautions before you install motherboard components or change any motherboard settings. • Unplug the power cord from the power supply. Failure to do so may cause severe...
...8226; Hold components by the edges to the motherboard, peripherals, and/or components. SB_PWR K8V ® K8V SE Deluxe Onboard LED ON Standby Power OFF Powered Off ASUS K8V SE Deluxe motherboard 2-1 2.1 Before you proceed Note of the onboard LED. Onboard LED The motherboard comes with the component. • Before you... with a standby power LED. The illustration below shows the location of the following precautions before you install motherboard components or change any motherboard settings. • Unplug the power cord from the power supply. Failure to do so may cause severe...

K8V SE Deluxe User's Manual
Page 24
... chassis 2-2 Chapter 2: Hardware information Unplug the power cord before installing or removing the motherboard. Do not overtighten the screws! Failure to do so may damage the motherboard. Doing so may cause you place it . 2.2 Motherboard overview Before you install the motherboard, study the configuration of your chassis to ensure that you physical injury and...
... chassis 2-2 Chapter 2: Hardware information Unplug the power cord before installing or removing the motherboard. Do not overtighten the screws! Failure to do so may damage the motherboard. Doing so may cause you place it . 2.2 Motherboard overview Before you install the motherboard, study the configuration of your chassis to ensure that you physical injury and...

K8V SE Deluxe User's Manual
Page 25
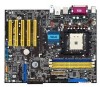
PRI_IDE SEC_IDE 30.5cm (12.0in) 2.2.3 Motherboard layout 24.5cm (9.6in) PS/2KBMS T: Mouse B: Keyboard KBPWR ATX12V CPU_FAN SPDIF_O DDR DIMM1 (64 bit,184-pin module) DDR DIMM2 (64 bit,184-pin ... Gigabit LAN SPDIF_OUT CD Audio Codec AUX FP_AUDIO Accelerated Graphics Port (AGP) K8V PCI1 CLRTC PCI2 PCI3 CR2032 3V Lithium Cell CMOS Power PCI4 PCI5 ® WIFI USBPWR56 USBPWR78 USB78 USB56 COM2 RAID Promise PDC20378 FLOPPY VIA VT8237 SATA2 PRI_RAID SATA1 SEC_SATA PRI_SATA Super 4Mbit I/O BIOS CHASSIS SB_PWR GAME PANEL CHA_FAN ASUS K8V SE Deluxe motherboard 2-3
PRI_IDE SEC_IDE 30.5cm (12.0in) 2.2.3 Motherboard layout 24.5cm (9.6in) PS/2KBMS T: Mouse B: Keyboard KBPWR ATX12V CPU_FAN SPDIF_O DDR DIMM1 (64 bit,184-pin module) DDR DIMM2 (64 bit,184-pin ... Gigabit LAN SPDIF_OUT CD Audio Codec AUX FP_AUDIO Accelerated Graphics Port (AGP) K8V PCI1 CLRTC PCI2 PCI3 CR2032 3V Lithium Cell CMOS Power PCI4 PCI5 ® WIFI USBPWR56 USBPWR78 USB78 USB56 COM2 RAID Promise PDC20378 FLOPPY VIA VT8237 SATA2 PRI_RAID SATA1 SEC_SATA PRI_SATA Super 4Mbit I/O BIOS CHASSIS SB_PWR GAME PANEL CHA_FAN ASUS K8V SE Deluxe motherboard 2-3

K8V SE Deluxe User's Manual
Page 27
... (Red 2-pin IDE_LED) Page 2-22 2-22 2-23 2-23 2-24 2-25 2-26 2-26 2-26 2-26 2-27 2-27 2-28 2-29 2-29 2-29 2-30 2-30 2-31 2-31 2-32 ASUS K8V SE Deluxe motherboard 2-5 Serial ATA connectors (7-pin SATA1, SATA2) 6. Serial Port 2 connector (10-1 pin COM2) 11. IEEE 1394 connector (10-1 pin IE1394_1) 17. System Warning Speaker Lead (Orange...
... (Red 2-pin IDE_LED) Page 2-22 2-22 2-23 2-23 2-24 2-25 2-26 2-26 2-26 2-26 2-27 2-27 2-28 2-29 2-29 2-29 2-30 2-30 2-31 2-31 2-32 ASUS K8V SE Deluxe motherboard 2-5 Serial ATA connectors (7-pin SATA1, SATA2) 6. Serial Port 2 connector (10-1 pin COM2) 11. IEEE 1394 connector (10-1 pin IE1394_1) 17. System Warning Speaker Lead (Orange...
K8V SE Deluxe User's Manual
Page 28
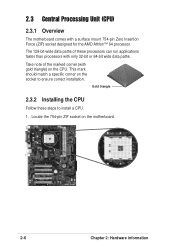
... the CPU Follow these processors can run applications faster than processors with gold triangle) on the CPU. This mark should match a specific corner on the motherboard. 2-6 Chapter 2: Hardware information Locate the 754-pin ZIF socket on the socket to install a CPU. 1. Take note of these steps to ensure correct installation. 2.3 Central...
... the CPU Follow these processors can run applications faster than processors with gold triangle) on the CPU. This mark should match a specific corner on the motherboard. 2-6 Chapter 2: Hardware information Locate the 754-pin ZIF socket on the socket to install a CPU. 1. Take note of these steps to ensure correct installation. 2.3 Central...

K8V SE Deluxe User's Manual
Page 29
... into the socket until it is lifted up to indicate that the CPU corner with the gold triangle matches the socket corner with a small triangle. 4. ASUS K8V SE Deluxe motherboard 2-7 Position the CPU above the socket such that it fits in one correct orientation. Small triangle Gold triangle The CPU fits only in place. Carefully...
... into the socket until it is lifted up to indicate that the CPU corner with the gold triangle matches the socket corner with a small triangle. 4. ASUS K8V SE Deluxe motherboard 2-7 Position the CPU above the socket such that it fits in one correct orientation. Small triangle Gold triangle The CPU fits only in place. Carefully...

K8V SE Deluxe User's Manual
Page 30
Place the heatsink on the motherboard upon purchase. • You do not match the CPU documentation, follow the latter. 2-8 Chapter 2: Hardware information Make sure that the heatsink fits properly on the ... condition and performance. If the instructions in this section do not have to remove the retention module base when installing the CPU or installing other motherboard components. CPU Fan CPU Heatsink Retention Module Base Retention bracket Retention bracket lock Your boxed CPU heatsink and fan assembly should come with installation instructions...
Place the heatsink on the motherboard upon purchase. • You do not match the CPU documentation, follow the latter. 2-8 Chapter 2: Hardware information Make sure that the heatsink fits properly on the ... condition and performance. If the instructions in this section do not have to remove the retention module base when installing the CPU or installing other motherboard components. CPU Fan CPU Heatsink Retention Module Base Retention bracket Retention bracket lock Your boxed CPU heatsink and fan assembly should come with installation instructions...


