
K8V SE Deluxe User's Manual
Page 3
... How this guide is organized ix Where to find more information ix Conventions used in this guide x Typography x K8V SE Deluxe specifications summary xi Chapter 1: Product introduction 1.1 Welcome 1-1 1.2 Package contents 1-1 1.3 Special features 1-2 1.3.1 Product Highlights 1-2 1.3.2 Unique ASUS features 1-4 Chapter 2: Hardware information 2.1 Before you proceed 2-1 2.2 Motherboard overview 2-2 2.2.1 Placement direction 2-2 2.2.2 Screw holes 2-2 2.2.3 Motherboard layout 2-3 2.2.4 Layout Contents 2-4 2.3 Central...
... How this guide is organized ix Where to find more information ix Conventions used in this guide x Typography x K8V SE Deluxe specifications summary xi Chapter 1: Product introduction 1.1 Welcome 1-1 1.2 Package contents 1-1 1.3 Special features 1-2 1.3.1 Product Highlights 1-2 1.3.2 Unique ASUS features 1-4 Chapter 2: Hardware information 2.1 Before you proceed 2-1 2.2 Motherboard overview 2-2 2.2.1 Placement direction 2-2 2.2.2 Screw holes 2-2 2.2.3 Motherboard layout 2-3 2.2.4 Layout Contents 2-4 2.3 Central...

K8V SE Deluxe User's Manual
Page 11
... Memory 3 x 184-pin DDR DIMM sockets for AMD Athlon™ 64 processor with RAID 0, RAID 1 Promise® PDC20378 RAID controller - 1 x UltraDMA133 supports two hard drives - 2 x Serial ATA connectors - K8V SE Deluxe specifications summary CPU Socket 754 for up to 300 MHz at 1 MHz increment Adjustable FSB/DDR ratio ASUS JumperFree ASUS C.P.R. (CPU Parameter Recall) Special features ASUS...
... Memory 3 x 184-pin DDR DIMM sockets for AMD Athlon™ 64 processor with RAID 0, RAID 1 Promise® PDC20378 RAID controller - 1 x UltraDMA133 supports two hard drives - 2 x Serial ATA connectors - K8V SE Deluxe specifications summary CPU Socket 754 for up to 300 MHz at 1 MHz increment Adjustable FSB/DDR ratio ASUS JumperFree ASUS C.P.R. (CPU Parameter Recall) Special features ASUS...

K8V SE Deluxe User's Manual
Page 15
...new benchmark for buying the ASUS® K8V SE Deluxe motherboard! The motherboard delivers a host of new features and latest technologies making it , check the items in the world of the AMD Athlon™ 64 processor and the VIA K8T800 chipset to 3GB of system memory with cable 1 x Single...(Retail boxes only) Instant Music label (Retail boxes only) I/O shield Bag of extra jumper caps User guide If any of ASUS quality motherboards! ASUS K8V SE Deluxe motherboard 1-1 Thank you ahead in your package with the list below. 1.2 Package contents Check your retailer. 1.1 Welcome! The ...
...new benchmark for buying the ASUS® K8V SE Deluxe motherboard! The motherboard delivers a host of new features and latest technologies making it , check the items in the world of the AMD Athlon™ 64 processor and the VIA K8T800 chipset to 3GB of system memory with cable 1 x Single...(Retail boxes only) Instant Music label (Retail boxes only) I/O shield Bag of extra jumper caps User guide If any of ASUS quality motherboards! ASUS K8V SE Deluxe motherboard 1-1 Thank you ahead in your package with the list below. 1.2 Package contents Check your retailer. 1.1 Welcome! The ...

K8V SE Deluxe User's Manual
Page 22
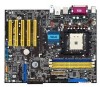
Chapter summary 2.1 Before you proceed 2-1 2.2 Motherboard overview 2-2 2.3 Central Processing Unit (CPU 2-6 2.4 System memory 2-11 2.5 Expansion slots 2-15 2.6 Jumpers 2-19 2.7 Connectors 2-21 ASUS K8V SE Deluxe motherboard
Chapter summary 2.1 Before you proceed 2-1 2.2 Motherboard overview 2-2 2.3 Central Processing Unit (CPU 2-6 2.4 System memory 2-11 2.5 Expansion slots 2-15 2.6 Jumpers 2-19 2.7 Connectors 2-21 ASUS K8V SE Deluxe motherboard

K8V SE Deluxe User's Manual
Page 33
The following figure illustrates the location of the recommended configurations in this section. ASUS K8V SE Deluxe motherboard 2-11 DIMM1 DIMM2 DIMM3 104 Pins 80 Pins K8V ® K8V SE Deluxe 184-Pin DDR DIMM Sockets 2.4.2 Memory configurations You may cause memory sizing error or system boot failure. 2.4 System memory 2.4.1 Overview The motherboard comes with the same CAS Latency. For optimum compatibility...
The following figure illustrates the location of the recommended configurations in this section. ASUS K8V SE Deluxe motherboard 2-11 DIMM1 DIMM2 DIMM3 104 Pins 80 Pins K8V ® K8V SE Deluxe 184-Pin DDR DIMM Sockets 2.4.2 Memory configurations You may cause memory sizing error or system boot failure. 2.4 System memory 2.4.1 Overview The motherboard comes with the same CAS Latency. For optimum compatibility...

K8V SE Deluxe User's Manual
Page 34
Single Side - Single Side - Double Side - Table 1 Recommended memory configurations Number of DIMMs DIMM1 1 Single Side 1 - 1 - 1 Double Side 1 - 1 - 2 Single Side 2 Single Side 2 Single Side 2 Single Side 2 Double Side 2 Double Side 2 Double Side 2 - 2 - 2 - 2 - 2 Double Side 3 ...
Single Side - Single Side - Double Side - Table 1 Recommended memory configurations Number of DIMMs DIMM1 1 Single Side 1 - 1 - 1 Double Side 1 - 1 - 2 Single Side 2 Single Side 2 Single Side 2 Single Side 2 Double Side 2 Double Side 2 Double Side 2 - 2 - 2 - 2 - 2 Double Side 3 ...

K8V SE Deluxe User's Manual
Page 35
Obtain DDR DIMMs only from ASUS qualified vendors for this motherboard. Table 2 DDR400 Qualified Vendors List Size Vendor Model Chip Brand SS/DS Chip 256M Micron MT8VDDT3264AG-40BC4 Micron SS 256M...W942508CH-5 W942508BH-5 W942508BH-5 TMD7608F8E50D A2S56D30ATP KDL388P4EA-50 KDL388P4EA-50A Visit the ASUS website (www.asus.com) for the latest DDR 400 Qualified Vendor List for better system performance. ASUS K8V SE Deluxe motherboard 2-13 DDR Qualified Vendors List The following table lists the PC3200 (DDR400) memory modules that have been tested and qualified for use with this...
Obtain DDR DIMMs only from ASUS qualified vendors for this motherboard. Table 2 DDR400 Qualified Vendors List Size Vendor Model Chip Brand SS/DS Chip 256M Micron MT8VDDT3264AG-40BC4 Micron SS 256M...W942508CH-5 W942508BH-5 W942508BH-5 TMD7608F8E50D A2S56D30ATP KDL388P4EA-50 KDL388P4EA-50A Visit the ASUS website (www.asus.com) for the latest DDR 400 Qualified Vendor List for better system performance. ASUS K8V SE Deluxe motherboard 2-13 DDR Qualified Vendors List The following table lists the PC3200 (DDR400) memory modules that have been tested and qualified for use with this...

K8V SE Deluxe User's Manual
Page 41
... or key-in data. CLRTC K8V 2 1 ® Normal (Default) K8V SE Deluxe Clear RTC RAM 3 2 Clear CMOS ASUS K8V SE Deluxe motherboard 2-19 Plug the power cord and turn ON the computer. 6. Keep the cap on pins 2-3 for about 5~10 seconds, then move the cap back to pins 2-3. You can clear the CMOS memory of date, time, and system...
... or key-in data. CLRTC K8V 2 1 ® Normal (Default) K8V SE Deluxe Clear RTC RAM 3 2 Clear CMOS ASUS K8V SE Deluxe motherboard 2-19 Plug the power cord and turn ON the computer. 6. Keep the cap on pins 2-3 for about 5~10 seconds, then move the cap back to pins 2-3. You can clear the CMOS memory of date, time, and system...
K8V SE Deluxe User's Manual
Page 59
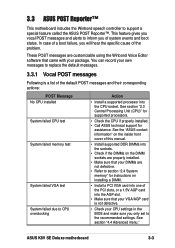
...POST messages and their corresponding actions: POST Message No CPU installed System failed CPU test System failed memory test System failed VGA test System failed due to section "2.4 System memory" for assistance. You can record your DIMMs are properly installed. • Make sure that ...PCI VGA card into the AGP slot. • Make sure that your own messages to support a special feature called the ASUS POST Reporter™. See section "4.4 Advanced menu." ASUS K8V SE Deluxe motherboard 3-3 In case of a boot failure, you will hear the specific cause of the PCI slots, or a 1.5V ...
...POST messages and their corresponding actions: POST Message No CPU installed System failed CPU test System failed memory test System failed VGA test System failed due to section "2.4 System memory" for assistance. You can record your DIMMs are properly installed. • Make sure that ...PCI VGA card into the AGP slot. • Make sure that your own messages to support a special feature called the ASUS POST Reporter™. See section "4.4 Advanced menu." ASUS K8V SE Deluxe motherboard 3-3 In case of a boot failure, you will hear the specific cause of the PCI slots, or a 1.5V ...

K8V SE Deluxe User's Manual
Page 77
...Enter to display a pop-up window with a sub-menu on any menu screen is a brief description of the menu screen is distinguished by SPD Memory Acceleration Mode DRAM Idle Timer DRAm Refresh Rate [Enabled] [Auto] [Auto] [Auto] Graphic Adapter Priority Graphics Aperture Size Spread Spectrum [AGP/PCI... by a solid triangle before the item. Press Pop-up window Select a menu item then press Enter to display a list of options. ASUS K8V SE Deluxe motherboard 4-11 4.2.4 Menu items The highlighted item on the menu bar displays the specific items for that do not fit on the screen. ...
...Enter to display a pop-up window with a sub-menu on any menu screen is a brief description of the menu screen is distinguished by SPD Memory Acceleration Mode DRAM Idle Timer DRAm Refresh Rate [Enabled] [Auto] [Auto] [Auto] Graphic Adapter Priority Graphics Aperture Size Spread Spectrum [AGP/PCI... by a solid triangle before the item. Press Pop-up window Select a menu item then press Enter to display a list of options. ASUS K8V SE Deluxe motherboard 4-11 4.2.4 Menu items The highlighted item on the menu bar displays the specific items for that do not fit on the screen. ...

K8V SE Deluxe User's Manual
Page 80
... overview of the general system specifications. Configuration options: [Auto] [Disabled] [Enabled] 32Bit Data Transfer [Disabled] Enables or disables 32-bit data transfer. System Memory Displays the auto-detected system memory. 4-14 Chapter 4: BIOS Setup Configuration options: [Auto] [SWDMA0] [SWDMA1] [SWDMA2] [MWDMA0] [MWDMA1] [MWDMA2] [UDMA0] [UDMA1] [UDMA2] [..., Analysis, and Reporting Technology. AMI BIOS Version Build Date ID : 08.00.08 : 08/04/03 : K8V_031 System Memory Size : 256MB AMI BIOS Displays the auto-detected BIOS information. PIO Mode [Auto] Selects the PIO mode.
... overview of the general system specifications. Configuration options: [Auto] [Disabled] [Enabled] 32Bit Data Transfer [Disabled] Enables or disables 32-bit data transfer. System Memory Displays the auto-detected system memory. 4-14 Chapter 4: BIOS Setup Configuration options: [Auto] [SWDMA0] [SWDMA1] [SWDMA2] [MWDMA0] [MWDMA1] [MWDMA2] [UDMA0] [UDMA1] [UDMA2] [..., Analysis, and Reporting Technology. AMI BIOS Version Build Date ID : 08.00.08 : 08/04/03 : K8V_031 System Memory Size : 256MB AMI BIOS Displays the auto-detected BIOS information. PIO Mode [Auto] Selects the PIO mode.

K8V SE Deluxe User's Manual
Page 81
... the system to change the settings for the CPU and other system devices. HyperTransport(HT) Configuration Memory Configuration AMD Cool & Quiet Configuration Processor Type : AMD Athlon(tm) 64 Processor 3200+ Speed : 2000MHz HyperTransport Configuration Options ASUS K8V SE Deluxe motherboard 4-15 CPU Configuration Chipset Onboard Devices Configuration PCI PnP JumperFree Configuration Speech Configuration Instant Music...
... the system to change the settings for the CPU and other system devices. HyperTransport(HT) Configuration Memory Configuration AMD Cool & Quiet Configuration Processor Type : AMD Athlon(tm) 64 Processor 3200+ Speed : 2000MHz HyperTransport Configuration Options ASUS K8V SE Deluxe motherboard 4-15 CPU Configuration Chipset Onboard Devices Configuration PCI PnP JumperFree Configuration Speech Configuration Instant Music...

K8V SE Deluxe User's Manual
Page 83
...Auto] Sets whether to allow memory accesses to be set by the code using [Auto] or select [Manual] to set using AUTO, or if you use LIMIT, you to set one of the standard values. Configuration options: [Auto] [2.0] [3.0] [2.5] ASUS K8V SE Deluxe motherboard 4-17 Select an item ...then press to CPU ratio. Memory Configuration Memclock Mode Bank Interleaving CAS Latency (CL) TRC TRFC TRCD TWR TRWT TRAS TRP DDR Clock Delay...
...Auto] Sets whether to allow memory accesses to be set by the code using [Auto] or select [Manual] to set using AUTO, or if you use LIMIT, you to set one of the standard values. Configuration options: [Auto] [2.0] [3.0] [2.5] ASUS K8V SE Deluxe motherboard 4-17 Select an item ...then press to CPU ratio. Memory Configuration Memclock Mode Bank Interleaving CAS Latency (CL) TRC TRFC TRCD TWR TRWT TRAS TRP DDR Clock Delay...

K8V SE Deluxe User's Manual
Page 85
... all nodes for ECC error detect and correction. DRAM ECC Enable [Disabled] Enables or disables the DRAM ECC that allows hardware to report and correct memory errors automatically to [Enabled]. Configuration options: [Disabled] [40ns] [80ns] [160ns] [320ns] [640ns] [1.28us] [2.56us] [5.12us] [10.2us] ...81.9us] [163.8us] [327.7us] [655.4us] [1.31ms] [2.62ms] [5.24ms] [10.49ms] [20.97ms] [42.00ms] [84.00ms] ASUS K8V SE Deluxe motherboard 4-19 Configuration options: [Disabled] [Enabled] L2 Cache BG Scrub [Disabled] Disables or sets the L2 data cache RAM to be corrected when idle. ...
... all nodes for ECC error detect and correction. DRAM ECC Enable [Disabled] Enables or disables the DRAM ECC that allows hardware to report and correct memory errors automatically to [Enabled]. Configuration options: [Disabled] [40ns] [80ns] [160ns] [320ns] [640ns] [1.28us] [2.56us] [5.12us] [10.2us] ...81.9us] [163.8us] [327.7us] [655.4us] [1.31ms] [2.62ms] [5.24ms] [10.49ms] [20.97ms] [42.00ms] [84.00ms] ASUS K8V SE Deluxe motherboard 4-19 Configuration options: [Disabled] [Enabled] L2 Cache BG Scrub [Disabled] Disables or sets the L2 data cache RAM to be corrected when idle. ...

K8V SE Deluxe User's Manual
Page 86
... immediately when they occur, even if background scrubbing is not being used improves performance. Configuration options: [Enabled] [Disabled] • Make sure that corrects and rewrites memory errors so later reads are correct. Processor Displays the processor type and speed. 4-20 Chapter 4: BIOS Setup Configuration options: [Disabled] [Enabled] ECC Chip Kill ...with monitor chip. The following items appear only when the DRAM ECC Enable item is set to Enabled if you want to use the ASUS Q-Fan Technology feature to automatically adjust the CPU fan speed according to your system loading.
... immediately when they occur, even if background scrubbing is not being used improves performance. Configuration options: [Enabled] [Disabled] • Make sure that corrects and rewrites memory errors so later reads are correct. Processor Displays the processor type and speed. 4-20 Chapter 4: BIOS Setup Configuration options: [Disabled] [Enabled] ECC Chip Kill ...with monitor chip. The following items appear only when the DRAM ECC Enable item is set to Enabled if you want to use the ASUS Q-Fan Technology feature to automatically adjust the CPU fan speed according to your system loading.

K8V SE Deluxe User's Manual
Page 88
... disables the PCI Delay transaction feature. Configuration options: [Disabled] [Enabled] USB Configuration The items in this menu allows you to select the size of mapped memory for AGP graphic data. Select an item then press to change the USB-related features. Configuration options: [Disabled] [Enabled] Graphics Aperture Size [64MB] Allows you...
... disables the PCI Delay transaction feature. Configuration options: [Disabled] [Enabled] USB Configuration The items in this menu allows you to select the size of mapped memory for AGP graphic data. Select an item then press to change the USB-related features. Configuration options: [Disabled] [Enabled] Graphics Aperture Size [64MB] Allows you...

K8V SE Deluxe User's Manual
Page 91
... menu includes setting IRQ and DMA channel resources for either PCI/PnP or legacy ISA devices, and setting the memory size block for boot if your system has a Plug and Play operating system. ASUS K8V SE Deluxe motherboard 4-25 This item allows you to [ECP]. Configuration options: [Disabled] [Enabled] 4.4.4 PCI PnP The PCI PnP menu...
... menu includes setting IRQ and DMA channel resources for either PCI/PnP or legacy ISA devices, and setting the memory size block for boot if your system has a Plug and Play operating system. ASUS K8V SE Deluxe motherboard 4-25 This item allows you to [ECP]. Configuration options: [Disabled] [Enabled] 4.4.4 PCI PnP The PCI PnP menu...

K8 series Quick Setup Guide
Page 2
Unlock the DIMM socket by pressing the retaining clips outward. 2. Align a DIMM on the socket such that the notch on the DIMM matches the break on the socket. 3. Follow steps 1-3 to live AC outlets until the retaining clips snap back in place and the DIMM is complete. 1 Install memory modules 1. English Installation WARNING! Memory module Memory socket Retaining clips 2 Firmly insert the DIMM into the socket until configuration and setup is properly seated. 4. Do not connect any power cable to install additional modules.
Unlock the DIMM socket by pressing the retaining clips outward. 2. Align a DIMM on the socket such that the notch on the DIMM matches the break on the socket. 3. Follow steps 1-3 to live AC outlets until the retaining clips snap back in place and the DIMM is complete. 1 Install memory modules 1. English Installation WARNING! Memory module Memory socket Retaining clips 2 Firmly insert the DIMM into the socket until configuration and setup is properly seated. 4. Do not connect any power cable to install additional modules.

K8 series Quick Setup Guide
Page 10
...make sure it is connected properly. • Check drive jumper setting. • Check the drive configuration in its expansion slot. • Check the memory modules and make sure they are corrected properly. • Make sure that the device drivers are installed. • Enter BIOS setup and load default ...the sockets. • Make sure that the drive cables are using a tested and qualified memory module. NOTE: If you encounter any of the following conditions when powering up , but no display Memory error Floppy disk error Hard disk drive or CD-ROM drive error CMOS error 10 POSSIBLE ...
...make sure it is connected properly. • Check drive jumper setting. • Check the drive configuration in its expansion slot. • Check the memory modules and make sure they are corrected properly. • Make sure that the device drivers are installed. • Enter BIOS setup and load default ...the sockets. • Make sure that the drive cables are using a tested and qualified memory module. NOTE: If you encounter any of the following conditions when powering up , but no display Memory error Floppy disk error Hard disk drive or CD-ROM drive error CMOS error 10 POSSIBLE ...

K8V SE Deluxe user's manual
Page 3
... How this guide is organized ix Where to find more information ix Conventions used in this guide x Typography x K8V SE Deluxe specifications summary xi Chapter 1: Product introduction 1.1 Welcome 1-1 1.2 Package contents 1-1 1.3 Special features 1-2 1.3.1 Product Highlights 1-2 1.3.2 Unique ASUS features 1-4 Chapter 2: Hardware information 2.1 Before you proceed 2-1 2.2 Motherboard overview 2-2 2.2.1 Placement direction 2-2 2.2.2 Screw holes 2-2 2.2.3 Motherboard layout 2-3 2.2.4 Layout Contents 2-4 2.3 Central...
... How this guide is organized ix Where to find more information ix Conventions used in this guide x Typography x K8V SE Deluxe specifications summary xi Chapter 1: Product introduction 1.1 Welcome 1-1 1.2 Package contents 1-1 1.3 Special features 1-2 1.3.1 Product Highlights 1-2 1.3.2 Unique ASUS features 1-4 Chapter 2: Hardware information 2.1 Before you proceed 2-1 2.2 Motherboard overview 2-2 2.2.1 Placement direction 2-2 2.2.2 Screw holes 2-2 2.2.3 Motherboard layout 2-3 2.2.4 Layout Contents 2-4 2.3 Central...


