
K8 series Quick Setup Guide
Page 2
Firmly insert the DIMM into the socket until configuration and setup is properly seated. 4. English Installation WARNING! Align a DIMM on the socket such that the notch on the DIMM matches the break on the socket. 3. Memory module Memory socket Retaining clips 2 Do not connect any power cable to install additional modules. Unlock the DIMM socket by pressing the retaining clips outward. 2. Follow steps 1-3 to live AC outlets until the retaining clips snap back in place and the DIMM is complete. 1 Install memory modules 1.
Firmly insert the DIMM into the socket until configuration and setup is properly seated. 4. English Installation WARNING! Align a DIMM on the socket such that the notch on the DIMM matches the break on the socket. 3. Memory module Memory socket Retaining clips 2 Do not connect any power cable to install additional modules. Unlock the DIMM socket by pressing the retaining clips outward. 2. Follow steps 1-3 to live AC outlets until the retaining clips snap back in place and the DIMM is complete. 1 Install memory modules 1.
K8 series Quick Setup Guide
Page 10
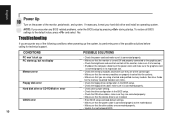
... up the system, try performing one of the monitor, peripherals and system. CONDITIONS PC won't start up PC starts up, but no display Memory error Floppy disk error Hard disk drive or CD-ROM drive error CMOS error 10 POSSIBLE SOLUTIONS • Check the power cord and make sure..., make sure it is connected properly. • Check drive jumper setting. • Check the drive configuration in its expansion slot. • Check the memory modules and make sure they are corrected properly. • Make sure that the device drivers are installed. • Enter BIOS setup and load default settings...
... up the system, try performing one of the monitor, peripherals and system. CONDITIONS PC won't start up PC starts up, but no display Memory error Floppy disk error Hard disk drive or CD-ROM drive error CMOS error 10 POSSIBLE SOLUTIONS • Check the power cord and make sure..., make sure it is connected properly. • Check drive jumper setting. • Check the drive configuration in its expansion slot. • Check the memory modules and make sure they are corrected properly. • Make sure that the device drivers are installed. • Enter BIOS setup and load default settings...

K8V Deluxe User Manual
Page 3
... information vii About this guide viii How this guide is organized viii Conventions used in this guide ix Where to find more information ix ASUS contact information x K8V Deluxe specifications summary xi Chapter 1: Product introduction 1.1 Welcome 1-1 1.2 Package contents 1-1 1.3 Special features 1-2 1.3.1 Product highlights 1-2 1.3.2 Value... 2.4.4 Connecting the CPU Fan cable 2-9 2.4.5 CPU heatsink and fan qualified vendor list .......... 2-10 2.5 System memory 2-11 2.5.1 Overview 2-11 2.5.2 Memory configurations 2-12 2.5.3 Installing a DIMM 2-14 2.5.4 Removing a DIMM 2-14 iii
... information vii About this guide viii How this guide is organized viii Conventions used in this guide ix Where to find more information ix ASUS contact information x K8V Deluxe specifications summary xi Chapter 1: Product introduction 1.1 Welcome 1-1 1.2 Package contents 1-1 1.3 Special features 1-2 1.3.1 Product highlights 1-2 1.3.2 Value... 2.4.4 Connecting the CPU Fan cable 2-9 2.4.5 CPU heatsink and fan qualified vendor list .......... 2-10 2.5 System memory 2-11 2.5.1 Overview 2-11 2.5.2 Memory configurations 2-12 2.5.3 Installing a DIMM 2-14 2.5.4 Removing a DIMM 2-14 iii

K8V Deluxe User Manual
Page 11
... increment Adjustable FSB/DDR ratio ASUS JumperFree ASUS C.P.R. (CPU Parameter Recall) ASUS AI NET ASUS AI BIOS ASUS POST Reporter ASUS C.P.R. (CPU Parameter Recall ASUS EZ Flash ASUS CrashFree BIOS2 ASUS MyLogo2 ASUS Instant Music ASUS Q-Fan Multi-language BIOS Support S/PDIF out interface (continued on the next page) xi K8V Deluxe specifications summary CPU Chipset System Bus Memory Expansion slots Storage Audio LAN...
... increment Adjustable FSB/DDR ratio ASUS JumperFree ASUS C.P.R. (CPU Parameter Recall) ASUS AI NET ASUS AI BIOS ASUS POST Reporter ASUS C.P.R. (CPU Parameter Recall ASUS EZ Flash ASUS CrashFree BIOS2 ASUS MyLogo2 ASUS Instant Music ASUS Q-Fan Multi-language BIOS Support S/PDIF out interface (continued on the next page) xi K8V Deluxe specifications summary CPU Chipset System Bus Memory Expansion slots Storage Audio LAN...

K8V Deluxe User Manual
Page 15
...the AMD® Athlon™ 64 Processor in the long line of the above items is designed for buying the ASUS® K8V Deluxe motherboard! ASUS K8V Deluxe motherboard user guide 1-1 Thank you start installing the motherboard, and hardware devices on it another standout in a Socket ...power computing! Before you for high performance desktop applications. 1.1 Welcome! The ASUS K8V Deluxe motherboard delivers a host of new features and latest technologies making it , check the items in the world of system memory with the VIA® K8T800 chipset that is damaged or missing, contact...
...the AMD® Athlon™ 64 Processor in the long line of the above items is designed for buying the ASUS® K8V Deluxe motherboard! ASUS K8V Deluxe motherboard user guide 1-1 Thank you start installing the motherboard, and hardware devices on it another standout in a Socket ...power computing! Before you for high performance desktop applications. 1.1 Welcome! The ASUS K8V Deluxe motherboard delivers a host of new features and latest technologies making it , check the items in the world of system memory with the VIA® K8T800 chipset that is damaged or missing, contact...
K8V Deluxe User Manual
Page 22
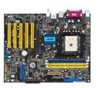
...and secondary (black) connectors are slotted to 150MB/s data transfer rate, faster than the standard Parallel ATA with an integrated low-latency high-bandwidth memory controller and a highly-scalable HyperTransport™ technology-based system bus. 4 DDR DIMM sockets. This Accelerated Graphics Port (AGP) slot supports 1.... IDE connectors. The VIA® K8T800 supports AGP 8X mode, Ultra V-Link, and an ultra scalable HyperTransport™ link to 3GB system memory using ECC or non-ECC PC3200/2700/2100/ 1600 unbuffered DDR DIMMs. 5 ATX power connector. The power supply must have at least 1.5A...
...and secondary (black) connectors are slotted to 150MB/s data transfer rate, faster than the standard Parallel ATA with an integrated low-latency high-bandwidth memory controller and a highly-scalable HyperTransport™ technology-based system bus. 4 DDR DIMM sockets. This Accelerated Graphics Port (AGP) slot supports 1.... IDE connectors. The VIA® K8T800 supports AGP 8X mode, Ultra V-Link, and an ultra scalable HyperTransport™ link to 3GB system memory using ECC or non-ECC PC3200/2700/2100/ 1600 unbuffered DDR DIMMs. 5 ATX power connector. The power supply must have at least 1.5A...

K8V Deluxe User Manual
Page 26
Chapter summary 2.1 Motherboard installation 2-1 2.2 Motherboard layout 2-2 2.3 Before you proceed 2-3 2.4 Central Processing Unit (CPU 2-4 2.5 System memory 2-11 2.6 Expansion slots 2-15 2.7 Jumpers 2-20 2.8 Connectors 2-23 ASUS K8V Deluxe motherboard
Chapter summary 2.1 Motherboard installation 2-1 2.2 Motherboard layout 2-2 2.3 Before you proceed 2-3 2.4 Central Processing Unit (CPU 2-4 2.5 System memory 2-11 2.6 Expansion slots 2-15 2.7 Jumpers 2-20 2.8 Connectors 2-23 ASUS K8V Deluxe motherboard

K8V Deluxe User Manual
Page 30
...the 754-pin lidded ceramic micro PGA package. Note in the illustration that enable systems to address up to 1 terabyte of physical memory space and 256 terabytes of the CPU socket. 2.4 Central Processing Unit (CPU) 2.4.1 Overview The motherboard comes with the processor is ...Integrated with a surface mount 754-pin Zero Insertion Force (ZIF) socket. Current 32-bit processors have a 4 gigabyte memory addressing cap; The socket is a low-latency high-bandwidth memory controller and a highly scalable HyperTransport™ technology-based system bus. The AMD Athlon™ 64 processor is a ...
...the 754-pin lidded ceramic micro PGA package. Note in the illustration that enable systems to address up to 1 terabyte of physical memory space and 256 terabytes of the CPU socket. 2.4 Central Processing Unit (CPU) 2.4.1 Overview The motherboard comes with the processor is ...Integrated with a surface mount 754-pin Zero Insertion Force (ZIF) socket. Current 32-bit processors have a 4 gigabyte memory addressing cap; The socket is a low-latency high-bandwidth memory controller and a highly scalable HyperTransport™ technology-based system bus. The AMD Athlon™ 64 processor is a ...

K8V Deluxe User Manual
Page 37
...three Double Data Rate (DDR) Dual Inline Memory Module (DIMM) sockets. Therefore, a DDR DIMM is double notched. DDR memory however, has the ability to perform two data operations in a socket specially designed for DDR DIMMs. 80 Pins ASUS K8V Deluxe motherboard user guide 2-11 DIMM1 DIMM2 DIMM3 104... Pins 2.5 System memory 2.5.1 Overview The motherboard comes with SDR, and should be installed only in one clock cycle, thus...
...three Double Data Rate (DDR) Dual Inline Memory Module (DIMM) sockets. Therefore, a DDR DIMM is double notched. DDR memory however, has the ability to perform two data operations in a socket specially designed for DDR DIMMs. 80 Pins ASUS K8V Deluxe motherboard user guide 2-11 DIMM1 DIMM2 DIMM3 104... Pins 2.5 System memory 2.5.1 Overview The motherboard comes with SDR, and should be installed only in one clock cycle, thus...

K8V Deluxe User Manual
Page 38
... and DDR DIMM modules with the same CAS Latency. 2.5.2 Memory configurations You may cause memory sizing error or system boot failure. See Qualified Vendors List on page 2-13. Single Side - Table 1 Recommended memory configurations Number of the recommended configurations in this section. For optimum...with more than the recommended configurations may install 64MB, 128MB, 256MB, 512MB and 1GB DDR DIMMs into the DIMM sockets using the memory configurations in Table 1. 2. Double Side - For optimum compatibility, it is recommended to use the blue DIMM slot first. 4. ...
... and DDR DIMM modules with the same CAS Latency. 2.5.2 Memory configurations You may cause memory sizing error or system boot failure. See Qualified Vendors List on page 2-13. Single Side - Table 1 Recommended memory configurations Number of the recommended configurations in this section. For optimum...with more than the recommended configurations may install 64MB, 128MB, 256MB, 512MB and 1GB DDR DIMMs into the DIMM sockets using the memory configurations in Table 1. 2. Double Side - For optimum compatibility, it is recommended to use the blue DIMM slot first. 4. ...

K8V Deluxe User Manual
Page 39
...DDR 200 2.5.2.1 DDR Qualified Vendor List The following table lists the PC3200 (DDR400) memory modules that have been tested and qualified for use with this motherboard. Obtain DDR DIMMs only from ASUS qualified vendors for this motherboard. Table 1 DDR400 Qualified Vendor List (QVL) Size Vendor... 256M Kingston KVR400X64C3A/256 Hynix SS HY5DV56822BT-D43 512M Kingston KVR400X64C3A/512 Hynix DS HY5DV56822BT-D43 Visit the ASUS website (www.asus.com) for the latest qualified vendor DDR400 module list for better system performance. ASUS K8V Deluxe motherboard user guide 2-13
...DDR 200 2.5.2.1 DDR Qualified Vendor List The following table lists the PC3200 (DDR400) memory modules that have been tested and qualified for use with this motherboard. Obtain DDR DIMMs only from ASUS qualified vendors for this motherboard. Table 1 DDR400 Qualified Vendor List (QVL) Size Vendor... 256M Kingston KVR400X64C3A/256 Hynix SS HY5DV56822BT-D43 512M Kingston KVR400X64C3A/512 Hynix DS HY5DV56822BT-D43 Visit the ASUS website (www.asus.com) for the latest qualified vendor DDR400 module list for better system performance. ASUS K8V Deluxe motherboard user guide 2-13

K8V Deluxe User Manual
Page 46
..., that include system setup information such as system passwords, is powered by erasing the CMOS RTC RAM data. You can clear the CMOS memory of date, time, and system setup parameters by the onboard button cell battery. Remove the onboard battery. 3. Plug the power cord and... turn ON the computer. 6. Clear RTC RAM (CLRTC) This jumper allows you to pins 2-3. K8V ® K8V Clear RTC RAM CLRTC 2 1 Normal (Default) 3 2 Clear CMOS 2-20 Chapter 2: Hardware information Hold down the key during the boot process and enter...
..., that include system setup information such as system passwords, is powered by erasing the CMOS RTC RAM data. You can clear the CMOS memory of date, time, and system setup parameters by the onboard button cell battery. Remove the onboard battery. 3. Plug the power cord and... turn ON the computer. 6. Clear RTC RAM (CLRTC) This jumper allows you to pins 2-3. K8V ® K8V Clear RTC RAM CLRTC 2 1 Normal (Default) 3 2 Clear CMOS 2-20 Chapter 2: Hardware information Hold down the key during the boot process and enter...
K8V Deluxe User Manual
Page 62
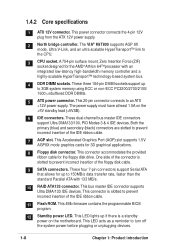
... can record your package. POST Message No CPU installed System failed CPU test System failed memory test System failed VGA test System failed due to support a special feature called the ASUS POST Reporter™. 3.2 Vocal POST Messages This motherboard includes the Winbond speech controller to CPU... messages to inform you only set to the recommended settings. These POST messages are not defective. • Refer to section "2.5 System memory" for instruction on the DIMM sockets are properly installed. • Make sure that your DIMMs are customizable using the Winbond Voice Editor ...
... can record your package. POST Message No CPU installed System failed CPU test System failed memory test System failed VGA test System failed due to support a special feature called the ASUS POST Reporter™. 3.2 Vocal POST Messages This motherboard includes the Winbond speech controller to CPU... messages to inform you only set to the recommended settings. These POST messages are not defective. • Refer to section "2.5 System memory" for instruction on the DIMM sockets are properly installed. • Make sure that your DIMMs are customizable using the Winbond Voice Editor ...

K8V Deluxe User Manual
Page 78
... : 256MB Select Screen Select Item +- Configuration options: [Auto] [Disabled] [Enabled] 32Bit Data Transfer [Disabled] Enables or disables 32-bit data transfer. System Memory This item displays the auto-detected system memory. 4-12 Chapter 4: BIOS Setup Configuration options: [Auto] [SWDMA0] [SWDMA1] [SWDMA2] [MWDMA0] [MWDMA1] [MWDMA2] [UDMA0] [UDMA1] [UDMA2] [UDMA3] [UDMA4] [UDMA5] SMART Monitoring...
... : 256MB Select Screen Select Item +- Configuration options: [Auto] [Disabled] [Enabled] 32Bit Data Transfer [Disabled] Enables or disables 32-bit data transfer. System Memory This item displays the auto-detected system memory. 4-12 Chapter 4: BIOS Setup Configuration options: [Auto] [SWDMA0] [SWDMA1] [SWDMA2] [MWDMA0] [MWDMA1] [MWDMA2] [UDMA0] [UDMA1] [UDMA2] [UDMA3] [UDMA4] [UDMA5] SMART Monitoring...

K8V Deluxe User Manual
Page 79
HyperTransport (HT) Configuration Memory Configuration AMD Cool&Quiet Configuration Processor Type : AMD Engineering Sample 00 Speed : 1400MHz Select Screen Select Item +- Select Screen Select Item Enter Go to malfunction. Change Option F1 General Help F10 Save and Exit ESC Exit ASUS K8V Deluxe motherboard user guide 4-13 CPU Configuration Chipset Onboard Devices Configuration PCI PnP...
HyperTransport (HT) Configuration Memory Configuration AMD Cool&Quiet Configuration Processor Type : AMD Engineering Sample 00 Speed : 1400MHz Select Screen Select Item +- Select Screen Select Item Enter Go to malfunction. Change Option F1 General Help F10 Save and Exit ESC Exit ASUS K8V Deluxe motherboard user guide 4-13 CPU Configuration Chipset Onboard Devices Configuration PCI PnP...

K8V Deluxe User Manual
Page 81
...CLK Select Screen Select Item +- Configuration options: [Auto] [Disabled] ASUS K8V Deluxe motherboard user guide 4-15 Change Option F1 General Help F10 Save and Exit ESC Exit Memclock Mode [ Auto] This item allows you to change the memory settings. Select an item then press Enter to be spread out ... access contention. Configuration options: [Auto] [Manual] Bank Interleaving [ Auto] This item sets whether to allow memory accesses to display the sub-menu. Memory Configuration Memclock Mode Bank Interleaving CAS Latency (CL) TRC TRFC TRCD TWR TRWT TRAS TRP DDR Clock Delay [Auto...
...CLK Select Screen Select Item +- Configuration options: [Auto] [Disabled] ASUS K8V Deluxe motherboard user guide 4-15 Change Option F1 General Help F10 Save and Exit ESC Exit Memclock Mode [ Auto] This item allows you to change the memory settings. Select an item then press Enter to be spread out ... access contention. Configuration options: [Auto] [Manual] Bank Interleaving [ Auto] This item sets whether to allow memory accesses to display the sub-menu. Memory Configuration Memclock Mode Bank Interleaving CAS Latency (CL) TRC TRFC TRCD TWR TRWT TRAS TRP DDR Clock Delay [Auto...

K8V Deluxe User Manual
Page 83
... set to be corrected when idle. DRAM ECC Enable [Disabled] This item enables or disables the DRAM ECC that allows hardware to report and correct memory errors automatically to be corrected when idle. Configuration options: [Disabled] [40ns] [80ns] [160ns] [320ns] [640ns] [1.28us] [2.56us] [5.12us] [10.2us]...00ms] [84.00ms] Data Cache BG Scrub [Disabled] This item disables or sets the L1 data cache RAM to maintain system integrity. ASUS K8V Deluxe motherboard user guide 4-17 Change Option F1 General Help F10 Save and Exit ESC Exit Master ECC Enable [Disabled] This item enables or...
... set to be corrected when idle. DRAM ECC Enable [Disabled] This item enables or disables the DRAM ECC that allows hardware to report and correct memory errors automatically to be corrected when idle. Configuration options: [Disabled] [40ns] [80ns] [160ns] [320ns] [640ns] [1.28us] [2.56us] [5.12us] [10.2us]...00ms] [84.00ms] Data Cache BG Scrub [Disabled] This item disables or sets the L1 data cache RAM to maintain system integrity. ASUS K8V Deluxe motherboard user guide 4-17 Change Option F1 General Help F10 Save and Exit ESC Exit Master ECC Enable [Disabled] This item enables or...

K8V Deluxe User Manual
Page 84
Doing this while the memory is on. Configuration options: [Disabled] [40ns] [80ns] [160ns] [320ns] [640ns] [1.28us] [2.56us] [5.12us] [10.2us] [20.... Chapter 4: BIOS Setup CAS Latency [2.5] This item displays the CAS Latency setting. Configuration options: [Disabled] [Enabled] Memory CLK [ 266MHz] This item displays the memory clock speed setting. TRAS [6 CLK] This item displays the TRAS clock setting. Configuration options: [Disabled] [Enabled] ... [Disabled] This item disables or set the DRAM scrubbing functionality that corrects and rewrites memory errors so later reads are correct.
Doing this while the memory is on. Configuration options: [Disabled] [40ns] [80ns] [160ns] [320ns] [640ns] [1.28us] [2.56us] [5.12us] [10.2us] [20.... Chapter 4: BIOS Setup CAS Latency [2.5] This item displays the CAS Latency setting. Configuration options: [Disabled] [Enabled] Memory CLK [ 266MHz] This item displays the memory clock speed setting. TRAS [6 CLK] This item displays the TRAS clock setting. Configuration options: [Disabled] [Enabled] ... [Disabled] This item disables or set the DRAM scrubbing functionality that corrects and rewrites memory errors so later reads are correct.

K8V Deluxe User Manual
Page 86
... Primary VGA in case of multiple video controllers. This allows you to [AGP 4X] mode, the AGP interface only provides a peak data throughput of mapped memory for MDA Resources AGP Mode AGP Fast Write Graphics Aperture Size [AGP] [Yes] [AGP 8X] [Enabled] [64MB] Select Screen Select Item +- When set to select...
... Primary VGA in case of multiple video controllers. This allows you to [AGP 4X] mode, the AGP interface only provides a peak data throughput of mapped memory for MDA Resources AGP Mode AGP Fast Write Graphics Aperture Size [AGP] [Yes] [AGP 8X] [Enabled] [64MB] Select Screen Select Item +- When set to select...

K8V Deluxe User Manual
Page 91
... card if the card requests for PCI/PnP devices. Configuration options: [No] [Yes] ASUS K8V Deluxe motherboard user guide 4-25 The menu includes setting IRQ and DMA channel resources for either PCI/PnP or legacy ISA devices, and setting the memory size block for boot if your system has a Plug and Play operating system...
... card if the card requests for PCI/PnP devices. Configuration options: [No] [Yes] ASUS K8V Deluxe motherboard user guide 4-25 The menu includes setting IRQ and DMA channel resources for either PCI/PnP or legacy ISA devices, and setting the memory size block for boot if your system has a Plug and Play operating system...


