
K8 series Quick Setup Guide
Page 1
... Quick Setup Guide will help you get your motherboard package for the following items. Motherboard 80-Conductor IDE signal cable ® 40-Conductor IDE signal cable Floppy disk signal cable Serial ATA signal cable Bag of jumper caps Motherboard support CD Quick Setup Guide User Guide SAFETY ...INFORMATION Computer components are extremely sensitive to the User Guide. Check your motherboard up static electricity. 1 For detailed setup instructions, refer to electrostatic discharge (ESD). Refer to release any built-up and running ...
... Quick Setup Guide will help you get your motherboard package for the following items. Motherboard 80-Conductor IDE signal cable ® 40-Conductor IDE signal cable Floppy disk signal cable Serial ATA signal cable Bag of jumper caps Motherboard support CD Quick Setup Guide User Guide SAFETY ...INFORMATION Computer components are extremely sensitive to the User Guide. Check your motherboard up static electricity. 1 For detailed setup instructions, refer to electrostatic discharge (ESD). Refer to release any built-up and running ...

K8 series Quick Setup Guide
Page 3
WARNING! If the CPU does not fit, check its orientation or check for bent pins. 4. Install a heatsink with fan and the motherboard user guide.) 6. English 2 Install the CPU and heatsink with fan Lever CPU Gold triangle 3 DO NOT force the CPU into the socket until it fits ..., while making sure that came with the heatsink with fan assembly. (Refer to the documentation that the CPU is locked. 5. The lever clicks on the motherboard.
WARNING! If the CPU does not fit, check its orientation or check for bent pins. 4. Install a heatsink with fan and the motherboard user guide.) 6. English 2 Install the CPU and heatsink with fan Lever CPU Gold triangle 3 DO NOT force the CPU into the socket until it fits ..., while making sure that came with the heatsink with fan assembly. (Refer to the documentation that the CPU is locked. 5. The lever clicks on the motherboard.

K8 series Quick Setup Guide
Page 4
...and mouse ports are aligned to the top of the I /O shield that came with your chassis to ensure that the motherboard fits into the appropriate screw holes on the rear panel that covers the rear I /O ports to most standard chassis. Screws Mounting ...screws Standoffs Motherboard screw holes 4 Before you install the motherboard, study the configuration of the motherboard is not touching the chassis, otherwise, a short circuit may occur. Install the rear I /O shield. 5. Position...
...and mouse ports are aligned to the top of the I /O shield that came with your chassis to ensure that the motherboard fits into the appropriate screw holes on the rear panel that covers the rear I /O ports to most standard chassis. Screws Mounting ...screws Standoffs Motherboard screw holes 4 Before you install the motherboard, study the configuration of the motherboard is not touching the chassis, otherwise, a short circuit may occur. Install the rear I /O shield. 5. Position...

K8 series Quick Setup Guide
Page 7
English 6 Connect the chassis LED and power switch cable On the front of your AGP graphics card in the proper slot. 3. Connect these leads to install the expansion cards. 2. Press the card firmly into the slot. 4. Secure the card with a screw. 5. Install other expansion cards using the same procedure. Install your chassis, you wish to the panel connector on the motherboard. 7 Install expansion cards 1. LED and switch leads PCI card AGP card Wi-Fi card 7 Remove the slot covers from the chassis where you will find some LED and power switch leads.
English 6 Connect the chassis LED and power switch cable On the front of your AGP graphics card in the proper slot. 3. Connect these leads to install the expansion cards. 2. Press the card firmly into the slot. 4. Secure the card with a screw. 5. Install other expansion cards using the same procedure. Install your chassis, you wish to the panel connector on the motherboard. 7 Install expansion cards 1. LED and switch leads PCI card AGP card Wi-Fi card 7 Remove the slot covers from the chassis where you will find some LED and power switch leads.

K8 series Quick Setup Guide
Page 8
... supply are designed to connect the 4-pin ATX 12V power plug. Make sure that the plastic clip on the side matches the plastic tab on motherboard power connector. The system may become unstable or may not boot up if the power is 350W. The plug is in place when the clip... the 20-pin power plug such that your ATX 12V power supply can provide 8A on the +12V lead and at least 1A on the motherboard. 1.
... supply are designed to connect the 4-pin ATX 12V power plug. Make sure that the plastic clip on the side matches the plastic tab on motherboard power connector. The system may become unstable or may not boot up if the power is 350W. The plug is in place when the clip... the 20-pin power plug such that your ATX 12V power supply can provide 8A on the +12V lead and at least 1A on the motherboard. 1.
K8 series Quick Setup Guide
Page 10
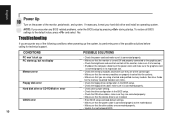
... of the monitor, peripherals and system. If necessary, format your hard disk drive and install an operating system. To restore all BIOS settings to the motherboard. • Make sure that the monitor is turned ON and properly connected to the graphics port. • Check the brightness and contract controls of the... cord and make sure it is connected properly to the default value, press and select Yes. NOTE: If you are connected properly. • Update the motherboard BIOS.
... of the monitor, peripherals and system. If necessary, format your hard disk drive and install an operating system. To restore all BIOS settings to the motherboard. • Make sure that the monitor is turned ON and properly connected to the graphics port. • Check the brightness and contract controls of the... cord and make sure it is connected properly to the default value, press and select Yes. NOTE: If you are connected properly. • Update the motherboard BIOS.

K8V Deluxe User Manual
Page 1
Motherboard K8V Deluxe User Guide
Motherboard K8V Deluxe User Guide

K8V Deluxe User Manual
Page 3
...in this guide ix Where to find more information ix ASUS contact information x K8V Deluxe specifications summary xi Chapter 1: Product introduction 1.1 Welcome 1-1 1.2 Package contents 1-1 1.3 Special features 1-2 1.3.1 Product highlights 1-2 1.3.2 Value-added solutions 1-5 1.4 Motherboard overview 1-6 1.4.1 Major components 1-6 1.4.2 Core specifications 1-8 Chapter 2: Hardware information 2.1 Motherboard installation 2-1 2.1.1 Placement direction 2-1 2.1.2 Screw holes 2-1 2.2 Motherboard layout 2-2 2.3 Before you proceed 2-3 2.4 Central Processing Unit (CPU 2-4 2.4.1 Overview...
...in this guide ix Where to find more information ix ASUS contact information x K8V Deluxe specifications summary xi Chapter 1: Product introduction 1.1 Welcome 1-1 1.2 Package contents 1-1 1.3 Special features 1-2 1.3.1 Product highlights 1-2 1.3.2 Value-added solutions 1-5 1.4 Motherboard overview 1-6 1.4.1 Major components 1-6 1.4.2 Core specifications 1-8 Chapter 2: Hardware information 2.1 Motherboard installation 2-1 2.1.1 Placement direction 2-1 2.1.2 Screw holes 2-1 2.2 Motherboard layout 2-2 2.3 Before you proceed 2-3 2.4 Central Processing Unit (CPU 2-4 2.4.1 Overview...

K8V Deluxe User Manual
Page 7
... you are not sure about the voltage of the electrical outlet you add a device. • Before connecting or removing signal cables from the motherboard, ensure that your power supply is set to the correct voltage in any damage, contact your local power company. • If the power ...8226; Before using the product, make sure all cables are correctly connected and the power cables are not damaged. Operation safety • Before installing the motherboard and adding devices on a stable surface. • If you detect any area where it may become wet. • Place the product on it by...
... you are not sure about the voltage of the electrical outlet you add a device. • Before connecting or removing signal cables from the motherboard, ensure that your power supply is set to the correct voltage in any damage, contact your local power company. • If the power ...8226; Before using the product, make sure all cables are correctly connected and the power cables are not damaged. Operation safety • Before installing the motherboard and adding devices on a stable surface. • If you detect any area where it may become wet. • Place the product on it by...

K8V Deluxe User Manual
Page 8
... the BIOS parameters are also provided. • Chapter 5: Software support This chapter describes the contents of the support CD that you need when installing the ASUS K8V Deluxe motherboard. How this guide This user guide contains the information you have to change system settings through the BIOS Setup menus. It includes brief descriptions of...
... the BIOS parameters are also provided. • Chapter 5: Software support This chapter describes the contents of the support CD that you need when installing the ASUS K8V Deluxe motherboard. How this guide This user guide contains the information you have to change system settings through the BIOS Setup menus. It includes brief descriptions of...

K8V Deluxe User Manual
Page 13
Product introduction Chapter 1 This chapter describes the features of the motherboard and the new technology it supports. It includes brief explanations of the special attributes of the K8V Deluxe motherboard.
Product introduction Chapter 1 This chapter describes the features of the motherboard and the new technology it supports. It includes brief explanations of the special attributes of the K8V Deluxe motherboard.

K8V Deluxe User Manual
Page 14
Chapter summary 1.1 Welcome 1-1 1.2 Package contents 1-1 1.3 Special features 1-2 1.4 Motherboard overview 1-6 ASUS K8V Deluxe motherboard
Chapter summary 1.1 Welcome 1-1 1.2 Package contents 1-1 1.3 Special features 1-2 1.4 Motherboard overview 1-6 ASUS K8V Deluxe motherboard

K8V Deluxe User Manual
Page 15
...sets a new benchmark for buying the ASUS® K8V Deluxe motherboard! The K8V Deluxe incorporates the AMD® Athlon™ 64 Processor in the world of ASUS quality motherboards! Before you for an effective desktop platform solution. 1.1 Welcome! The ASUS K8V Deluxe motherboard delivers a host of new features and...) Instant Music label (retail boxes only) If any of the above items is damaged or missing, contact your K8V Deluxe package for the following items. ASUS K8V Deluxe motherboard ASUS support CD 2 x SATA cable 1 x Single port 1394 module 1 x 4 port USB module with the ...
...sets a new benchmark for buying the ASUS® K8V Deluxe motherboard! The K8V Deluxe incorporates the AMD® Athlon™ 64 Processor in the world of ASUS quality motherboards! Before you for an effective desktop platform solution. 1.1 Welcome! The ASUS K8V Deluxe motherboard delivers a host of new features and...) Instant Music label (retail boxes only) If any of the above items is damaged or missing, contact your K8V Deluxe package for the following items. ASUS K8V Deluxe motherboard ASUS support CD 2 x SATA cable 1 x Single port 1394 module 1 x 4 port USB module with the ...

K8V Deluxe User Manual
Page 16
Dual SATA RAID The K8V motherboard provides two high-performance Serial ATA RAID controllers that enables enhanced graphics performance with high bandwidth speeds up protection without the cost of the Parallel ...) specification, an evolutionary replacement of additional RAID cards. See page 2-4 for RAID 0 and RAID 1 functions. See page 2-18. 1-2 Chapter 1: Product introduction Serial ATA solution The motherboard supports four interfaces compliant to 48 times faster than some existing technologies. See page 2-25. AGP 8X support AGP 8X (AGP 3.0) is a high-speed, low...
Dual SATA RAID The K8V motherboard provides two high-performance Serial ATA RAID controllers that enables enhanced graphics performance with high bandwidth speeds up protection without the cost of the Parallel ...) specification, an evolutionary replacement of additional RAID cards. See page 2-4 for RAID 0 and RAID 1 functions. See page 2-18. 1-2 Chapter 1: Product introduction Serial ATA solution The motherboard supports four interfaces compliant to 48 times faster than some existing technologies. See page 2-25. AGP 8X support AGP 8X (AGP 3.0) is a high-speed, low...
K8V Deluxe User Manual
Page 17
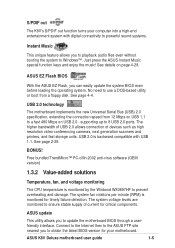
... cable faults from a remote location up an environment for wireless LAN. The ASUS WiFi-b™ add-on Motherboard (LOM) applications. When the system hangs due to overclocking. ASUS Q-Fan technology The ASUS Q-Fan technology smartly adjusts the fan speeds according to the system loading to ...-Fi slot is based on the 802.11b/g wireless standard that is specifically designed for the ASUS WiFi-b™ add-on card to set up to 100 meters. ASUS K8V Deluxe motherboard user guide 1-3 Simply shut down and reboot the system, and BIOS automatically restores the CPU ...
... cable faults from a remote location up an environment for wireless LAN. The ASUS WiFi-b™ add-on Motherboard (LOM) applications. When the system hangs due to overclocking. ASUS Q-Fan technology The ASUS Q-Fan technology smartly adjusts the fan speeds according to the system loading to ...-Fi slot is based on the 802.11b/g wireless standard that is specifically designed for the ASUS WiFi-b™ add-on card to set up to 100 meters. ASUS K8V Deluxe motherboard user guide 1-3 Simply shut down and reboot the system, and BIOS automatically restores the CPU ...

K8V Deluxe User Manual
Page 18
... codes and data are corrupted. Through an added external speaker, you will hear the messages informing you to restore the original BIOS data from the ASUS support CD in the K8V Deluxe motherboard allows you to select the language of peripherals and devices compliant to your choice from the available options...
... codes and data are corrupted. Through an added external speaker, you will hear the messages informing you to restore the original BIOS data from the ASUS support CD in the K8V Deluxe motherboard allows you to select the language of peripherals and devices compliant to your choice from the available options...
K8V Deluxe User Manual
Page 19
... 2.0 allows connection of current for critical components. See page 2-29. The system voltage levels are monitored to 8 USB 2.0 ports. No need to update the motherboard BIOS through a userfriendly interface. BONUS! ASUS K8V Deluxe motherboard user guide 1-5 The system fan rotations per minute (RPM) is monitored by the Winbond W83697HF to Windows™. Just press the...
... 2.0 allows connection of current for critical components. See page 2-29. The system voltage levels are monitored to 8 USB 2.0 ports. No need to update the motherboard BIOS through a userfriendly interface. BONUS! ASUS K8V Deluxe motherboard user guide 1-5 The system fan rotations per minute (RPM) is monitored by the Winbond W83697HF to Windows™. Just press the...

K8V Deluxe User Manual
Page 20
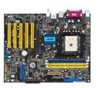
... yourself with its components. 1.4.1 Major components The following are the major components of the K8V Deluxe motherboard as pointed out in the picture on the components. 1-6 Chapter 1: Product introduction CPU socket 4. DDR DIMM sockets 5. Standby power...board and its physical configuration and available features to Chapter 2 for the specifications of each component. Parallel port 25. Refer to facilitate the motherboard installation and future upgrades. Keyboard port See page 1-8 for detailed information on page 1-7. 1. 12V ATX power connector 2. NorthBridge controller 3. ...
... yourself with its components. 1.4.1 Major components The following are the major components of the K8V Deluxe motherboard as pointed out in the picture on the components. 1-6 Chapter 1: Product introduction CPU socket 4. DDR DIMM sockets 5. Standby power...board and its physical configuration and available features to Chapter 2 for the specifications of each component. Parallel port 25. Refer to facilitate the motherboard installation and future upgrades. Keyboard port See page 1-8 for detailed information on page 1-7. 1. 12V ATX power connector 2. NorthBridge controller 3. ...

K8V Deluxe User Manual
Page 21
1 23 4 5 6 22 21 20 19 18 23 34 7 8 9 10 11 17 1615 14 13 12 24 25 26 27 28 29 33 32 31 30 ASUS K8V Deluxe motherboard user guide 1-7
1 23 4 5 6 22 21 20 19 18 23 34 7 8 9 10 11 17 1615 14 13 12 24 25 26 27 28 29 33 32 31 30 ASUS K8V Deluxe motherboard user guide 1-7
K8V Deluxe User Manual
Page 22
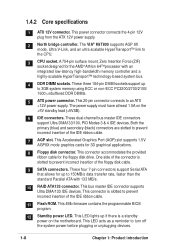
... cable. 9 SATA connectors. This 4Mb firmware contains the programmable BIOS program. 12 Standby power LED. The power supply must have at least 1.5A on the motherboard. These dual-channel bus master IDE connectors support Ultra DMA133/100, PIO Modes 3 & 4 IDE devices. This connector is a standby power on the +5V standby lead...
... cable. 9 SATA connectors. This 4Mb firmware contains the programmable BIOS program. 12 Standby power LED. The power supply must have at least 1.5A on the motherboard. These dual-channel bus master IDE connectors support Ultra DMA133/100, PIO Modes 3 & 4 IDE devices. This connector is a standby power on the +5V standby lead...


