K8S-MX English User Manual E1884
Page 12
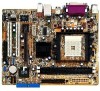
...; processor and the SiS 760GX chipset to 2GB of system memory with the list below. 1.2 Package contents Check your motherboard package for the following items. ASUS K8S-MX motherboard ASUS motherboard support CD 1 x Ultra DMA 133/100/66 cables 2 x Serial ATA cables 1 x Floppy disk cable I/O shield User guide If any of the ... and latest technologies making it , check the items in your retailer. 1-2 Chapter 1: Product introduction Supporting up to set a new benchmark for buying the ASUS® K8S-MX motherboard! The motherboard delivers a host of power computing! 1.1 Welcome!
...; processor and the SiS 760GX chipset to 2GB of system memory with the list below. 1.2 Package contents Check your motherboard package for the following items. ASUS K8S-MX motherboard ASUS motherboard support CD 1 x Ultra DMA 133/100/66 cables 2 x Serial ATA cables 1 x Floppy disk cable I/O shield User guide If any of the ... and latest technologies making it , check the items in your retailer. 1-2 Chapter 1: Product introduction Supporting up to set a new benchmark for buying the ASUS® K8S-MX motherboard! The motherboard delivers a host of power computing! 1.1 Welcome!
K8S-MX English User Manual E1884
Page 13
... ATA connectors for everyday computing. The Serial ATA specification allows for thinner, more flexible cables with maximum bandwidth speeds of the Parallel ATA storage interface. ASUS K8S-MX motherboard 1-3 The AMD Athlon™ 64 is the VGA interface specification that enhance hard disk performance and data backup protection without the cost of the...
... ATA connectors for everyday computing. The Serial ATA specification allows for thinner, more flexible cables with maximum bandwidth speeds of the Parallel ATA storage interface. ASUS K8S-MX motherboard 1-3 The AMD Athlon™ 64 is the VGA interface specification that enhance hard disk performance and data backup protection without the cost of the...
K8S-MX English User Manual E1884
Page 15
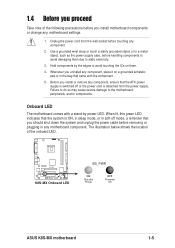
... that came with a stand-by the edges to static electricity. 3. 1.4 Before you proceed Take note of the onboard LED. ® K8S-MX K8S-MX Onboard LED SB_PWR ON Standby Power OFF Powered Off ASUS K8S-MX motherboard 1-5 Unplug the power cord from the power supply. Use a grounded wrist strap or touch a safely grounded object or to the...
... that came with a stand-by the edges to static electricity. 3. 1.4 Before you proceed Take note of the onboard LED. ® K8S-MX K8S-MX Onboard LED SB_PWR ON Standby Power OFF Powered Off ASUS K8S-MX motherboard 1-5 Unplug the power cord from the power supply. Use a grounded wrist strap or touch a safely grounded object or to the...
K8S-MX English User Manual E1884
Page 17
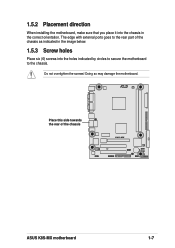
The edge with external ports goes to the chassis. R Place this side towards the rear of the chassis as indicated in the correct orientation. Doing so may damage the motherboard. Do not overtighten the screws! 1.5.2 Placement direction When installing the motherboard, make sure that you place it into the chassis in the image below. 1.5.3 Screw holes Place six (6) screws into the holes indicated by circles to secure the motherboard to the rear part of the chassis K8S-MX ASUS K8S-MX motherboard 1-7
The edge with external ports goes to the chassis. R Place this side towards the rear of the chassis as indicated in the correct orientation. Doing so may damage the motherboard. Do not overtighten the screws! 1.5.2 Placement direction When installing the motherboard, make sure that you place it into the chassis in the image below. 1.5.3 Screw holes Place six (6) screws into the holes indicated by circles to secure the motherboard to the rear part of the chassis K8S-MX ASUS K8S-MX motherboard 1-7

K8S-MX English User Manual E1884
Page 19
... lever sideways, then lift it up to indicate that it fits in one correct orientation. Small triangle Gold triangle The CPU fits only in place. ASUS K8S-MX motherboard 1-9 Carefully insert the CPU into the socket to a 90°-100° angle. DO NOT force the CPU into the socket until it is...
... lever sideways, then lift it up to indicate that it fits in one correct orientation. Small triangle Gold triangle The CPU fits only in place. ASUS K8S-MX motherboard 1-9 Carefully insert the CPU into the socket to a 90°-100° angle. DO NOT force the CPU into the socket until it is...

K8S-MX English User Manual E1884
Page 21
...-TCCC K4H560838F-TCCC K4H560838F-TCB3 K4H5608838F-TCB3 W942508CH-5 W942508CH-6 W942508BH-6 W942508CH-5 DD2508AKTA-5C DD2508AMTA K4H560838F-TCCC V58C2256804SAT5B DIMM support AB (Continued on the next page) ASUS K8S-MX motherboard 1-11 Single Side - Table 1 Recommended memory configurations Number of DIMMs DIMM1 1 Single Side 1 - 1 Double Side 1 - 2 Single Side 2 Single Side 2 Double Side 2 Double Side DIMM...
...-TCCC K4H560838F-TCCC K4H560838F-TCB3 K4H5608838F-TCB3 W942508CH-5 W942508CH-6 W942508BH-6 W942508CH-5 DD2508AKTA-5C DD2508AMTA K4H560838F-TCCC V58C2256804SAT5B DIMM support AB (Continued on the next page) ASUS K8S-MX motherboard 1-11 Single Side - Table 1 Recommended memory configurations Number of DIMMs DIMM1 1 Single Side 1 - 1 Double Side 1 - 2 Single Side 2 Single Side 2 Double Side 2 Double Side DIMM...

K8S-MX English User Manual E1884
Page 23
... a DIMM on the socket such that the notch on the DIMM matches the break on the system and change the necessary BIOS settings, if any. ASUS K8S-MX motherboard 1-13
... a DIMM on the socket such that the notch on the DIMM matches the break on the system and change the necessary BIOS settings, if any. ASUS K8S-MX motherboard 1-13

K8S-MX English User Manual E1884
Page 25
Install only +1.5V AGP cards. ® K8S-MX Keyed for 1.5v K8S-MX Accelerated Graphics Port (AGP) If installing the ATi 9500 or 9700 Pro Series VGA cards, use only the card version PN xxx-xxxxx-30 or later, for one with +1.5V specification. ASUS K8S-MX motherboard 1-15 When you buy an AGP card, make sure that they fit the AGP slot on the card golden fingers to ensure that you ask for optimum performance and overclocking stability. 1.8.5 AGP slot The Accelerated Graphics Port (AGP) slot supports AGP 8X/4X (+1.5V) cards. Note the notches on the motherboard.
Install only +1.5V AGP cards. ® K8S-MX Keyed for 1.5v K8S-MX Accelerated Graphics Port (AGP) If installing the ATi 9500 or 9700 Pro Series VGA cards, use only the card version PN xxx-xxxxx-30 or later, for one with +1.5V specification. ASUS K8S-MX motherboard 1-15 When you buy an AGP card, make sure that they fit the AGP slot on the card golden fingers to ensure that you ask for optimum performance and overclocking stability. 1.8.5 AGP slot The Accelerated Graphics Port (AGP) slot supports AGP 8X/4X (+1.5V) cards. Note the notches on the motherboard.

K8S-MX English User Manual E1884
Page 27
... connected USB devices. Otherwise, the system would not power up from S1 sleep mode (CPU stopped, DRAM refreshed, system running in sleep mode. ASUS K8S-MX motherboard 1-17 Set to +5VSB to CPU, DRAM in slow refresh, power supply in reduced power mode). ® USBPW34 USBPW12 12 23... K8S-MX +5V +5VSB (Default) USBPW78 USBPW56 12 23 K8S-MX USB device wake-up +5V (Default) +5VSB • The USB device wake-up feature requires a power supply that can provide...
... connected USB devices. Otherwise, the system would not power up from S1 sleep mode (CPU stopped, DRAM refreshed, system running in sleep mode. ASUS K8S-MX motherboard 1-17 Set to +5VSB to CPU, DRAM in slow refresh, power supply in reduced power mode). ® USBPW34 USBPW12 12 23... K8S-MX +5V +5VSB (Default) USBPW78 USBPW56 12 23 K8S-MX USB device wake-up +5V (Default) +5VSB • The USB device wake-up feature requires a power supply that can provide...
K8S-MX English User Manual E1884
Page 29
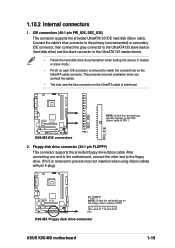
...near the blue connector on the UltraATA cable is removed to prevent incorrect insertion when using ribbon cables with pin 5 plug). ® K8S-MX FLOPPY NOTE: Orient the red markings on the floppy ribbon cable to PIN 1. After connecting one end to the motherboard, connect the ... drive documentation when setting the device in master or slave mode. • Pin 20 on the UltraATA cable connector. PIN 1 K8S-MX Floppy disk drive connector ASUS K8S-MX motherboard 1-19 1.10.2 Internal connectors 1. Floppy disk drive connector (34-1 pin FLOPPY) This connector supports the provided floppy drive ...
...near the blue connector on the UltraATA cable is removed to prevent incorrect insertion when using ribbon cables with pin 5 plug). ® K8S-MX FLOPPY NOTE: Orient the red markings on the floppy ribbon cable to PIN 1. After connecting one end to the motherboard, connect the ... drive documentation when setting the device in master or slave mode. • Pin 20 on the UltraATA cable connector. PIN 1 K8S-MX Floppy disk drive connector ASUS K8S-MX motherboard 1-19 1.10.2 Internal connectors 1. Floppy disk drive connector (34-1 pin FLOPPY) This connector supports the provided floppy drive ...

K8S-MX English User Manual E1884
Page 31
...generation USB peripherals such as high resolution cameras, scanners, and printers. ® USB+5V USB_P6USB_P6+ GND NC USB+5V USB_P8USB_P8+ GND NC K8S-MX USB78 1 K8S-MX USB 2.0 connectors USB56 1 USB+5V USB_P7USB_P7+ GND • The USB 2.0 module is purchased separately. • Install the USB 2.0 ...10-1 pin USB56, USB78) If the USB ports on the fan connectors! ® CPU_FAN Rotation +12V GND K8S-MX K8S-MX Fan connectors CHA_FAN Rotation +12V GND 6. 5. ASUS K8S-MX motherboard USB+5V USB_P5USB_P5+ GND 1-21 Do not forget to connect the fan cables to this header. Connect the...
...generation USB peripherals such as high resolution cameras, scanners, and printers. ® USB+5V USB_P6USB_P6+ GND NC USB+5V USB_P8USB_P8+ GND NC K8S-MX USB78 1 K8S-MX USB 2.0 connectors USB56 1 USB+5V USB_P7USB_P7+ GND • The USB 2.0 module is purchased separately. • Install the USB 2.0 ...10-1 pin USB56, USB78) If the USB ports on the fan connectors! ® CPU_FAN Rotation +12V GND K8S-MX K8S-MX Fan connectors CHA_FAN Rotation +12V GND 6. 5. ASUS K8S-MX motherboard USB+5V USB_P5USB_P5+ GND 1-21 Do not forget to connect the fan cables to this header. Connect the...

K8S-MX English User Manual E1884
Page 33
... to 150 MB/s data transfer rate, faster than the standard parallel ATA with 133MB/s (Ultra ATA/133). ® GND RSATA_RXN2 RSATA_RXP2 GND RSATA_TXN2 RSATA_TXP2 GND K8S-MX K8S-MX SATA connectors GND RSATA_RXN1 RSATA_RXP1 GND RSATA_TXN1 RSATA_TXP1 GND SATA2 SATA1 ASUS K8S-MX motherboard 1-23 If a GAME/MIDI module is purchased separately. 10.
... to 150 MB/s data transfer rate, faster than the standard parallel ATA with 133MB/s (Ultra ATA/133). ® GND RSATA_RXN2 RSATA_RXP2 GND RSATA_TXN2 RSATA_TXP2 GND K8S-MX K8S-MX SATA connectors GND RSATA_RXN1 RSATA_RXP1 GND RSATA_TXN1 RSATA_TXP1 GND SATA2 SATA1 ASUS K8S-MX motherboard 1-23 If a GAME/MIDI module is purchased separately. 10.

K8S-MX English User Manual E1884
Page 35
ASUS K8S-MX motherboard 1-25 Any read or write activity of the specific connector colors as described. The System Panel connector is color-coded for rebooting the system ...
ASUS K8S-MX motherboard 1-25 Any read or write activity of the specific connector colors as described. The System Panel connector is color-coded for rebooting the system ...

K8S-MX English User Manual E1884
Page 37
Chapter 2 This chapter tells how to change system settings through the BIOS Setup menus. Detailed descriptions of the BIOS parameters are also provided. BIOS information ASUS K8S-MX motherboard 2-1
Chapter 2 This chapter tells how to change system settings through the BIOS Setup menus. Detailed descriptions of the BIOS parameters are also provided. BIOS information ASUS K8S-MX motherboard 2-1
K8S-MX English User Manual E1884
Page 39
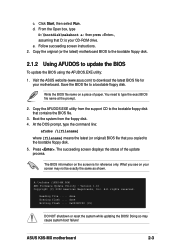
... the system from the support CD to download the latest BIOS file for reference only. Doing so may not be exactly the same as shown. ASUS K8S-MX motherboard 2-3 Copy the original (or the latest) motherboard BIOS to the bootable floppy disk. 2.1.2 Using AFUDOS to a bootable floppy disk. The ...filename] means the latest (or original) BIOS file that you see on your screen may cause system boot failure! Reading file ..... Visit the ASUS website (www.asus.com) to the bootable floppy disk that D: is for your CD-ROM drive. Press . What you copied to type the exact BIOS file...
... the system from the support CD to download the latest BIOS file for reference only. Doing so may not be exactly the same as shown. ASUS K8S-MX motherboard 2-3 Copy the original (or the latest) motherboard BIOS to the bootable floppy disk. 2.1.2 Using AFUDOS to a bootable floppy disk. The ...filename] means the latest (or original) BIOS file that you see on your screen may cause system boot failure! Reading file ..... Visit the ASUS website (www.asus.com) to the bootable floppy disk that D: is for your CD-ROM drive. Press . What you copied to type the exact BIOS file...

K8S-MX English User Manual E1884
Page 41
... copy the current system BIOS by simply pressing during POST to rename the downloaded BIOS file as K8S-MX.ROM. The EZ Flash is built-in the floppy disk, the error message "Floppy not found !" ASUS K8S-MX motherboard 2-5 To update the BIOS using a DOS-based utility. A:\>afudos /oMYBIOS03.ROM AMI Firmware Update Utility - Reboot...
... copy the current system BIOS by simply pressing during POST to rename the downloaded BIOS file as K8S-MX.ROM. The EZ Flash is built-in the floppy disk, the error message "Floppy not found !" ASUS K8S-MX motherboard 2-5 To update the BIOS using a DOS-based utility. A:\>afudos /oMYBIOS03.ROM AMI Firmware Update Utility - Reboot...
K8S-MX English User Manual E1884
Page 43
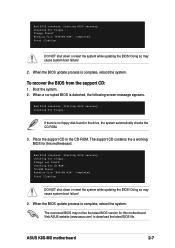
... file. Completed. To recover the BIOS from the support CD: 1. Bad BIOS checksum. When the BIOS update process is detected, the following screen message appears. ASUS K8S-MX motherboard 2-7 Completed. When the BIOS update process is no floppy disk found ! Checking for floppy... DO NOT shut down or reset the system while updating...
... file. Completed. To recover the BIOS from the support CD: 1. Bad BIOS checksum. When the BIOS update process is detected, the following screen message appears. ASUS K8S-MX motherboard 2-7 Completed. When the BIOS update process is no floppy disk found ! Checking for floppy... DO NOT shut down or reset the system while updating...

K8S-MX English User Manual E1884
Page 45
... fields General help System Time System Date Legacy Diskette A [11:51:19] [Thu 08/05/2003] [1.44M, 3.5 in] Primary IDE Master : [ST320413A] Primary IDE Slave : [ASUS CD-S340] Secondary IDE Master : [Not Detected] Secondary IDE Slave : [Not Detected] Onboard PCI S-ATA Controller [Disabled] System Information Use [ENTER], [TAB] or [SHIFT-TAB... until the desired item is highlighted. 2.2.3 Navigation keys At the bottom right corner of the navigation keys differ from one screen to configure system time. ASUS K8S-MX motherboard 2-9
... fields General help System Time System Date Legacy Diskette A [11:51:19] [Thu 08/05/2003] [1.44M, 3.5 in] Primary IDE Master : [ST320413A] Primary IDE Slave : [ASUS CD-S340] Secondary IDE Master : [Not Detected] Secondary IDE Slave : [Not Detected] Onboard PCI S-ATA Controller [Disabled] System Information Use [ENTER], [TAB] or [SHIFT-TAB... until the desired item is highlighted. 2.2.3 Navigation keys At the bottom right corner of the navigation keys differ from one screen to configure system time. ASUS K8S-MX motherboard 2-9

K8S-MX English User Manual E1884
Page 47
... enter the BIOS Setup program, the Main menu screen appears giving you to set the system date. 2.3.3 Legacy Diskette A [1.44M, 3.5 in .] ASUS K8S-MX motherboard 2-11 System Time System Date Legacy Diskette A [11:51:19] [Thu 08/05/2003] [1.44M, 3.5 in] Primary IDE Master : [ST320413A] ...Primary IDE Slave : [ASUS CD-S340] Secondary IDE Master : [Not Detected] Secondary IDE Slave : [Not Detected] Onboard PCI S-ATA Controller [Disabled] System Information Use [ENTER], [TAB...
... enter the BIOS Setup program, the Main menu screen appears giving you to set the system date. 2.3.3 Legacy Diskette A [1.44M, 3.5 in .] ASUS K8S-MX motherboard 2-11 System Time System Date Legacy Diskette A [11:51:19] [Thu 08/05/2003] [1.44M, 3.5 in] Primary IDE Master : [ST320413A] ...Primary IDE Slave : [ASUS CD-S340] Secondary IDE Master : [Not Detected] Secondary IDE Slave : [Not Detected] Onboard PCI S-ATA Controller [Disabled] System Information Use [ENTER], [TAB...
K8S-MX English User Manual E1884
Page 49
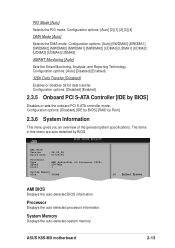
... options: [Auto] [SWDMA0] [SWDMA1] [SWDMA2] [MWDMA0] [MWDMA1] [MWDMA2] [UDMA0] [UDMA1] [UDMA2] [UDMA3] [UDMA4] [UDMA5] SMART Monitoring [Auto] Sets the Smart Monitoring, Analysis, and Reporting Technology. ASUS K8S-MX motherboard 2-13 Configuration options: [Disabled] [Enabled] 2.3.5 Onboard PCI S-ATA Controller [IDE by BIOS. Processor Displays the auto-detected processor information. PIO Mode [Auto] Selects the...
... options: [Auto] [SWDMA0] [SWDMA1] [SWDMA2] [MWDMA0] [MWDMA1] [MWDMA2] [UDMA0] [UDMA1] [UDMA2] [UDMA3] [UDMA4] [UDMA5] SMART Monitoring [Auto] Sets the Smart Monitoring, Analysis, and Reporting Technology. ASUS K8S-MX motherboard 2-13 Configuration options: [Disabled] [Enabled] 2.3.5 Onboard PCI S-ATA Controller [IDE by BIOS. Processor Displays the auto-detected processor information. PIO Mode [Auto] Selects the...


