
Users Manual
Page 3
... to open the display panel 29 Press the power button 29 Gestures for the touch screen and touchpad 30 Using the touch screen 30 Using the touchpad...32 Using the keyboard 39 Function keys...39 Function keys for ASUS Apps 40 Windows®8 keys...41 Multimedia control keys (on selected models 41 Numeric...
... to open the display panel 29 Press the power button 29 Gestures for the touch screen and touchpad 30 Using the touch screen 30 Using the touchpad...32 Using the keyboard 39 Function keys...39 Function keys for ASUS Apps 40 Windows®8 keys...41 Multimedia control keys (on selected models 41 Numeric...
Users Manual
Page 4
... Windows® Apps...47 Hotspots...48 Working with Windows® apps 51 Launching apps...51 Customizing apps...51 Accessing the Apps screen 54 Charms bar...57 Snap feature...60 Other keyboard shortcuts 62 Connecting to wireless networks 64 Wi-Fi...64 Bluetooth ...66 Airplane mode...68 Connecting ...
... Windows® Apps...47 Hotspots...48 Working with Windows® apps 51 Launching apps...51 Customizing apps...51 Accessing the Apps screen 54 Charms bar...57 Snap feature...60 Other keyboard shortcuts 62 Connecting to wireless networks 64 Wi-Fi...64 Bluetooth ...66 Airplane mode...68 Connecting ...

Users Manual
Page 30
Gestures for the touch screen and touchpad Gestures allow you to launch programs and access the settings of the screen to shuffle your running apps. Refer to launch the Charms bar. 30 Notebook PC E-Manual Using the touch screen Left edge swipe Right edge swipe Swipe from the right edge of the screen to the following illustrations when using hand gestures on your Notebook PC. Swipe from the left edge of your touch screen and touchpad.
Gestures for the touch screen and touchpad Gestures allow you to launch programs and access the settings of the screen to shuffle your running apps. Refer to launch the Charms bar. 30 Notebook PC E-Manual Using the touch screen Left edge swipe Right edge swipe Swipe from the right edge of the screen to the following illustrations when using hand gestures on your Notebook PC. Swipe from the left edge of your touch screen and touchpad.

Users Manual
Page 31
bar. • In a running app, swipe from the top edge of the screen to pan the screen left or right. Notebook PC E-Manual 31 Zoom out Zoom in Bring together your two fingers on the touch panel. Top edge swipe Spread apart your finger to scroll up from the top edge of the and down and slide your finger screen to view the All Apps to view its menu. Finger slide • In the Start screen, swipe Slide your two fingers on the touch panel.
bar. • In a running app, swipe from the top edge of the screen to pan the screen left or right. Notebook PC E-Manual 31 Zoom out Zoom in Bring together your two fingers on the touch panel. Top edge swipe Spread apart your finger to scroll up from the top edge of the and down and slide your finger screen to view the All Apps to view its menu. Finger slide • In the Start screen, swipe Slide your two fingers on the touch panel.

Users Manual
Page 33
Drag and drop Double-tap an item, then slide the same finger without lifting it off the touchpad. To drop the item to launch it. Notebook PC E-Manual 33 One-finger gestures Tap/Double tap • In the Start screen, tap an app to launch it. • In Desktop mode, double-tap an application to its new location, lift your finger from the touchpad.
Drag and drop Double-tap an item, then slide the same finger without lifting it off the touchpad. To drop the item to launch it. Notebook PC E-Manual 33 One-finger gestures Tap/Double tap • In the Start screen, tap an app to launch it. • In Desktop mode, double-tap an application to its new location, lift your finger from the touchpad.

Users Manual
Page 34
app to select it and launch • In Desktop mode, doubleclick an application to launch it . NOTE: The areas inside the dotted line represent the locations of the left mouse button and the right mouse button on the touchpad. 34 Notebook PC E-Manual Left-click Right-click • In the Start screen, click an • In the Start screen, click an app to launch it . You can also press this button to launch the All Apps bar. • In Desktop mode, use this button to open the right- click menu. the settings bar.
app to select it and launch • In Desktop mode, doubleclick an application to launch it . NOTE: The areas inside the dotted line represent the locations of the left mouse button and the right mouse button on the touchpad. 34 Notebook PC E-Manual Left-click Right-click • In the Start screen, click an • In the Start screen, click an app to launch it . You can also press this button to launch the All Apps bar. • In Desktop mode, use this button to open the right- click menu. the settings bar.

Users Manual
Page 35
the Charms bar. Top edge swipe • In the Start screen, swipe from the top edge to launch the All Apps bar. • In a running apps. Notebook PC E-Manual 35 Left edge swipe Right edge swipe Swipe from the top edge to launch your running app, swipe from the left edge to shuffle Swipe the right edge to view its menu.
the Charms bar. Top edge swipe • In the Start screen, swipe from the top edge to launch the All Apps bar. • In a running apps. Notebook PC E-Manual 35 Left edge swipe Right edge swipe Swipe from the top edge to launch your running app, swipe from the left edge to shuffle Swipe the right edge to view its menu.

Users Manual
Page 39
Using the keyboard Function keys The function keys on your Notebook PC. Decreases display brightness Increases display brightness Turns the display panel off Activates the second screen NOTE: Ensure that the second display is connected to your Notebook PC's keyboard can trigger the following commands: Puts the Notebook PC into Sleep mode Turns Airplane mode on or off NOTE: When enabled, the Airplane mode disables all wireless connectivity. Enables or disables the touchpad Turns the speaker on or off Notebook PC E-Manual 39
Using the keyboard Function keys The function keys on your Notebook PC. Decreases display brightness Increases display brightness Turns the display panel off Activates the second screen NOTE: Ensure that the second display is connected to your Notebook PC's keyboard can trigger the following commands: Puts the Notebook PC into Sleep mode Turns Airplane mode on or off NOTE: When enabled, the Airplane mode disables all wireless connectivity. Enables or disables the touchpad Turns the speaker on or off Notebook PC E-Manual 39
Users Manual
Page 41
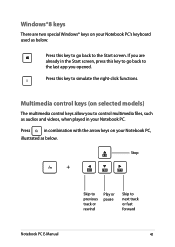
...to control multimedia files, such as below . Multimedia control keys (on your Notebook PC's keyboard used as audios and videos, when played in the Start screen, press this key to next track or fast forward 41 Press in combination with the arrow keys on selected models) The multimedia control keys allow... you opened. Press this key to go back to the Start screen. Stop Notebook PC E-Manual Skip to previous track or rewind Play or pause Skip to simulate the right-click functions.
...to control multimedia files, such as below . Multimedia control keys (on your Notebook PC's keyboard used as audios and videos, when played in the Start screen, press this key to next track or fast forward 41 Press in combination with the arrow keys on selected models) The multimedia control keys allow... you opened. Press this key to go back to the Start screen. Stop Notebook PC E-Manual Skip to previous track or rewind Play or pause Skip to simulate the right-click functions.
Users Manual
Page 46
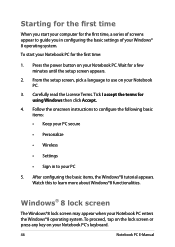
.... Watch this to your PC secure • Personalize • Wireless • Settings • Sign in configuring the basic settings of screens appear to use on your Notebook PC. 3. Carefully read the License Terms. Tick I accept the terms for a few minutes until the setup... screen appears. 2. Windows® 8 lock screen The Windows®8 lock screen may appear when your Notebook PC for the first time: 1. To start your computer for the first time, a series...
.... Watch this to your PC secure • Personalize • Wireless • Settings • Sign in configuring the basic settings of screens appear to use on your Notebook PC. 3. Carefully read the License Terms. Tick I accept the terms for a few minutes until the setup... screen appears. 2. Windows® 8 lock screen The Windows®8 lock screen may appear when your Notebook PC for the first time: 1. To start your computer for the first time, a series...

Users Manual
Page 47
... in just one place. Zoom in/out button Windows® Apps These are fully launched. Start screen The Start screen appears after successfully signing in to organize and easily access Windows® apps from the Start screen. NOTE: Some apps require signing in to your Notebook PC. Notebook PC E-Manual 47 It also... on tiled-format for easy access. It helps organize all the applications you to your Microsoft account before they are apps pinned on the Start screen and displayed on your user account.
... in just one place. Zoom in/out button Windows® Apps These are fully launched. Start screen The Start screen appears after successfully signing in to organize and easily access Windows® apps from the Start screen. NOTE: Some apps require signing in to your Notebook PC. Notebook PC E-Manual 47 It also... on tiled-format for easy access. It helps organize all the applications you to your Microsoft account before they are apps pinned on the Start screen and displayed on your user account.

Users Manual
Page 48
Hotspots Onscreen hotspots allow you to launch programs and access the settings of your Notebook PC. Hotspots on a running app Hotspots on the Start screen 48 Notebook PC E-Manual The functions in these hotspots can be activated using the touchpad.
Hotspots Onscreen hotspots allow you to launch programs and access the settings of your Notebook PC. Hotspots on a running app Hotspots on the Start screen 48 Notebook PC E-Manual The functions in these hotspots can be activated using the touchpad.

Users Manual
Page 49
... can also press the Windows key on your mouse pointer on the lower left corner then tap on the Start screen's thumbnail to go back to the Start screen. From the Start screen: Hover your mouse pointer on the lower left corner then tap on the running app's thumbnail to go back to... the Start screen. From a running apps. Notebook PC E-Manual 49 Hotspot upper left corner lower left corner Action Hover your mouse pointer on the upper left corner then ...
... can also press the Windows key on your mouse pointer on the lower left corner then tap on the Start screen's thumbnail to go back to the Start screen. From the Start screen: Hover your mouse pointer on the lower left corner then tap on the running app's thumbnail to go back to... the Start screen. From a running apps. Notebook PC E-Manual 49 Hotspot upper left corner lower left corner Action Hover your mouse pointer on the upper left corner then ...

Users Manual
Page 51
Position your Notebook PC's touchpad, or keyboard to launch, customize, and close apps from the Start screen using the following steps: Moving apps (on selected models) Tap and hold the app tile then drag it to a new location. Double-tap on selected ...
Position your Notebook PC's touchpad, or keyboard to launch, customize, and close apps from the Start screen using the following steps: Moving apps (on selected models) Tap and hold the app tile then drag it to a new location. Double-tap on selected ...

Users Manual
Page 53
Notebook PC E-Manual 53 From the running app then drag it down to the bottom of the screen to close it . Closing apps (on the top side of the launched app then wait for the pointer to change to a hand icon. 2. Drag then drop the app to the bottom of the screen to close it . 1. Move your mouse pointer on selected models) Tap and hold the top side of the running app's screen, press .
Notebook PC E-Manual 53 From the running app then drag it down to the bottom of the screen to close it . Closing apps (on the top side of the launched app then wait for the pointer to change to a hand icon. 2. Drag then drop the app to the bottom of the screen to close it . 1. Move your mouse pointer on selected models) Tap and hold the top side of the running app's screen, press .

Users Manual
Page 54
Accessing the Apps screen Aside from the apps already pinned on your Start screen, you can also open other applications through the Apps screen. Horizontal scroll bar 54 Notebook PC E-Manual
Accessing the Apps screen Aside from the apps already pinned on your Start screen, you can also open other applications through the Apps screen. Horizontal scroll bar 54 Notebook PC E-Manual

Users Manual
Page 55
From the Start screen, press All Apps icon then press to launch the All Apps bar. 2. Launching the Apps screen Launch the Apps screen using your Notebook PC. Swipe from the top edge to show all installed apps in your Notebook PC's touch screen (on selected models), touchpad, or keyboard. 1. Swipe from the top or bottom edge of the screen to select the . Notebook PC E-Manual 55 Tap to launch the All Apps bar.
From the Start screen, press All Apps icon then press to launch the All Apps bar. 2. Launching the Apps screen Launch the Apps screen using your Notebook PC. Swipe from the top edge to show all installed apps in your Notebook PC's touch screen (on selected models), touchpad, or keyboard. 1. Swipe from the top or bottom edge of the screen to select the . Notebook PC E-Manual 55 Tap to launch the All Apps bar.
Users Manual
Page 56
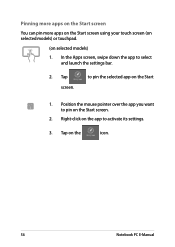
Position the mouse pointer over the app you want to activate its settings. 3. Tap on selected models) 1. Right-click on the app to pin on the Start 1. Tap screen. Pinning more apps on the Start screen You can pin more apps on the Start screen using your touch screen (on selected models) or touchpad. (on the icon. 56 Notebook PC E-Manual In the Apps screen, swipe down the app to pin the selected app on the Start screen. 2. to select and launch the settings bar. 2.
Position the mouse pointer over the app you want to activate its settings. 3. Tap on selected models) 1. Right-click on the app to pin on the Start 1. Tap screen. Pinning more apps on the Start screen You can pin more apps on the Start screen using your touch screen (on selected models) or touchpad. (on the icon. 56 Notebook PC E-Manual In the Apps screen, swipe down the app to pin the selected app on the Start screen. 2. to select and launch the settings bar. 2.

Users Manual
Page 57
It consists of several charms that can be triggered on the right side of your screen. Charms bar Notebook PC E-Manual 57 Charms bar The Charms bar is a toolbar that allow you to share applications and provide quick access for customizing the settings of your Notebook PC.
It consists of several charms that can be triggered on the right side of your screen. Charms bar Notebook PC E-Manual 57 Charms bar The Charms bar is a toolbar that allow you to share applications and provide quick access for customizing the settings of your Notebook PC.
Users Manual
Page 58
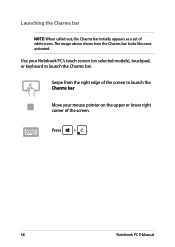
Use your mouse pointer on selected models), touchpad, or keyboard to launch the Charms bar. Move your Notebook PC's touch screen (on the upper or lower right corner of white icons. Launching the Charms bar NOTE: When called out, the Charms bar initially appears as a set of the screen. The image above shows how the Charms bar looks like once activated. Press . 58 Notebook PC E-Manual Swipe from the right edge of the screen to launch the Charms bar.
Use your mouse pointer on selected models), touchpad, or keyboard to launch the Charms bar. Move your Notebook PC's touch screen (on the upper or lower right corner of white icons. Launching the Charms bar NOTE: When called out, the Charms bar initially appears as a set of the screen. The image above shows how the Charms bar looks like once activated. Press . 58 Notebook PC E-Manual Swipe from the right edge of the screen to launch the Charms bar.


