
H61M-E User's Manual
Page 1
H61M-E Motherboard
H61M-E Motherboard
H61M-E User's Manual
Page 3
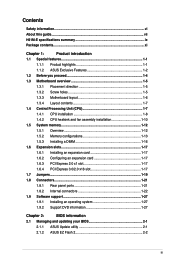
Contents Safety information...vi About this guide...vii H61M-E specifications summary ix Package contents...xi Chapter 1: Product introduction 1.1 Special features 1-1 1.1.1 Product highlights 1-1 1.1.2 ASUS Exclusive Features 1-2 1.2 Before you proceed 1-4 1.3 Motherboard overview 1-5 1.3.1 Placement direction 1-5 1.3.2 Screw holes 1-5 1.3.3 Motherboard layout 1-6 1.3.4 Layout contents 1-7 1.4 Central Processing Unit (CPU 1-7 1.4.1 CPU installation 1-8 1.4.2 CPU heatsink and fan assembly installation 1-10 1.5 System memory 1-12 1.5.1 Overview...
Contents Safety information...vi About this guide...vii H61M-E specifications summary ix Package contents...xi Chapter 1: Product introduction 1.1 Special features 1-1 1.1.1 Product highlights 1-1 1.1.2 ASUS Exclusive Features 1-2 1.2 Before you proceed 1-4 1.3 Motherboard overview 1-5 1.3.1 Placement direction 1-5 1.3.2 Screw holes 1-5 1.3.3 Motherboard layout 1-6 1.3.4 Layout contents 1-7 1.4 Central Processing Unit (CPU 1-7 1.4.1 CPU installation 1-8 1.4.2 CPU heatsink and fan assembly installation 1-10 1.5 System memory 1-12 1.5.1 Overview...
H61M-E User's Manual
Page 6
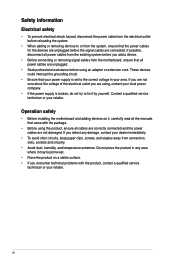
... qualified service technician or your dealer immediately. • To avoid short circuits, keep paper clips, screws, and staples away from the motherboard, ensure that the power cables for the devices are unplugged before the signal cables are not damaged. Operation safety • Before installing the... motherboard and adding devices on a stable surface. • If you are unplugged. • Seek professional assistance before using the product, ...
... qualified service technician or your dealer immediately. • To avoid short circuits, keep paper clips, screws, and staples away from the motherboard, ensure that the power cables for the devices are unplugged before the signal cables are not damaged. Operation safety • Before installing the... motherboard and adding devices on a stable surface. • If you are unplugged. • Seek professional assistance before using the product, ...
H61M-E User's Manual
Page 7
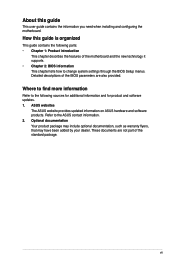
...provided. How this guide This user guide contains the information you need when installing and configuring the motherboard. Where to find more information Refer to the following parts: • Chapter 1: Product introduction This chapter describes the features... of the motherboard and the new technology it supports. • Chapter 2: BIOS information This chapter tells how to the ASUS contact information. 2. Detailed descriptions of the standard package. ASUS websites The ASUS website provides updated information on ASUS hardware and software products. Optional...
...provided. How this guide This user guide contains the information you need when installing and configuring the motherboard. Where to find more information Refer to the following parts: • Chapter 1: Product introduction This chapter describes the features... of the motherboard and the new technology it supports. • Chapter 2: BIOS information This chapter tells how to the ASUS contact information. 2. Detailed descriptions of the standard package. ASUS websites The ASUS website provides updated information on ASUS hardware and software products. Optional...
H61M-E User's Manual
Page 11
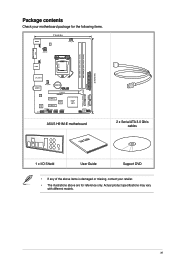
Actual product specifications may vary with different models. xi Package contents Check your motherboard package for the following items. KBMS 17.5cm(6.9in) RT 8876 CPU_FAN KBPWR ATX12V VGA DDR3 DIMM_A1 (64bit, 240-pin module) DDR3 DIMM_B1 (... Super I/O ALC PCIEX1_2 887 USBPW5-10 SB_PWR USB56 USB78 AAFP USB910 Intel® H61 CLRTC SPEAKER F_PANEL 64Mb BIOS SATA3G_3 SATA3G_1 SATA3G_4 SATA3G_2 ASUS H61M-E motherboard User Guide 2 x Serial ATA 3.0 Gb/s cables 1 x I/O Shield User Guide Support DVD • If any of the above items is damaged or missing, contact your ...
Actual product specifications may vary with different models. xi Package contents Check your motherboard package for the following items. KBMS 17.5cm(6.9in) RT 8876 CPU_FAN KBPWR ATX12V VGA DDR3 DIMM_A1 (64bit, 240-pin module) DDR3 DIMM_B1 (... Super I/O ALC PCIEX1_2 887 USBPW5-10 SB_PWR USB56 USB78 AAFP USB910 Intel® H61 CLRTC SPEAKER F_PANEL 64Mb BIOS SATA3G_3 SATA3G_1 SATA3G_4 SATA3G_2 ASUS H61M-E motherboard User Guide 2 x Serial ATA 3.0 Gb/s cables 1 x I/O Shield User Guide Support DVD • If any of the above items is damaged or missing, contact your ...
H61M-E User's Manual
Page 13
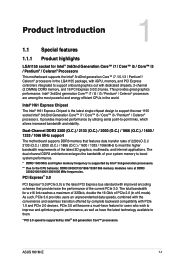
... and Internet applications. Dual-Channel DDR3 2200 (O.C.) / 2133 (O.C.) / 2000 (O.C.) / 1866 (O.C.) / 1600 / 1333 / 1066 MHz support The motherboard supports DDR3 memory that provide twice the performance of 2200 (O.C.)/ 2133 (O.C.) / 2000 (O.C.) / 1866 (O.C.) / 1600 / 1333 / 1066 MHz to...provides great graphics performance. ASUS H61M-E 1-1 Product introduction 1 1.1 Special features 1.1.1 Product highlights LGA1155 socket for Intel® 3rd/2nd Generation Core™ i7 / Core™ i5 / Core™ i3 / Pentium® / Celeron® Processors This motherboard supports the Intel®...
... and Internet applications. Dual-Channel DDR3 2200 (O.C.) / 2133 (O.C.) / 2000 (O.C.) / 1866 (O.C.) / 1600 / 1333 / 1066 MHz support The motherboard supports DDR3 memory that provide twice the performance of 2200 (O.C.)/ 2133 (O.C.) / 2000 (O.C.) / 1866 (O.C.) / 1600 / 1333 / 1066 MHz to...provides great graphics performance. ASUS H61M-E 1-1 Product introduction 1 1.1 Special features 1.1.1 Product highlights LGA1155 socket for Intel® 3rd/2nd Generation Core™ i7 / Core™ i5 / Core™ i3 / Pentium® / Celeron® Processors This motherboard supports the Intel®...
H61M-E User's Manual
Page 14
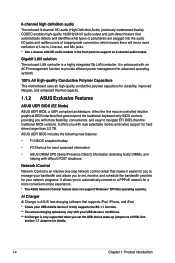
...helping with dual selectable modes and native support for durability, improved lifespan, and enhanced thermal capacity. 1.1.2 ASUS Exclusive Features ASUS UEFI BIOS (EZ Mode) ASUS UEFI BIOS, a UEFI compliant architecture, offers the first mouse-controlled intuitive graphical BIOS interface that automatically ... function to provide efficient power management for advanced operating systems. 100% All High-quality Conductive Polymer Capacitors This motherboard uses all high-quality conductive polymer capacitors for hard drives larger than the traditional BIOS versions. Gigabit LAN solution...
...helping with dual selectable modes and native support for durability, improved lifespan, and enhanced thermal capacity. 1.1.2 ASUS Exclusive Features ASUS UEFI BIOS (EZ Mode) ASUS UEFI BIOS, a UEFI compliant architecture, offers the first mouse-controlled intuitive graphical BIOS interface that automatically ... function to provide efficient power management for advanced operating systems. 100% All High-quality Conductive Polymer Capacitors This motherboard uses all high-quality conductive polymer capacitors for hard drives larger than the traditional BIOS versions. Gigabit LAN solution...
H61M-E User's Manual
Page 15
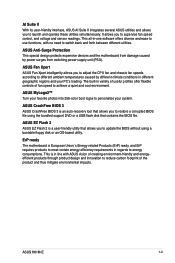
...DVD or a USB flash disk that contains the BIOS file. ErP ready The motherboard is an auto-recovery tool that allows you to personalize your PC's loading. ASUS CrashFree BIOS 3 ASUS CrashFree BIOS 3 is European Union´s Energy-related Products (ErP) ready, and.... It allows you to energy consumptions. ASUS Anti-Surge Protection This special design protects expensive devices and the motherboard from damage caused by different climate conditions in variety of useful profiles offer flexible controls of the product and thus mitigate environmental impacts. ASUS H61M-E 1-3
...DVD or a USB flash disk that contains the BIOS file. ErP ready The motherboard is an auto-recovery tool that allows you to personalize your PC's loading. ASUS CrashFree BIOS 3 ASUS CrashFree BIOS 3 is European Union´s Energy-related Products (ErP) ready, and.... It allows you to energy consumptions. ASUS Anti-Surge Protection This special design protects expensive devices and the motherboard from damage caused by different climate conditions in variety of useful profiles offer flexible controls of the product and thus mitigate environmental impacts. ASUS H61M-E 1-3
H61M-E User's Manual
Page 16
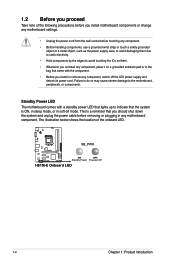
..., or components. Failure to do so may cause severe damage to indicate that you install or remove any motherboard component. Standby Power LED The motherboard comes with the component. • Before you should shut down the system and unplug the power cable before removing or... plugging in soft-off the ATX power supply and detach its power cord. SB_PWR H61M-E ON OFF Standby Power Powered Off H61M-E Onboard LED 1-4 ...
..., or components. Failure to do so may cause severe damage to indicate that you install or remove any motherboard component. Standby Power LED The motherboard comes with the component. • Before you should shut down the system and unplug the power cable before removing or... plugging in soft-off the ATX power supply and detach its power cord. SB_PWR H61M-E ON OFF Standby Power Powered Off H61M-E Onboard LED 1-4 ...
H61M-E User's Manual
Page 17
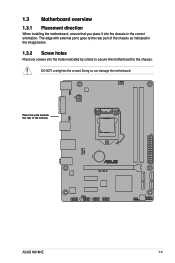
The edge with external ports goes to the rear part of the chassis H61M-E ASUS H61M-E 1-5 Doing so can damage the motherboard. 1.3 Motherboard overview 1.3.1 Placement direction When installing the motherboard, ensure that you place it into the holes indicated by circles to secure the motherboard to the chassis. Place this side towards the rear of the chassis as indicated in the image below. 1.3.2 Screw holes Place six screws into the chassis in the correct orientation. DO NOT overtighten the screws!
The edge with external ports goes to the rear part of the chassis H61M-E ASUS H61M-E 1-5 Doing so can damage the motherboard. 1.3 Motherboard overview 1.3.1 Placement direction When installing the motherboard, ensure that you place it into the holes indicated by circles to secure the motherboard to the chassis. Place this side towards the rear of the chassis as indicated in the image below. 1.3.2 Screw holes Place six screws into the chassis in the correct orientation. DO NOT overtighten the screws!
H61M-E User's Manual
Page 19
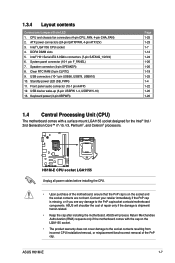
... from incorrect CPU installation/removal, or misplacement/loss/incorrect removal of the motherboard, ensure that the PnP cap is shipment/ transit-related. • Keep the cap after installing the motherboard. ASUS H61M-E 1-7 System panel connector (10-1 pin F_PANEL) 7. USB connectors (...10-1 pin USB56, USB78, USB910) 10. H61M-E H61M-E CPU socket LGA1155 Unplug all power cables before installing the CPU. &#...
... from incorrect CPU installation/removal, or misplacement/loss/incorrect removal of the motherboard, ensure that the PnP cap is shipment/ transit-related. • Keep the cap after installing the motherboard. ASUS H61M-E 1-7 System panel connector (10-1 pin F_PANEL) 7. USB connectors (...10-1 pin USB56, USB78, USB910) 10. H61M-E H61M-E CPU socket LGA1155 Unplug all power cables before installing the CPU. &#...

H61M-E User's Manual
Page 24
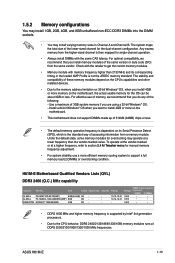
DDR3 modules are developed for better performance with two Double Data Rate 3 (DDR3) Dual Inline Memory Modules (DIMM) sockets. The figure illustrates the location of the DDR3 DIMM sockets: DIMM_A1 DIMM_B1 H61M-E H61M-E 240-pin DDR3 DIMM sockets Channel Channel A Channel B Sockets DIMM_A1 DIMM_B1 1-12 Chapter 1: Product introduction 1.5 System memory 1.5.1 Overview This motherboard comes with less power consumption. A DDR3 module has the same physical dimensions as a DDR2 DIMM but is notched differently to prevent installation on a DDR2 DIMM socket.
DDR3 modules are developed for better performance with two Double Data Rate 3 (DDR3) Dual Inline Memory Modules (DIMM) sockets. The figure illustrates the location of the DDR3 DIMM sockets: DIMM_A1 DIMM_B1 H61M-E H61M-E 240-pin DDR3 DIMM sockets Channel Channel A Channel B Sockets DIMM_A1 DIMM_B1 1-12 Chapter 1: Product introduction 1.5 System memory 1.5.1 Overview This motherboard comes with less power consumption. A DDR3 module has the same physical dimensions as a DDR2 DIMM but is notched differently to prevent installation on a DDR2 DIMM socket.
H61M-E User's Manual
Page 25
... for the dual-channel configuration. Timing - 10-12-12-31 - 10-12-12-31 - - H61M-E Motherboard Qualified Vendors Lists (QVL) DDR3 2400 (O.C.) MHz capability Vendors G.SKILL G.SKILL KINGSTON Part No. ASUS H61M-E 1-13 Any excess memory from a memory module. Check with the retailer to support a full memory ... the DIMM sockets. • You may operate at a higher frequency, refer to install 4GB or more on the motherboard. • This motherboard does not support DIMMs made up of 512Mb (64MB) chips or less. • The default memory operation frequency is dependent ...
... for the dual-channel configuration. Timing - 10-12-12-31 - 10-12-12-31 - - H61M-E Motherboard Qualified Vendors Lists (QVL) DDR3 2400 (O.C.) MHz capability Vendors G.SKILL G.SKILL KINGSTON Part No. ASUS H61M-E 1-13 Any excess memory from a memory module. Check with the retailer to support a full memory ... the DIMM sockets. • You may operate at a higher frequency, refer to install 4GB or more on the motherboard. • This motherboard does not support DIMMs made up of 512Mb (64MB) chips or less. • The default memory operation frequency is dependent ...
H61M-E User's Manual
Page 29
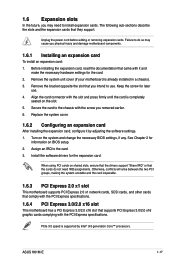
...Expansion slots In the future, you may cause you physical injury and damage motherboard components. 1.6.1 Installing an expansion card To install an expansion card: 1. Remove the system unit cover (if your motherboard is supported by adjusting the software settings. 1. Keep the screw for the... the PCI Express specifications. 1.6.4 PCI Express 3.0/2.0 x16 slot This motherboard has a PCI Express 3.0/2.0 x16 slot that came with the PCI Express specifications. Failure to do not need to the card. 3. ASUS H61M-E 1-17 Before installing the expansion card, read the documentation that ...
...Expansion slots In the future, you may cause you physical injury and damage motherboard components. 1.6.1 Installing an expansion card To install an expansion card: 1. Remove the system unit cover (if your motherboard is supported by adjusting the software settings. 1. Keep the screw for the... the PCI Express specifications. 1.6.4 PCI Express 3.0/2.0 x16 slot This motherboard has a PCI Express 3.0/2.0 x16 slot that came with the PCI Express specifications. Failure to do not need to the card. 3. ASUS H61M-E 1-17 Before installing the expansion card, read the documentation that ...
H61M-E User's Manual
Page 30
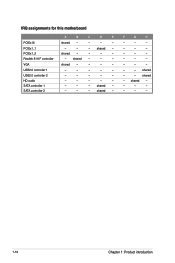
shared - - - - - - - - - - - - - - - - - - - - - - shared - IRQ assignments for this motherboard PCIEx16 PCIEx1_1 PCIEx1_2 Realtek 8111F controller VGA USB2.0 controller 1 USB2.0 controller 2 HD audio SATA controller 1 SATA controller 2 A B C D E shared - - - - - - shared - - - - shared - - shared - - shared - - - - - - - 1-18 Chapter 1: Product introduction shared - shared - - - F G H - - - - - - - - - - - - - - - - - shared - - - - -
shared - - - - - - - - - - - - - - - - - - - - - - shared - IRQ assignments for this motherboard PCIEx16 PCIEx1_1 PCIEx1_2 Realtek 8111F controller VGA USB2.0 controller 1 USB2.0 controller 2 HD audio SATA controller 1 SATA controller 2 A B C D E shared - - - - - - shared - - - - shared - - shared - - shared - - - - - - - 1-18 Chapter 1: Product introduction shared - shared - - - F G H - - - - - - - - - - - - - - - - - shared - - - - -
H61M-E User's Manual
Page 34
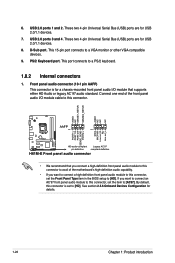
Front panel audio connector (10-1 pin AAFP) This connector is set to [AC97]. Connect one end of the motherboard's high-definition audio capability. • If you want to connect an AC'97 front panel audio module to this connector, set the Front Panel Type... AGND NC NC NC AAFP PIN 1 PIN 1 MIC2 MICPWR Line out_R NC Line out_L PORT1 L PORT1 R PORT2 R SENSE_SEND PORT2 L H61M-E HD-audio-compliant Legacy AC'97 pin definition compliant definition H61M-E Front panel audio connector • We recommend that supports either HD Audio or legacy AC`97 audio standard. USB 2.0 ports...
Front panel audio connector (10-1 pin AAFP) This connector is set to [AC97]. Connect one end of the motherboard's high-definition audio capability. • If you want to connect an AC'97 front panel audio module to this connector, set the Front Panel Type... AGND NC NC NC AAFP PIN 1 PIN 1 MIC2 MICPWR Line out_R NC Line out_L PORT1 L PORT1 R PORT2 R SENSE_SEND PORT2 L H61M-E HD-audio-compliant Legacy AC'97 pin definition compliant definition H61M-E Front panel audio connector • We recommend that supports either HD Audio or legacy AC`97 audio standard. USB 2.0 ports...
H61M-E User's Manual
Page 37
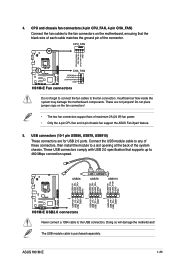
Insufficient air flow inside the system may damage the motherboard components. These are for USB 2.0 ports. Doing so will damage the motherboard! Connect the USB module cable to any of the system chassis. ASUS H61M-E 1-25 Do not place jumper caps on the motherboard, ensuring that supports up to the fan connectors. USB56 USB78 USB910 USB...
Insufficient air flow inside the system may damage the motherboard components. These are for USB 2.0 ports. Doing so will damage the motherboard! Connect the USB module cable to any of the system chassis. ASUS H61M-E 1-25 Do not place jumper caps on the motherboard, ensuring that supports up to the fan connectors. USB56 USB78 USB910 USB...
H61M-E User's Manual
Page 39
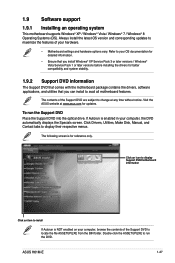
... versions / Windows® Vista Service Pack 1 or later versions before installing the drivers for reference only. Visit the ASUS website at any time without notice. ASUS H61M-E 1-27 1.9 Software support 1.9.1 Installing an operating system This motherboard supports Windows® XP / Windows® Vista / Windows® 7 / Windows® 8 Operating Systems (OS). Refer to display their...
... versions / Windows® Vista Service Pack 1 or later versions before installing the drivers for reference only. Visit the ASUS website at any time without notice. ASUS H61M-E 1-27 1.9 Software support 1.9.1 Installing an operating system This motherboard supports Windows® XP / Windows® Vista / Windows® 7 / Windows® 8 Operating Systems (OS). Refer to display their...
H61M-E User's Manual
Page 41
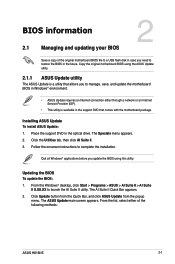
... appears. 2. Installing ASUS Update To install ASUS Update: 1. BIOS information 2.1 Managing and updating your BIOS 2 Save a copy of the original motherboard BIOS file to a USB flash disk in case you need to manage, save, and update the motherboard BIOS in Windows® environment. • ASUS Update requires an Internet connection either of the following methods: ASUS H61M-E 2-1
... appears. 2. Installing ASUS Update To install ASUS Update: 1. BIOS information 2.1 Managing and updating your BIOS 2 Save a copy of the original motherboard BIOS file to a USB flash disk in case you need to manage, save, and update the motherboard BIOS in Windows® environment. • ASUS Update requires an Internet connection either of the following methods: ASUS H61M-E 2-1
H61M-E User's Manual
Page 43
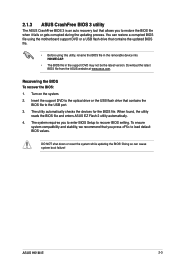
...To recover the BIOS: 1. Insert the support DVD to the optical drive or the USB flash drive that you press to the USB port. 3. ASUS H61M-E 2-3 Turn on the system. 2. Doing so can restore a corrupted BIOS file using this utility, rename the BIOS file in the removable device...BIOS values. The utility automatically checks the devices for the BIOS file. 2.1.3 ASUS CrashFree BIOS 3 utility The ASUS CrashFree BIOS 3 is an auto recovery tool that contains the updated BIOS file. • Before using the motherboard support DVD or a USB flash drive that allows you to enter BIOS ...
...To recover the BIOS: 1. Insert the support DVD to the optical drive or the USB flash drive that you press to the USB port. 3. ASUS H61M-E 2-3 Turn on the system. 2. Doing so can restore a corrupted BIOS file using this utility, rename the BIOS file in the removable device...BIOS values. The utility automatically checks the devices for the BIOS file. 2.1.3 ASUS CrashFree BIOS 3 utility The ASUS CrashFree BIOS 3 is an auto recovery tool that contains the updated BIOS file. • Before using the motherboard support DVD or a USB flash drive that allows you to enter BIOS ...


