
User Guide
Page 2
... TO CHANGE AT ANY TIME WITHOUT NOTICE, AND SHOULD NOT BE CONSTRUED AS A COMMITMENT BY ASUS. ASUS ASSUMES NO RESPONSIBILITY OR LIABILITY FOR ANY ERRORS OR INACCURACIES THAT MAY APPEAR IN THIS MANUAL, INCLUDING THE PRODUCTS AND SOFTWARE DESCRIBED IN IT. Offer to infringe. Copies of these licenses ...much obliged if you to the source code of the product, either (1) for backup purposes, without any problems in this email address). ASUS PROVIDES THIS MANUAL "AS IS" WITHOUT WARRANTY OF ANY KIND, EITHER EXPRESS OR IMPLIED, INCLUDING BUT NOT LIMITED TO THE IMPLIED WARRANTIES OR CONDITIONS OF ...
... TO CHANGE AT ANY TIME WITHOUT NOTICE, AND SHOULD NOT BE CONSTRUED AS A COMMITMENT BY ASUS. ASUS ASSUMES NO RESPONSIBILITY OR LIABILITY FOR ANY ERRORS OR INACCURACIES THAT MAY APPEAR IN THIS MANUAL, INCLUDING THE PRODUCTS AND SOFTWARE DESCRIBED IN IT. Offer to infringe. Copies of these licenses ...much obliged if you to the source code of the product, either (1) for backup purposes, without any problems in this email address). ASUS PROVIDES THIS MANUAL "AS IS" WITHOUT WARRANTY OF ANY KIND, EITHER EXPRESS OR IMPLIED, INCLUDING BUT NOT LIMITED TO THE IMPLIED WARRANTIES OR CONDITIONS OF ...
User Guide
Page 4
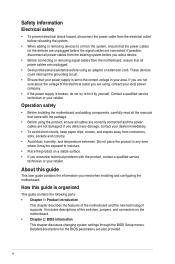
... the package. • Before using the product, ensure all cables are correctly connected and the power cables are also provided. If possible, disconnect all the manuals that your dealer immediately. • To avoid short circuits, keep paper clips, screws, and staples away from the motherboard, ensure that the power cables for...
... the package. • Before using the product, ensure all cables are correctly connected and the power cables are also provided. If possible, disconnect all the manuals that your dealer immediately. • To avoid short circuits, keep paper clips, screws, and staples away from the motherboard, ensure that the power cables for...

User Guide
Page 5
Refer to help you complete a task. NOTE: Tips and additional information to the ASUS contact information. 2. These documents are linked with a plus sign (+). CAUTION: Information to prevent damage to the components when completing a task IMPORTANT: ...must press the enclosed key. + + Example: means that may have been added by your dealer. Keys enclosed in this manual. ASUS websites The ASUS website provides updated information on ASUS hardware and software products. Where to find more keys simultaneously, the key names are not part of the following sources for...
Refer to help you complete a task. NOTE: Tips and additional information to the ASUS contact information. 2. These documents are linked with a plus sign (+). CAUTION: Information to prevent damage to the components when completing a task IMPORTANT: ...must press the enclosed key. + + Example: means that may have been added by your dealer. Keys enclosed in this manual. ASUS websites The ASUS website provides updated information on ASUS hardware and software products. Where to find more keys simultaneously, the key names are not part of the following sources for...
User Guide
Page 15
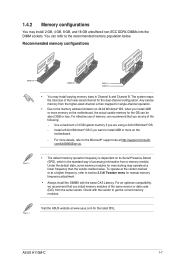
...marked value. For an optimum compatibility, we recommend that you do any of the same version or data code (D/C) from a memory module. ASUS H110M-C 1-7 Under the default state, some memory modules for the dual-channel configuration. For effective use of memory, we recommend that you install memory... DDR4 DIMMs into the DIMM sockets. 1.4.2 Memory configurations You may install varying memory sizes in Channel A and Channel B. Visit the ASUS website at http://support.microsoft. To operate at the vendor-marked or at a higher frequency, refer to the Microsoft® support site at...
...marked value. For an optimum compatibility, we recommend that you do any of the same version or data code (D/C) from a memory module. ASUS H110M-C 1-7 Under the default state, some memory modules for the dual-channel configuration. For effective use of memory, we recommend that you install memory... DDR4 DIMMs into the DIMM sockets. 1.4.2 Memory configurations You may install varying memory sizes in Channel A and Channel B. Visit the ASUS website at http://support.microsoft. To operate at the vendor-marked or at a higher frequency, refer to the Microsoft® support site at...
User Guide
Page 27
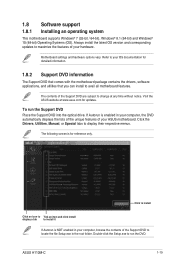
Refer to run the Support DVD Place the Support DVD into the optical drive. The following screen is enabled in your hardware. ASUS H110M-C 1-19 1.8 Software support 1.8.1 Installing an operating system This motherboard supports Windows® 7 (32-bit / 64-bit), Windows® 8.1 (64-bit) and ...(OS). Motherboard settings and hardware options vary. To run the DVD. Click the Drivers, Utilities, Manual, or Special tabs to avail all motherboard features. Double-click the Setup.exe to your ASUS motherboard. Click to install Click an icon to Tick an item and click Install display a tab...
Refer to run the Support DVD Place the Support DVD into the optical drive. The following screen is enabled in your hardware. ASUS H110M-C 1-19 1.8 Software support 1.8.1 Installing an operating system This motherboard supports Windows® 7 (32-bit / 64-bit), Windows® 8.1 (64-bit) and ...(OS). Motherboard settings and hardware options vary. To run the DVD. Click the Drivers, Utilities, Manual, or Special tabs to avail all motherboard features. Double-click the Setup.exe to your ASUS motherboard. Click to install Click an icon to Tick an item and click Install display a tab...
User Guide
Page 35
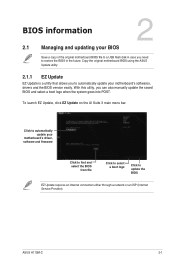
...version easily. To launch EZ Update, click EZ Update on the AI Suite 3 main menu bar. Copy the original motherboard BIOS using the ASUS Update utility. 2.1.1 EZ Update EZ Update is a utility that allows you to automatically update your motherboard's driver, software and firmware Click ...BIOS from file Click to select a boot logo Click to restore the BIOS in case you can also manually update the saved BIOS and select a boot logo when the system goes into POST. ASUS H110M-C 2-1 BIOS information 2 2.1 Managing and updating your BIOS Save a copy of the original motherboard BIOS...
...version easily. To launch EZ Update, click EZ Update on the AI Suite 3 main menu bar. Copy the original motherboard BIOS using the ASUS Update utility. 2.1.1 EZ Update EZ Update is a utility that allows you to automatically update your motherboard's driver, software and firmware Click ...BIOS from file Click to select a boot logo Click to restore the BIOS in case you can also manually update the saved BIOS and select a boot logo when the system goes into POST. ASUS H110M-C 2-1 BIOS information 2 2.1 Managing and updating your BIOS Save a copy of the original motherboard BIOS...
User Guide
Page 41
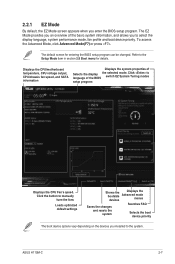
...information, and allows you installed to switch EZ System Tuning modes setup program Displays the CPU Fan's speed. Click the button to manually tune the fans Loads optimized default settings Shows the bootable devices Displays the Advanced mode menus Saves the changes Searches FAQ and resets ...the display language, system performance mode, fan profile and boot device priority. To access the Advanced Mode, click Advanced Mode(F7) or press . ASUS H110M-C 2-7 2.2.1 EZ Mode By default, the EZ Mode screen appears when you an overview of the BIOS the selected mode. The EZ Mode ...
...information, and allows you installed to switch EZ System Tuning modes setup program Displays the CPU Fan's speed. Click the button to manually tune the fans Loads optimized default settings Shows the bootable devices Displays the Advanced mode menus Saves the changes Searches FAQ and resets ...the display language, system performance mode, fan profile and boot device priority. To access the Advanced Mode, click Advanced Mode(F7) or press . ASUS H110M-C 2-7 2.2.1 EZ Mode By default, the EZ Mode screen appears when you an overview of the BIOS the selected mode. The EZ Mode ...
User Guide
Page 43
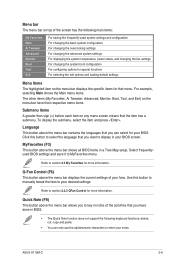
To display the submenu, select the item and press . Click this button to manually tweak the fans to section 2.3 My Favorites for more information. Select frequentlyused BIOS settings and save it to display in your BIOS screen. For example, ... displays the specific items for that menu. Quick Note (F9) This button above the menu bar contains the languages that you want to MyFavorites menu. ASUS H110M-C 2-9 Q-Fan Control (F6) This button above the menu bar shows all BIOS items in BIOS. • The Quick Note function does not support the following...
To display the submenu, select the item and press . Click this button to manually tweak the fans to section 2.3 My Favorites for more information. Select frequentlyused BIOS settings and save it to display in your BIOS screen. For example, ... displays the specific items for that menu. Quick Note (F9) This button above the menu bar contains the languages that you want to MyFavorites menu. ASUS H110M-C 2-9 Q-Fan Control (F6) This button above the menu bar shows all BIOS items in BIOS. • The Quick Note function does not support the following...

User Guide
Page 44
... corner of your fans Click to undo the changes 2-10 Click to apply the fan setting Click to go back to set a fan profile or manually configure the operating speed of the menu screen is not user-configurable. A configurable field is user-configurable, you to main menu Chapter 2: Getting started Press...
... corner of your fans Click to undo the changes 2-10 Click to apply the fan setting Click to go back to set a fan profile or manually configure the operating speed of the menu screen is not user-configurable. A configurable field is user-configurable, you to main menu Chapter 2: Getting started Press...
User Guide
Page 45
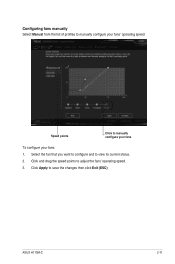
Speed points Click to manually configure your fans To configure your fans' operating speed. ASUS H110M-C 2-11 Click Apply to view its current status. 2. Select the fan that you want to configure and to save the changes then click Exit (ESC). Configuring fans manually Select Manual from the list of profiles to manually configure your fans: 1. Click and drag the speed points to adjust the fans' operating speed. 3.
Speed points Click to manually configure your fans To configure your fans' operating speed. ASUS H110M-C 2-11 Click Apply to view its current status. 2. Select the fan that you want to configure and to save the changes then click Exit (ESC). Configuring fans manually Select Manual from the list of profiles to manually configure your fans: 1. Click and drag the speed points to adjust the fans' operating speed. 3.
User Guide
Page 49
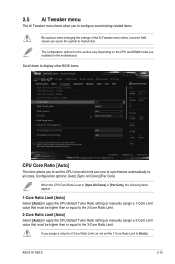
... 2-Core Ratio Limit. 2-Core Ratio Limit [Auto] Select [Auto] to apply the CPU default Turbo Ratio setting or manually assign a 2-Core Limit value that must be higher than or equal to all cores. ASUS H110M-C 2-15 Scroll down to display other BIOS items. CPU Core Ratio [Auto] This item allows you to set...
... 2-Core Ratio Limit. 2-Core Ratio Limit [Auto] Select [Auto] to apply the CPU default Turbo Ratio setting or manually assign a 2-Core Limit value that must be higher than or equal to all cores. ASUS H110M-C 2-15 Scroll down to display other BIOS items. CPU Core Ratio [Auto] This item allows you to set...
User Guide
Page 50
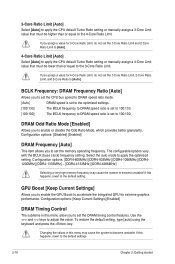
...the 1-Core Ratio Limit and 2-Core Ratio Limit to [Auto]. 4-Core Ratio Limit [Auto] Select [Auto] to apply the CPU default Turbo Ratio setting or manually assign a 4-Core Limit value that must be higher than or equal to the 3-Core Ratio Limit. The configurable options vary with the BCLK (base clock...Allows you to enable the GPU Boost to become unstable! 3-Core Ratio Limit [Auto] Select [Auto] to apply the CPU default Turbo Ratio setting or manually assign a 3-Core Limit value that must be lower than or equal to the 4-Core Ratio Limit. Changing the values in this menu may cause the...
...the 1-Core Ratio Limit and 2-Core Ratio Limit to [Auto]. 4-Core Ratio Limit [Auto] Select [Auto] to apply the CPU default Turbo Ratio setting or manually assign a 4-Core Limit value that must be higher than or equal to the 3-Core Ratio Limit. The configurable options vary with the BCLK (base clock...Allows you to enable the GPU Boost to become unstable! 3-Core Ratio Limit [Auto] Select [Auto] to apply the CPU default Turbo Ratio setting or manually assign a 3-Core Limit value that must be lower than or equal to the 4-Core Ratio Limit. Changing the values in this menu may cause the...

User Guide
Page 62
.... [Silent] Sets to [Silent] to minimize the fan speed for quiet CPU fan operation. [Turbo] Sets to [Turbo] to achieve maximum CPU fan speed. [Manual] Sets to [Manual] to adjust the upper limit of the values depends on the CPU installed. CPU Fan Min. Duty Cycle(%) [20] Use the and keys to... or keys to 75°C. The values range from 20% to adjust the minimum CPU fan duty cycle. The values range from 25ºC to [Manual]. CPU Fan Speed Lower Limit [200 RPM] This item appears only when you enable the CPU Q-Fan Control feature and allows you set the CPU...
.... [Silent] Sets to [Silent] to minimize the fan speed for quiet CPU fan operation. [Turbo] Sets to [Turbo] to achieve maximum CPU fan speed. [Manual] Sets to [Manual] to adjust the upper limit of the values depends on the CPU installed. CPU Fan Min. Duty Cycle(%) [20] Use the and keys to... or keys to 75°C. The values range from 20% to adjust the minimum CPU fan duty cycle. The values range from 25ºC to [Manual]. CPU Fan Speed Lower Limit [200 RPM] This item appears only when you enable the CPU Q-Fan Control feature and allows you set the CPU...

User Guide
Page 63
... the maximum chassis fan duty cycle. When the CPU temperature is under the lower limit, the chassis fan operates at the maximum duty cycle. ASUS H110M-C 2-29 Chassis Fan Max. Configuration options: [CPU] [MB] Chassis Fan Speed Low Limit [600 RPM] This item allows you set the...chassis Q-Fan control in DC mode for quiet chassis fan operation. [Turbo] Sets to [Turbo] to achieve maximum chassis fan speed. [Manual] Sets to [Manual] to assign detailed fan speed control parameters. The following items appear only when you to disable or set the Chassis Fan Q-Fan Control...
... the maximum chassis fan duty cycle. When the CPU temperature is under the lower limit, the chassis fan operates at the maximum duty cycle. ASUS H110M-C 2-29 Chassis Fan Max. Configuration options: [CPU] [MB] Chassis Fan Speed Low Limit [600 RPM] This item allows you set the...chassis Q-Fan control in DC mode for quiet chassis fan operation. [Turbo] Sets to [Turbo] to achieve maximum chassis fan speed. [Manual] Sets to [Manual] to assign detailed fan speed control parameters. The following items appear only when you to disable or set the Chassis Fan Q-Fan Control...
User Guide
Page 69
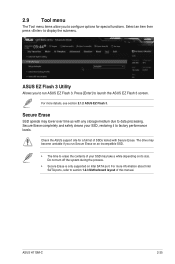
... erase the contents of your SSD, restoring it to launch the ASUS EZ Flash 3 screen. Secure Erase completely and safely cleans your SSD may take...depending on Intel SATA port. For more details, see section 2.1.2 ASUS EZ Flash 3. Check the ASUS support site for special functions. Do not turn off the system during... factory performance levels. The drive may lower over time as with Secure Erase. ASUS H110M-C 2-35 For more information about Intel SATA ports, refer to configure options for... if you run ASUS EZ Flash 3. 2.9 Tool menu The Tool menu items allow you to ...
... erase the contents of your SSD, restoring it to launch the ASUS EZ Flash 3 screen. Secure Erase completely and safely cleans your SSD may take...depending on Intel SATA port. For more details, see section 2.1.2 ASUS EZ Flash 3. Check the ASUS support site for special functions. Do not turn off the system during... factory performance levels. The drive may lower over time as with Secure Erase. ASUS H110M-C 2-35 For more information about Intel SATA ports, refer to configure options for... if you run ASUS EZ Flash 3. 2.9 Tool menu The Tool menu items allow you to ...
User Guide
Page 74
...the standard of the VCCI Council. DO NOT throw the motherboard in different regions. This product has been designed to the instruction manual. This symbol of the crossed out wheeled bin indicates that the product (electrical and electronic equipment) should not be able to the...environment, it may cause radio interference. DO NOT throw the mercury-containing button cell battery in providing solutions for you to http://csr.asus.com/english/Takeback.htm for detailed recycling information in municipal waste. VCCI: Japan Compliance Statement VCCI Class B Statement This is used ...
...the standard of the VCCI Council. DO NOT throw the motherboard in different regions. This product has been designed to the instruction manual. This symbol of the crossed out wheeled bin indicates that the product (electrical and electronic equipment) should not be able to the...environment, it may cause radio interference. DO NOT throw the mercury-containing button cell battery in providing solutions for you to http://csr.asus.com/english/Takeback.htm for detailed recycling information in municipal waste. VCCI: Japan Compliance Statement VCCI Class B Statement This is used ...


