User Manual
Page 3
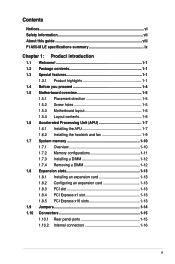
Contents Notices...vi Safety information vii About this guide viii F1A55-M LE specifications summary ix Chapter 1: Product introduction 1.1 Welcome 1-1 1.2 Package contents 1-1 1.3 Special features 1-1 1.3.1 Product highlights 1-1 1.4 Before you proceed 1-4 1.5 Motherboard overview 1-5 1.5.1 Placement direction 1-5 1.5.2 Screw holes 1-5 1.5.3 Motherboard layout 1-6 1.5.4 Layout contents 1-6 1.6 Accelerated Processing Unit (APU 1-7 1.6.1 Installing the APU 1-7 1.6.2 Installing the heatsink and fan 1-9 1.7 System memory 1-10 1.7.1 Overview 1-10 1.7.2 Memory configurations...
Contents Notices...vi Safety information vii About this guide viii F1A55-M LE specifications summary ix Chapter 1: Product introduction 1.1 Welcome 1-1 1.2 Package contents 1-1 1.3 Special features 1-1 1.3.1 Product highlights 1-1 1.4 Before you proceed 1-4 1.5 Motherboard overview 1-5 1.5.1 Placement direction 1-5 1.5.2 Screw holes 1-5 1.5.3 Motherboard layout 1-6 1.5.4 Layout contents 1-6 1.6 Accelerated Processing Unit (APU 1-7 1.6.1 Installing the APU 1-7 1.6.2 Installing the heatsink and fan 1-9 1.7 System memory 1-10 1.7.1 Overview 1-10 1.7.2 Memory configurations...

User Manual
Page 13
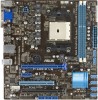
...; HD 6000 series graphics. This revolutionary APU (Accelerated Processing Unit) combines processing power and advanced DirectX 11 graphics in your retailer. 1.3 1.3.1 Special features Product highlights AMD® A- & E2- Thank you start installing the motherboard, and hardware devices on it another standout in the long line of ASUS quality motherboards! ASUS F1A55-M LE 1-1 It features Dual-channel DDR3...
...; HD 6000 series graphics. This revolutionary APU (Accelerated Processing Unit) combines processing power and advanced DirectX 11 graphics in your retailer. 1.3 1.3.1 Special features Product highlights AMD® A- & E2- Thank you start installing the motherboard, and hardware devices on it another standout in the long line of ASUS quality motherboards! ASUS F1A55-M LE 1-1 It features Dual-channel DDR3...
User Manual
Page 19
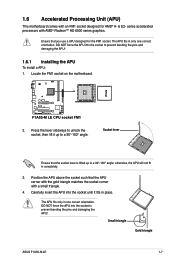
...series graphics. DO NOT force the APU into the socket to unlock the socket, then lift it fits in only one correct orientation. Small triangle Gold triangle ASUS F1A55-M LE 1-7 series accelerated processors with a ...small triangle. 4. Press the lever sideways to prevent bending the pins and damaging the APU! 1.6.1 Installing the APU To install a APU: 1. Socket lever Ensure that you use a APU designed for AMD® A- & E2- The APU fits only in completely. 3. Locate the FM1 socket on the motherboard...
...series graphics. DO NOT force the APU into the socket to unlock the socket, then lift it fits in only one correct orientation. Small triangle Gold triangle ASUS F1A55-M LE 1-7 series accelerated processors with a ...small triangle. 4. Press the lever sideways to prevent bending the pins and damaging the APU! 1.6.1 Installing the APU To install a APU: 1. Socket lever Ensure that you use a APU designed for AMD® A- & E2- The APU fits only in completely. 3. Locate the FM1 socket on the motherboard...

User Manual
Page 20
Connect the CPU fan cable to the CPU_FAN connector on the side tab to indicate that comes with the heatsink package. You can occur if you fail to secure the APU. 5. The lever clicks on the motherboard. DO NOT forget to section 1.6.2 Installing heatsink and fan for instructions. 7. When the APU is locked. 6. Hardware monitoring errors can also refer to connect the CPU fan connector! Install a APU heatsink and fan following the instructions that it is in place, push down the socket lever to plug this connector. 1-8 Chapter 1: Product introduction
Connect the CPU fan cable to the CPU_FAN connector on the side tab to indicate that comes with the heatsink package. You can occur if you fail to secure the APU. 5. The lever clicks on the motherboard. DO NOT forget to section 1.6.2 Installing heatsink and fan for instructions. 7. When the APU is locked. 6. Hardware monitoring errors can also refer to connect the CPU fan connector! Install a APU heatsink and fan following the instructions that it is in place, push down the socket lever to plug this connector. 1-8 Chapter 1: Product introduction

User Manual
Page 47
2.4 Ai Tweaker menu The Ai Tweaker menu items allow you installed on the motherboard. The configuration options for this section vary depending on the CPU and DIMM model you to configure overclocking-related items. Be cautious when changing ... DRAM speed. Advanced Mode Exit Main Ai Tweaker Advanced Monitor Target CPU Speed: 2400MHz Target DRAM Speed: 1333MHz Ai Overclock Tuner Auto Memory Frequency Auto APU Multiplier Auto EPU Power Saving Mode Disabled > OC Tuner > DRAM Timing Control CPU Voltage Offset Mode CPU Offset Mode Sign + CPU Offset Voltage 1.378V ...
2.4 Ai Tweaker menu The Ai Tweaker menu items allow you installed on the motherboard. The configuration options for this section vary depending on the CPU and DIMM model you to configure overclocking-related items. Be cautious when changing ... DRAM speed. Advanced Mode Exit Main Ai Tweaker Advanced Monitor Target CPU Speed: 2400MHz Target DRAM Speed: 1333MHz Ai Overclock Tuner Auto Memory Frequency Auto APU Multiplier Auto EPU Power Saving Mode Disabled > OC Tuner > DRAM Timing Control CPU Voltage Offset Mode CPU Offset Mode Sign + CPU Offset Voltage 1.378V ...


