
User Manual
Page 7
TIP: Tips for special situations. Important information that must be followed to prevent damage to complete certain tasks safely and effectively.These notes have different degrees of importance as follows: WARNING! NOTE: Information for completing tasks. IMPORTANT! ASUS Eee PC 1-3 Vital information that must be followed for This Manual A few notes and warnings are used throughout this guide, allowing you to data, components, or persons. Notes for safe operation.
TIP: Tips for special situations. Important information that must be followed to prevent damage to complete certain tasks safely and effectively.These notes have different degrees of importance as follows: WARNING! NOTE: Information for completing tasks. IMPORTANT! ASUS Eee PC 1-3 Vital information that must be followed for This Manual A few notes and warnings are used throughout this guide, allowing you to data, components, or persons. Notes for safe operation.

User Manual
Page 8
... life of warm water and remove any extra moisture with a dry cloth. Do not use near the surface. Seek servicing if the casing has been damaged. DO NOT press or touch the display panel. DO NOT expose to or use strong solvents such as described in fire. DO NOT disassemble the battery. 1-4 Chapter 1: Introducing the Eee PC Except as thinners, benzene...
... life of warm water and remove any extra moisture with a dry cloth. Do not use near the surface. Seek servicing if the casing has been damaged. DO NOT press or touch the display panel. DO NOT expose to or use strong solvents such as described in fire. DO NOT disassemble the battery. 1-4 Chapter 1: Introducing the Eee PC Except as thinners, benzene...
User Manual
Page 17
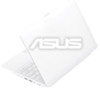
... Key Pressing this key repeatedly to launch frequently used for Super Hybrid Engine function. ASUS Eee PC 2-3 The Eee PC uses an active matrix TFT LCD, which provides excellent viewing like that of a button. Unlike desktop monitors, the LCD panel does not produce any radiation or flickering, so it is easier on the keyboard, mouse or touchpad will activate monitor again. 1 Built-in Camera The built-in array microphone is more clear and echo-free...
... Key Pressing this key repeatedly to launch frequently used for Super Hybrid Engine function. ASUS Eee PC 2-3 The Eee PC uses an active matrix TFT LCD, which provides excellent viewing like that of a button. Unlike desktop monitors, the LCD panel does not produce any radiation or flickering, so it is easier on the keyboard, mouse or touchpad will activate monitor again. 1 Built-in Camera The built-in array microphone is more clear and echo-free...

User Manual
Page 18
... functions as a desktop mouse. The power switch only works when the display panel is available to turn ON and hold it to allow easy web and document navigation. 8 Status Indicators (front) Power Indicator The power indicator lights when the Eee PC is turned ON and blinks slowly when the Eee PC is turned OFF. 2-4 Chapter 2: Knowing the Parts Multi-finger gesture input is opened. 6 Keyboard The keyboard provides keys with built-in the Saveto-RAM (Suspend) mode. This indicator...
... functions as a desktop mouse. The power switch only works when the display panel is available to turn ON and hold it to allow easy web and document navigation. 8 Status Indicators (front) Power Indicator The power indicator lights when the Eee PC is turned ON and blinks slowly when the Eee PC is turned OFF. 2-4 Chapter 2: Knowing the Parts Multi-finger gesture input is opened. 6 Keyboard The keyboard provides keys with built-in the Saveto-RAM (Suspend) mode. This indicator...

User Manual
Page 19
... Blinking Slowly Green Blinking Slowly Battery charge is less than 10% Orange Blinking Quickly Green Blinking Quickly Standby Mode / Powered OFF AC Mode Battery Mode Battery charge is between 100%-80% Orange ON Off Battery charge is between 80%-10% Orange Blinking Slowly Off Battery charge is less than 10% Orange Blinking Quickly Off The Battery Charge Indicator will not light when the battery is written to or read from your Eee PC. Solid-State disk (SSD)/Hard disk (HDD) Indicator The solid-state disk drive/hard disk drive indicator blinks...
... Blinking Slowly Green Blinking Slowly Battery charge is less than 10% Orange Blinking Quickly Green Blinking Quickly Standby Mode / Powered OFF AC Mode Battery Mode Battery charge is between 100%-80% Orange ON Off Battery charge is between 80%-10% Orange Blinking Slowly Off Battery charge is less than 10% Orange Blinking Quickly Off The Battery Charge Indicator will not light when the battery is written to or read from your Eee PC. Solid-State disk (SSD)/Hard disk (HDD) Indicator The solid-state disk drive/hard disk drive indicator blinks...

User Manual
Page 21
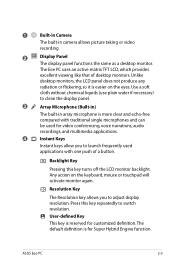
... specifications for this Eee PC. Audio features are secured in stereo speaker system allows you to insert or remove the battery pack. The battery pack cannot be disassembled and must be depressed with external stereo headphones or speakers). ASUS Eee PC 2-7 Move the manual lock to the unlocked position to hear audio without additional attachments. This allows use when moving temporarily between locations. Manual The manual battery lock is not connected. 2 Battery Pack The battery...
... specifications for this Eee PC. Audio features are secured in stereo speaker system allows you to insert or remove the battery pack. The battery pack cannot be disassembled and must be depressed with external stereo headphones or speakers). ASUS Eee PC 2-7 Move the manual lock to the unlocked position to hear audio without additional attachments. This allows use when moving temporarily between locations. Manual The manual battery lock is not connected. 2 Battery Pack The battery...
User Manual
Page 25
... disassembled and must be purchased as a single unit. Using this Eee PC. This allows use when moving temporarily between locations. Rear Side Refer to the illustration below to identify the components on this side of the Eee PC. 1 1 Battery Pack The battery pack is not connected. 5 Headphone Output Jack The 1/8" stereo headphone jack (3.55mm) connects the Eee PC's audio out signal to the Eee PC when AC power is automatically charged...
... disassembled and must be purchased as a single unit. Using this Eee PC. This allows use when moving temporarily between locations. Rear Side Refer to the illustration below to identify the components on this side of the Eee PC. 1 1 Battery Pack The battery pack is not connected. 5 Headphone Output Jack The 1/8" stereo headphone jack (3.55mm) connects the Eee PC's audio out signal to the Eee PC when AC power is automatically charged...

User Manual
Page 31
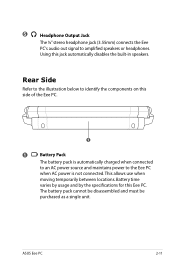
... above or below this Eee PC. ASUS Eee PC 3-5 For safety reasons, DO NOT throw the battery in fire, DO NOT short circuit the contacts, and DO NOT disassemble the battery. You must be purchased from an authorized dealer for storing. Because batteries also have a shelf life, it can be used . It is ideal that the Eee PC's internal temperature is higher than...
... above or below this Eee PC. ASUS Eee PC 3-5 For safety reasons, DO NOT throw the battery in fire, DO NOT short circuit the contacts, and DO NOT disassemble the battery. You must be purchased from an authorized dealer for storing. Because batteries also have a shelf life, it can be used . It is ideal that the Eee PC's internal temperature is higher than...

User Manual
Page 37
... / Bluetooth OFF. ASUS Eee PC 3-11 A. (901 Series) zzZ Icon (F1): Places the Eee PC in this series: LCD Only -> CRT Only (External Monitor) -> LCD + CRT Clone. Radio Tower (F2): Wireless Models Only:Toggles the internal wireless LAN or Bluetooth (on -screen-display. When enabled, the corresponding wireless indicator will light. Some function icons appear in the Notification area after activation. Follow the icons whenever your hot key locations do not match the manual. Sun Down Icon (F3): Decreases the display brightness...
... / Bluetooth OFF. ASUS Eee PC 3-11 A. (901 Series) zzZ Icon (F1): Places the Eee PC in this series: LCD Only -> CRT Only (External Monitor) -> LCD + CRT Clone. Radio Tower (F2): Wireless Models Only:Toggles the internal wireless LAN or Bluetooth (on -screen-display. When enabled, the corresponding wireless indicator will light. Some function icons appear in the Notification area after activation. Follow the icons whenever your hot key locations do not match the manual. Sun Down Icon (F3): Decreases the display brightness...

User Manual
Page 63
... All listed software packages are copyright by their respective source code. ASUSTeK COMPUTER Inc. For more information on how you can obtain our open source code, visit our website (http://support.asus.com.tw/download/). ASUS Eee PC A-19 GNU General Public License Licensing Information This product includes copyrighted third-party software licensed under the terms of the object code. All future firmware updates will...
... All listed software packages are copyright by their respective source code. ASUSTeK COMPUTER Inc. For more information on how you can obtain our open source code, visit our website (http://support.asus.com.tw/download/). ASUS Eee PC A-19 GNU General Public License Licensing Information This product includes copyrighted third-party software licensed under the terms of the object code. All future firmware updates will...

User Manual
Page 3
... Info...2-36 Date & Time 2-36 Personalization 2-37 Add/Remove Software 2-37 Touchpad...2-41 Disk Utility...2-41 Diagnostic Tools 2-42 EeeAP ...2-44 Instant Key (on selected models 2-45 Voice Command (in selected territories 2-46 Task Manager 2-47 Favorites...2-48 Customize...2-48 System Recovery 3-1 Chapter 3: System Recovery System Recovery 3-2 Using Hidden Partition 3-2 Using the Recovery DVD 3-3 Using USB Flash Disk 3-4 Chapter 4: Installing Windows® XP Preparing to install Windows® XP 4-2 Installing Windows® XP 4-2 Support CD information 4-4 ASUS Eee PC iii
... Info...2-36 Date & Time 2-36 Personalization 2-37 Add/Remove Software 2-37 Touchpad...2-41 Disk Utility...2-41 Diagnostic Tools 2-42 EeeAP ...2-44 Instant Key (on selected models 2-45 Voice Command (in selected territories 2-46 Task Manager 2-47 Favorites...2-48 Customize...2-48 System Recovery 3-1 Chapter 3: System Recovery System Recovery 3-2 Using Hidden Partition 3-2 Using the Recovery DVD 3-3 Using USB Flash Disk 3-4 Chapter 4: Installing Windows® XP Preparing to install Windows® XP 4-2 Installing Windows® XP 4-2 Support CD information 4-4 ASUS Eee PC iii

User Manual
Page 6
... the support CD. 4. Important information that must be followed to prevent damage to data, components, or persons. NOTE: Information for completing tasks. Using the Eee PC Provides information on using the Eee PC's utilities. 2. Appendix Provides you information on system recovery. 3. IMPORTANT! Notes for safe operation. About This User's Manual You are major sections of this guide, allowing you information on how to install Windows®...
... the support CD. 4. Important information that must be followed to prevent damage to data, components, or persons. NOTE: Information for completing tasks. Using the Eee PC Provides information on using the Eee PC's utilities. 2. Appendix Provides you information on system recovery. 3. IMPORTANT! Notes for safe operation. About This User's Manual You are major sections of this guide, allowing you information on how to install Windows®...
User Manual
Page 7
... your power adapter complies with small items that may scratch or enter the Eee PC. DO NOT operate during electrical storms. DO NOT leave the Eee PC on uneven or unstable work surfaces. DO NOT press or touch the display panel. DO NOT disassemble the battery. Do not use strong solvents such as thinners, benzene, or other peripherals. DO NOT throw the Eee PC in fire. Seek servicing...
... your power adapter complies with small items that may scratch or enter the Eee PC. DO NOT operate during electrical storms. DO NOT leave the Eee PC on uneven or unstable work surfaces. DO NOT press or touch the display panel. DO NOT disassemble the battery. Do not use strong solvents such as thinners, benzene, or other peripherals. DO NOT throw the Eee PC in fire. Seek servicing...

User Manual
Page 24
... the drop-down list and fill out your instant messaging account. 2. Chatting with other necessary information to login your account. If you are using from different service providers, press Add button again to Pidgin screen displays. Select an instant messaging service you have an IM... account, apply one from the Internet tab and the Welcome to add and configure more IM accounts. 2-16 Chapter 2: Using the Eee PC
... the drop-down list and fill out your instant messaging account. 2. Chatting with other necessary information to login your account. If you are using from different service providers, press Add button again to Pidgin screen displays. Select an instant messaging service you have an IM... account, apply one from the Internet tab and the Welcome to add and configure more IM accounts. 2-16 Chapter 2: Using the Eee PC

User Manual
Page 58
... Restore Factory Settings and press to select which entry is highlighted. Contact your local RMA for details. System Recovery There are three ways to update your OS. Ensure to your Eee PC, the builtin hidden partition would be cleared and cannot be something wrong with your important data before booting, or 'c' for system recovery. 2. After the system recovery, use the Add/Remove Software in the Recovery DVD...
... Restore Factory Settings and press to select which entry is highlighted. Contact your local RMA for details. System Recovery There are three ways to update your OS. Ensure to your Eee PC, the builtin hidden partition would be cleared and cannot be something wrong with your important data before booting, or 'c' for system recovery. 2. After the system recovery, use the Add/Remove Software in the Recovery DVD...
User Manual
Page 59
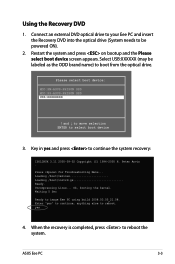
... HDD:SS-ASUS-PHISON SSD USB:XXXXXXXX ↑ and ↓ to move selection ENTER to image Eee PC using build 2008.03.05_21.08. Uncompressing Linux... Peter Anvin . yes 4. ASUS Eee PC 3-3 Key in yes and press to reboot. Ok, booting the kernel. Enter "yes" to continue, anything else to continue the system recovery: ISOLINUX 3.11 2005-09-02 Copyright (C) 1994-2005 H. Connect an external DVD optical drive to your Eee PC...
... HDD:SS-ASUS-PHISON SSD USB:XXXXXXXX ↑ and ↓ to move selection ENTER to image Eee PC using build 2008.03.05_21.08. Uncompressing Linux... Peter Anvin . yes 4. ASUS Eee PC 3-3 Key in yes and press to reboot. Ok, booting the kernel. Enter "yes" to continue, anything else to continue the system recovery: ISOLINUX 3.11 2005-09-02 Copyright (C) 1994-2005 H. Connect an external DVD optical drive to your Eee PC...
User Manual
Page 62
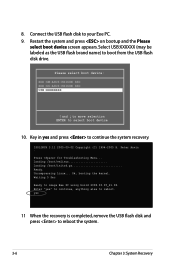
... for Troubleshooting Menu... yes 11 When the recovery is completed, remove the USB flash disk and press to image Eee PC using build 2008.03.05_21.08. Uncompressing Linux... Loading /boot/vmlinuz Loading /boot/initrd.gz Ready. Connect the USB flash disk to reboot. Enter "yes" to continue, anything else to your Eee PC. 9. Restart the system and press on bootup and the Please select boot device screen appears. Ok, booting the kernel. Key in yes...
... for Troubleshooting Menu... yes 11 When the recovery is completed, remove the USB flash disk and press to image Eee PC using build 2008.03.05_21.08. Uncompressing Linux... Loading /boot/vmlinuz Loading /boot/initrd.gz Ready. Connect the USB flash disk to reboot. Enter "yes" to continue, anything else to your Eee PC. 9. Restart the system and press on bootup and the Please select boot device screen appears. Ok, booting the kernel. Key in yes...
User Manual
Page 66
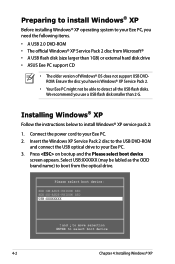
... your Eee PC, you use a USB flash disk smaller than 1GB) or external hard disk drive • ASUS Eee PC support CD • The older version of Windows® OS does not support USB DVDROM. Insert the Windows XP Service Pack 2 disc to the USB DVD-ROM and connect the USB optical drive to select boot device 4-2 Chapter 4: Installing Windows® XP Please select boot device: HDD:SM-ASUS-PHISON SSD HDD:SS-ASUS-PHISON SSD USB:XXXXXXXX ↑ and ↓ to move selection ENTER to your Eee PC. 2. Select USB...
... your Eee PC, you use a USB flash disk smaller than 1GB) or external hard disk drive • ASUS Eee PC support CD • The older version of Windows® OS does not support USB DVDROM. Insert the Windows XP Service Pack 2 disc to the USB DVD-ROM and connect the USB optical drive to select boot device 4-2 Chapter 4: Installing Windows® XP Please select boot device: HDD:SM-ASUS-PHISON SSD HDD:SS-ASUS-PHISON SSD USB:XXXXXXXX ↑ and ↓ to move selection ENTER to your Eee PC. 2. Select USB...
User Manual
Page 67
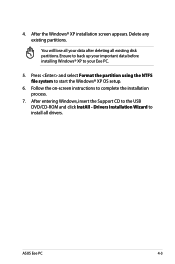
... select Format the partition using the NTFS file system to complete the installation process. 7. Follow the on-screen instructions to start the Windows® XP OS setup. 6. Ensure to back up your important data before installing Windows® XP to install all drivers. ASUS Eee PC 4-3 You will lose all existing disk partitions. 4. Drivers Installation Wizard to your data after deleting all your Eee PC. 5. After entering Windows, insert the Support CD to the USB DVD/CD-ROM...
... select Format the partition using the NTFS file system to complete the installation process. 7. Follow the on-screen instructions to start the Windows® XP OS setup. 6. Ensure to back up your important data before installing Windows® XP to install all drivers. ASUS Eee PC 4-3 You will lose all existing disk partitions. 4. Drivers Installation Wizard to your data after deleting all your Eee PC. 5. After entering Windows, insert the Support CD to the USB DVD/CD-ROM...

User Manual
Page 68
Running the support CD Insert the support CD in the external optical drive.The CD automatically displays the Drivers menu if Autorun is NOT enabled in the support DVD are subject to activate the devices. All the following screens appear only in your computer, browse the contents of the support CD to run the CD. Double-click the ASSETUP.EXE file to locate the file ASSETUP...
Running the support CD Insert the support CD in the external optical drive.The CD automatically displays the Drivers menu if Autorun is NOT enabled in the support DVD are subject to activate the devices. All the following screens appear only in your computer, browse the contents of the support CD to run the CD. Double-click the ASSETUP.EXE file to locate the file ASSETUP...


