User Manual
Page 3
Video Manager 2-35 Webcam ...2-36 Sound Recorder 2-36 Games ...2-36 Picasa ...2-36 Settings...2-37 Desktop Mode 2-37 Anti-Virus...2-38 Volume ...2-38 Instant Shutdown 2-39 Printers ...2-39 System Info...2-40 Date & Time 2-40 Personalization 2-41 Add/Remove Software 2-41 Touchpad...2-45 Disk Utility...2-45 Diagnostic Tools 2-46 Add/Remove Keyboard 2-48 Task Manager 2-50 Favorites...2-51 Customize...2-51 Chapter 3: System Recovery System Recovery 3-2 Using Hidden Partition 3-2 Using the Recovery DVD 3-3 Using USB Flash Disk 3-4 Chapter 4: Installing Windows® XP...
Video Manager 2-35 Webcam ...2-36 Sound Recorder 2-36 Games ...2-36 Picasa ...2-36 Settings...2-37 Desktop Mode 2-37 Anti-Virus...2-38 Volume ...2-38 Instant Shutdown 2-39 Printers ...2-39 System Info...2-40 Date & Time 2-40 Personalization 2-41 Add/Remove Software 2-41 Touchpad...2-45 Disk Utility...2-45 Diagnostic Tools 2-46 Add/Remove Keyboard 2-48 Task Manager 2-50 Favorites...2-51 Customize...2-51 Chapter 3: System Recovery System Recovery 3-2 Using Hidden Partition 3-2 Using the Recovery DVD 3-3 Using USB Flash Disk 3-4 Chapter 4: Installing Windows® XP...
User Manual
Page 7
TIP: Tips for This Manual A few notes and warnings are used throughout this guide, allowing you to data, components, or persons. Vital information that must be followed for special situations. IMPORTANT! Notes for completing tasks. Important information that must be followed to prevent damage to complete certain tasks safely and effectively.These notes have different degrees of importance as follows: WARNING! ASUS Eee PC 1-3 NOTE: Information for safe operation.
TIP: Tips for This Manual A few notes and warnings are used throughout this guide, allowing you to data, components, or persons. Vital information that must be followed for special situations. IMPORTANT! Notes for completing tasks. Important information that must be followed to prevent damage to complete certain tasks safely and effectively.These notes have different degrees of importance as follows: WARNING! ASUS Eee PC 1-3 NOTE: Information for safe operation.

User Manual
Page 8
... any part of the Eee PC. Disconnect the AC power and remove the battery pack(s) before cleaning. DO NOT press or touch the display panel. DO NOT place together with a dry cloth. DO NOT disassemble the battery. 1-4 Chapter 1: Introducing the Eee PC Battery safety warning: DO NOT throw the battery in this manual, refer all precautions and instructions. Except as thinners, benzene, or other peripherals. Do not use...
... any part of the Eee PC. Disconnect the AC power and remove the battery pack(s) before cleaning. DO NOT press or touch the display panel. DO NOT place together with a dry cloth. DO NOT disassemble the battery. 1-4 Chapter 1: Introducing the Eee PC Battery safety warning: DO NOT throw the battery in this manual, refer all precautions and instructions. Except as thinners, benzene, or other peripherals. Do not use...

User Manual
Page 16
7. Repeat the step 1-4 of Using a dynamic IP to make changes. Toggle the second option Static IP address and click Next. 3. Click Finish to apply the settings or click Back to start the static IP network configuration. 2. Click the box before Connect automatically at system startup or before the box Start this connection when finished based on your service provider. 2-6 Chapter 2: Using the Eee PC Using a static IP: 1. Enter the IP address, Subnet mask and Gateway from your needs.
7. Repeat the step 1-4 of Using a dynamic IP to make changes. Toggle the second option Static IP address and click Next. 3. Click Finish to apply the settings or click Back to start the static IP network configuration. 2. Click the box before Connect automatically at system startup or before the box Start this connection when finished based on your service provider. 2-6 Chapter 2: Using the Eee PC Using a static IP: 1. Enter the IP address, Subnet mask and Gateway from your needs.

User Manual
Page 19
... 1. Select Connect automatically at system startup or Start this connection when finished based on your connection and click Next. 4. Click the Browse Wireless Networks button to search for the access point you would like to make changes. 6. Repeat the step 1-2 of connection you want to use to connect. Select the type of Using a static IP to start the wireless PPPoE network configuration. 2. Select the hardware that you are using and click Next. 3. ASUS Eee PC 2-9
... 1. Select Connect automatically at system startup or Start this connection when finished based on your connection and click Next. 4. Click the Browse Wireless Networks button to search for the access point you would like to make changes. 6. Repeat the step 1-2 of connection you want to use to connect. Select the type of Using a static IP to start the wireless PPPoE network configuration. 2. Select the hardware that you are using and click Next. 3. ASUS Eee PC 2-9

User Manual
Page 25
... Internet tab button and select Web to log onto your e-mail service provider and click it to link to the webmail homepage. Enjoying free resources Eee PC thoughtfully builds several resources shortcuts, including iGoogle, Google Search, Google Docs, Wikipedia, Internet Radio, vTap, and Google Map. Connects to display the webmail accesses, including Gmail, Hotmail, Yahoo Mail, and AOL Mail. ASUS Eee PC 2-15 Accessing...
... Internet tab button and select Web to log onto your e-mail service provider and click it to link to the webmail homepage. Enjoying free resources Eee PC thoughtfully builds several resources shortcuts, including iGoogle, Google Search, Google Docs, Wikipedia, Internet Radio, vTap, and Google Map. Connects to display the webmail accesses, including Gmail, Hotmail, Yahoo Mail, and AOL Mail. ASUS Eee PC 2-15 Accessing...
User Manual
Page 29
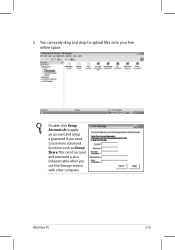
ASUS Eee PC 2-19 Double-click Setup Account.sh to apply an account and setup a password if you use more advanced functions such as Group Share. This set of account and password is also indispensable when you need to upload files onto your free online space. 2. You can easily drag and drop to use Eee Storage service with other computer.
ASUS Eee PC 2-19 Double-click Setup Account.sh to apply an account and setup a password if you use more advanced functions such as Group Share. This set of account and password is also indispensable when you need to upload files onto your free online space. 2. You can easily drag and drop to use Eee Storage service with other computer.
User Manual
Page 31
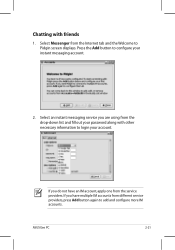
Press the Add button to login your instant messaging account. 2. Select an instant messaging service you are using from the Internet tab and the Welcome to add and configure more IM accounts. Select Messenger from the drop-down list and fill out your password along with friends 1. If you do not have multiple IM accounts from the service providers. ASUS Eee PC 2-21 If you have an IM account, apply one from different service providers, press Add button again to Pidgin screen displays. Chatting with other necessary information to configure your account.
Press the Add button to login your instant messaging account. 2. Select an instant messaging service you are using from the Internet tab and the Welcome to add and configure more IM accounts. Select Messenger from the drop-down list and fill out your password along with friends 1. If you do not have multiple IM accounts from the service providers. ASUS Eee PC 2-21 If you have an IM account, apply one from different service providers, press Add button again to Pidgin screen displays. Chatting with other necessary information to configure your account.

User Manual
Page 33
At the prompt, click My Home on the left and double-click D: to start OpenOffice.org Writer. 2. Double-click Documents to enter. ASUS Eee PC 2-23 On the File menu, click Open, or press + . 3. Accessing files The following example describes how to locate and open your document from the connected external storage device: 1.
At the prompt, click My Home on the left and double-click D: to start OpenOffice.org Writer. 2. Double-click Documents to enter. ASUS Eee PC 2-23 On the File menu, click Open, or press + . 3. Accessing files The following example describes how to locate and open your document from the connected external storage device: 1.

User Manual
Page 35
... that you can use for new account setup. Opens a post-it-on like sticker to export and share drawings. Starts the Mozilla Thunderbird e-mail client. You can use to write down important messages as a reminder. Draw Math OpenOffice Draw is an OpenOffice Math is a mind-mapping software which you to create equations to leave messages. ASUS Eee PC 2-25 Opens OpenOffice Draw...
... that you can use for new account setup. Opens a post-it-on like sticker to export and share drawings. Starts the Mozilla Thunderbird e-mail client. You can use to write down important messages as a reminder. Draw Math OpenOffice Draw is an OpenOffice Math is a mind-mapping software which you to create equations to leave messages. ASUS Eee PC 2-25 Opens OpenOffice Draw...

User Manual
Page 64
... recovery, use the Add/Remove Software in the Recovery DVD may be not the latest version. Hold during the system recovery. If you have installed WIndows XP to edit the commands before recovering your data during bootup (requires a Recovery Partition). Press enter to boot the selected OS, 'e' to your Eee PC, the builtin hidden partition would be cleared and cannot be something wrong with your Eee PC disk drive. If the system recovery...
... recovery, use the Add/Remove Software in the Recovery DVD may be not the latest version. Hold during the system recovery. If you have installed WIndows XP to edit the commands before recovering your data during bootup (requires a Recovery Partition). Press enter to boot the selected OS, 'e' to your Eee PC, the builtin hidden partition would be cleared and cannot be something wrong with your Eee PC disk drive. If the system recovery...

User Manual
Page 65
... optical drive. Using the Recovery DVD 1. Select USB:XXXXXX (may be powered ON). 2. Waiting 5 Sec Ready to select boot device 3. ASUS Eee PC 3-3 Please select boot device: HDD:SM-ASUS-PHISON SSD USB:XXXXXXXX ↑ and ↓ to move selection ENTER to image Eee PC using build 2008.03.05_21.08. Key in yes and press to continue the system recovery: ISOLINUX 3.11 2005-09-02 Copyright (C) 1994-2005 H. Press for Troubleshooting Menu... Peter...
... optical drive. Using the Recovery DVD 1. Select USB:XXXXXX (may be powered ON). 2. Waiting 5 Sec Ready to select boot device 3. ASUS Eee PC 3-3 Please select boot device: HDD:SM-ASUS-PHISON SSD USB:XXXXXXXX ↑ and ↓ to move selection ENTER to image Eee PC using build 2008.03.05_21.08. Key in yes and press to continue the system recovery: ISOLINUX 3.11 2005-09-02 Copyright (C) 1994-2005 H. Press for Troubleshooting Menu... Peter...
User Manual
Page 68
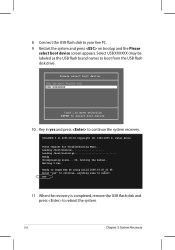
... Eee PC. 9. Ok, booting the kernel. Connect the USB flash disk to reboot. Waiting 5 Sec Ready to select boot device 10. Please select boot device: HDD:SM-ASUS-PHISON SSD USB:XXXXXXXX ↑ and ↓ to move selection ENTER to image Eee PC using build 2008.03.05_21.08. ISOLINUX 3.11 2005-09-02 Copyright (C) 1994-2005 H. yes 11 When the recovery is completed, remove the USB flash disk and press to boot from the USB flash disk drive...
... Eee PC. 9. Ok, booting the kernel. Connect the USB flash disk to reboot. Waiting 5 Sec Ready to select boot device 10. Please select boot device: HDD:SM-ASUS-PHISON SSD USB:XXXXXXXX ↑ and ↓ to move selection ENTER to image Eee PC using build 2008.03.05_21.08. ISOLINUX 3.11 2005-09-02 Copyright (C) 1994-2005 H. yes 11 When the recovery is completed, remove the USB flash disk and press to boot from the USB flash disk drive...
User Manual
Page 72
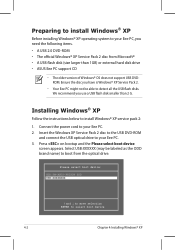
... Service Pack 2 disc to the USB DVD-ROM and connect the USB optical drive to your Eee PC. 2. Press on bootup and the Please select boot device screen appears. We recommend you use a USB flash disk smaller than 1GB) or external hard disk drive • ASUS Eee PC support CD • The older version of Windows® OS does not support USB DVDROM. Preparing to install Windows® XP Before installing Windows® XP operating system to your Eee PC, you need the following items. • A USB 2.0 DVD-ROM...
... Service Pack 2 disc to the USB DVD-ROM and connect the USB optical drive to your Eee PC. 2. Press on bootup and the Please select boot device screen appears. We recommend you use a USB flash disk smaller than 1GB) or external hard disk drive • ASUS Eee PC support CD • The older version of Windows® OS does not support USB DVDROM. Preparing to install Windows® XP Before installing Windows® XP operating system to your Eee PC, you need the following items. • A USB 2.0 DVD-ROM...
User Manual
Page 73
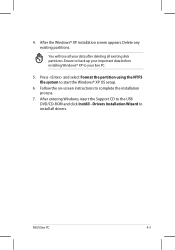
... all your Eee PC. 5. After entering Windows, insert the Support CD to start the Windows® XP OS setup. 6. Ensure to back up your important data before installing Windows® XP to your data after deleting all drivers. ASUS Eee PC 4-3 Press and select Format the partition using the NTFS file system to the USB DVD/CD-ROM and click InstAll - After the Windows® XP installation screen appears. Delete any existing partitions. Drivers Installation Wizard to...
... all your Eee PC. 5. After entering Windows, insert the Support CD to start the Windows® XP OS setup. 6. Ensure to back up your important data before installing Windows® XP to your data after deleting all drivers. ASUS Eee PC 4-3 Press and select Format the partition using the NTFS file system to the USB DVD/CD-ROM and click InstAll - After the Windows® XP installation screen appears. Delete any existing partitions. Drivers Installation Wizard to...

User Manual
Page 74
... support CD that comes with the Eee PC package contains the drivers, software applications, and utilities that you can install to activate the devices. If Autorun is enabled in your computer. The drivers and utilities bundled in the Windows® XP SP2 environment. Drivers menu The Drivers menu shows available device drivers when the system detects installed devices. Running the support CD Insert the support CD in the external optical drive.The CD automatically displays the Drivers menu...
... support CD that comes with the Eee PC package contains the drivers, software applications, and utilities that you can install to activate the devices. If Autorun is enabled in your computer. The drivers and utilities bundled in the Windows® XP SP2 environment. Drivers menu The Drivers menu shows available device drivers when the system detects installed devices. Running the support CD Insert the support CD in the external optical drive.The CD automatically displays the Drivers menu...
User Manual
Page 7
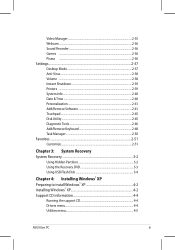
Notes for This Manual A few notes and warnings are used throughout this guide, allowing you to data, components, or persons. TIP: Tips for special situations. ASUS Eee PC 1-3 Vital information that must be followed for safe operation. Important information that must be followed to prevent damage to complete certain tasks safely and effectively.These notes have different degrees of importance as follows: WARNING! NOTE: Information for completing tasks. IMPORTANT!
Notes for This Manual A few notes and warnings are used throughout this guide, allowing you to data, components, or persons. TIP: Tips for special situations. ASUS Eee PC 1-3 Vital information that must be followed for safe operation. Important information that must be followed to prevent damage to complete certain tasks safely and effectively.These notes have different degrees of importance as follows: WARNING! NOTE: Information for completing tasks. IMPORTANT!

User Manual
Page 15
... touchpad and its buttons comprises a pointing device that of desktop monitors. Press the switch once to turn ON and hold it is easier on selected models) The built-in camera allows picture taking or video recording. 2 Display Panel The display panel functions the same as a desktop mouse. ASUS Eee PC 2-3 The power switch only works when the display panel is available to clean the display panel. 3 Power Switch The power switch allows powering ON and OFF the Eee PC and recovering from STR. Use...
... touchpad and its buttons comprises a pointing device that of desktop monitors. Press the switch once to turn ON and hold it is easier on selected models) The built-in camera allows picture taking or video recording. 2 Display Panel The display panel functions the same as a desktop mouse. ASUS Eee PC 2-3 The power switch only works when the display panel is available to clean the display panel. 3 Power Switch The power switch allows powering ON and OFF the Eee PC and recovering from STR. Use...

User Manual
Page 31
... manual. When enabled, the corresponding wireless indicator will light. Sun Up Icon (F4): Increases the display brightness. The Hot Key locations on the function keys may vary depending on the Eee PC's keyboard. ASUS Eee PC 3-9 Some function icons appear in this series: LCD Only -> CRT Only (External Monitor) -> LCD + CRT Clone -> LCD + CRT Extend. LCD/Monitor Icons (F5): Toggles between the Eee PC's LCD display and an external monitor in the Notification area after activation. Radio Tower (F2): Wireless Models Only:Toggles the internal wireless LAN...
... manual. When enabled, the corresponding wireless indicator will light. Sun Up Icon (F4): Increases the display brightness. The Hot Key locations on the function keys may vary depending on the Eee PC's keyboard. ASUS Eee PC 3-9 Some function icons appear in this series: LCD Only -> CRT Only (External Monitor) -> LCD + CRT Clone -> LCD + CRT Extend. LCD/Monitor Icons (F5): Toggles between the Eee PC's LCD display and an external monitor in the Notification area after activation. Radio Tower (F2): Wireless Models Only:Toggles the internal wireless LAN...

User Manual
Page 32
... "Print Screen" key to initiate screen capture utility to scroll up the Eee PC. Pg Up (↑): Press to capture, save, or print the contents of the keyboard for number entering. Speaker Up Icon (F9): Increases the speaker volume. Allows use a larger portion of entire desktop. Connect an external monitor before booting up in documents or the web browser. Num Lk (F11): Toggles the numeric keypad (number lock...
... "Print Screen" key to initiate screen capture utility to scroll up the Eee PC. Pg Up (↑): Press to capture, save, or print the contents of the keyboard for number entering. Speaker Up Icon (F9): Increases the speaker volume. Allows use a larger portion of entire desktop. Connect an external monitor before booting up in documents or the web browser. Num Lk (F11): Toggles the numeric keypad (number lock...


