User Manual
Page 3
... Using the Eee PC Network Connection 4-2 Configuring a wireless network connection 4-2 Configuring a network connection 4-4 Browsing web pages 4-10 ASUS Update 4-11 Updating the BIOS through the Internet 4-11 Updating the BIOS through a BIOS file 4-13 Bluetooth Connection (on selected models 4-14 ASUS Instant Key 4-16 Super Hybrid Engine 4-17 Eee Storage...4-18 Video Conferencing 4-20 Chapter 5: Support DVD & System Recovery Support DVD information 5-2 Running the support DVD 5-2 Drivers menu 5-2 Utilities menu 5-3 Contact ...5-4 Other information 5-4 System Recovery 5-5 Using...
... Using the Eee PC Network Connection 4-2 Configuring a wireless network connection 4-2 Configuring a network connection 4-4 Browsing web pages 4-10 ASUS Update 4-11 Updating the BIOS through the Internet 4-11 Updating the BIOS through a BIOS file 4-13 Bluetooth Connection (on selected models 4-14 ASUS Instant Key 4-16 Super Hybrid Engine 4-17 Eee Storage...4-18 Video Conferencing 4-20 Chapter 5: Support DVD & System Recovery Support DVD information 5-2 Running the support DVD 5-2 Drivers menu 5-2 Utilities menu 5-3 Contact ...5-4 Other information 5-4 System Recovery 5-5 Using...
User Manual
Page 7
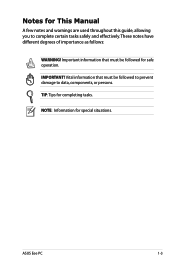
Important information that must be followed to prevent damage to complete certain tasks safely and effectively.These notes have different degrees of importance as follows: WARNING! TIP: Tips for special situations. Vital information that must be followed for This Manual A few notes and warnings are used throughout this guide, allowing you to data, components, or persons. NOTE: Information for completing tasks. IMPORTANT! Notes for safe operation. ASUS Eee PC 1-3
Important information that must be followed to prevent damage to complete certain tasks safely and effectively.These notes have different degrees of importance as follows: WARNING! TIP: Tips for special situations. Vital information that must be followed for This Manual A few notes and warnings are used throughout this guide, allowing you to data, components, or persons. NOTE: Information for completing tasks. IMPORTANT! Notes for safe operation. ASUS Eee PC 1-3

User Manual
Page 8
...: DO NOT throw the battery in this manual, refer all precautions and instructions. Except as thinners, benzene, or other peripherals. DO NOT use strong solvents such as described in fire. DO NOT disassemble the battery. 1-4 Chapter 1: Introducing the Eee PC Safety Precautions The following safety precautions will increase the life of warm water and remove any extra moisture with...
...: DO NOT throw the battery in this manual, refer all precautions and instructions. Except as thinners, benzene, or other peripherals. DO NOT use strong solvents such as described in fire. DO NOT disassemble the battery. 1-4 Chapter 1: Introducing the Eee PC Safety Precautions The following safety precautions will increase the life of warm water and remove any extra moisture with...

User Manual
Page 15
... Microphone (Built-in) The built-in camera allows picture taking or video recording. 2 Display Panel The display panel functions the same as a desktop monitor. Press this key turns off the LCD monitor backlight. Backlight Key Pressing this key repeatedly to adjust display resolution. User-defined Key This key is reserved for customized definition.The default definition is for video conferencing, voice narrations, audio recordings, and multimedia applications. 4 Instant Keys Instant keys allow you to switch resolution. ASUS Eee PC 2-3 Use...
... Microphone (Built-in) The built-in camera allows picture taking or video recording. 2 Display Panel The display panel functions the same as a desktop monitor. Press this key turns off the LCD monitor backlight. Backlight Key Pressing this key repeatedly to adjust display resolution. User-defined Key This key is reserved for customized definition.The default definition is for video conferencing, voice narrations, audio recordings, and multimedia applications. 4 Instant Keys Instant keys allow you to switch resolution. ASUS Eee PC 2-3 Use...
User Manual
Page 16
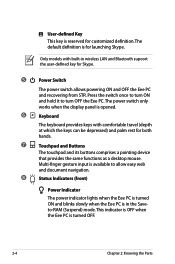
... Skype. 5 Power Switch The power switch allows powering ON and OFF the Eee PC and recovering from STR. User-defined Key This key is reserved for customized definition.The default definition is in wireless LAN and Bluetooth supoort the user-defined key for both hands. 7 Touchpad and Buttons The touchpad and its buttons comprises a pointing device that provides the same functions as a desktop mouse. This indicator is OFF when the Eee PC is opened. 6 Keyboard The keyboard provides keys with built...
... Skype. 5 Power Switch The power switch allows powering ON and OFF the Eee PC and recovering from STR. User-defined Key This key is reserved for customized definition.The default definition is in wireless LAN and Bluetooth supoort the user-defined key for both hands. 7 Touchpad and Buttons The touchpad and its buttons comprises a pointing device that provides the same functions as a desktop mouse. This indicator is OFF when the Eee PC is opened. 6 Keyboard The keyboard provides keys with built...

User Manual
Page 17
... Blinking Quickly Green Blinking Quickly Standby Mode / Powered OFF AC Mode Battery Mode Battery charge is between 100%-80% Orange ON Off Battery charge is between 80%-10% Orange Blinking Slowly Off Battery charge is less than 10% Orange Blinking Quickly Off The Battery Charge Indicator will not light when the battery is removed from the disk drive. Wireless/Bluetooth Indicator This is only applicable on models with built-in wireless LAN/Bluetooth is written to or read from your Eee PC. Solid-State disk (SSD)/Hard disk (HDD) Indicator...
... Blinking Quickly Green Blinking Quickly Standby Mode / Powered OFF AC Mode Battery Mode Battery charge is between 100%-80% Orange ON Off Battery charge is between 80%-10% Orange Blinking Slowly Off Battery charge is less than 10% Orange Blinking Quickly Off The Battery Charge Indicator will not light when the battery is removed from the disk drive. Wireless/Bluetooth Indicator This is only applicable on models with built-in wireless LAN/Bluetooth is written to or read from your Eee PC. Solid-State disk (SSD)/Hard disk (HDD) Indicator...

User Manual
Page 19
... disk drive/ hard disk drive and memory are software controlled. Move the manual lock to the unlocked position to keep the battery pack secured. 2 Battery Pack The battery pack is automatically charged when connected to an AC power source and maintains power to hear audio without additional attachments. Battery time varies by usage and by the specifications for this Eee PC. The reset button is not connected. ASUS Eee PC 2-7 Move the manual lock to restart the Eee PC. The battery pack cannot be disassembled...
... disk drive/ hard disk drive and memory are software controlled. Move the manual lock to the unlocked position to keep the battery pack secured. 2 Battery Pack The battery pack is automatically charged when connected to an AC power source and maintains power to hear audio without additional attachments. Battery time varies by usage and by the specifications for this Eee PC. The reset button is not connected. ASUS Eee PC 2-7 Move the manual lock to restart the Eee PC. The battery pack cannot be disassembled...

User Manual
Page 23
... temporarily between locations. Battery time varies by usage and by the specifications for this side of the Eee PC. 1 1 Battery Pack The battery pack is automatically charged when connected to an AC power source and maintains power to amplified speakers or headphones. ASUS Eee PC 2-11 5 Headphone Output Jack The 1/8" stereo headphone jack (3.55mm) connects the Eee PC's audio out signal to the Eee PC when AC power is not connected. Using this jack automatically disables the...
... temporarily between locations. Battery time varies by usage and by the specifications for this side of the Eee PC. 1 1 Battery Pack The battery pack is automatically charged when connected to an AC power source and maintains power to amplified speakers or headphones. ASUS Eee PC 2-11 5 Headphone Output Jack The 1/8" stereo headphone jack (3.55mm) connects the Eee PC's audio out signal to the Eee PC when AC power is not connected. Using this jack automatically disables the...

User Manual
Page 27
.... ASUS Eee PC 3-3 If there is turned ON, as this model or else damage may damage both your battery pack(s) and the Eee PC with a removable battery pack.The battery pack consists of a set of battery cells housed together. Remember to fully charge the battery before first use the following procedures to install the battery pack. 1 Never attemp3t to power other electrical devices. To install the battery pack: To remove the battery pack: 3 1 2 2 1 3 Only use battery...
.... ASUS Eee PC 3-3 If there is turned ON, as this model or else damage may damage both your battery pack(s) and the Eee PC with a removable battery pack.The battery pack consists of a set of battery cells housed together. Remember to fully charge the battery before first use the following procedures to install the battery pack. 1 Never attemp3t to power other electrical devices. To install the battery pack: To remove the battery pack: 3 1 2 2 1 3 Only use battery...

User Manual
Page 33
... command. The Hot Key locations on the function keys may vary depending on the Eee PC's keyboard. A. ASUS Eee PC 3-9 Some function icons appear in the Notification area after activation. When enabled, the corresponding wireless indicator will light. Radio Tower (F2): Wireless Models Only:Toggles the internal wireless LAN or Bluetooth (on -screen-display. Sun Down Icon (F3): Decreases the display brightness. Follow the icons whenever your hot key locations do not match the manual. The default setting is WLAN ON / Bluetooth OFF. Sun...
... command. The Hot Key locations on the function keys may vary depending on the Eee PC's keyboard. A. ASUS Eee PC 3-9 Some function icons appear in the Notification area after activation. When enabled, the corresponding wireless indicator will light. Radio Tower (F2): Wireless Models Only:Toggles the internal wireless LAN or Bluetooth (on -screen-display. Sun Down Icon (F3): Decreases the display brightness. Follow the icons whenever your hot key locations do not match the manual. The default setting is WLAN ON / Bluetooth OFF. Sun...

User Manual
Page 34
... web browser. 3-10 Chapter 3: Getting Started Allows you want to use a larger portion of 1024 x 600 pixels. Speaker Up Icon (F9): Increases the speaker volume. Set your Eee PC to High Performance or Super Performance mode if you to scroll up the Eee PC. Scr Lk (F12): Toggles the "Scroll Lock" ON and OFF. LCD + CRT Clone mode only supports a maximum resolution of the keyboard for number entering.
... web browser. 3-10 Chapter 3: Getting Started Allows you want to use a larger portion of 1024 x 600 pixels. Speaker Up Icon (F9): Increases the speaker volume. Set your Eee PC to High Performance or Super Performance mode if you to scroll up the Eee PC. Scr Lk (F12): Toggles the "Scroll Lock" ON and OFF. LCD + CRT Clone mode only supports a maximum resolution of the keyboard for number entering.

User Manual
Page 35
... touchpad/mouse on -screen-display. B. The default setting is equivalent to the end of the line. Menu with an on an object. ASUS Eee PC Sun Down Icon (F5): Decreases the display brightness. zzZ Icon (F1): Places the Eee PC in suspend mode (Save-to scroll down in documents or the web browser. When enabled, the corresponding wireless indicator will light. Radio Tower (F2): Wireless Models Only:Toggles the internal wireless LAN or Bluetooth (on selected models...
... touchpad/mouse on -screen-display. B. The default setting is equivalent to the end of the line. Menu with an on an object. ASUS Eee PC Sun Down Icon (F5): Decreases the display brightness. zzZ Icon (F1): Places the Eee PC in suspend mode (Save-to scroll down in documents or the web browser. When enabled, the corresponding wireless indicator will light. Radio Tower (F2): Wireless Models Only:Toggles the internal wireless LAN or Bluetooth (on selected models...

User Manual
Page 36
... Manager to use of a larger portion of 1024 x 600 pixels. Volume Down Icon (F11): Decreases speaker volume. Volume Up Icon (F12): Increases the speaker volume. Crossed Screen Icon (F7): Turns off the display backlight. LCD + CRT Clone mode only supports a maximum resolution of the keyboard for number entering. 3-12 Chapter 3: Getting Started LCD/Monitor Icons (F8): Toggles between the Eee PC's LCD display and an external monitor in this series: LCD Only -> CRT Only (External Monitor) -> LCD + CRT Clone -> LCD...
... Manager to use of a larger portion of 1024 x 600 pixels. Volume Down Icon (F11): Decreases speaker volume. Volume Up Icon (F12): Increases the speaker volume. Crossed Screen Icon (F7): Turns off the display backlight. LCD + CRT Clone mode only supports a maximum resolution of the keyboard for number entering. 3-12 Chapter 3: Getting Started LCD/Monitor Icons (F8): Toggles between the Eee PC's LCD display and an external monitor in this series: LCD Only -> CRT Only (External Monitor) -> LCD + CRT Clone -> LCD...
User Manual
Page 66
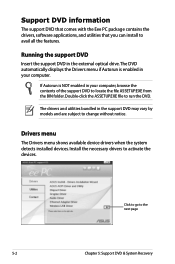
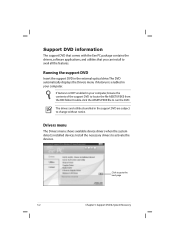
... to activate the devices. The drivers and utilities bundled in your computer, browse the contents of the support DVD to change without notice. Running the support DVD Insert the support DVD in the external optical drive.The DVD automatically displays the Drivers menu if Autorun is NOT enabled in your computer. Install the necessary drivers to the next page 5-2 Chapter 5: Support DVD & System Recovery If Autorun is enabled in the support DVD may vary by models and...
... to activate the devices. The drivers and utilities bundled in your computer, browse the contents of the support DVD to change without notice. Running the support DVD Insert the support DVD in the external optical drive.The DVD automatically displays the Drivers menu if Autorun is NOT enabled in your computer. Install the necessary drivers to the next page 5-2 Chapter 5: Support DVD & System Recovery If Autorun is enabled in the support DVD may vary by models and...

User Manual
Page 69
... original working order. Before using the Support DVD, copy your Eee PC and insert the Support DVD into the optical drive (System needs to select boot device 3. Please select boot device: HDD:SM-ASUS-PHISON SSD HDD:SS-ASUS-PHISON SSD USB:XXXXXXXX ↑ and ↓ to move selection ENTER to be labeled as network settings). 1. Press any key to a network drive and make note of the operating system, installed on bootup and the Please select boot device screen appears. Connect an external optical drive...
... original working order. Before using the Support DVD, copy your Eee PC and insert the Support DVD into the optical drive (System needs to select boot device 3. Please select boot device: HDD:SM-ASUS-PHISON SSD HDD:SS-ASUS-PHISON SSD USB:XXXXXXXX ↑ and ↓ to move selection ENTER to be labeled as network settings). 1. Press any key to a network drive and make note of the operating system, installed on bootup and the Please select boot device screen appears. Connect an external optical drive...
User Manual
Page 7
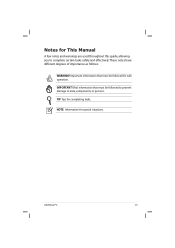
ASUS Eee PC 1-3 IMPORTANT! NOTE: Information for completing tasks. Notes for This Manual A few notes and warnings are used throughout this guide, allowing you to data, components, or persons. TIP: Tips for special situations. Important information that must be followed to prevent damage to complete certain tasks safely and effectively.These notes have different degrees of importance as follows: WARNING! Vital information that must be followed for safe operation.
ASUS Eee PC 1-3 IMPORTANT! NOTE: Information for completing tasks. Notes for This Manual A few notes and warnings are used throughout this guide, allowing you to data, components, or persons. TIP: Tips for special situations. Important information that must be followed to prevent damage to complete certain tasks safely and effectively.These notes have different degrees of importance as follows: WARNING! Vital information that must be followed for safe operation.

User Manual
Page 8
... your power adapter complies with the rating. Seek servicing if the casing has been damaged. DO NOT disassemble the battery. DO NOT place on uneven or unstable work surfaces. Safety Precautions The following safety precautions will reduce air circulation such as a carrying bag. 1-4 Chapter 1: Introducing the Eee PC Do not use the modem during a gas leak. SAFE TEMP: This Eee PC should...
... your power adapter complies with the rating. Seek servicing if the casing has been damaged. DO NOT disassemble the battery. DO NOT place on uneven or unstable work surfaces. Safety Precautions The following safety precautions will reduce air circulation such as a carrying bag. 1-4 Chapter 1: Introducing the Eee PC Do not use the modem during a gas leak. SAFE TEMP: This Eee PC should...

User Manual
Page 32
... on-screen-display. The Hot Key locations on the function keys may vary depending on the Eee PC's keyboard. Follow the icons whenever your hot key locations do not match the manual. Keyboard Usage Special Function Keys The following defines the colored hot keys on model but the functions should remain the same. When enabled, the corresponding wireless indicator will light. Sun Up Icon (F4): Increases the display brightness. Dual display mode does not work in this series: Eee PC LCD -> External Monitor -> Both...
... on-screen-display. The Hot Key locations on the function keys may vary depending on the Eee PC's keyboard. Follow the icons whenever your hot key locations do not match the manual. Keyboard Usage Special Function Keys The following defines the colored hot keys on model but the functions should remain the same. When enabled, the corresponding wireless indicator will light. Sun Up Icon (F4): Increases the display brightness. Dual display mode does not work in this series: Eee PC LCD -> External Monitor -> Both...
User Manual
Page 64
Support DVD information The support DVD that comes with the Eee PC package contains the drivers, software applications, and utilities that you can install to run the DVD. Running the support DVD Insert the support DVD in the external optical drive.The DVD automatically displays the Drivers menu if Autorun is NOT enabled in your computer. Double-click the ASSETUP.EXE file to avail all the features. Click to go to activate the...
Support DVD information The support DVD that comes with the Eee PC package contains the drivers, software applications, and utilities that you can install to run the DVD. Running the support DVD Insert the support DVD in the external optical drive.The DVD automatically displays the Drivers menu if Autorun is NOT enabled in your computer. Double-click the ASSETUP.EXE file to avail all the features. Click to go to activate the...

User Manual
Page 67
... brand name) to its original working order. System Recovery Using the Support DVD The Support DVD includes an image of the operating system, installed on bootup and the Please select boot device screen appears. Press any key to be labled as network settings). 1. Select USB:XXXXXX (may be powered ON). 2. Connect an external optical drive to your Eee PC and insert the Support DVD into the optical drive (System needs to boot from CD... Press any key to select boot device 3. ASUS Eee PC 5-5
... brand name) to its original working order. System Recovery Using the Support DVD The Support DVD includes an image of the operating system, installed on bootup and the Please select boot device screen appears. Press any key to be labled as network settings). 1. Select USB:XXXXXX (may be powered ON). 2. Connect an external optical drive to your Eee PC and insert the Support DVD into the optical drive (System needs to boot from CD... Press any key to select boot device 3. ASUS Eee PC 5-5


