User Guide
Page 2
... earlier than December 1, 2011, either (1) for free by downloading it , may contain copyrighted software that uses the Library") for identification or explanation and to the email address gpl@asus.com, stating the product and describing the problem (please do NOT send large attachments such as...Copyright © 2010 ASUSTeK COMPUTER INC. or (2) the serial number of the LGPL Software (with you give us a notification to the owners' benefit, without any problems in this information. ASUS ASSUMES NO RESPONSIBILITY OR LIABILITY FOR ANY ERRORS OR INACCURACIES THAT MAY APPEAR IN THIS ...
... earlier than December 1, 2011, either (1) for free by downloading it , may contain copyrighted software that uses the Library") for identification or explanation and to the email address gpl@asus.com, stating the product and describing the problem (please do NOT send large attachments such as...Copyright © 2010 ASUSTeK COMPUTER INC. or (2) the serial number of the LGPL Software (with you give us a notification to the owners' benefit, without any problems in this information. ASUS ASSUMES NO RESPONSIBILITY OR LIABILITY FOR ANY ERRORS OR INACCURACIES THAT MAY APPEAR IN THIS ...
User Guide
Page 6
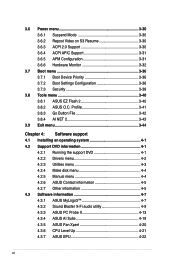
... the support DVD 4-1 4.2.2 Drivers menu 4-2 4.2.3 Utilities menu 4-3 4.2.4 Make disk menu 4-4 4.2.5 Manual menu 4-4 4.2.6 ASUS Contact information 4-5 4.2.7 Other information 4-5 4.3 Software information 4-7 4.3.1 ASUS MyLogo3 4-7 4.3.2 Sound Blaster X-Fi audio utility 4-9 4.3.3 ASUS PC Probe II 4-13 4.3.4 ASUS AI Suite 4-19 4.3.5 ASUS Fan Xpert 4-20 4.3.6 CPU Level Up 4-21 4.3.7 ASUS EPU 4-22 vi 3.6 Power menu 3-30 3.6.1 Suspend Mode 3-30 3.6.2 Repost Video on S3...
... the support DVD 4-1 4.2.2 Drivers menu 4-2 4.2.3 Utilities menu 4-3 4.2.4 Make disk menu 4-4 4.2.5 Manual menu 4-4 4.2.6 ASUS Contact information 4-5 4.2.7 Other information 4-5 4.3 Software information 4-7 4.3.1 ASUS MyLogo3 4-7 4.3.2 Sound Blaster X-Fi audio utility 4-9 4.3.3 ASUS PC Probe II 4-13 4.3.4 ASUS AI Suite 4-19 4.3.5 ASUS Fan Xpert 4-20 4.3.6 CPU Level Up 4-21 4.3.7 ASUS EPU 4-22 vi 3.6 Power menu 3-30 3.6.1 Suspend Mode 3-30 3.6.2 Repost Video on S3...

User Guide
Page 10
... • Chapter 1: Product introduction This chapter describes the features of the switches, jumpers, and connectors on ASUS hardware and software products. ASUS websites The ASUS website provides updated information on the motherboard. • Chapter 3: BIOS setup This chapter tells how to the... ASUS contact information. 2. About this guide is organized This guide contains the following sources for additional information...
... • Chapter 1: Product introduction This chapter describes the features of the switches, jumpers, and connectors on ASUS hardware and software products. ASUS websites The ASUS website provides updated information on the motherboard. • Chapter 3: BIOS setup This chapter tells how to the... ASUS contact information. 2. About this guide is organized This guide contains the following sources for additional information...
User Guide
Page 14
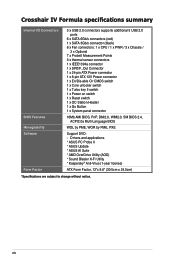
xiv Drivers and applications * ASUS PC Probe II * ASUS Update * ASUS AI Suite * AMD OverDrive Utility (AOD) * Sound Blaster X-Fi Utility * Kaspersky® Anti-Virus (1-year license) ATX Form Factor, 12"x 9.6" (30.5cm x 24.5cm) *Specifications are subject to change without notice. Crosshair IV Formula specifications summary Internal I/O Connectors BIOS Features Manageability Software Form Factor 3 x USB 2.0 connectors supports...
xiv Drivers and applications * ASUS PC Probe II * ASUS Update * ASUS AI Suite * AMD OverDrive Utility (AOD) * Sound Blaster X-Fi Utility * Kaspersky® Anti-Virus (1-year license) ATX Form Factor, 12"x 9.6" (30.5cm x 24.5cm) *Specifications are subject to change without notice. Crosshair IV Formula specifications summary Internal I/O Connectors BIOS Features Manageability Software Form Factor 3 x USB 2.0 connectors supports...
User Guide
Page 49
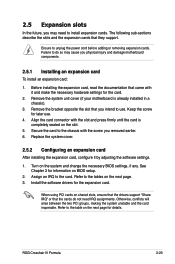
... intend to the tables on the slot. 5. Keep the screw for the expansion card. Align the card connector with it by adjusting the software settings. 1. Turn on BIOS setup. 2. Otherwise, conflicts will arise between the two PCI groups, making the system unstable and the card ... an expansion card After installing the expansion card, configure it and make the necessary hardware settings for details. Install the software drivers for later use . ROG Crosshair IV Formula 2-23 Secure the card to unplug the power cord before adding or removing expansion cards. Assign an IRQ to the table...
... intend to the tables on the slot. 5. Keep the screw for the expansion card. Align the card connector with it by adjusting the software settings. 1. Turn on BIOS setup. 2. Otherwise, conflicts will arise between the two PCI groups, making the system unstable and the card ... an expansion card After installing the expansion card, configure it and make the necessary hardware settings for details. Install the software drivers for later use . ROG Crosshair IV Formula 2-23 Secure the card to unplug the power cord before adding or removing expansion cards. Assign an IRQ to the table...

User Guide
Page 121
This chapter describes the contents of the support DVD that comes with the motherboard package and the software. 4 Software support
This chapter describes the contents of the support DVD that comes with the motherboard package and the software. 4 Software support

User Guide
Page 122
Chapter summary 4 4.1 Installing an operating system 4-1 4.2 Support DVD information 4-1 4.3 Software information 4-7 4.4 RAID configurations 4-28 4.5 Creating a RAID driver disk 4-33 ROG Crosshair IV Formula
Chapter summary 4 4.1 Installing an operating system 4-1 4.2 Support DVD information 4-1 4.3 Software information 4-7 4.4 RAID configurations 4-28 4.5 Creating a RAID driver disk 4-33 ROG Crosshair IV Formula
User Guide
Page 123
...DVD. Double-click the ASSETUP.EXE to display the ASUS contact information. Click an item to change at www.asus.com for reference only. Click an item to install Click to obtain the corresponding software manuals Click an icon to display DVD/ motherboard ...information If Autorun is enabled in your computer, browse the contents of the support DVD are subject to open the folder of supplementary user manuals. ROG Crosshair IV Formula...
...DVD. Double-click the ASSETUP.EXE to display the ASUS contact information. Click an item to change at www.asus.com for reference only. Click an item to install Click to obtain the corresponding software manuals Click an icon to display DVD/ motherboard ...information If Autorun is enabled in your computer, browse the contents of the support DVD are subject to open the folder of supplementary user manuals. ROG Crosshair IV Formula...
User Guide
Page 124
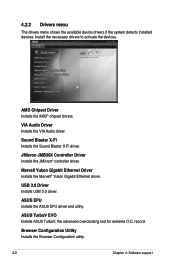
...Installs the Browser Configuration utility. 4-2 Chapter 4: Software support AMD Chipset Driver Installs the AMD® chipset drivers. Marvell Yukon Gigabit Ethernet Driver Installs the Marvell® Yukon Gigabit Ethernet driver. ASUS EPU Installs the ASUS EPU driver and utility. record. USB 3.0 ...Driver Installs USB 3.0 driver. JMicron JMB36X Controller Driver Installs the JMicron® controller driver. ASUS TurboV EVO Installs ASUS TurboV, the advanced overclocking tool for extreme O.C. Install the necessary drivers to activate the devices. 4.2.2 Drivers...
...Installs the Browser Configuration utility. 4-2 Chapter 4: Software support AMD Chipset Driver Installs the AMD® chipset drivers. Marvell Yukon Gigabit Ethernet Driver Installs the Marvell® Yukon Gigabit Ethernet driver. ASUS EPU Installs the ASUS EPU driver and utility. record. USB 3.0 ...Driver Installs USB 3.0 driver. JMicron JMB36X Controller Driver Installs the JMicron® controller driver. ASUS TurboV EVO Installs ASUS TurboV, the advanced overclocking tool for extreme O.C. Install the necessary drivers to activate the devices. 4.2.2 Drivers...
User Guide
Page 125
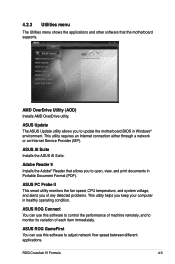
... II This smart utility monitors the fan speed, CPU temperature, and system voltage, and alerts you of each item immediately. ASUS ROG Connect You can use this software to adjust network flow speed between different applications. ROG Crosshair IV Formula 4-3 ASUS Update The ASUS Update utility allows you to update the motherboard BIOS in healthy operating condition...
... II This smart utility monitors the fan speed, CPU temperature, and system voltage, and alerts you of each item immediately. ASUS ROG Connect You can use this software to adjust network flow speed between different applications. ROG Crosshair IV Formula 4-3 ASUS Update The ASUS Update utility allows you to update the motherboard BIOS in healthy operating condition...
User Guide
Page 126
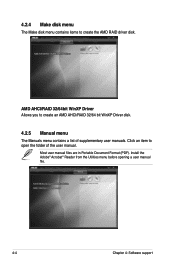
Install the Adobe® Acrobat® Reader from the Utilities menu before opening a user manual file. 4-4 Chapter 4: Software support Most user manual files are in Portable Document Format (PDF). 4.2.4 Make disk menu The Make disk menu contains items to open the folder of supplementary user manuals. Click an item to create the AMD RAID driver disk. AMD AHCI/RAID 32/64bit WinXP Driver Allows you to create an AMD AHCI/RAID 32/64 bit WinXP Driver disk. 4.2.5 Manual menu The Manuals menu contains a list of the user manual.
Install the Adobe® Acrobat® Reader from the Utilities menu before opening a user manual file. 4-4 Chapter 4: Software support Most user manual files are in Portable Document Format (PDF). 4.2.4 Make disk menu The Make disk menu contains items to open the folder of supplementary user manuals. Click an item to create the AMD RAID driver disk. AMD AHCI/RAID 32/64bit WinXP Driver Allows you to create an AMD AHCI/RAID 32/64 bit WinXP Driver disk. 4.2.5 Manual menu The Manuals menu contains a list of the user manual.

User Guide
Page 128
Filelist Displays the contents of the support DVD and a brief description of each in graphical format. Browse this DVD Displays the support DVD contents in text format. 4-6 Chapter 4: Software support
Filelist Displays the contents of the support DVD and a brief description of each in graphical format. Browse this DVD Displays the support DVD contents in text format. 4-6 Chapter 4: Software support
User Guide
Page 129
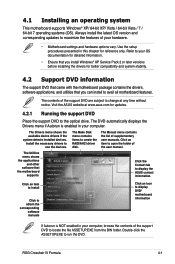
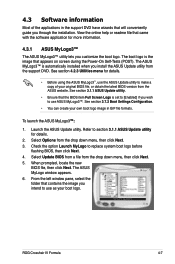
... the new BIOS file, then click Next. See section 4.2.3 Utilities menu for details. • Before using the ASUS MyLogo3™, use the ASUS Update utility to use ASUS MyLogo3™. To launch the ASUS MyLogo3 1. ROG Crosshair IV Formula 4-7 4.3 Software information Most of your boot logo. The boot logo is the image that contains the image you wish...
... the new BIOS file, then click Next. See section 4.2.3 Utilities menu for details. • Before using the ASUS MyLogo3™, use the ASUS Update utility to use ASUS MyLogo3™. To launch the ASUS MyLogo3 1. ROG Crosshair IV Formula 4-7 4.3 Software information Most of your boot logo. The boot logo is the image that contains the image you wish...
User Guide
Page 130
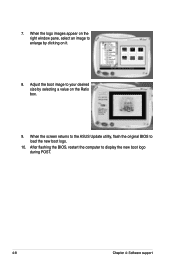
When the logo images appear on the right window pane, select an image to your desired size by clicking on the Ratio box. 9. After flashing the BIOS, restart the computer to load the new boot logo. 10. When the screen returns to the ASUS Update utility, flash the original BIOS to display the new boot logo during POST. 4-8 Chapter 4: Software support 7. Adjust the boot image to enlarge by selecting a value on it. 8.
When the logo images appear on the right window pane, select an image to your desired size by clicking on the Ratio box. 9. After flashing the BIOS, restart the computer to load the new boot logo. 10. When the screen returns to the ASUS Update utility, flash the original BIOS to display the new boot logo during POST. 4-8 Chapter 4: Software support 7. Adjust the boot image to enlarge by selecting a value on it. 8.

User Guide
Page 132
... to adjust bass Click to adjust volume of each icon to configure the following settings (from left to test speaker noise in turn 4-10 Chapter 4: Software support Click each speaker Click to test speaker sound in turn Click to right): Speakers and Headphone, EAX Effects, X-Fi CMSS-3D, X-Fi Crystalizer, Smart...
... to adjust bass Click to adjust volume of each icon to configure the following settings (from left to test speaker noise in turn 4-10 Chapter 4: Software support Click each speaker Click to test speaker sound in turn Click to right): Speakers and Headphone, EAX Effects, X-Fi CMSS-3D, X-Fi Crystalizer, Smart...

User Guide
Page 134
Click to enable EQ Drag to customize effects Click to select an EQ preset Click to save settings Mixer Panel This panel allows you to avoid large volume fluctuations. Drag to adjust volume Click to select a recording device 4-12 Click to adjust volume Click to select a recording device and adjust recording/playback devices volume. Click to switch on/off SVM Graphic Equalizer Panel This panel allows you to mute volume Chapter 4: Software support Smart Volume Management Panel Enable Smart Volume Management (SVM) to customize equalizer settings or select an EQ presets.
Click to enable EQ Drag to customize effects Click to select an EQ preset Click to save settings Mixer Panel This panel allows you to avoid large volume fluctuations. Drag to adjust volume Click to select a recording device 4-12 Click to adjust volume Click to select a recording device and adjust recording/playback devices volume. Click to switch on/off SVM Graphic Equalizer Panel This panel allows you to mute volume Chapter 4: Software support Smart Volume Management Panel Enable Smart Volume Management (SVM) to customize equalizer settings or select an EQ presets.
User Guide
Page 135
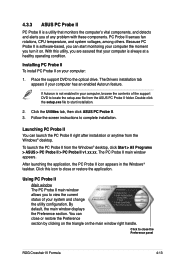
... among others. Place the support DVD to complete installation. Because PC Probe II is software-based, you can close or restore the Preference section by clicking on the triangle on . 4.3.3 ASUS PC Probe II PC Probe II is a utility that your computer the moment you turn...then click ASUS PC Probe II. 3. Follow the screen instructions to the optical drive. You can start installation. 2. After launching the application, the PC Probe II icon appears in your system and change the utility configuration. With this icon to close the Preference panel ROG Crosshair IV Formula 4-13...
... among others. Place the support DVD to complete installation. Because PC Probe II is software-based, you can close or restore the Preference section by clicking on the triangle on . 4.3.3 ASUS PC Probe II PC Probe II is a utility that your computer the moment you turn...then click ASUS PC Probe II. 3. Follow the screen instructions to the optical drive. You can start installation. 2. After launching the application, the PC Probe II icon appears in your system and change the utility configuration. With this icon to close the Preference panel ROG Crosshair IV Formula 4-13...
User Guide
Page 136
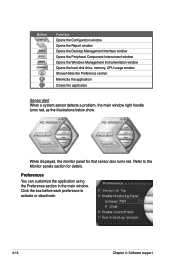
... sensor also turns red. Preferences You can customize the application using the Preference section in the main window. Refer to activate or deactivate. 4-14 Chapter 4: Software support
... sensor also turns red. Preferences You can customize the application using the Preference section in the main window. Refer to activate or deactivate. 4-14 Chapter 4: Software support

User Guide
Page 138
.... Click an item from the left panel to display the WMI (Windows Management Instrumentation) browser. DMI browser Click to display the available information. 4-16 Chapter 4: Software support Click the plus sign (+) before DMI Information to display the DMI (Desktop Management Interface) browser. You can enlarge or reduce the browser size by...
.... Click an item from the left panel to display the WMI (Windows Management Instrumentation) browser. DMI browser Click to display the available information. 4-16 Chapter 4: Software support Click the plus sign (+) before DMI Information to display the DMI (Desktop Management Interface) browser. You can enlarge or reduce the browser size by...

User Guide
Page 140
.... Loads the default threshold values for each sensor Applies your changes Cancels or ignores your changes Loads your saved configuration Saves your configuration 4-18 Chapter 4: Software support Memory usage The Memory tab shows both used (blue) and the available physical memory.
.... Loads the default threshold values for each sensor Applies your changes Cancels or ignores your changes Loads your saved configuration Saves your configuration 4-18 Chapter 4: Software support Memory usage The Memory tab shows both used (blue) and the available physical memory.


