User Guide
Page 6
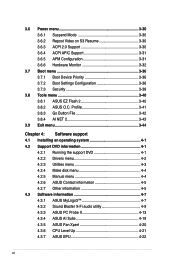
... menu 3-44 Chapter 4: Software support 4.1 Installing an operating system 4-1 4.2 Support DVD information 4-1 4.2.1 Running the support DVD 4-1 4.2.2 Drivers menu 4-2 4.2.3 Utilities menu 4-3 4.2.4 Make disk menu 4-4 4.2.5 Manual menu 4-4 4.2.6 ASUS Contact information 4-5 4.2.7 Other information 4-5 4.3 Software information 4-7 4.3.1 ASUS MyLogo3 4-7 4.3.2 Sound Blaster X-Fi audio utility 4-9 4.3.3 ASUS PC Probe II 4-13 4.3.4 ASUS AI Suite 4-19 4.3.5 ASUS Fan Xpert 4-20 4.3.6 CPU Level Up 4-21...
... menu 3-44 Chapter 4: Software support 4.1 Installing an operating system 4-1 4.2 Support DVD information 4-1 4.2.1 Running the support DVD 4-1 4.2.2 Drivers menu 4-2 4.2.3 Utilities menu 4-3 4.2.4 Make disk menu 4-4 4.2.5 Manual menu 4-4 4.2.6 ASUS Contact information 4-5 4.2.7 Other information 4-5 4.3 Software information 4-7 4.3.1 ASUS MyLogo3 4-7 4.3.2 Sound Blaster X-Fi audio utility 4-9 4.3.3 ASUS PC Probe II 4-13 4.3.4 ASUS AI Suite 4-19 4.3.5 ASUS Fan Xpert 4-20 4.3.6 CPU Level Up 4-21...
User Guide
Page 14
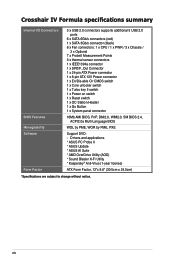
Crosshair IV Formula specifications summary Internal I/O Connectors BIOS Features Manageability Software Form Factor 3 x USB 2.0 connectors supports additional 5 USB 2.0 ports 6 x SATA 6Gb/s connectors (red) 1 x SATA 3Gb/s connector (black) 8 x Fan ....0, SM BIOS 2.4, ACPI2.0a Multi-Language BIOS WOL by PME, WOR by PME, PXE Support DVD: - xiv Drivers and applications * ASUS PC Probe II * ASUS Update * ASUS AI Suite * AMD OverDrive Utility (AOD) * Sound Blaster X-Fi Utility * Kaspersky® Anti-Virus (1-year license) ATX Form Factor, 12"x 9.6" (30.5cm x 24.5cm) *Specifications are ...
Crosshair IV Formula specifications summary Internal I/O Connectors BIOS Features Manageability Software Form Factor 3 x USB 2.0 connectors supports additional 5 USB 2.0 ports 6 x SATA 6Gb/s connectors (red) 1 x SATA 3Gb/s connector (black) 8 x Fan ....0, SM BIOS 2.4, ACPI2.0a Multi-Language BIOS WOL by PME, WOR by PME, PXE Support DVD: - xiv Drivers and applications * ASUS PC Probe II * ASUS Update * ASUS AI Suite * AMD OverDrive Utility (AOD) * Sound Blaster X-Fi Utility * Kaspersky® Anti-Virus (1-year license) ATX Form Factor, 12"x 9.6" (30.5cm x 24.5cm) *Specifications are ...
User Guide
Page 21
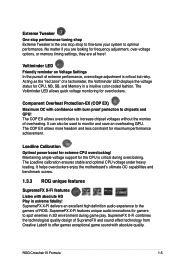
... 1.3.3 ROG unique features SupremeFX X-Fi features Listen with absolute quality. SupremeFX X-Fi combines the technological quality design of SupremeFX and sound effect technology from Creative Labs® to increase chipset voltages without the worries of ROG. Maintaining ample voltage support for CPU, NB... but risky. The COP EX allows overclockers to offer games exceptional game sound with absolute HD Play in extreme fidelity! It can also be used to chipsets and GPU! ROG Crosshair IV Formula 1-5 No matter if you are looking for maximum performance achievement. Component Overheat...
... 1.3.3 ROG unique features SupremeFX X-Fi features Listen with absolute quality. SupremeFX X-Fi combines the technological quality design of SupremeFX and sound effect technology from Creative Labs® to increase chipset voltages without the worries of ROG. Maintaining ample voltage support for CPU, NB... but risky. The COP EX allows overclockers to offer games exceptional game sound with absolute HD Play in extreme fidelity! It can also be used to chipsets and GPU! ROG Crosshair IV Formula 1-5 No matter if you are looking for maximum performance achievement. Component Overheat...

User Guide
Page 38
Align the other end of the retention bracket to the retention module base. 3. Ensure that the retention bracket is in place. 4. Push down the retention bracket lock on the retention mechanism to secure the heatsink and fan to the retention module base. A clicking sound denotes that the fan and heatsink assembly perfectly fits the retention mechanism module base, otherwise you cannot snap the retention bracket in place. 2. Attach one end of the retention bracket to the module base. 2-12 Chapter 2: Hardware information
Align the other end of the retention bracket to the retention module base. 3. Ensure that the retention bracket is in place. 4. Push down the retention bracket lock on the retention mechanism to secure the heatsink and fan to the retention module base. A clicking sound denotes that the fan and heatsink assembly perfectly fits the retention mechanism module base, otherwise you cannot snap the retention bracket in place. 2. Attach one end of the retention bracket to the module base. 2-12 Chapter 2: Hardware information
User Guide
Page 124
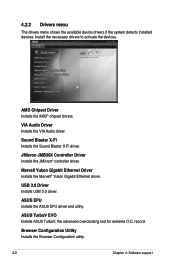
... the Marvell® Yukon Gigabit Ethernet driver. VIA Audio Driver Installs the VIA Audio driver. Sound Blaster X-Fi Installs the Sound Blaster X-Fi driver. JMicron JMB36X Controller Driver Installs the JMicron® controller driver. ASUS TurboV EVO Installs ASUS TurboV, the advanced overclocking tool for extreme O.C. record. USB 3.0 Driver Installs USB 3.0 driver. Install the...
... the Marvell® Yukon Gigabit Ethernet driver. VIA Audio Driver Installs the VIA Audio driver. Sound Blaster X-Fi Installs the Sound Blaster X-Fi driver. JMicron JMB36X Controller Driver Installs the JMicron® controller driver. ASUS TurboV EVO Installs ASUS TurboV, the advanced overclocking tool for extreme O.C. record. USB 3.0 Driver Installs USB 3.0 driver. Install the...
User Guide
Page 131
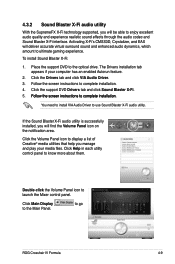
... utility. You need to install VIA Audio Driver to complete installation. 4. Click Help in each utility control panel to go ROG Crosshair IV Formula 4-9 To install Sound Blaster X-Fi: 1. to know more about them. Activating X-Fi's CMSS3D, Crystalizer, and EAX will find the Volume Panel icon...the Mixer control panel. Click the Drivers tab and click VIA Audio Driver. 3. Click the support DVD Drivers tab and click Sound Blaster X-Fi. 5. ���F�o��ll�o�w��t�h�e��s�c�r�e&#...
... utility. You need to install VIA Audio Driver to complete installation. 4. Click Help in each utility control panel to go ROG Crosshair IV Formula 4-9 To install Sound Blaster X-Fi: 1. to know more about them. Activating X-Fi's CMSS3D, Crystalizer, and EAX will find the Volume Panel icon...the Mixer control panel. Click the Drivers tab and click VIA Audio Driver. 3. Click the support DVD Drivers tab and click Sound Blaster X-Fi. 5. ���F�o��ll�o�w��t�h�e��s�c�r�e&#...

User Guide
Page 132
... and Headphone Panel This panel allows you to configure speakers/headphone settings including bass management and speaker volume. Click each speaker Click to test speaker sound in turn 4-10 Chapter 4: Software support You can also test each icon to configure the following settings (from left to test speaker noise in turn...
... and Headphone Panel This panel allows you to configure speakers/headphone settings including bass management and speaker volume. Click each speaker Click to test speaker sound in turn 4-10 Chapter 4: Software support You can also test each icon to configure the following settings (from left to test speaker noise in turn...


