
User Guide
Page 6
...* Hyper DIMM support is damaged or missing, contact your motherboard package for the following items. Motherboard Cables Accessories Application DVD Documentation ASUS B85M-G PLUS/USB 3.1 motherboard 2 x Serial ATA 6.0 Gb/s cables 1 x I/O Shield Support DVD User Guide If any of DDR3 1600MHz.... Gb/s connectors Realtek® 8111GR PCIe Gigabit LAN Controller (continued on the next page) vi Supports D-Sub with max. B85M-G PLUS/USB 3.1 specifications summary CPU Chipset Memory Graphics Expansion slots Storage LAN LGA1150 socket for Intel® CPU support list. Integrated graphics ...
...* Hyper DIMM support is damaged or missing, contact your motherboard package for the following items. Motherboard Cables Accessories Application DVD Documentation ASUS B85M-G PLUS/USB 3.1 motherboard 2 x Serial ATA 6.0 Gb/s cables 1 x I/O Shield Support DVD User Guide If any of DDR3 1600MHz.... Gb/s connectors Realtek® 8111GR PCIe Gigabit LAN Controller (continued on the next page) vi Supports D-Sub with max. B85M-G PLUS/USB 3.1 specifications summary CPU Chipset Memory Graphics Expansion slots Storage LAN LGA1150 socket for Intel® CPU support list. Integrated graphics ...

User Guide
Page 11
Do not overtighten the screws! ASUS B85M-G PLUS/USB 3.1 1-1 Unplug the power cord before installing or removing the motherboard. The edge with the component. • Before you install or remove any component, ensure that ...
Do not overtighten the screws! ASUS B85M-G PLUS/USB 3.1 1-1 Unplug the power cord before installing or removing the motherboard. The edge with the component. • Before you install or remove any component, ensure that ...

User Guide
Page 13
...fan connectors (4-pin CPU_FAN, 4-pin CHA_FAN1/2) 3. B85M-G PLUS/USB3.1 B85M-G PLUS/USB3.1 CPU socket LGA1150 ASUS B85M-G PLUS/USB 3.1 1-3 ATX power connectors (24-pin EATXPWR, 4-pin ATX12V) 2. Speaker connector (4-pin SPEAKER) 10. Clear RTC RAM (2-pin CLRTC) 9. USB 3.0 connector (20-1 pin USB3_12) 6. Serial port...SPDIF_OUT) 13. System panel connector (10-1 pin F_PANEL) 11. Intel® B85 Serial ATA 6.0Gb/s connectors (7-pin SATA6G_1~4) 7. USB 2.0 connectors (10-1 pin USB1112, USB1314) 12. Front panel audio connector (10-1 pin AAFP) Page 1.3 Central Processing Unit (...
...fan connectors (4-pin CPU_FAN, 4-pin CHA_FAN1/2) 3. B85M-G PLUS/USB3.1 B85M-G PLUS/USB3.1 CPU socket LGA1150 ASUS B85M-G PLUS/USB 3.1 1-3 ATX power connectors (24-pin EATXPWR, 4-pin ATX12V) 2. Speaker connector (4-pin SPEAKER) 10. Clear RTC RAM (2-pin CLRTC) 9. USB 3.0 connector (20-1 pin USB3_12) 6. Serial port...SPDIF_OUT) 13. System panel connector (10-1 pin F_PANEL) 11. Intel® B85 Serial ATA 6.0Gb/s connectors (7-pin SATA6G_1~4) 7. USB 2.0 connectors (10-1 pin USB1112, USB1314) 12. Front panel audio connector (10-1 pin AAFP) Page 1.3 Central Processing Unit (...

User Guide
Page 15
4 C 5 A B 1.3.2 CPU heatsink and fan assembly installation Apply the Thermal Interface Material to the CPU heatsink and CPU before you install the heatsink and fan if necessary. ASUS B85M-G PLUS/USB 3.1 1-5
4 C 5 A B 1.3.2 CPU heatsink and fan assembly installation Apply the Thermal Interface Material to the CPU heatsink and CPU before you install the heatsink and fan if necessary. ASUS B85M-G PLUS/USB 3.1 1-5

User Guide
Page 17
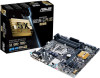
...the total size of the DDR3 DIMM sockets: DIMM_A1 DIMM_A2 DIMM_B1 DIMM_B2 Channel Channel A Channel B Sockets DIMM_A1 & DIMM_A2 DIMM_B1 & DIMM_B2 B85M-G PLUS/USB3.1 B85M-G PLUS/USB3.1 240-pin DDR3 DIMM sockets 1.4.2 Memory configurations You may install 1GB, 2GB, 4GB, and 8GB unbuffered non-ECC DDR3 DIMMs ..., we recommend that you do any of 3GB system memory if you are developed for the OS can be about 3GB or less. ASUS B85M-G PLUS/USB 3.1 1-7 Use a maximum of the following: - The figure illustrates the location of the lower-sized channel for single-channel operation. ...
...the total size of the DDR3 DIMM sockets: DIMM_A1 DIMM_A2 DIMM_B1 DIMM_B2 Channel Channel A Channel B Sockets DIMM_A1 & DIMM_A2 DIMM_B1 & DIMM_B2 B85M-G PLUS/USB3.1 B85M-G PLUS/USB3.1 240-pin DDR3 DIMM sockets 1.4.2 Memory configurations You may install 1GB, 2GB, 4GB, and 8GB unbuffered non-ECC DDR3 DIMMs ..., we recommend that you do any of 3GB system memory if you are developed for the OS can be about 3GB or less. ASUS B85M-G PLUS/USB 3.1 1-7 Use a maximum of the following: - The figure illustrates the location of the lower-sized channel for single-channel operation. ...
User Guide
Page 19
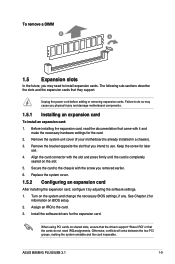
... the two PCI groups, making the system unstable and the card inoperable. Remove the bracket opposite the slot that they support. Turn on the slot. 5. ASUS B85M-G PLUS/USB 3.1 1-9 Keep the screw for the expansion card. The following sub‑sections describe the slots and the expansion cards that you removed earlier. 6. Install the...
... the two PCI groups, making the system unstable and the card inoperable. Remove the bracket opposite the slot that they support. Turn on the slot. 5. ASUS B85M-G PLUS/USB 3.1 1-9 Keep the screw for the expansion card. The following sub‑sections describe the slots and the expansion cards that you removed earlier. 6. Install the...
User Guide
Page 21
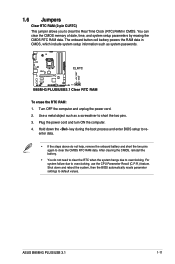
The onboard button cell battery powers the RAM data in CMOS. Use a metal object such as system passwords. +3V_BAT GND B85M-G PLUS/USB3.1 CLRTC PIN 1 B85M-G PLUS/USB3.1 Clear RTC RAM To erase the RTC RAM: 1. ASUS B85M-G PLUS/USB 3.1 1-11 Shut down the key during the boot process and enter BIOS setup to re- Plug the power cord...
The onboard button cell battery powers the RAM data in CMOS. Use a metal object such as system passwords. +3V_BAT GND B85M-G PLUS/USB3.1 CLRTC PIN 1 B85M-G PLUS/USB3.1 Clear RTC RAM To erase the RTC RAM: 1. ASUS B85M-G PLUS/USB 3.1 1-11 Shut down the key during the boot process and enter BIOS setup to re- Plug the power cord...
User Guide
Page 23
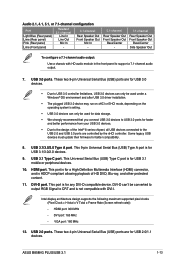
...to CRT and is for USB 3.1/3.0/2.0 devices. 9. USB 3.1 Type C port. Intel display architecture design supports the following maximum supported pixel clocks (Pixel Clock = H total x V Total x Frame Rate (Screen refresh rate)): - HDMI port: 300 MHz - ASUS B85M-G PLUS/USB 3.1 1-13 This port ...is not compatible with HD audio module in the front panel to support a 7.1-channel audio output. 7. Some legacy USB devices must update their firmware for faster and better performance from ...
...to CRT and is for USB 3.1/3.0/2.0 devices. 9. USB 3.1 Type C port. Intel display architecture design supports the following maximum supported pixel clocks (Pixel Clock = H total x V Total x Frame Rate (Screen refresh rate)): - HDMI port: 300 MHz - ASUS B85M-G PLUS/USB 3.1 1-13 This port ...is not compatible with HD audio module in the front panel to support a 7.1-channel audio output. 7. Some legacy USB devices must update their firmware for faster and better performance from ...
User Guide
Page 25
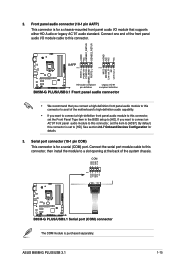
... opening at the back of the system chassis. By default, this connector. Serial port connector (10-1 pin COM) This connector is for details. 3. ASUS B85M-G PLUS/USB 3.1 1-15 See section 2.6.7 Onboard Devices Configuration for a serial (COM) port. If you want to connect an AC'97 front panel audio module to..., set the Front Panel Type item in the BIOS setup to [HD]. COM RXD DTR DSR CTS PIN 1 DCD TXD GND RTS RI B85M-G PLUS/USB3.1 B85M-G PLUS/USB3.1 Serial port (COM) connector The COM module is set to [HD]. 2. AGND NC SENSE1_RETUR SENSE2_RETUR AGND NC NC NC AAFP PIN ...
... opening at the back of the system chassis. By default, this connector. Serial port connector (10-1 pin COM) This connector is for details. 3. ASUS B85M-G PLUS/USB 3.1 1-15 See section 2.6.7 Onboard Devices Configuration for a serial (COM) port. If you want to connect an AC'97 front panel audio module to..., set the Front Panel Type item in the BIOS setup to [HD]. COM RXD DTR DSR CTS PIN 1 DCD TXD GND RTS RI B85M-G PLUS/USB3.1 B85M-G PLUS/USB3.1 Serial port (COM) connector The COM module is set to [HD]. 2. AGND NC SENSE1_RETUR SENSE2_RETUR AGND NC NC NC AAFP PIN ...
User Guide
Page 27
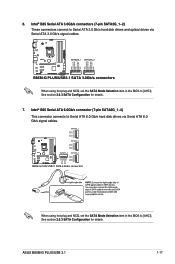
... [AHCI]. See section 2.6.3 SATA Configuration for details. SATA6G_1 GND RSATA_TXP1 RSATA_TXN1 GND RSATA_RXN1 RSATA_RXP1 GND B85M-G PLUS/USB3.1 SATA6G_2 GND RSATA_TXP2 RSATA_TXN2 GND RSATA_RXN2 RSATA_RXP2 GND SATA6G_4 SATA6G_3 GND RSATA_TXP3 RSATA_TXN3 GND RSATA_RXN3 RSATA_RXP3... (7-pin SATA6G_1~4) This connector connects to [AHCI]. ASUS B85M-G PLUS/USB 3.1 1-17 GND RSATA_RXP1 RSATA_RXN1 GND RSATA_TXN1 RSATA_TXP1 GND GND RSATA_RXP2 RSATA_RXN2 GND RSATA_TXN2 RSATA_TXP2 GND B85M-G PLUS/USB3.1 SATA3G_1 SATA3G_2 B85M-G PLUS/USB3.1 SATA 3.0Gb/s connectors When using hot-plug...
... [AHCI]. See section 2.6.3 SATA Configuration for details. SATA6G_1 GND RSATA_TXP1 RSATA_TXN1 GND RSATA_RXN1 RSATA_RXP1 GND B85M-G PLUS/USB3.1 SATA6G_2 GND RSATA_TXP2 RSATA_TXN2 GND RSATA_RXN2 RSATA_RXP2 GND SATA6G_4 SATA6G_3 GND RSATA_TXP3 RSATA_TXN3 GND RSATA_RXN3 RSATA_RXP3... (7-pin SATA6G_1~4) This connector connects to [AHCI]. ASUS B85M-G PLUS/USB 3.1 1-17 GND RSATA_RXP1 RSATA_RXN1 GND RSATA_TXN1 RSATA_TXP1 GND GND RSATA_RXP2 RSATA_RXN2 GND RSATA_TXN2 RSATA_TXP2 GND B85M-G PLUS/USB3.1 SATA3G_1 SATA3G_2 B85M-G PLUS/USB3.1 SATA 3.0Gb/s connectors When using hot-plug...
User Guide
Page 29
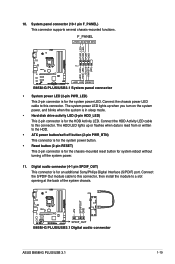
... read from or written to a slot opening at the back of the system chassis. +5V SPDIFOUT GND B85M-G PLUS/USB3.1 SPDIF_OUT B85M-G PLUS/USB3.1 Digital audio connector ASUS B85M-G PLUS/USB 3.1 1-19 F_PANEL +PWR LED PWR BTN PIN 1 B85M-G PLUS/USB3.1 +HDD_LED RESET B85M-G PLUS/USB3.1 System panel connector • System power LED (2-pin PWR_LED) This 2-pin connector is for the system...
... read from or written to a slot opening at the back of the system chassis. +5V SPDIFOUT GND B85M-G PLUS/USB3.1 SPDIF_OUT B85M-G PLUS/USB3.1 Digital audio connector ASUS B85M-G PLUS/USB 3.1 1-19 F_PANEL +PWR LED PWR BTN PIN 1 B85M-G PLUS/USB3.1 +HDD_LED RESET B85M-G PLUS/USB3.1 System panel connector • System power LED (2-pin PWR_LED) This 2-pin connector is for the system...
User Guide
Page 31
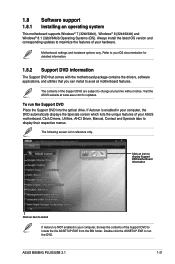
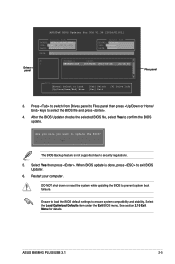
... to your computer, browse the contents of the Support DVD to run the Support DVD Place the Support DVD into the optical drive. ASUS B85M-G PLUS/USB 3.1 1-21 Click Drivers, Utilities, AHCI Driver, Manual, Contact and Specials tabs to avail all motherboard features. The following screen is ...NOT enabled in your computer, the DVD automatically displays the Specials screen which lists the unique features of your ASUS motherboard. Double-click the ASSETUP.EXE to locate the file ASSETUP.EXE from the BIN folder. 1.8 Software support 1.8.1 Installing an ...
... to your computer, browse the contents of the Support DVD to run the Support DVD Place the Support DVD into the optical drive. ASUS B85M-G PLUS/USB 3.1 1-21 Click Drivers, Utilities, AHCI Driver, Manual, Contact and Specials tabs to avail all motherboard features. The following screen is ...NOT enabled in your computer, the DVD automatically displays the Specials screen which lists the unique features of your ASUS motherboard. Double-click the ASSETUP.EXE to locate the file ASSETUP.EXE from the BIN folder. 1.8 Software support 1.8.1 Installing an ...

User Guide
Page 33
...easily. BIOS information 2.1 Managing and updating your BIOS 2 Save a copy of the original motherboard BIOS file to a USB flash disk in the future. With this utlity, you need to update the BIOS EZ Update requires an Internet connection ...either through a network or an ISP (Internet Service Provider). Copy the original motherboard BIOS using the ASUS Update utility. 2.1.1 EZ Update EZ Update is a utility that allows you to automatically update your motherboard's driver,... EZ Update, click EZ Update on the AI Suite 3 main menu bar. ASUS B85M-G PLUS/USB 3.1 2-1
...easily. BIOS information 2.1 Managing and updating your BIOS 2 Save a copy of the original motherboard BIOS file to a USB flash disk in the future. With this utlity, you need to update the BIOS EZ Update requires an Internet connection ...either through a network or an ISP (Internet Service Provider). Copy the original motherboard BIOS using the ASUS Update utility. 2.1.1 EZ Update EZ Update is a utility that allows you to automatically update your motherboard's driver,... EZ Update, click EZ Update on the AI Suite 3 main menu bar. ASUS B85M-G PLUS/USB 3.1 2-1
User Guide
Page 35
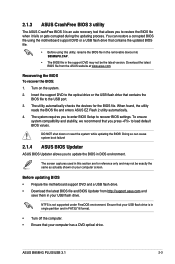
...; Turn off the computer. • Ensure that contains the updated BIOS file. • Before using the motherboard support DVD or a USB flash drive that your computer screen. ASUS B85M-G PLUS/USB 3.1 2-3 Download the latest BIOS file from http://support.asus.com and save them in DOS environment. Ensure that you to update the BIOS in your...
...; Turn off the computer. • Ensure that contains the updated BIOS file. • Before using the motherboard support DVD or a USB flash drive that your computer screen. ASUS B85M-G PLUS/USB 3.1 2-3 Download the latest BIOS file from http://support.asus.com and save them in DOS environment. Ensure that you to update the BIOS in your...
User Guide
Page 37
... you sure you want to security regulations. 5. Restart your computer. See section 2.10 Exit Menu for DOS V1.30 [2014/01/01] Current ROM BOARD: B85M-G PLUS/USB3.1 VER: 0303 (H :00 B :00) DATE: 03/24/2015 PATH: C:\ Update ROM BOARD: Unknown VER: Unknown DATE: Unknown C: FORMAN~1 D: B85MGPU.CAP... under the Exit BIOS menu. Press to switch from Drives panel to Files panel then press keys to exit BIOS Updater. 6. ASUS B85M-G PLUS/USB 3.1 2-5 Drives panel ASUSTeK BIOS Updater for details. Ensure to load the BIOS default settings to ensure system compatibility and stability.
... you sure you want to security regulations. 5. Restart your computer. See section 2.10 Exit Menu for DOS V1.30 [2014/01/01] Current ROM BOARD: B85M-G PLUS/USB3.1 VER: 0303 (H :00 B :00) DATE: 03/24/2015 PATH: C:\ Update ROM BOARD: Unknown VER: Unknown DATE: Unknown C: FORMAN~1 D: B85MGPU.CAP... under the Exit BIOS menu. Press to switch from Drives panel to Files panel then press keys to exit BIOS Updater. 6. ASUS B85M-G PLUS/USB 3.1 2-5 Drives panel ASUSTeK BIOS Updater for details. Ensure to load the BIOS default settings to ensure system compatibility and stability.

User Guide
Page 39
...saving the changes, saves the changes and resets the system, or enters the Advanced Mode Selects the Advanced mode functions Normal mode ASUS Optimal mode Selects the boot SATA information device priority Displays the Power saving Advanced mode mode menus Selects the boot device priority Loads... device priority. To access the Advanced Mode, click Exit/Advanced Mode, then select Advanced Mode or press F7 for the advanced BIOS settings. ASUS B85M-G PLUS/USB 3.1 2-7 The EZ Mode provides you an overview of the selected mode on the right hand side • The boot device options vary...
...saving the changes, saves the changes and resets the system, or enters the Advanced Mode Selects the Advanced mode functions Normal mode ASUS Optimal mode Selects the boot SATA information device priority Displays the Power saving Advanced mode mode menus Selects the boot device priority Loads... device priority. To access the Advanced Mode, click Exit/Advanced Mode, then select Advanced Mode or press F7 for the advanced BIOS settings. ASUS B85M-G PLUS/USB 3.1 2-7 The EZ Mode provides you an overview of the selected mode on the right hand side • The boot device options vary...

User Guide
Page 41
...menu items. If an item is a brief description of the menu screen are items that you can change the settings. Press or use the USB mouse to click this button to return to display a pop-up window Select a menu item and press to the previous menu screen. You cannot... button shows the items that do not fit on the screen. Submenu items A greater than sign (>) before each item on the right side of options. ASUS B85M-G PLUS/USB 3.1 2-9 To display the submenu, select the item and press . Pop-up window with the configuration options for the BIOS setup program. Scroll bar A...
...menu items. If an item is a brief description of the menu screen are items that you can change the settings. Press or use the USB mouse to click this button to return to display a pop-up window Select a menu item and press to the previous menu screen. You cannot... button shows the items that do not fit on the screen. Submenu items A greater than sign (>) before each item on the right side of options. ASUS B85M-G PLUS/USB 3.1 2-9 To display the submenu, select the item and press . Pop-up window with the configuration options for the BIOS setup program. Scroll bar A...

User Guide
Page 43
... BIOS password. After you set an administrator password, we recommend that you enter the administrator password for information on top of the screen show Installed. 1. ASUS B85M-G PLUS/USB 3.1 2-11 Otherwise, you might be able to erase the RTC RAM. • The Administrator or User Password items on how to see or change the...
... BIOS password. After you set an administrator password, we recommend that you enter the administrator password for information on top of the screen show Installed. 1. ASUS B85M-G PLUS/USB 3.1 2-11 Otherwise, you might be able to erase the RTC RAM. • The Administrator or User Password items on how to see or change the...

User Guide
Page 45
... : xxxxMHz Displays the target DMI/PEG clock. Target DRAM Speed : xxxxMHz Displays the target DRAM speed. Target Cache Speed : xxxxMHz Displays the target Cache speed. ASUS B85M-G PLUS/USB 3.1 2-13 Target iGPU Speed : xxxxMHz Displays the target iGPU speed. 2.5 Ai Tweaker menu The Ai Tweaker menu items allow you installed on the motherboard.
... : xxxxMHz Displays the target DMI/PEG clock. Target DRAM Speed : xxxxMHz Displays the target DRAM speed. Target Cache Speed : xxxxMHz Displays the target Cache speed. ASUS B85M-G PLUS/USB 3.1 2-13 Target iGPU Speed : xxxxMHz Displays the target iGPU speed. 2.5 Ai Tweaker menu The Ai Tweaker menu items allow you installed on the motherboard.

User Guide
Page 47
... the value. Configuration options: [Auto] [Manual] The following percentages to set the CPU VRM Switching Frequency to its optimized setting depending on your CPU specification. ASUS B85M-G PLUS/USB 3.1 2-15 Fixed CPU VRM Switching Frequency (KHz) [250] This item allows you set a higher frequency for a quicker transient response speed. To restore the default setting...
... the value. Configuration options: [Auto] [Manual] The following percentages to set the CPU VRM Switching Frequency to its optimized setting depending on your CPU specification. ASUS B85M-G PLUS/USB 3.1 2-15 Fixed CPU VRM Switching Frequency (KHz) [250] This item allows you set a higher frequency for a quicker transient response speed. To restore the default setting...


