User Manual
Page 9
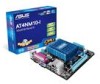
AT4NM10-I specifications summary Internal connectors BIOS features Accessories Support DVD contents Form Factor 2 x USB 2.0/1.1 connector supports additional 4 USB 2.0/1.1 ports 1 x CPU fan connector 1 x Chassis fan connector 1 x Chassis ... EATX power connector 1 x 4-pin ATX 12V power connector 8 Mb Flash ROM, AMI BIOS, PnP, DMI2.0, WfM2.0, SMBIOS 2.5 1 x Serial ATA cable 1 x I/O shield 1 x User Manual Drivers ASUS PC Probe II ASUS Update Anti-virus software (OEM version) Mini ITX form factor: 6.75 in x 6.75 in (17.1cm x 17.1cm) * Specifications are subject to change without...
AT4NM10-I specifications summary Internal connectors BIOS features Accessories Support DVD contents Form Factor 2 x USB 2.0/1.1 connector supports additional 4 USB 2.0/1.1 ports 1 x CPU fan connector 1 x Chassis fan connector 1 x Chassis ... EATX power connector 1 x 4-pin ATX 12V power connector 8 Mb Flash ROM, AMI BIOS, PnP, DMI2.0, WfM2.0, SMBIOS 2.5 1 x Serial ATA cable 1 x I/O shield 1 x User Manual Drivers ASUS PC Probe II ASUS Update Anti-virus software (OEM version) Mini ITX form factor: 6.75 in x 6.75 in (17.1cm x 17.1cm) * Specifications are subject to change without...
User Manual
Page 17
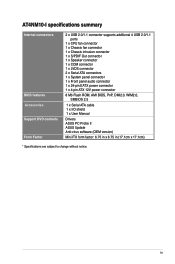
Unplug the power cord before adding or removing expansion cards. Install the software drivers for the card. 2. Assign an IRQ to the card. 3. Secure the card to the chassis with PCI specifications. The following sub‑sections describe the ... you removed earlier. 6. Remove the system unit cover (if your motherboard is completely seated on the system and change the necessary BIOS settings, if any. ASUS AT4NM10-I 1-8 Turn on the slot. 5. Keep the screw for information on BIOS setup. 2. See Chapter 2 for later use . 1.5 Expansion slot In the future, you intend to...
Unplug the power cord before adding or removing expansion cards. Install the software drivers for the card. 2. Assign an IRQ to the card. 3. Secure the card to the chassis with PCI specifications. The following sub‑sections describe the ... you removed earlier. 6. Remove the system unit cover (if your motherboard is completely seated on the system and change the necessary BIOS settings, if any. ASUS AT4NM10-I 1-8 Turn on the slot. 5. Keep the screw for information on BIOS setup. 2. See Chapter 2 for later use . 1.5 Expansion slot In the future, you intend to...
User Manual
Page 27
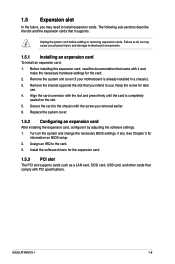
...ASSETUP.EXE from the BIN folder. ASUS AT4NM10-I 1-18 To run the DVD. Click Drivers, Utilities, Make Disk, Manual, and Contact tabs to the optical drive. The contents of ASUS motherboard. Double-click the ASSETUP.EXE to change at www.asus.com for better compatibility and system stability.... 1.8.2 Support DVD information The Support DVD that comes with the motherboard package contains the drivers, software applications, and utilities that...
...ASSETUP.EXE from the BIN folder. ASUS AT4NM10-I 1-18 To run the DVD. Click Drivers, Utilities, Make Disk, Manual, and Contact tabs to the optical drive. The contents of ASUS motherboard. Double-click the ASSETUP.EXE to change at www.asus.com for better compatibility and system stability.... 1.8.2 Support DVD information The Support DVD that comes with the motherboard package contains the drivers, software applications, and utilities that...

User Manual
Page 28
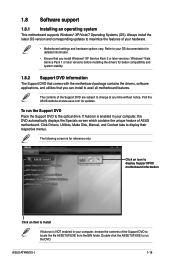
... before you update the BIOS using the ASUS Update utility. 2.1.1 ASUS Update utility The ASUS Update is a utility that allows you to manage, save, and update the motherboard BIOS in Windows® environment. • ASUS Update requires an Internet connection either through ...the updating process: Updating from the Internet, then click Next. The Drivers menu appears. 2. Follow the onscreen instructions to launch the ASUS Update utility. 2. c. From the Windows® desktop, click Start > Programs > ASUS > ASUSUpdate > ASUSUpdate to complete the installation. b. Copy the original...
... before you update the BIOS using the ASUS Update utility. 2.1.1 ASUS Update utility The ASUS Update is a utility that allows you to manage, save, and update the motherboard BIOS in Windows® environment. • ASUS Update requires an Internet connection either through ...the updating process: Updating from the Internet, then click Next. The Drivers menu appears. 2. Follow the onscreen instructions to launch the ASUS Update utility. 2. c. From the Windows® desktop, click Start > Programs > ASUS > ASUSUpdate > ASUSUpdate to complete the installation. b. Copy the original...


