User's Manual for English Edition
Page 3
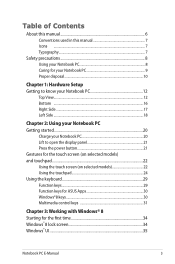
... 2: Using your Notebook PC Getting started 20 Charge your Notebook PC 20 Lift to open the display panel 21 Press the power button 21 Gestures for the touch screen (on selected models) and touchpad...22 Using the touch screen (on selected models 22 Using the touchpad 24 Using the keyboard 29 Function keys 29 Function keys for ASUS Apps 30 Windows®8 keys 30 Multimedia control keys 31 Chapter 3: Working with Windows® 8 Starting for the first time 34 Windows® 8 lock screen 34 Windows® UI...35 Notebook...
... 2: Using your Notebook PC Getting started 20 Charge your Notebook PC 20 Lift to open the display panel 21 Press the power button 21 Gestures for the touch screen (on selected models) and touchpad...22 Using the touch screen (on selected models 22 Using the touchpad 24 Using the keyboard 29 Function keys 29 Function keys for ASUS Apps 30 Windows®8 keys 30 Multimedia control keys 31 Chapter 3: Working with Windows® 8 Starting for the first time 34 Windows® 8 lock screen 34 Windows® UI...35 Notebook...
User's Manual for English Edition
Page 4
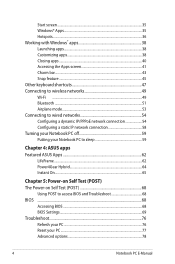
... network connection 58 Turning your Notebook PC off 59 Putting your Notebook PC to sleep 59 Chapter 4: ASUS apps Featured ASUS Apps 62 LifeFrame...62 Power4Gear Hybrid 64 Instant On...65 Chapter 5: Power-on Self Test (POST) The Power-on Self Test (POST 68 Using POST to access BIOS and Troubleshoot 68 BIOS ...68 Accessing BIOS 68 BIOS Settings...69 Troubleshoot...76 Refresh your PC 76 Reset your PC...77 Advanced options...
... network connection 58 Turning your Notebook PC off 59 Putting your Notebook PC to sleep 59 Chapter 4: ASUS apps Featured ASUS Apps 62 LifeFrame...62 Power4Gear Hybrid 64 Instant On...65 Chapter 5: Power-on Self Test (POST) The Power-on Self Test (POST 68 Using POST to access BIOS and Troubleshoot 68 BIOS ...68 Accessing BIOS 68 BIOS Settings...69 Troubleshoot...76 Refresh your PC 76 Reset your PC...77 Advanced options...
User's Manual for English Edition
Page 9
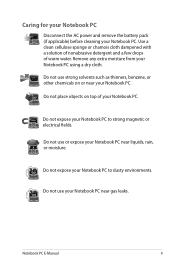
... Do not expose your Notebook PC to dusty environments. Caring for your Notebook PC Disconnect the AC power and remove the battery pack (if applicable) before cleaning your Notebook PC. Do not use strong solvents such as ...thinners, benzene, or other chemicals on top of warm water. Do not place objects on or near liquids, rain, or moisture. Do not use or expose your Notebook PC using a dry cloth. Remove any extra moisture from your Notebook PC near your Notebook PC. Do not use your Notebook PC. Notebook PC E-Manual...
... Do not expose your Notebook PC to dusty environments. Caring for your Notebook PC Disconnect the AC power and remove the battery pack (if applicable) before cleaning your Notebook PC. Do not use strong solvents such as ...thinners, benzene, or other chemicals on top of warm water. Do not place objects on or near liquids, rain, or moisture. Do not use or expose your Notebook PC using a dry cloth. Remove any extra moisture from your Notebook PC near your Notebook PC. Do not use your Notebook PC. Notebook PC E-Manual...
User's Manual for English Edition
Page 14
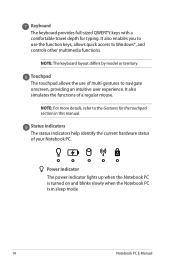
... to navigate onscreen, providing an intuitive user experience. Touchpad The touchpad allows the use the function keys, allows quick access to Windows®, and controls other multimedia functions. It also enables you to use of multi-gestures to the Gestures for typing. Keyboard The keyboard provides full-sized QWERTY keys with a comfortable travel depth for the touchpad section in sleep mode 14 Notebook PC E-Manual NOTE: The keyboard layout differs by model or territory.
... to navigate onscreen, providing an intuitive user experience. Touchpad The touchpad allows the use the function keys, allows quick access to Windows®, and controls other multimedia functions. It also enables you to use of multi-gestures to the Gestures for typing. Keyboard The keyboard provides full-sized QWERTY keys with a comfortable travel depth for the touchpad section in sleep mode 14 Notebook PC E-Manual NOTE: The keyboard layout differs by model or territory.
User's Manual for English Edition
Page 15
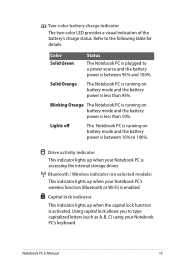
...-color LED provides a visual indication of the battery's charge status. Bluetooth / Wireless indicator (on battery mode and the battery power is enabled. Using capital lock allows you to 100%. Blinking Orange The Notebook PC is running on battery mode and the battery power is between 95% and 100%. Notebook PC E-Manual 15 Lights off The Notebook PC is running on battery mode and the battery power is less than 95%. Drive activity indicator This indicator lights up when the capital lock function is accessing the internal storage drives...
...-color LED provides a visual indication of the battery's charge status. Bluetooth / Wireless indicator (on battery mode and the battery power is enabled. Using capital lock allows you to 100%. Blinking Orange The Notebook PC is running on battery mode and the battery power is between 95% and 100%. Notebook PC E-Manual 15 Lights off The Notebook PC is running on battery mode and the battery power is less than 95%. Drive activity indicator This indicator lights up when the capital lock function is accessing the internal storage drives...
User's Manual for English Edition
Page 16
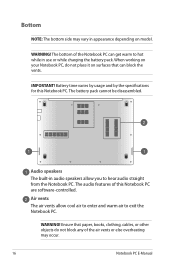
... Notebook PC E-Manual Battery time varies by usage and by the specifications for this Notebook PC are software-controlled. Air vents The air vents allow you to exit the Notebook PC. Ensure that can get warm to hot while in audio speakers allow cool air to enter and warm air to hear audio straight from the Notebook PC. WARNING! IMPORTANT! When working on your Notebook...
... Notebook PC E-Manual Battery time varies by usage and by the specifications for this Notebook PC are software-controlled. Air vents The air vents allow you to exit the Notebook PC. Ensure that can get warm to hot while in audio speakers allow cool air to enter and warm air to hear audio straight from the Notebook PC. WARNING! IMPORTANT! When working on your Notebook...
User's Manual for English Edition
Page 17
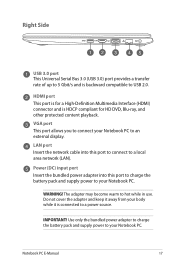
Notebook PC E-Manual 17 LAN port Insert the network cable into this port to connect to a local area network (LAN). Do not cover the adapter and keep it is HDCP compliant for a High-Definition Multimedia Interface (HDMI) connector and is connected to an external display. Use only the bundled power adapter to charge the battery pack and supply power to your Notebook PC to a power source. WARNING! HDMI port This port is for HD DVD, Blu-ray, and other...
Notebook PC E-Manual 17 LAN port Insert the network cable into this port to connect to a local area network (LAN). Do not cover the adapter and keep it is HDCP compliant for a High-Definition Multimedia Interface (HDMI) connector and is connected to an external display. Use only the bundled power adapter to charge the battery pack and supply power to your Notebook PC to a power source. WARNING! HDMI port This port is for HD DVD, Blu-ray, and other...
User's Manual for English Edition
Page 18
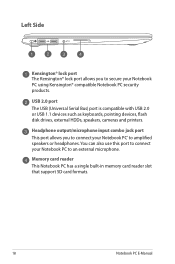
... memory card reader slot that support SD card formats. 18 Notebook PC E-Manual USB 2.0 port The USB (Universal Serial Bus) port is compatible with USB 2.0 or USB 1.1 devices such as keyboards, pointing devices, flash disk drives, external HDDs, speakers, cameras and printers. You can also use this port to connect your Notebook PC to an external microphone. Headphone output/microphone input combo jack port This port allows you to secure your Notebook PC using Kensington® compatible Notebook PC security products. Left Side Kensington® lock port The Kensington® lock port...
... memory card reader slot that support SD card formats. 18 Notebook PC E-Manual USB 2.0 port The USB (Universal Serial Bus) port is compatible with USB 2.0 or USB 1.1 devices such as keyboards, pointing devices, flash disk drives, external HDDs, speakers, cameras and printers. You can also use this port to connect your Notebook PC to an external microphone. Headphone output/microphone input combo jack port This port allows you to secure your Notebook PC using Kensington® compatible Notebook PC security products. Left Side Kensington® lock port The Kensington® lock port...
User's Manual for English Edition
Page 29
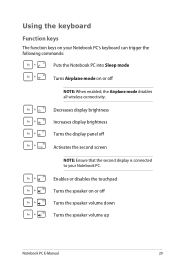
Using the keyboard Function keys The function keys on your Notebook PC. Enables or disables the touchpad Turns the speaker on or off Turns the speaker volume down Turns the speaker volume up Notebook PC E-Manual 29 Decreases display brightness Increases display brightness Turns the display panel off Activates the second screen NOTE: Ensure that the second display is connected to your Notebook PC's keyboard can trigger the following commands: Puts the Notebook PC into Sleep mode Turns Airplane mode on or off NOTE: When enabled, the Airplane mode disables all wireless connectivity.
Using the keyboard Function keys The function keys on your Notebook PC. Enables or disables the touchpad Turns the speaker on or off Turns the speaker volume down Turns the speaker volume up Notebook PC E-Manual 29 Decreases display brightness Increases display brightness Turns the display panel off Activates the second screen NOTE: Ensure that the second display is connected to your Notebook PC's keyboard can trigger the following commands: Puts the Notebook PC into Sleep mode Turns Airplane mode on or off NOTE: When enabled, the Airplane mode disables all wireless connectivity.
User's Manual for English Edition
Page 30
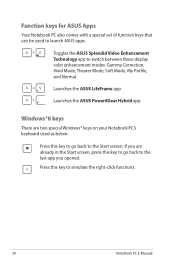
... opened. Press this key to go back to the last app you are two special Windows® keys on your Notebook PC's keyboard used to switch between these display color enhancement modes: Gamma Correction, Vivid Mode, Theater Mode, Soft Mode, My Profile, and Normal. Launches the ASUS LifeFrame app Launches the ASUS Power4Gear Hybrid app Windows®8 keys There are already in the Start screen, press this key to the Start screen. Function keys...
... opened. Press this key to go back to the last app you are two special Windows® keys on your Notebook PC's keyboard used to switch between these display color enhancement modes: Gamma Correction, Vivid Mode, Theater Mode, Soft Mode, My Profile, and Normal. Launches the ASUS LifeFrame app Launches the ASUS Power4Gear Hybrid app Windows®8 keys There are already in the Start screen, press this key to the Start screen. Function keys...
User's Manual for English Edition
Page 34
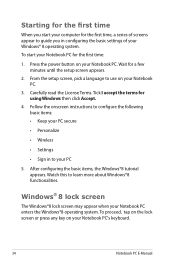
...; Wireless • Settings • Sign in conifguring the basic settings of screens appear to guide you start your computer for the first time: 1. Press the power button on your Notebook PC enters the Windows®8 operating system. Windows® 8 lock screen The Windows®8 lock screen may appear when your Notebook PC. 3. From the setup screen, pick a language to use on your Notebook PC's keyboard. 34 Notebook PC E-Manual To start your Notebook PC for the first time, a series...
...; Wireless • Settings • Sign in conifguring the basic settings of screens appear to guide you start your computer for the first time: 1. Press the power button on your Notebook PC enters the Windows®8 operating system. Windows® 8 lock screen The Windows®8 lock screen may appear when your Notebook PC. 3. From the setup screen, pick a language to use on your Notebook PC's keyboard. 34 Notebook PC E-Manual To start your Notebook PC for the first time, a series...
User's Manual for English Edition
Page 68
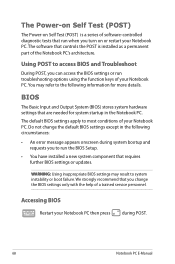
... installed as a permanent part of a trained service personnel. The software that controls the POST is a series of software-controlled diagnostic tests that you can access the BIOS settings or run troubleshooting options using the function keys of your Notebook PC. The default BIOS settings apply to access BIOS and Troubleshoot During POST, you change the default BIOS settings except in the following information for system startup in the Notebook PC. We strongly recommend that run the BIOS Setup. • You have installed a new...
... installed as a permanent part of a trained service personnel. The software that controls the POST is a series of software-controlled diagnostic tests that you can access the BIOS settings or run troubleshooting options using the function keys of your Notebook PC. The default BIOS settings apply to access BIOS and Troubleshoot During POST, you change the default BIOS settings except in the following information for system startup in the Notebook PC. We strongly recommend that run the BIOS Setup. • You have installed a new...
User's Manual for English Edition
Page 69
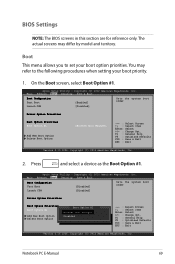
... Aptio Setup Utility - Notebook PC E-Manual 69 You may differ by model and territory. Main Advance Boot Security Save & Exit Boot Configuration Fast Boot Launch CSM [Enabled] [Disabled] Sets the system boot order Driver Option Priorities Boot Option Priorities Boot Option #1 Add New Boot Option Delete Boot Option [Windows Boot Manager] →← : Select Screen ↑↓ : Select Item Enter: Select +/- : Change Opt. Main Advance Boot Security Save & Exit Boot Configuration Fast Boot Launch CSM [Disabled] [Disabled] Sets the system boot order Driver Option...
... Aptio Setup Utility - Notebook PC E-Manual 69 You may differ by model and territory. Main Advance Boot Security Save & Exit Boot Configuration Fast Boot Launch CSM [Enabled] [Disabled] Sets the system boot order Driver Option Priorities Boot Option Priorities Boot Option #1 Add New Boot Option Delete Boot Option [Windows Boot Manager] →← : Select Screen ↑↓ : Select Item Enter: Select +/- : Change Opt. Main Advance Boot Security Save & Exit Boot Configuration Fast Boot Launch CSM [Disabled] [Disabled] Sets the system boot order Driver Option...
User's Manual for English Edition
Page 70
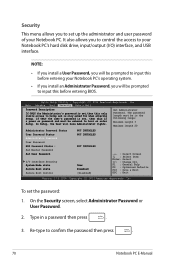
... is only asked for when entering Setup. NOTE: • If you install a User Password, you will have Administrator rights. In Setup, the User will be prompted to input this before entering your Notebook PC's hard disk drive, input/output (I /O Interface Security System Mode state Secure Boot state Secure Boot Control NOT INSTALLED NOT INSTALLED NOT INSTALLED User Disabled [Disabled] →← : Select Screen ↑↓ : Select Item Enter: Select +/- : Change Opt. It also allows you...
... is only asked for when entering Setup. NOTE: • If you install a User Password, you will have Administrator rights. In Setup, the User will be prompted to input this before entering your Notebook PC's hard disk drive, input/output (I /O Interface Security System Mode state Secure Boot state Secure Boot Control NOT INSTALLED NOT INSTALLED NOT INSTALLED User Disabled [Disabled] →← : Select Screen ↑↓ : Select Item Enter: Select +/- : Change Opt. It also allows you...
User's Manual for English Edition
Page 71
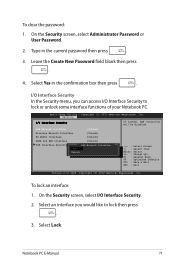
... E-Manual 71 I /O Interface Security to lock then press . 3. LAN Network Interface [UnLock] Wireless Network Interface [UnLock] HD AUDIO Interface [UnLock] SATA 2nd HDD Interface [UnLock] USB Interface Security LAN Network Interface Lock UnLock →← : Select Screen ↑↓ : Select Item Enter: Select +/- : Change Opt. Select an interface you can access I /O Interface Security In the Security menu, you would like to lock or unlock some interface functions of your Notebook PC. On the Security screen, select Administrator Password...
... E-Manual 71 I /O Interface Security to lock then press . 3. LAN Network Interface [UnLock] Wireless Network Interface [UnLock] HD AUDIO Interface [UnLock] SATA 2nd HDD Interface [UnLock] USB Interface Security LAN Network Interface Lock UnLock →← : Select Screen ↑↓ : Select Item Enter: Select +/- : Change Opt. Select an interface you can access I /O Interface Security In the Security menu, you would like to lock or unlock some interface functions of your Notebook PC. On the Security screen, select Administrator Password...

User's Manual for English Edition
Page 72
... Setup Utility - Security USB Interface Security USB Interface [UnLock] If LOCKED, all USB devices will be disabled External Ports CMOS Camera Card Reader [UnLock] [UnLock] Lock [UnLock] USB Interface UnLock →← : Select Screen ↑↓ : Select Item Enter: Select +/- : Change Opt. On the Security screen, select I /O Interface Security menu, you would like to Lock also locks and hides the External Ports and other devices included under USB Interface Security. 72 Notebook PC E-Manual Select an interface that you can also access USB Interface Security to lock...
... Setup Utility - Security USB Interface Security USB Interface [UnLock] If LOCKED, all USB devices will be disabled External Ports CMOS Camera Card Reader [UnLock] [UnLock] Lock [UnLock] USB Interface UnLock →← : Select Screen ↑↓ : Select Item Enter: Select +/- : Change Opt. On the Security screen, select I /O Interface Security menu, you would like to Lock also locks and hides the External Ports and other devices included under USB Interface Security. 72 Notebook PC E-Manual Select an interface that you can also access USB Interface Security to lock...
User's Manual for English Edition
Page 73
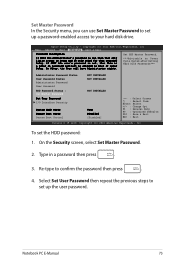
... Security System Mode state Secure Boot state Secure Boot Control NOT INSTALLED NOT INSTALLED NOT INSTALLED User Disabled [Disabled] →← : Select Screen ↑↓ : Select Item Enter: Select +/- : Change Opt. Set Master Password In the Security menu, you can use Set Master Password to set up a password-enabled access to set up the user password. If ONLY the user's password is set the HDD password: 1. Select Set User Password then repeat the previous steps to your hard disk drive. AAppttiioo SSeettuupp UUttiilliittyy -- Notebook PC E-Manual 73 To set , then...
... Security System Mode state Secure Boot state Secure Boot Control NOT INSTALLED NOT INSTALLED NOT INSTALLED User Disabled [Disabled] →← : Select Screen ↑↓ : Select Item Enter: Select +/- : Change Opt. Set Master Password In the Security menu, you can use Set Master Password to set up a password-enabled access to set up the user password. If ONLY the user's password is set the HDD password: 1. Select Set User Password then repeat the previous steps to your hard disk drive. AAppttiioo SSeettuupp UUttiilliittyy -- Notebook PC E-Manual 73 To set , then...
User's Manual for English Edition
Page 74
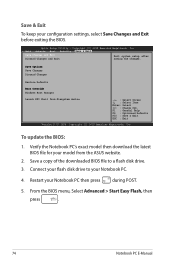
... Save Changes and Exit Discard Changes and Exit Exit system setup after saving the changes. F1 : General Help F9 : Optimized Defaults F10 : Save & Exit ESC : Exit Version 2.15.1226. Aptio Setup Utility - Restart your model from filesystem device →← : Select Screen ↑↓ : Select Item Enter: Select +/- : Change Opt. Connect your flash disk drive to a flash disk drive. 3. From the BIOS menu, Select Advanced > Start Easy Flash, then press . 74 Notebook PC E-Manual Save...
... Save Changes and Exit Discard Changes and Exit Exit system setup after saving the changes. F1 : General Help F9 : Optimized Defaults F10 : Save & Exit ESC : Exit Version 2.15.1226. Aptio Setup Utility - Restart your model from filesystem device →← : Select Screen ↑↓ : Select Item Enter: Select +/- : Change Opt. Connect your flash disk drive to a flash disk drive. 3. From the BIOS menu, Select Advanced > Start Easy Flash, then press . 74 Notebook PC E-Manual Save...
User's Manual for English Edition
Page 75
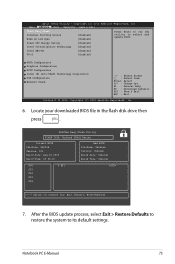
..... Notebook PC E-Manual 75 Start Easy Flash Internal Pointing Device Wake on Lid Open [Enabled] [Enabled] Press Enter to run the utility to its default settings. Power Off Energy Saving [Enabled] Intel Virtualization Technology [Enabled] Intel AES-NI [Enabled] VT-d [Enabled] SATA Configuration Graphics Configuration DPTF Configuration Intel (R) Anti-Theft Technology Corporation USB Configuration Network Stack →← : Select Screen ↑↓ : Select Item Enter: Select +/- : Change Opt. ASUSTek Easy Flash Utility FLASH TYPE: Winbond 25X/Q Series Current BIOS...
..... Notebook PC E-Manual 75 Start Easy Flash Internal Pointing Device Wake on Lid Open [Enabled] [Enabled] Press Enter to run the utility to its default settings. Power Off Energy Saving [Enabled] Intel Virtualization Technology [Enabled] Intel AES-NI [Enabled] VT-d [Enabled] SATA Configuration Graphics Configuration DPTF Configuration Intel (R) Anti-Theft Technology Corporation USB Configuration Network Stack →← : Select Screen ↑↓ : Select Item Enter: Select +/- : Change Opt. ASUSTek Easy Flash Utility FLASH TYPE: Winbond 25X/Q Series Current BIOS...
User's Manual for English Edition
Page 79
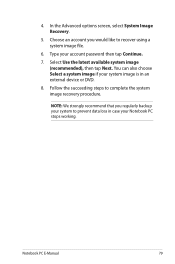
Type your system image is in case your Notebook PC stops working. Follow the succeeding steps to recover using a system image file. 6. Choose an account you regularly backup your system to prevent data loss in an external device or DVD. 8. Select Use the latest available system image (recommended), then tap Next. Notebook PC E-Manual 79 In the Advanced options screen, select System Image Recovery. 5. You can...
Type your system image is in case your Notebook PC stops working. Follow the succeeding steps to recover using a system image file. 6. Choose an account you regularly backup your system to prevent data loss in an external device or DVD. 8. Select Use the latest available system image (recommended), then tap Next. Notebook PC E-Manual 79 In the Advanced options screen, select System Image Recovery. 5. You can...


