
User Manual
Page 22
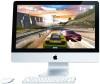
Other Components of Your iMac Power port Security slot ® Power button ® Memory access (underneath) 22 Chapter 2 Life with Your iMac
Other Components of Your iMac Power port Security slot ® Power button ® Memory access (underneath) 22 Chapter 2 Life with Your iMac
User Manual
Page 23
... to turn on your iMac during troubleshooting. Chapter 2 Life with at least 4 GB of memory installed as the Apple Wireless Keyboard and Apple Magic Mouse, Bluetooth mobile phones, PDAs, and printers. Memory access Your iMac comes with Your iMac 23 Security slot Attach a lock and cable to discourage theft (available separately). ® Power button Press...
... to turn on your iMac during troubleshooting. Chapter 2 Life with at least 4 GB of memory installed as the Apple Wireless Keyboard and Apple Magic Mouse, Bluetooth mobile phones, PDAs, and printers. Memory access Your iMac comes with Your iMac 23 Security slot Attach a lock and cable to discourage theft (available separately). ® Power button Press...
User Manual
Page 37
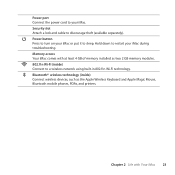
... cloth on the surface and the bottom faces you. Do not attempt to 16 GB of your iMac and remove the power cord before installing memory. Installing Memory Your iMac has four memory slots. To install memory: 1 Turn off your iMac by choosing Apple () > Shut Down. 2 Disconnect all cables and the power cord from an...
... cloth on the surface and the bottom faces you. Do not attempt to 16 GB of your iMac and remove the power cord before installing memory. Installing Memory Your iMac has four memory slots. To install memory: 1 Turn off your iMac by choosing Apple () > Shut Down. 2 Disconnect all cables and the power cord from an...

User Manual
Page 40
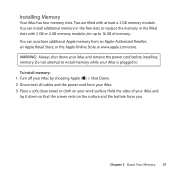
Memory modules 40 Chapter 3 Boost Your Memory ® Tuck the tab 8 Insert the new memory modules in the slots with the notches facing right, as shown in the illustration. ÂÂ If you install additional memory modules, insert them in the open slots. ÂÂ If you replace the installed memory modules, insert a new memory module in each of the slots furthest from the display. 9 Press each memory module firmly and evenly into the memory compartment. You'll hear a slight click when the memory module is seated correctly. 10 Tuck the tabs into its slot.
Memory modules 40 Chapter 3 Boost Your Memory ® Tuck the tab 8 Insert the new memory modules in the slots with the notches facing right, as shown in the illustration. ÂÂ If you install additional memory modules, insert them in the open slots. ÂÂ If you replace the installed memory modules, insert a new memory module in each of the slots furthest from the display. 9 Press each memory module firmly and evenly into the memory compartment. You'll hear a slight click when the memory module is seated correctly. 10 Tuck the tabs into its slot.

User Manual
Page 78
... 23 power port 10, 23 power specifications 64 PPPoE connections 51 problems. See troubleshooting Q question mark, flashing 46 R RAM. See memory security slot 23 serial number 60 service and support 57, 58 setting up 12 using 29 wireless 12 N network address translation (NAT) 52 connecting...64 storing your iMac 67 SuperDrive about 19 supported disc sizes 67 support and service 57, 58 78 Looking for Something? See memory reinstalling software 54 replacing batteries 47, 48 resetting paramater RAM (PRAM) 46 S safety important information 62 optical drive 65 screen ...
... 23 power port 10, 23 power specifications 64 PPPoE connections 51 problems. See troubleshooting Q question mark, flashing 46 R RAM. See memory security slot 23 serial number 60 service and support 57, 58 setting up 12 using 29 wireless 12 N network address translation (NAT) 52 connecting...64 storing your iMac 67 SuperDrive about 19 supported disc sizes 67 support and service 57, 58 78 Looking for Something? See memory reinstalling software 54 replacing batteries 47, 48 resetting paramater RAM (PRAM) 46 S safety important information 62 optical drive 65 screen ...