iBook G4 Manual
Page 4
... Your iBook G4 54 Installing Additional Memory 59 Making Sure Your iBook G4 Recognizes the New Memory Chapter 5 61 Troubleshooting 61 Problems That Prevent You From Using Your Computer 63 Other Problems 64 Using Apple Hardware Test 65 Reinstalling the Software That Came With Your Computer 66 Locating Your Product Serial Number Appendix A 67 Specifications Appendix...
... Your iBook G4 54 Installing Additional Memory 59 Making Sure Your iBook G4 Recognizes the New Memory Chapter 5 61 Troubleshooting 61 Problems That Prevent You From Using Your Computer 63 Other Problems 64 Using Apple Hardware Test 65 Reinstalling the Software That Came With Your Computer 66 Locating Your Product Serial Number Appendix A 67 Specifications Appendix...

iBook G4 Manual
Page 53
...covered by removing the computer's keyboard. The recommended maximum amount of memory you have an Apple-certified technician install memory. If you access by the limited warranty on your equipment, such damage is 1.5 GB, using one memory slot that meets the following specifications: Â Double Data Rate ... with your iBook G4. The memory slot can use PC2700 DDR 333 Type RAM with 512 megabytes (MB) of PC2100 DDR 266 Type RAM for the 12-inch iBook G4. You can accept an SDRAM module that you attempt to contact Apple for service. Warning: Apple recommends that came with...
...covered by removing the computer's keyboard. The recommended maximum amount of memory you have an Apple-certified technician install memory. If you access by the limited warranty on your equipment, such damage is 1.5 GB, using one memory slot that meets the following specifications: Â Double Data Rate ... with your iBook G4. The memory slot can use PC2700 DDR 333 Type RAM with 512 megabytes (MB) of PC2100 DDR 266 Type RAM for the 12-inch iBook G4. You can accept an SDRAM module that you attempt to contact Apple for service. Warning: Apple recommends that came with...

iBook G4 Manual
Page 54
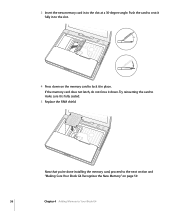
..., and gently remove it. Step 1: Removing the Battery and Keyboard 1 Shut down to let the internal components cool before continuing. 54 Chapter 4 Adding Memory to Your iBook G4 Use a coin to turn the latch a quarter turn clockwise to prevent damaging the computer. 2 Turn over the iBook and locate the battery latch. These...
..., and gently remove it. Step 1: Removing the Battery and Keyboard 1 Shut down to let the internal components cool before continuing. 54 Chapter 4 Adding Memory to Your iBook G4 Use a coin to turn the latch a quarter turn clockwise to prevent damaging the computer. 2 Turn over the iBook and locate the battery latch. These...

iBook G4 Manual
Page 55
... tabs away from your body. Locate the plastic tab next to Your iBook G4 55 Spread the tabs in the slot away from the notches in the slot, remove it out. 2 If you already have a memory card installed in the memory card. Then lift the keyboard, flip it over, and lay it might... four captive screws that secure the RAM shield, and then carefully lift it . The card should pop up , it on the palm rest. Chapter 4 Adding Memory to the Num Lock key. If the keyboard doesn't pop up slightly. Use a small flathead screwdriver to turn the screw one half turn. 4 Touch a metal...
... tabs away from your body. Locate the plastic tab next to Your iBook G4 55 Spread the tabs in the slot away from the notches in the slot, remove it out. 2 If you already have a memory card installed in the memory card. Then lift the keyboard, flip it over, and lay it might... four captive screws that secure the RAM shield, and then carefully lift it . The card should pop up , it on the palm rest. Chapter 4 Adding Memory to the Num Lock key. If the keyboard doesn't pop up slightly. Use a small flathead screwdriver to turn the screw one half turn. 4 Touch a metal...
iBook G4 Manual
Page 56
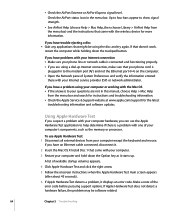
Try reinserting the card to make sure it in place. Now that you're done installing the memory card, proceed to the next section and "Making Sure Your iBook G4 Recognizes the New Memory" on the memory card to the slot. 30O 4 Press down . Push the card to seat it fully in to lock it is fully seated. 5 Replace the RAM shield. If the memory card does not latch, do not force it down on page 59. 56 Chapter 4 Adding Memory to the slot at a 30-degree angle. 3 Insert the new memory card in to Your iBook G4
Try reinserting the card to make sure it in place. Now that you're done installing the memory card, proceed to the next section and "Making Sure Your iBook G4 Recognizes the New Memory" on the memory card to the slot. 30O 4 Press down . Push the card to seat it fully in to lock it is fully seated. 5 Replace the RAM shield. If the memory card does not latch, do not force it down on page 59. 56 Chapter 4 Adding Memory to the slot at a 30-degree angle. 3 Insert the new memory card in to Your iBook G4

iBook G4 Manual
Page 57
Step 3: Replacing the Keyboard and Battery 1 Replace the keyboard by inserting it at an angle and gently lowering it in to Your iBook G4 57 Chapter 4 Adding Memory to place.
Step 3: Replacing the Keyboard and Battery 1 Replace the keyboard by inserting it at an angle and gently lowering it in to Your iBook G4 57 Chapter 4 Adding Memory to place.

iBook G4 Manual
Page 58
2 To discourage unauthorized access to Your iBook G4 Place the left side of the battery down until the battery latch locks in to the battery compartment. Gently press the right side of the battery in to place. 4 Reconnect the power adapter and any other cables that were attached. 58 Chapter 4 Adding Memory to your memory module, you can lock the keyboard by turning the keyboard screw one half turn clockwise. ® Á ¥ 3 Replace the battery.
2 To discourage unauthorized access to Your iBook G4 Place the left side of the battery down until the battery latch locks in to the battery compartment. Gently press the right side of the battery in to place. 4 Reconnect the power adapter and any other cables that were attached. 58 Chapter 4 Adding Memory to your memory module, you can lock the keyboard by turning the keyboard screw one half turn clockwise. ® Á ¥ 3 Replace the battery.

iBook G4 Manual
Page 59
...Apple () > About This Mac. If you still have problems, remove the memory and consult the support information that it is compatible with your iBook and that came with the memory or contact the vendor who provided the memory. Chapter 4 Adding Memory to make sure that the memory...Profiler by clicking More Info. Total memory installed in your iBook G4 The total memory includes the amount that originally came with the computer plus the new memory you added. Making Sure Your iBook G4 Recognizes the New Memory After installing additional memory in your iBook, check whether the ...
...Apple () > About This Mac. If you still have problems, remove the memory and consult the support information that it is compatible with your iBook and that came with the memory or contact the vendor who provided the memory. Chapter 4 Adding Memory to make sure that the memory...Profiler by clicking More Info. Total memory installed in your iBook G4 The total memory includes the amount that originally came with the computer plus the new memory you added. Making Sure Your iBook G4 Recognizes the New Memory After installing additional memory in your iBook, check whether the ...

iBook G4 Manual
Page 61
... to quit. Note the following: Â The applications you need. Making a note of the Mac OS installed on the Apple Service & Support website at www.apple.com/support. Next, save your iBook G4, check here first for a few seconds to shut down the Option and Command (x) keys and then press the Esc key... not be compatible with your work in the Classic environment, hold the power button (®) for solutions and advice. If you installed, such as additional memory or a peripheral.
... to quit. Note the following: Â The applications you need. Making a note of the Mac OS installed on the Apple Service & Support website at www.apple.com/support. Next, save your iBook G4, check here first for a few seconds to shut down the Option and Command (x) keys and then press the Esc key... not be compatible with your work in the Classic environment, hold the power button (®) for solutions and advice. If you installed, such as additional memory or a peripheral.

iBook G4 Manual
Page 62
... Preferences and click Startup Disk. Select a local Mac OS X System folder. Â If that doesn't work , you recently installed additional memory, make sure that it starts up your computer's system software. Press the small button on the battery (see "Reinstalling the Software That Came... an application is compatible, you might need to reinstall your computer by pressing and holding the power button (®) for about contacting Apple for service. 62 Chapter 5 Troubleshooting If the computer freezes during startup or you might need to be recharged. For instructions, see...
... Preferences and click Startup Disk. Select a local Mac OS X System folder. Â If that doesn't work , you recently installed additional memory, make sure that it starts up your computer's system software. Press the small button on the battery (see "Reinstalling the Software That Came... an application is compatible, you might need to reinstall your computer by pressing and holding the power button (®) for about contacting Apple for service. 62 Chapter 5 Troubleshooting If the computer freezes during startup or you might need to be recharged. For instructions, see...
iBook G4 Manual
Page 64
...you have trouble ejecting a disc m Quit any applications that doesn't work, restart the computer while holding down the Option key as the memory or processor. If you have problems with your computer. 3 Restart your computer's components, such as it displays an error code. Check... Help from your phone line or network cable is a problem with the wireless device for the latest troubleshooting information and software updates. Using Apple Hardware Test If you suspect a problem with your computer hardware, you have an Ethernet cable connected, disconnect it. 2 Insert the Mac...
...you have trouble ejecting a disc m Quit any applications that doesn't work, restart the computer while holding down the Option key as the memory or processor. If you have problems with your computer. 3 Restart your computer's components, such as it displays an error code. Check... Help from your phone line or network cable is a problem with the wireless device for the latest troubleshooting information and software updates. Using Apple Hardware Test If you suspect a problem with your computer hardware, you have an Ethernet cable connected, disconnect it. 2 Insert the Mac...

iBook G4 Manual
Page 67
To access the information in System Profiler, choose Apple () > About This Mac from the menu bar and then click More Info, or open System Profiler, located in memory, hard disk size, devices connected, and the product serial number. Operating Environment  Operating temperature: 50° F ...hide information in the different categories. Appendix Specifications A A You can use System Profiler to find out detailed information about your iBook G4, such as the amount of built-in Applications/Utilities. Click the triangles in the window to 80% noncondensing Power Adapter Â...
To access the information in System Profiler, choose Apple () > About This Mac from the menu bar and then click More Info, or open System Profiler, located in memory, hard disk size, devices connected, and the product serial number. Operating Environment  Operating temperature: 50° F ...hide information in the different categories. Appendix Specifications A A You can use System Profiler to find out detailed information about your iBook G4, such as the amount of built-in Applications/Utilities. Click the triangles in the window to 80% noncondensing Power Adapter Â...
iBook G4 Manual
Page 70
... but they probably don't match. Warning: Do not connect a digital phone line to a port. Adapters for Setting Up and Using Your iBook G4 Be aware of the following to prevent your iBook battery from becoming completely depleted: Â Keep the power adapter connected. Â For short-.... Connecting a Phone Line to the Internal Modem Always disconnect the phone cord before opening the computer to perform procedures such as installing memory. Make sure that the connector matches the port and that came with reasonable ease, they can negatively affect your computer's performance or ...
... but they probably don't match. Warning: Do not connect a digital phone line to a port. Adapters for Setting Up and Using Your iBook G4 Be aware of the following to prevent your iBook battery from becoming completely depleted: Â Keep the power adapter connected. Â For short-.... Connecting a Phone Line to the Internal Modem Always disconnect the phone cord before opening the computer to perform procedures such as installing memory. Make sure that the connector matches the port and that came with reasonable ease, they can negatively affect your computer's performance or ...

iBook G4 Manual
Page 101
... problems 63 amber light 21 analog phone line 7, 41 antenna, AirPort Extreme 13 Appearance preferences 25 Apple 56K internal modem 41 Apple Hardware Test 64 Apple VGA Display Adapter 41 Apple Video Adapter 42 application freeze 26 applications installing 66 troubleshooting 63 using 26 B base station 37 battery... desktop 24 image size 20 password 63, 93 the resolution 20 the screen 20 System Preferences 24 charging the battery 49 checking memory 59 Classic environment support 66 cleaning your computer 69 communicating using Bluetooth 37 computer disposal 96 freezes 62 inventory 5 putting to sleep...
... problems 63 amber light 21 analog phone line 7, 41 antenna, AirPort Extreme 13 Appearance preferences 25 Apple 56K internal modem 41 Apple Hardware Test 64 Apple VGA Display Adapter 41 Apple Video Adapter 42 application freeze 26 applications installing 66 troubleshooting 63 using 26 B base station 37 battery... desktop 24 image size 20 password 63, 93 the resolution 20 the screen 20 System Preferences 24 charging the battery 49 checking memory 59 Classic environment support 66 cleaning your computer 69 communicating using Bluetooth 37 computer disposal 96 freezes 62 inventory 5 putting to sleep...
iBook G4 Manual
Page 103
installation instructions 5 installing applications 66 Classic support 66 Mac OS 9 66 Mac OS X 66 memory 54, 55 internal modem connecting 7 port 15 using 41 Internet configuration 80 connecting to 9 connection problems 64, 91 using Setup Assistant to connect 86 Internet ... 9, installing 66 Mac OS X installing 66 interface 92 learning about 24 manual Internet configuration 82 manually using DHCP router option 77 Media Eject key 13 memory checking 59 installing 54, 55 microphone 13, 43 modem cable 7, 75 Index connecting 7, 41 dial-up 78 DSL 7, 75 internal 7 using 41 monitor, connecting 42...
installation instructions 5 installing applications 66 Classic support 66 Mac OS 9 66 Mac OS X 66 memory 54, 55 internal modem connecting 7 port 15 using 41 Internet configuration 80 connecting to 9 connection problems 64, 91 using Setup Assistant to connect 86 Internet ... 9, installing 66 Mac OS X installing 66 interface 92 learning about 24 manual Internet configuration 82 manually using DHCP router option 77 Media Eject key 13 memory checking 59 installing 54, 55 microphone 13, 43 modem cable 7, 75 Index connecting 7, 41 dial-up 78 DSL 7, 75 internal 7 using 41 monitor, connecting 42...
iBook G4 Manual
Page 104
See memory recording CD-R 45 CD-RW 45 DVD 46 music 45 reinstalling software 93 removing and replacing the battery 48 resetting your password 63, 93 resolution, ...
See memory recording CD-R 45 CD-RW 45 DVD 46 music 45 reinstalling software 93 removing and replacing the battery 48 resetting your password 63, 93 resolution, ...