
Service Guide
Page 6
iBook G4 (14-inch) Take Apart General Information Note: To organize the screws you remove from the assembly, use a tray with divided compartments (such as a plastic ice cube tray). Serial Number Location In this computer, the product serial number is located in two places: the battery bay and the top case underneath the keyboard. 5 -
iBook G4 (14-inch) Take Apart General Information Note: To organize the screws you remove from the assembly, use a tray with divided compartments (such as a plastic ice cube tray). Serial Number Location In this computer, the product serial number is located in two places: the battery bay and the top case underneath the keyboard. 5 -

Service Guide
Page 7
Part Location Battery Preliminary Steps Warning: Always shut down the computer before performing this procedure is a coin. Procedure Warning: If the computer has been recently operating, allow it .... After you shut down the computer and wait thirty minutes before continuing. Place the computer on a clean, flat surface. 2. Battery Tools The only tool required for 30 minutes before continuing. iBook G4 (14-inch) Take Apart - 6 Let the computer cool down before opening it to avoid damaging its internal components or causing...
Part Location Battery Preliminary Steps Warning: Always shut down the computer before performing this procedure is a coin. Procedure Warning: If the computer has been recently operating, allow it .... After you shut down the computer and wait thirty minutes before continuing. Place the computer on a clean, flat surface. 2. Battery Tools The only tool required for 30 minutes before continuing. iBook G4 (14-inch) Take Apart - 6 Let the computer cool down before opening it to avoid damaging its internal components or causing...

Service Guide
Page 8
... to reset the date and time (using the Date & Time control panel in data loss. 5. Note: You may result in System Preferences). iBook G4 (14-inch) Take Apart Battery Removing the battery will prevent you from accidentally turning on the computer unless all of its internal and external parts are in place and it.... 7 - Reconnect the power cord and any other cables that were connected and restart the computer. Warning: Never turn clockwise to the computer. 4. Install the replacement battery. 6. Disconnect the power cord and any other cables connected to unlock the...
... to reset the date and time (using the Date & Time control panel in data loss. 5. Note: You may result in System Preferences). iBook G4 (14-inch) Take Apart Battery Removing the battery will prevent you from accidentally turning on the computer unless all of its internal and external parts are in place and it.... 7 - Reconnect the power cord and any other cables that were connected and restart the computer. Warning: Never turn clockwise to the computer. 4. Install the replacement battery. 6. Disconnect the power cord and any other cables connected to unlock the...
Service Guide
Page 14
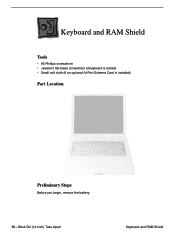
Keyboard and RAM Shield Tools • #0 Phillips screwdriver • Jeweler's flat-blade screwdriver (if keyboard is locked) • Small soft cloth (if an optional AirPort Extreme Card is installed) Part Location Preliminary Steps Before you begin, remove the battery. 13 - iBook G4 (14-inch) Take Apart Keyboard and RAM Shield
Keyboard and RAM Shield Tools • #0 Phillips screwdriver • Jeweler's flat-blade screwdriver (if keyboard is locked) • Small soft cloth (if an optional AirPort Extreme Card is installed) Part Location Preliminary Steps Before you begin, remove the battery. 13 - iBook G4 (14-inch) Take Apart Keyboard and RAM Shield

Service Guide
Page 22
Part Location Preliminary Steps Before you begin, remove the following: • Battery • Keyboard (but do not disconnect the keyboard cable) 21 - iBook G4 (14-inch) Take Apart AirPort Extreme Card AirPort Extreme Card Tools The only tool required for this procedure is a small soft cloth (if an optional AirPort Extreme Card is installed).
Part Location Preliminary Steps Before you begin, remove the following: • Battery • Keyboard (but do not disconnect the keyboard cable) 21 - iBook G4 (14-inch) Take Apart AirPort Extreme Card AirPort Extreme Card Tools The only tool required for this procedure is a small soft cloth (if an optional AirPort Extreme Card is installed).

Service Guide
Page 27
Part Location Preliminary Steps Before you begin, remove the following: • Battery • Keyboard and RAM shield (but do not disconnect the keyboard cable) • AirPort Extreme Card Memory Card iBook G4 (14-inch) Take Apart - 26 Only install memory cards that are approved for this computer. Tools The only tool required for this procedure is a small soft cloth (if an optional AirPort Extreme Card is installed). Memory Card Warning: Memory cards come in various specifications.
Part Location Preliminary Steps Before you begin, remove the following: • Battery • Keyboard and RAM shield (but do not disconnect the keyboard cable) • AirPort Extreme Card Memory Card iBook G4 (14-inch) Take Apart - 26 Only install memory cards that are approved for this computer. Tools The only tool required for this procedure is a small soft cloth (if an optional AirPort Extreme Card is installed). Memory Card Warning: Memory cards come in various specifications.

Service Guide
Page 30
iBook G4 (14-inch) Take Apart Bottom Case Bottom Case Tools • Soft cloth • Torx T8 screwdriver or 2.0-mm hex driver • Black stick (or other nonconductive nylon or plastic tool) • #0 Phillips screwdriver Part Location Preliminary Steps Before you begin, remove the battery. 29 -
iBook G4 (14-inch) Take Apart Bottom Case Bottom Case Tools • Soft cloth • Torx T8 screwdriver or 2.0-mm hex driver • Black stick (or other nonconductive nylon or plastic tool) • #0 Phillips screwdriver Part Location Preliminary Steps Before you begin, remove the battery. 29 -

Service Guide
Page 33
Remove the two identical Phillips screws next to the battery connector. Bottom Case iBook G4 (14-inch) Take Apart - 32 6.
Remove the two identical Phillips screws next to the battery connector. Bottom Case iBook G4 (14-inch) Take Apart - 32 6.

Service Guide
Page 34
The computer frame has tabs that fit into slots within the bottom case (six tabs in back). iBook G4 (14-inch) Take Apart Bottom Case two on the frame. 33 - When using a black stick to pry off the bottom case, it helps to gently pry up the corner of the slots on the bottom case pictured below. In the battery compartment, lift up the slot from the slots. 8. three in front; Note the locations of the bottom case, and use a black stick or jeweler's flat-blade screwdriver to know where the slots are as you free the tabs from the inner tabs on each side; 7.
The computer frame has tabs that fit into slots within the bottom case (six tabs in back). iBook G4 (14-inch) Take Apart Bottom Case two on the frame. 33 - When using a black stick to pry off the bottom case, it helps to gently pry up the corner of the slots on the bottom case pictured below. In the battery compartment, lift up the slot from the slots. 8. three in front; Note the locations of the bottom case, and use a black stick or jeweler's flat-blade screwdriver to know where the slots are as you free the tabs from the inner tabs on each side; 7.

Service Guide
Page 35
Open the computer and place it on its side. Starting at the battery compartment, use a black stick to pry up the bottom case from the computer. Use just the tip of the bottom case. Bottom Case iBook G4 (14-inch) Take Apart - 34 Warning: To avoid damaging the sleep light and other delicate components, do not insert the black stick too far into the computer as you free the bottom case from the computer. 10. Carefully work the black stick around the corners of the black stick to carefully pry up the bottom case. 11. 9.
Open the computer and place it on its side. Starting at the battery compartment, use a black stick to pry up the bottom case from the computer. Use just the tip of the bottom case. Bottom Case iBook G4 (14-inch) Take Apart - 34 Warning: To avoid damaging the sleep light and other delicate components, do not insert the black stick too far into the computer as you free the bottom case from the computer. 10. Carefully work the black stick around the corners of the black stick to carefully pry up the bottom case. 11. 9.

Service Guide
Page 37
...are in place before installing the bottom case. Bottom Case iBook G4 (14-inch) Take Apart - 36 The cap should be positioned against the inner frame. Note: When reassembling the computer, make sure that the two springs in the battery compartment are replacing any additional parts at this time, remove ...the two springs from the battery compartment so they do not wipe away the grease. 15. The springs have a small amount ...
...are in place before installing the bottom case. Bottom Case iBook G4 (14-inch) Take Apart - 36 The cap should be positioned against the inner frame. Note: When reassembling the computer, make sure that the two springs in the battery compartment are replacing any additional parts at this time, remove ...the two springs from the battery compartment so they do not wipe away the grease. 15. The springs have a small amount ...
Service Guide
Page 38
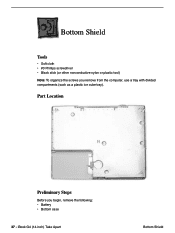
iBook G4 (14-inch) Take Apart Bottom Shield Part Location Preliminary Steps Before you remove from the computer, use a tray with divided compartments (such as a plastic ice cube tray). Bottom Shield Tools • Soft cloth • #0 Phillips screwdriver • Black stick (or other nonconductive nylon or plastic tool) Note: To organize the screws you begin, remove the following: • Battery • Bottom case 37 -
iBook G4 (14-inch) Take Apart Bottom Shield Part Location Preliminary Steps Before you remove from the computer, use a tray with divided compartments (such as a plastic ice cube tray). Bottom Shield Tools • Soft cloth • #0 Phillips screwdriver • Black stick (or other nonconductive nylon or plastic tool) Note: To organize the screws you begin, remove the following: • Battery • Bottom case 37 -

Service Guide
Page 40
... off the computer, being careful where it might catch on one end. iBook G4 (14-inch) Take Apart Bottom Shield Warning: Do not bend the bottom shield. When reassembling the computer, make sure that the two springs are in the battery compartment can become loose. Note: The two springs in place before installing...
... off the computer, being careful where it might catch on one end. iBook G4 (14-inch) Take Apart Bottom Shield Warning: Do not bend the bottom shield. When reassembling the computer, make sure that the two springs are in the battery compartment can become loose. Note: The two springs in place before installing...

Service Guide
Page 41
... • Black stick (or other nonconductive nylon or plastic tool) Preliminary Steps Before you begin, remove the following: • Battery • Bottom case • Bottom shield Procedure 1. iBook G4 (14-inch) Take Apart - 40 With the computer on a soft cloth, peel up the tape that you are servicing. ...the cable as shown in this procedure may differ somewhat from the bottom of the bottom case. Disconnect the inverter cable from the iBook model that secures the inverter cable to Protect the Inverter Ca- To protect the inverter cable, add spiral tubing to Protect the ...
... • Black stick (or other nonconductive nylon or plastic tool) Preliminary Steps Before you begin, remove the following: • Battery • Bottom case • Bottom shield Procedure 1. iBook G4 (14-inch) Take Apart - 40 With the computer on a soft cloth, peel up the tape that you are servicing. ...the cable as shown in this procedure may differ somewhat from the bottom of the bottom case. Disconnect the inverter cable from the iBook model that secures the inverter cable to Protect the Inverter Ca- To protect the inverter cable, add spiral tubing to Protect the ...

Service Guide
Page 44
iBook G4 (14-inch) Take Apart DC-In Board DC-In Board Tools • Soft cloth • #0 Phillips screwdriver • Black stick (or other nonconductive nylon or plastic tool) Part Location Preliminary Steps Before you begin, remove the following: • Battery • Bottom case • Bottom shield 43 -
iBook G4 (14-inch) Take Apart DC-In Board DC-In Board Tools • Soft cloth • #0 Phillips screwdriver • Black stick (or other nonconductive nylon or plastic tool) Part Location Preliminary Steps Before you begin, remove the following: • Battery • Bottom case • Bottom shield 43 -
Service Guide
Page 47
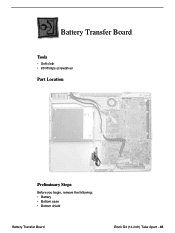
Battery Transfer Board Tools • Soft cloth • #0 Phillips screwdriver Part Location Preliminary Steps Before you begin, remove the following: • Battery • Bottom case • Bottom shield Battery Transfer Board iBook G4 (14-inch) Take Apart - 46
Battery Transfer Board Tools • Soft cloth • #0 Phillips screwdriver Part Location Preliminary Steps Before you begin, remove the following: • Battery • Bottom case • Bottom shield Battery Transfer Board iBook G4 (14-inch) Take Apart - 46

Service Guide
Page 48
iBook G4 (14-inch) Take Apart Battery Transfer Board Install the replacement battery transfer board, and reassemble and test the computer. 47 - With the computer on a soft cloth, remove the two screws that secure the battery connector board to the computer frame. 2. Disconnect the battery transfer board from the logic board. 3. Procedure 1.
iBook G4 (14-inch) Take Apart Battery Transfer Board Install the replacement battery transfer board, and reassemble and test the computer. 47 - With the computer on a soft cloth, remove the two screws that secure the battery connector board to the computer frame. 2. Disconnect the battery transfer board from the logic board. 3. Procedure 1.

Service Guide
Page 49
Top Case Tools This procedure requires the following tools: • Soft cloth • Small flat-blade screwdriver • #0 Phillips screwdriver (magnetized recommended for optical drive screws) • Black stick (or other nonconductive nylon or plastic tool) Note: To organize the screws you begin, remove the following: • Battery • Keyboard and RAM shield • AirPort Extreme Card iBook G4 (14-inch) Take Apart - 48 Part Location Top Case Preliminary Steps Before you remove from the computer, use a tray with divided compartments (such as a plastic ice cube tray).
Top Case Tools This procedure requires the following tools: • Soft cloth • Small flat-blade screwdriver • #0 Phillips screwdriver (magnetized recommended for optical drive screws) • Black stick (or other nonconductive nylon or plastic tool) Note: To organize the screws you begin, remove the following: • Battery • Keyboard and RAM shield • AirPort Extreme Card iBook G4 (14-inch) Take Apart - 48 Part Location Top Case Preliminary Steps Before you remove from the computer, use a tray with divided compartments (such as a plastic ice cube tray).

Service Guide
Page 52
4. While continuing to loosen the top case, use caution around the top case to protect the computer. 5. Reposition the computer as you work around the battery bay. If necessary, flex the inner frame to carefully separate the top case from the computer assembly. Using a black stick, begin to release that joins the top case and bottom case. 6. iBook G4 (14-inch) Take Apart Top Case Use a soft cloth to open up the seam that corner of the top case. 51 -
4. While continuing to loosen the top case, use caution around the top case to protect the computer. 5. Reposition the computer as you work around the battery bay. If necessary, flex the inner frame to carefully separate the top case from the computer assembly. Using a black stick, begin to release that joins the top case and bottom case. 6. iBook G4 (14-inch) Take Apart Top Case Use a soft cloth to open up the seam that corner of the top case. 51 -

Service Guide
Page 56
iBook G4 (14-inch) Take Apart Top Case Then peel off during the top case removal. Important: Make sure you transfer the original serial number label and ... cable • Display latch • Sleep magnet (on palm rest below left speaker) • Speaker cable and power switch cable • Trackpad assembly with the battery compartment. 55 -
iBook G4 (14-inch) Take Apart Top Case Then peel off during the top case removal. Important: Make sure you transfer the original serial number label and ... cable • Display latch • Sleep magnet (on palm rest below left speaker) • Speaker cable and power switch cable • Trackpad assembly with the battery compartment. 55 -

