
Service Guide
Page 7
Part Location Battery Preliminary Steps Warning: Always shut down the computer before continuing. Let the computer cool down the computer and wait thirty minutes before performing ... been recently operating, allow it to cool down the computer, the internal components can be very hot. Place the computer on a clean, flat surface. 2. iBook G4 (14-inch) Take Apart - 6 Battery Tools The only tool required for 30 minutes before opening it to avoid damaging its internal components or causing injury...
Part Location Battery Preliminary Steps Warning: Always shut down the computer before continuing. Let the computer cool down the computer and wait thirty minutes before performing ... been recently operating, allow it to cool down the computer, the internal components can be very hot. Place the computer on a clean, flat surface. 2. iBook G4 (14-inch) Take Apart - 6 Battery Tools The only tool required for 30 minutes before opening it to avoid damaging its internal components or causing injury...

Service Guide
Page 8
.... Reconnect the power cord and any other cables that were connected and restart the computer. Operating the computer when it is missing parts can damage the computer or cause injury. 7 - iBook G4 (14-inch) Take Apart Battery Use a coin to turn the battery latch 1/4 turn clockwise to reset the date and time (using...
.... Reconnect the power cord and any other cables that were connected and restart the computer. Operating the computer when it is missing parts can damage the computer or cause injury. 7 - iBook G4 (14-inch) Take Apart Battery Use a coin to turn the battery latch 1/4 turn clockwise to reset the date and time (using...

Service Guide
Page 9
Part Location Preliminary Steps Warning: Always shut down for 30 minutes before opening it to remove and replace the foot and foot socket. Let the computer ... avoid damaging its internal components or causing injury. After you shut down the computer, the internal components can be very hot. Foot and Foot Socket iBook G4 (14-inch) Take Apart - 8
Part Location Preliminary Steps Warning: Always shut down for 30 minutes before opening it to remove and replace the foot and foot socket. Let the computer ... avoid damaging its internal components or causing injury. After you shut down the computer, the internal components can be very hot. Foot and Foot Socket iBook G4 (14-inch) Take Apart - 8
Service Guide
Page 14
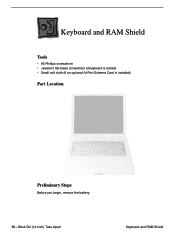
Keyboard and RAM Shield Tools • #0 Phillips screwdriver • Jeweler's flat-blade screwdriver (if keyboard is locked) • Small soft cloth (if an optional AirPort Extreme Card is installed) Part Location Preliminary Steps Before you begin, remove the battery. 13 - iBook G4 (14-inch) Take Apart Keyboard and RAM Shield
Keyboard and RAM Shield Tools • #0 Phillips screwdriver • Jeweler's flat-blade screwdriver (if keyboard is locked) • Small soft cloth (if an optional AirPort Extreme Card is installed) Part Location Preliminary Steps Before you begin, remove the battery. 13 - iBook G4 (14-inch) Take Apart Keyboard and RAM Shield
Service Guide
Page 17
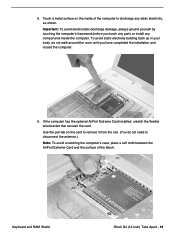
... damage, always ground yourself by touching the computer's framework before you have completed the installation and closed the computer. 6. Keyboard and RAM Shield iBook G4 (14-inch) Take Apart - 16 5. If the computer has the optional AirPort Extreme Card installed, unlatch the flexible wire bracket that...disconnect the antenna.) Note: To avoid scratching the computer's case, place a soft cloth between the AirPort Extreme Card and the surface of the iBook. Use the pull-tab on the inside the computer. Touch a metal surface on the card to remove it from the slot. (You ...
... damage, always ground yourself by touching the computer's framework before you have completed the installation and closed the computer. 6. Keyboard and RAM Shield iBook G4 (14-inch) Take Apart - 16 5. If the computer has the optional AirPort Extreme Card installed, unlatch the flexible wire bracket that...disconnect the antenna.) Note: To avoid scratching the computer's case, place a soft cloth between the AirPort Extreme Card and the surface of the iBook. Use the pull-tab on the inside the computer. Touch a metal surface on the card to remove it from the slot. (You ...

Service Guide
Page 22
Part Location Preliminary Steps Before you begin, remove the following: • Battery • Keyboard (but do not disconnect the keyboard cable) 21 - AirPort Extreme Card Tools The only tool required for this procedure is a small soft cloth (if an optional AirPort Extreme Card is installed). iBook G4 (14-inch) Take Apart AirPort Extreme Card
Part Location Preliminary Steps Before you begin, remove the following: • Battery • Keyboard (but do not disconnect the keyboard cable) 21 - AirPort Extreme Card Tools The only tool required for this procedure is a small soft cloth (if an optional AirPort Extreme Card is installed). iBook G4 (14-inch) Take Apart AirPort Extreme Card

Service Guide
Page 23
To avoid static electricity building back up in your body, do not walk around the room until you touch any parts or install any components inside of the keyboard well to discharge any static electricity. AirPort Extreme Card iBook G4 (14-inch) Take Apart - 22 Important: To avoid electrostatic discharge damage, always ground yourself by touching the computer's framework before you have completed the installation and closed the computer. Procedure 1. Touch a metal surface on the inside the computer.
To avoid static electricity building back up in your body, do not walk around the room until you touch any parts or install any components inside of the keyboard well to discharge any static electricity. AirPort Extreme Card iBook G4 (14-inch) Take Apart - 22 Important: To avoid electrostatic discharge damage, always ground yourself by touching the computer's framework before you have completed the installation and closed the computer. Procedure 1. Touch a metal surface on the inside the computer.

Service Guide
Page 27
Part Location Preliminary Steps Before you begin, remove the following: • Battery • Keyboard and RAM shield (but do not disconnect the keyboard cable) • AirPort Extreme Card Memory Card iBook G4 (14-inch) Take Apart - 26 Tools The only tool required for this procedure is a small soft cloth (if an optional AirPort Extreme Card is installed). Memory Card Warning: Memory cards come in various specifications. Only install memory cards that are approved for this computer.
Part Location Preliminary Steps Before you begin, remove the following: • Battery • Keyboard and RAM shield (but do not disconnect the keyboard cable) • AirPort Extreme Card Memory Card iBook G4 (14-inch) Take Apart - 26 Tools The only tool required for this procedure is a small soft cloth (if an optional AirPort Extreme Card is installed). Memory Card Warning: Memory cards come in various specifications. Only install memory cards that are approved for this computer.

Service Guide
Page 30
iBook G4 (14-inch) Take Apart Bottom Case Bottom Case Tools • Soft cloth • Torx T8 screwdriver or 2.0-mm hex driver • Black stick (or other nonconductive nylon or plastic tool) • #0 Phillips screwdriver Part Location Preliminary Steps Before you begin, remove the battery. 29 -
iBook G4 (14-inch) Take Apart Bottom Case Bottom Case Tools • Soft cloth • Torx T8 screwdriver or 2.0-mm hex driver • Black stick (or other nonconductive nylon or plastic tool) • #0 Phillips screwdriver Part Location Preliminary Steps Before you begin, remove the battery. 29 -

Service Guide
Page 37
..., make sure that the two springs in the battery compartment are replacing any additional parts at this time, remove the two springs from the battery compartment so they do not wipe away the grease. 15. Bottom Case iBook G4 (14-inch) Take Apart - 36 Each spring has a plastic cap on them; The springs...
..., make sure that the two springs in the battery compartment are replacing any additional parts at this time, remove the two springs from the battery compartment so they do not wipe away the grease. 15. Bottom Case iBook G4 (14-inch) Take Apart - 36 Each spring has a plastic cap on them; The springs...
Service Guide
Page 38
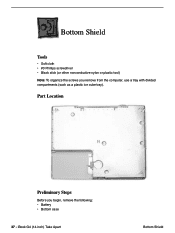
iBook G4 (14-inch) Take Apart Bottom Shield Part Location Preliminary Steps Before you remove from the computer, use a tray with divided compartments (such as a plastic ice cube tray). Bottom Shield Tools • Soft cloth • #0 Phillips screwdriver • Black stick (or other nonconductive nylon or plastic tool) Note: To organize the screws you begin, remove the following: • Battery • Bottom case 37 -
iBook G4 (14-inch) Take Apart Bottom Shield Part Location Preliminary Steps Before you remove from the computer, use a tray with divided compartments (such as a plastic ice cube tray). Bottom Shield Tools • Soft cloth • #0 Phillips screwdriver • Black stick (or other nonconductive nylon or plastic tool) Note: To organize the screws you begin, remove the following: • Battery • Bottom case 37 -

Service Guide
Page 44
DC-In Board Tools • Soft cloth • #0 Phillips screwdriver • Black stick (or other nonconductive nylon or plastic tool) Part Location Preliminary Steps Before you begin, remove the following: • Battery • Bottom case • Bottom shield 43 - iBook G4 (14-inch) Take Apart DC-In Board
DC-In Board Tools • Soft cloth • #0 Phillips screwdriver • Black stick (or other nonconductive nylon or plastic tool) Part Location Preliminary Steps Before you begin, remove the following: • Battery • Bottom case • Bottom shield 43 - iBook G4 (14-inch) Take Apart DC-In Board
Service Guide
Page 47
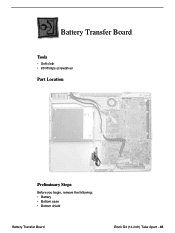
Battery Transfer Board Tools • Soft cloth • #0 Phillips screwdriver Part Location Preliminary Steps Before you begin, remove the following: • Battery • Bottom case • Bottom shield Battery Transfer Board iBook G4 (14-inch) Take Apart - 46
Battery Transfer Board Tools • Soft cloth • #0 Phillips screwdriver Part Location Preliminary Steps Before you begin, remove the following: • Battery • Bottom case • Bottom shield Battery Transfer Board iBook G4 (14-inch) Take Apart - 46

Service Guide
Page 49
Part Location Top Case Preliminary Steps Before you begin, remove the following tools: • Soft cloth • Small flat-blade screwdriver • #0 Phillips screwdriver (magnetized recommended for optical drive screws) • Black stick (or other nonconductive nylon or plastic tool) Note: To organize the screws you remove from the computer, use a tray with divided compartments (such as a plastic ice cube tray). Top Case Tools This procedure requires the following : • Battery • Keyboard and RAM shield • AirPort Extreme Card iBook G4 (14-inch) Take Apart - 48
Part Location Top Case Preliminary Steps Before you begin, remove the following tools: • Soft cloth • Small flat-blade screwdriver • #0 Phillips screwdriver (magnetized recommended for optical drive screws) • Black stick (or other nonconductive nylon or plastic tool) Note: To organize the screws you remove from the computer, use a tray with divided compartments (such as a plastic ice cube tray). Top Case Tools This procedure requires the following : • Battery • Keyboard and RAM shield • AirPort Extreme Card iBook G4 (14-inch) Take Apart - 48

Service Guide
Page 58
iBook G4 (14-inch) Take Apart Sleep Light Board Sleep Light Board Tools • Soft cloth • #0 Phillips screwdriver • Black stick (or other nonconductive nylon or plastic tool) Part Location Preliminary Steps Before you begin, remove the following: • Battery • Keyboard and RAM shield • AirPort Extreme Card • Memory card • Bottom case • Bottom shield • DC-in board • Top case 57 -
iBook G4 (14-inch) Take Apart Sleep Light Board Sleep Light Board Tools • Soft cloth • #0 Phillips screwdriver • Black stick (or other nonconductive nylon or plastic tool) Part Location Preliminary Steps Before you begin, remove the following: • Battery • Keyboard and RAM shield • AirPort Extreme Card • Memory card • Bottom case • Bottom shield • DC-in board • Top case 57 -
Service Guide
Page 61
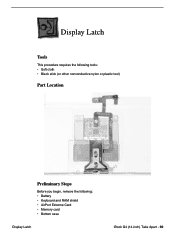
Display Latch Tools This procedure requires the following tools: • Soft cloth • Black stick (or other nonconductive nylon or plastic tool) Part Location Preliminary Steps Before you begin, remove the following: • Battery • Keyboard and RAM shield • AirPort Extreme Card • Memory card • Bottom case Display Latch iBook G4 (14-inch) Take Apart - 60
Display Latch Tools This procedure requires the following tools: • Soft cloth • Black stick (or other nonconductive nylon or plastic tool) Part Location Preliminary Steps Before you begin, remove the following: • Battery • Keyboard and RAM shield • AirPort Extreme Card • Memory card • Bottom case Display Latch iBook G4 (14-inch) Take Apart - 60

Service Guide
Page 65
Part Location Top Shield Preliminary Steps Before you remove from the computer, use a tray with divided compartments (such as a plastic ice cube tray). Top Shield Tools • Soft cloth • #0 Phillips screwdriver • #1 Phillips screwdriver • Black stick (or other nonconductive nylon or plastic tool) Note: To organize the screws you begin, remove the following: • Battery • Keyboard and RAM shield • AirPort Extreme Card iBook G4 (14-inch) Take Apart - 64
Part Location Top Shield Preliminary Steps Before you remove from the computer, use a tray with divided compartments (such as a plastic ice cube tray). Top Shield Tools • Soft cloth • #0 Phillips screwdriver • #1 Phillips screwdriver • Black stick (or other nonconductive nylon or plastic tool) Note: To organize the screws you begin, remove the following: • Battery • Keyboard and RAM shield • AirPort Extreme Card iBook G4 (14-inch) Take Apart - 64
Service Guide
Page 70
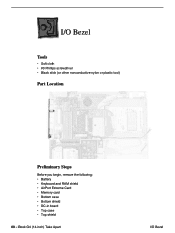
I /O Bezel iBook G4 (14-inch) Take Apart I /O Bezel Tools • Soft cloth • #0 Phillips screwdriver • Black stick (or other nonconductive nylon or plastic tool) Part Location Preliminary Steps Before you begin, remove the following: • Battery • Keyboard and RAM shield • AirPort Extreme Card • Memory card • Bottom case • Bottom shield • DC-in board • Top case • Top shield 69 -
I /O Bezel iBook G4 (14-inch) Take Apart I /O Bezel Tools • Soft cloth • #0 Phillips screwdriver • Black stick (or other nonconductive nylon or plastic tool) Part Location Preliminary Steps Before you begin, remove the following: • Battery • Keyboard and RAM shield • AirPort Extreme Card • Memory card • Bottom case • Bottom shield • DC-in board • Top case • Top shield 69 -

Service Guide
Page 73
RJ11 Modem Cable Tools • Soft cloth • Black stick (or other nonconductive nylon or plastic tool) Part Location Preliminary Steps Before you begin, remove the following: • Battery • Keyboard and RAM shield • AirPort Extreme Card • Memory card • Bottom case • Bottom shield • DC-in board • Top case • Top shield • I/O bezel RJ11 Modem Cable iBook G4 (14-inch) Take Apart - 72
RJ11 Modem Cable Tools • Soft cloth • Black stick (or other nonconductive nylon or plastic tool) Part Location Preliminary Steps Before you begin, remove the following: • Battery • Keyboard and RAM shield • AirPort Extreme Card • Memory card • Bottom case • Bottom shield • DC-in board • Top case • Top shield • I/O bezel RJ11 Modem Cable iBook G4 (14-inch) Take Apart - 72

Service Guide
Page 75
Part Location Preliminary Steps Before you remove from the computer, use a tray with divided compartments (such as a plastic ice cube tray). Hard Drive Tools • Soft cloth • #0 Phillips screwdriver • Black stick (or other nonconductive nylon or plastic tool) • Torx T8 screwdriver Note: To organize the screws you begin, remove the following: • Battery • Keyboard and RAM shield • AirPort Extreme Card • Memory card • Bottom case Hard Drive iBook G4 (14-inch) Take Apart - 74
Part Location Preliminary Steps Before you remove from the computer, use a tray with divided compartments (such as a plastic ice cube tray). Hard Drive Tools • Soft cloth • #0 Phillips screwdriver • Black stick (or other nonconductive nylon or plastic tool) • Torx T8 screwdriver Note: To organize the screws you begin, remove the following: • Battery • Keyboard and RAM shield • AirPort Extreme Card • Memory card • Bottom case Hard Drive iBook G4 (14-inch) Take Apart - 74