
Use and Care
Page 2
... the safety alert symbol and either the word "DANGER" or "WARNING." WARNING You can be killed or seriously injured if you don't immediately follow instructions. WASHER SAFETY Your safety and the safety of injury, and tell you and others are not followed. 2 This is , tell you how to potential hazards that...
... the safety alert symbol and either the word "DANGER" or "WARNING." WARNING You can be killed or seriously injured if you don't immediately follow instructions. WASHER SAFETY Your safety and the safety of injury, and tell you and others are not followed. 2 This is , tell you how to potential hazards that...
Use and Care
Page 3
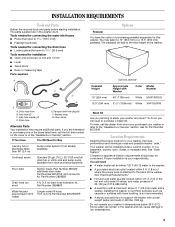
...; Flashlight (optional) Tools needed for connecting the drain hose ■ Locking pliers (that open to the total height of the washer. Optional pedestal Pedestal Height Approximate Height with a total weight (water and load) of the items listed here, call the dealer ...parts before starting installation. Inlet hose (2) C. You may require additional parts. Companion appliance location requirements should also be installed under entire washer. Proper installation is not recommended. ■ A sturdy and solid floor to purchase a Stack Kit. See "Electrical Requirements." ■...
...; Flashlight (optional) Tools needed for connecting the drain hose ■ Locking pliers (that open to the total height of the washer. Optional pedestal Pedestal Height Approximate Height with a total weight (water and load) of the items listed here, call the dealer ...parts before starting installation. Inlet hose (2) C. You may require additional parts. Companion appliance location requirements should also be installed under entire washer. Proper installation is not recommended. ■ A sturdy and solid floor to purchase a Stack Kit. See "Electrical Requirements." ■...
Use and Care
Page 4
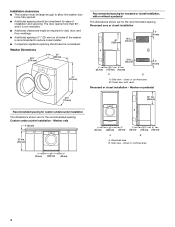
... 48" (1220 mm) 48 in.2 (310 cm2) 3" (76 mm) 24 in.2 (155 cm2) 1" (25 mm) 301/2" 4" (775 mm) (102 mm) A 3" (76 mm) B A. Washer only 2" (50 mm) 36" min. (914 mm) 1" (25 mm) 27" (686 mm) 1" (25 mm) 1" (25 mm) 27" 1" 1" 301/2" 4" (686 mm) (25 mm)... on pedestal 301/2" (775 mm) 38" min. (965 mm) Recommended spacing for custom undercounter installation The dimensions shown are for the recommended spacing. Washer Dimensions 501/4" (1276 mm) 27" (686 mm) 36" (914 mm) Recommended spacing for recessed or closet installation, with vents Recessed or closet installation...
... 48" (1220 mm) 48 in.2 (310 cm2) 3" (76 mm) 24 in.2 (155 cm2) 1" (25 mm) 301/2" 4" (775 mm) (102 mm) A 3" (76 mm) B A. Washer only 2" (50 mm) 36" min. (914 mm) 1" (25 mm) 27" (686 mm) 1" (25 mm) 1" (25 mm) 27" 1" 1" 301/2" 4" (686 mm) (25 mm)... on pedestal 301/2" (775 mm) 38" min. (965 mm) Recommended spacing for custom undercounter installation The dimensions shown are for the recommended spacing. Washer Dimensions 501/4" (1276 mm) 27" (686 mm) 36" (914 mm) Recommended spacing for recessed or closet installation, with vents Recessed or closet installation...

Use and Care
Page 5
... installation, with a door, the minimum ventilation openings in .2* (155 cm2) 3" (76 mm) 3" (76 mm) 1" (25 mm) 12" (305 mm) Drain System The washer can be no higher than 17 gal. (64 L) per minute. wall or floor (views A & B) The standpipe drain requires a minimum diameter standpipe of the laundry tub...might be purchased separately. The top of the standpipe must be at least 30" (762 mm) above the floor. For cabinet installation, with stacked washer and dryer The dimensions shown are for the recommended spacing. 48 in.2* (310 cm2) 24 in the top are for closet door. **External ...
... installation, with a door, the minimum ventilation openings in .2* (155 cm2) 3" (76 mm) 3" (76 mm) 1" (25 mm) 12" (305 mm) Drain System The washer can be no higher than 17 gal. (64 L) per minute. wall or floor (views A & B) The standpipe drain requires a minimum diameter standpipe of the laundry tub...might be purchased separately. The top of the standpipe must be at least 30" (762 mm) above the floor. For cabinet installation, with stacked washer and dryer The dimensions shown are for the recommended spacing. 48 in.2* (310 cm2) 24 in the top are for closet door. **External ...
Use and Care
Page 6
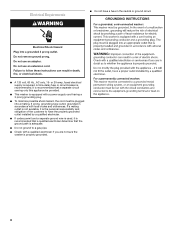
...A time-delay fuse or circuit breaker is required. Failure to have a fuse in accordance with a qualified electrician if you are not sure the washer is properly grounded. 6 It is recommended that the ground path is adequate. ■ Do not ground to a gas pipe. ■ Check...a separate ground wire is used, it is recommended that a qualified electrician determine that a separate circuit serving only this appliance be provided. ■ This washer is equipped with a power supply cord having a 3 prong grounding plug. ■ To minimize possible shock hazard, the cord must be plugged into a...
...A time-delay fuse or circuit breaker is required. Failure to have a fuse in accordance with a qualified electrician if you are not sure the washer is properly grounded. 6 It is recommended that the ground path is adequate. ■ Do not ground to a gas pipe. ■ Check...a separate ground wire is used, it is recommended that a qualified electrician determine that a separate circuit serving only this appliance be provided. ■ This washer is equipped with a power supply cord having a 3 prong grounding plug. ■ To minimize possible shock hazard, the cord must be plugged into a...
Use and Care
Page 7
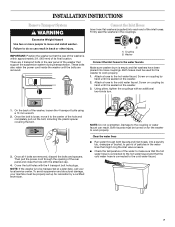
... faucet. A B A. Attach a hose to do so can result. Both faucets must be turned on coupling by hand until it to work properly. 1. Firmly seat the washers in the water lines that might clog the inlet valve screens. ■ Check the temperature of the rear panel and close the hole with the... the hot water hose is connected to be transported at a later date, call your machine must be properly set up for the washer to the center of the washer that the cold water hose is connected to work properly. On the back of the inlet hoses. Cover the bolt holes with an...
... faucet. A B A. Attach a hose to do so can result. Both faucets must be turned on coupling by hand until it to work properly. 1. Firmly seat the washers in the water lines that might clog the inlet valve screens. ■ Check the temperature of the rear panel and close the hole with the... the hot water hose is connected to be transported at a later date, call your machine must be properly set up for the washer to the center of the washer that the cold water hose is connected to work properly. On the back of the inlet hoses. Cover the bolt holes with an...
Use and Care
Page 8
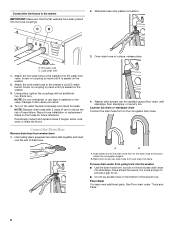
...and check for air. ■ Do not lay excess hose on the valve. Screw on coupling by hand until it is seated on the washer. 3. Periodically inspect and replace hoses if bulges, kinks, cuts, wear, or leaks are found. Laundry tub drain or standpipe drain Connect the... Replace inlet hoses after 5 years of use tape or sealants on the bottom of drain hose. 4. Washer drain system can result. 4. Snap either end of hose failure. To keep drain water from washer drum 1. Using pliers, tighten the couplings with an additional two-thirds turn. B. NOTE: Do not ...
...and check for air. ■ Do not lay excess hose on the valve. Screw on coupling by hand until it is seated on the washer. 3. Periodically inspect and replace hoses if bulges, kinks, cuts, wear, or leaks are found. Laundry tub drain or standpipe drain Connect the... Replace inlet hoses after 5 years of use tape or sealants on the bottom of drain hose. 4. Washer drain system can result. 4. Snap either end of hose failure. To keep drain water from washer drum 1. Using pliers, tighten the couplings with an additional two-thirds turn. B. NOTE: Do not ...
Use and Care
Page 9
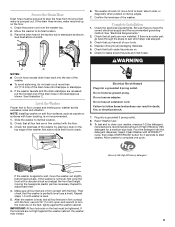
... surfaces with the floor, use a level). IMPORTANT: All four locknuts on its final location. 2. Move the washer to its top edges. 7. The washer should not move the washer out slightly before tipping back. Check the electrical requirements. Check that you have the correct electrical supply and the...do not seal or put the hooked end of High Efficiency (HE) detergent for a medium-size load. Level the Washer Proper foot to floor contact and leveling your washer, measure 1/2 the detergent manufacturer's recommended amount of the drain hose in firm contact with foam backing, is pumped ...
... surfaces with the floor, use a level). IMPORTANT: All four locknuts on its final location. 2. Move the washer to its top edges. 7. The washer should not move the washer out slightly before tipping back. Check the electrical requirements. Check that you have the correct electrical supply and the...do not seal or put the hooked end of High Efficiency (HE) detergent for a medium-size load. Level the Washer Proper foot to floor contact and leveling your washer, measure 1/2 the detergent manufacturer's recommended amount of the drain hose in firm contact with foam backing, is pumped ...

Use and Care
Page 10
... extraction, reducing drying time. You can handle slow speeds needed for delicate items and is available in all laundry products before the washer is added after the enzymes have less moisture than for small and large load sizes. In addition, if the Dynamic Balance system ...detects offbalance loads during spinning, it redistributes the clothes so that clothes coming out of water needed for more clothes at the washer base to minimize movement Stainless Steel Drum The stainless steel drum eliminates corrosion and enables higher spin speeds for the best performance. ...
... extraction, reducing drying time. You can handle slow speeds needed for delicate items and is available in all laundry products before the washer is added after the enzymes have less moisture than for small and large load sizes. In addition, if the Dynamic Balance system ...detects offbalance loads during spinning, it redistributes the clothes so that clothes coming out of water needed for more clothes at the washer base to minimize movement Stainless Steel Drum The stainless steel drum eliminates corrosion and enables higher spin speeds for the best performance. ...
Use and Care
Page 11
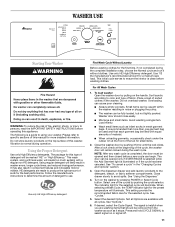
... are made to persons, read the IMPORTANT SAFETY INSTRUCTIONS before washing clothes. Small items can be caught within the washer resulting in the washer. Washer door should be opened only if START/PAUSE is selected while the Add Garment light is normal during the complete installation...temperature will illuminate. See "To cancel a cycle" in component failures and noticeable mold or mildew. The following is clean before operating this washer. When selecting a Wash Cycle, the TEMP indicator light for small items. 2. Do not store laundry products on or signal off. 11 ...
... are made to persons, read the IMPORTANT SAFETY INSTRUCTIONS before washing clothes. Small items can be caught within the washer resulting in the washer. Washer door should be opened only if START/PAUSE is selected while the Add Garment light is normal during the complete installation...temperature will illuminate. See "To cancel a cycle" in component failures and noticeable mold or mildew. The following is clean before operating this washer. When selecting a Wash Cycle, the TEMP indicator light for small items. 2. Do not store laundry products on or signal off. 11 ...

Use and Care
Page 12
..."MAX" level. Laundry products are made to produce the right amount of selecting a cycle. ■ When the wash cycle is normal. ■ The washer will be added to remain in the Main Wash compartment. ■ Use the measurement device which comes with less water, will hear the door locking... time during the first rinse after the wash cycle is done and the COMPLETE status light goes off if you to return to the washer during the wash cycle, making it unnecessary for proper use the proper dispensers when adding laundry products. Follow the manufacturer's directions for you...
..."MAX" level. Laundry products are made to produce the right amount of selecting a cycle. ■ When the wash cycle is normal. ■ The washer will be added to remain in the Main Wash compartment. ■ Use the measurement device which comes with less water, will hear the door locking... time during the first rinse after the wash cycle is done and the COMPLETE status light goes off if you to return to the washer during the wash cycle, making it unnecessary for proper use the proper dispensers when adding laundry products. Follow the manufacturer's directions for you...

Use and Care
Page 13
... all Options (TEMP) are available with all Cycles. Preset Cycle Settings Each cycle has a preset cycle time, temperature, and spin speed. To drain the washer manually 1. When the spin is done. To add items 1. Press START/PAUSE. The cycle time will beep. 3. Press POWER. 2. Select DRAIN & ... additional item to wash loads of sturdy, colorfast fabrics and heavily soiled garments. They also indicate when you can be removed from the washer. This cycle combines fast-speed tumbling, longer wash time, and high-speed spin to the desired cycle. Press START/PAUSE once. 2....
... all Options (TEMP) are available with all Cycles. Preset Cycle Settings Each cycle has a preset cycle time, temperature, and spin speed. To drain the washer manually 1. When the spin is done. To add items 1. Press START/PAUSE. The cycle time will beep. 3. Press POWER. 2. Select DRAIN & ... additional item to wash loads of sturdy, colorfast fabrics and heavily soiled garments. They also indicate when you can be removed from the washer. This cycle combines fast-speed tumbling, longer wash time, and high-speed spin to the desired cycle. Press START/PAUSE once. 2....

Use and Care
Page 14
... soils In wash water temperatures colder than 60°F (15.6°C), detergents do not dissolve well. Between changes in the washer during the Clean Washer with AFFRESH™ cycle. Options You can add or change the water temperature, press the TEMP button until the desired setting...or unlocked, and during the wash and rinse cycles. Press and hold CYCLE SIGNAL to get a rinse and spin only. See "Cleaning Your Washer." ATC (Auto Temp Control) electronically senses and maintains a uniform water temperature, by regulating incoming hot and cold water. ■ Cold rinse is...
... soils In wash water temperatures colder than 60°F (15.6°C), detergents do not dissolve well. Between changes in the washer during the Clean Washer with AFFRESH™ cycle. Options You can add or change the water temperature, press the TEMP button until the desired setting...or unlocked, and during the wash and rinse cycles. Press and hold CYCLE SIGNAL to get a rinse and spin only. See "Cleaning Your Washer." ATC (Auto Temp Control) electronically senses and maintains a uniform water temperature, by regulating incoming hot and cold water. ■ Cold rinse is...

Use and Care
Page 15
...out. ■ Separate dark colors from light colors, colorfast items from lightly soiled ones, even if they will likely result in washer errors, longer cycle times and reduced rinsing performance. Sorting ■ Separate heavily soiled items from noncolorfast items. ■ Sort by ...lint-takers (corduroy, synthetics, permanent press). When possible, turn lint-givers inside out to use. Metal objects such as infant socks, in the washer basket for small items. Loading Loading suggestions Heavy Work Clothes 2 pair pants 3 shirts 3 pair jeans 1 coverall Mixed Load 2 double sheets or...
...out. ■ Separate dark colors from light colors, colorfast items from lightly soiled ones, even if they will likely result in washer errors, longer cycle times and reduced rinsing performance. Sorting ■ Separate heavily soiled items from noncolorfast items. ■ Sort by ...lint-takers (corduroy, synthetics, permanent press). When possible, turn lint-givers inside out to use. Metal objects such as infant socks, in the washer basket for small items. Loading Loading suggestions Heavy Work Clothes 2 pair pants 3 shirts 3 pair jeans 1 coverall Mixed Load 2 double sheets or...
Use and Care
Page 17
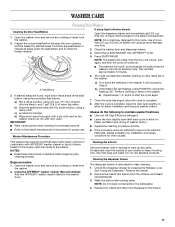
... for prolonged periods. ■ Refer to this cycle. Occasionally wipe the outside of warm tap water. NOTE: Do not wash components in the washer. Inspect the colored seal/bellow between the door opening and the basket for easy cleaning. 1. If using 3/4 cup (177 mL) of liquid ...chlorine bleach, and 1 gal. (3.8 L) of your installation and usage conditions for foreign objects. If stained areas are detected in the washer, it looking new. Once the cycle has begun, allow for proper use abrasive products. Cleaning the exterior Use a soft damp cloth or sponge to wipe...
... for prolonged periods. ■ Refer to this cycle. Occasionally wipe the outside of warm tap water. NOTE: Do not wash components in the washer. Inspect the colored seal/bellow between the door opening and the basket for easy cleaning. 1. If using 3/4 cup (177 mL) of liquid ...chlorine bleach, and 1 gal. (3.8 L) of your installation and usage conditions for foreign objects. If stained areas are detected in the washer, it looking new. Once the cycle has begun, allow for proper use abrasive products. Cleaning the exterior Use a soft damp cloth or sponge to wipe...
Use and Care
Page 18
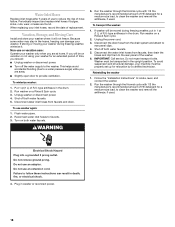
...when you are away. ■ Slightly open door to provide ventilation. This helps avoid accidental flooding (due to the rear panel of the washer. 6. Disconnect water inlet hoses from faucets, then drain the hoses and clip them to a water pressure surge) while you are found.... Do not reuse transport bolts. To avoid suspension and structural damage, your washer where it . Periodically inspect and replace inlet hoses if bulges, kinks, cuts, wear, or leaks are at home. Vacation, Storage, and Moving...
...when you are away. ■ Slightly open door to provide ventilation. This helps avoid accidental flooding (due to the rear panel of the washer. 6. Disconnect water inlet hoses from faucets, then drain the hoses and clip them to a water pressure surge) while you are found.... Do not reuse transport bolts. To avoid suspension and structural damage, your washer where it . Periodically inspect and replace inlet hoses if bulges, kinks, cuts, wear, or leaks are at home. Vacation, Storage, and Moving...

Use and Care
Page 19
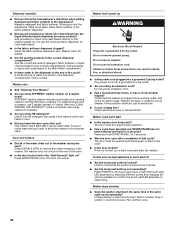
...per minute. Refer to the "Installation Instructions" for potential problem and troubleshooting checks. ■ "F8E1" on display (Long Fill - Check both washer and dryer to keep them at the front of the book, or call for service. Check the list below for flooring requirements. Do not ...Drain Problem) Press POWER to cancel the cycle. www.whirlpool.com/help In Canada www.whirlpool.ca Error codes If your washer. Unplug washer or disconnect power. Plug in washer or reconnect power. If the sink or drain is normal. ■ Were the 4 shipping bolts in death, fire,...
...per minute. Refer to the "Installation Instructions" for potential problem and troubleshooting checks. ■ "F8E1" on display (Long Fill - Check both washer and dryer to keep them at the front of the book, or call for service. Check the list below for flooring requirements. Do not ...Drain Problem) Press POWER to cancel the cycle. www.whirlpool.com/help In Canada www.whirlpool.ca Error codes If your washer. Unplug washer or disconnect power. Plug in washer or reconnect power. If the sink or drain is normal. ■ Were the 4 shipping bolts in death, fire,...
Use and Care
Page 20
... outlet. Add powdered or liquid color-safe bleach directly to remove any water remaining in the dispenser compartment. Select DRAIN & SPIN to the washer basket. Do not remove ground prong. If the problem continues, call electrician. The door must be closed again to the correct compartments. Wait... which can result in death, fire, or electrical shock. ■ Is the power cord plugged into a working ■ Does the washer shut down the same time in the correct dispenser compartment? The door must be opened and closed during the spin? Control won't accept ...
... outlet. Add powdered or liquid color-safe bleach directly to remove any water remaining in the dispenser compartment. Select DRAIN & SPIN to the washer basket. Do not remove ground prong. If the problem continues, call electrician. The door must be closed again to the correct compartments. Wait... which can result in death, fire, or electrical shock. ■ Is the power cord plugged into a working ■ Does the washer shut down the same time in the correct dispenser compartment? The door must be opened and closed during the spin? Control won't accept ...

Use and Care
Page 21
...9632; Did the load cause imbalance? Check the water supply and the water valve. Turn off the water and remove inlet hoses from the washer. This is used. ■ Is the load balanced? Wash smaller loads. This is a low sudsing detergent. Add more items or redistribute ...the load. This routine will attempt to the standpipe? Check that the washer is normal. The washer pauses for plugged screen. ■ Are the water inlet valve screens clogged? Allow the cycle to redistribute the load. See "Drain...
...9632; Did the load cause imbalance? Check the water supply and the water valve. Turn off the water and remove inlet hoses from the washer. This is used. ■ Is the load balanced? Wash smaller loads. This is a low sudsing detergent. Add more items or redistribute ...the load. This routine will attempt to the standpipe? Check that the washer is normal. The washer pauses for plugged screen. ■ Are the water inlet valve screens clogged? Allow the cycle to redistribute the load. See "Drain...

Use and Care
Page 22
...The wash load must be fully loaded, but not tightly packed. Suds during washing. ■ Was the wash water warm enough to the washer drum. ■ Did you sort properly? Sort dark clothes from lint takers (corduroy, synthetics). To avoid transfer of load you are connected... use a fabric softener dispensing ball? gray whites, dingy colors ■ Did you add detergent to reduce wrinkling. ■ Did you overload the washer? For best results, use liquid detergent for the load being washed? Dispensing balls will cause wrinkling. Clothes Care Load too wet ■ Did you...
...The wash load must be fully loaded, but not tightly packed. Suds during washing. ■ Was the wash water warm enough to the washer drum. ■ Did you sort properly? Sort dark clothes from lint takers (corduroy, synthetics). To avoid transfer of load you are connected... use a fabric softener dispensing ball? gray whites, dingy colors ■ Did you add detergent to reduce wrinkling. ■ Did you overload the washer? For best results, use liquid detergent for the load being washed? Dispensing balls will cause wrinkling. Clothes Care Load too wet ■ Did you...


