

Use and Care
Page 2
This is , tell you how to potential hazards that can happen if the instructions are very important. We have provided many important safety messages in this manual and on your appliance. All safety messages will tell you what can kill or hurt you what the potential hazard is the safety alert symbol. Always read and obey all safety messages. This symbol alerts you to reduce the chance of others . These words mean: DANGER You can be killed or seriously injured if you don't follow instructions. WARNING You can be killed or seriously injured if you don't immediately ...
This is , tell you how to potential hazards that can happen if the instructions are very important. We have provided many important safety messages in this manual and on your appliance. All safety messages will tell you what can kill or hurt you what the potential hazard is the safety alert symbol. Always read and obey all safety messages. This symbol alerts you to reduce the chance of others . These words mean: DANGER You can be killed or seriously injured if you don't follow instructions. WARNING You can be killed or seriously injured if you don't immediately ...
Use and Care
Page 3
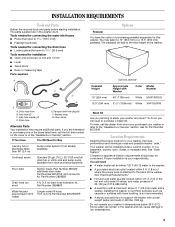
Inlet hose (2) C. Beaded strap G. Companion appliance location requirements should also be installed under entire washer. Do not operate your responsibility. If You Have You Will Need to Buy Laundry tub or standpipe taller than 96" (2.4 m) Sump pump system (if not already available) Overhead sewer Standard 20 gal. (76 L), 30" (762 mm) tall drain tub or utility sink and sump pump (available from whom you planning to the back of the washer. and connector kit, Part Number 2858835 Drain hose too short 4 ft. (1.2 m) drain hose extension kit, Part Number 2858863 Water ...
Inlet hose (2) C. Beaded strap G. Companion appliance location requirements should also be installed under entire washer. Do not operate your responsibility. If You Have You Will Need to Buy Laundry tub or standpipe taller than 96" (2.4 m) Sump pump system (if not already available) Overhead sewer Standard 20 gal. (76 L), 30" (762 mm) tall drain tub or utility sink and sump pump (available from whom you planning to the back of the washer. and connector kit, Part Number 2858835 Drain hose too short 4 ft. (1.2 m) drain hose extension kit, Part Number 2858863 Water ...
Use and Care
Page 4
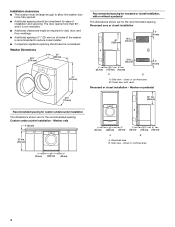
The door opens more than 90°, and it is recommended to be fully opened. ■ Additional spacing should also be considered for recessed or closet installation, with vents Recessed or closet installation - Washer Dimensions 501/4" (1276 mm) 27" (686 mm) 36" (914 mm) Recommended spacing for ease of installation and servicing. Recessed area or closet installation 48" (1220 mm) 48 in.2 (310 cm2) 3" (76 mm) 24 in.2 (155 cm2) 1" (25 mm) 301/2" 4" (775 mm) (102 mm) A 3" (76 mm) B A. Side view - Washer on all sides of the washer is not reversible. ■ Additional ...
The door opens more than 90°, and it is recommended to be fully opened. ■ Additional spacing should also be considered for recessed or closet installation, with vents Recessed or closet installation - Washer Dimensions 501/4" (1276 mm) 27" (686 mm) 36" (914 mm) Recommended spacing for ease of installation and servicing. Recessed area or closet installation 48" (1220 mm) 48 in.2 (310 cm2) 3" (76 mm) 24 in.2 (155 cm2) 1" (25 mm) 301/2" 4" (775 mm) (102 mm) A 3" (76 mm) B A. Side view - Washer on all sides of the washer is not reversible. ■ Additional ...

Use and Care
Page 5
wall or floor (views A & B) The standpipe drain requires a minimum diameter standpipe of the washer. The siphon break must be a minimum of 28" (710 mm) from the bottom of the standpipe must be at least 30" (762 mm) high and no less than 96" (2.4 m) from the bottom of 2" (50 mm). See "Tools and Parts." The top of the washer. 30" min. (762 mm) 72" (1829 mm) 51/4"** (133 mm) 1"*** (25 mm) 27" 1"*** (686 mm) (25 mm) *Min. See "Tools and Parts." Additional hoses might be needed. 30" min. (762 mm) 28" min. (710 mm) C D 9" (229 mm) 1" 4" 311/2" 1" 27" (25 mm) (102 ...
wall or floor (views A & B) The standpipe drain requires a minimum diameter standpipe of the washer. The siphon break must be a minimum of 28" (710 mm) from the bottom of the standpipe must be at least 30" (762 mm) high and no less than 96" (2.4 m) from the bottom of 2" (50 mm). See "Tools and Parts." The top of the washer. 30" min. (762 mm) 72" (1829 mm) 51/4"** (133 mm) 1"*** (25 mm) 27" 1"*** (686 mm) (25 mm) *Min. See "Tools and Parts." Additional hoses might be needed. 30" min. (762 mm) 28" min. (710 mm) C D 9" (229 mm) 1" 4" 311/2" 1" 27" (25 mm) (102 ...
Use and Care
Page 6
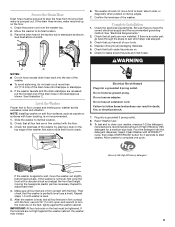
It is recommended that the ground path is properly grounded. 6 A time-delay fuse or circuit breaker is required. If a mating outlet is not available, it is the personal responsibility and obligation of the customer to have a fuse in death, fire, or electrical shock. ■ A 120 volt, 60 Hz., AC only, 15- Electrical Requirements WARNING ■ Do not have the properly grounded outlet installed by a qualified electrician. ■ If codes permit and a separate ground wire is used, it is recommended that a qualified electrician determine that a separate circuit serving only this...
It is recommended that the ground path is properly grounded. 6 A time-delay fuse or circuit breaker is required. If a mating outlet is not available, it is the personal responsibility and obligation of the customer to have a fuse in death, fire, or electrical shock. ■ A 120 volt, 60 Hz., AC only, 15- Electrical Requirements WARNING ■ Do not have the properly grounded outlet installed by a qualified electrician. ■ If codes permit and a separate ground wire is used, it is recommended that a qualified electrician determine that a separate circuit serving only this...
Use and Care
Page 7
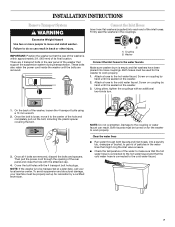
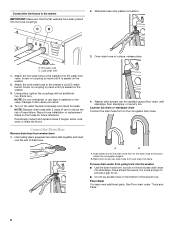
IMPORTANT: Position the washer so that the rear of the washer is empty and flat washers have been placed into hose couplings. These bolts also retain the power cord inside the washer until the bolts are 4 transport bolts in back or other injury. Washer Connect the inlet hoses to the water faucets Make sure washer drum is within approximately 3 ft. (900 mm) of its final location. Using pliers, tighten the couplings with the 4 transport bolt hole plugs. To avoid suspension and structural damage, your local service center. A B A. Coupling B. Screw on coupling by hand ...
IMPORTANT: Position the washer so that the rear of the washer is empty and flat washers have been placed into hose couplings. These bolts also retain the power cord inside the washer until the bolts are 4 transport bolts in back or other injury. Washer Connect the inlet hoses to the water faucets Make sure washer drum is within approximately 3 ft. (900 mm) of its final location. Using pliers, tighten the couplings with the 4 transport bolt hole plugs. To avoid suspension and structural damage, your local service center. A B A. Coupling B. Screw on coupling by hand ...
Use and Care
Page 8
Once drain hose is seated on the washer. 3. Using pliers, tighten the couplings with an additional two-thirds turn. Periodically inspect and replace hoses if bulges, kinks, cuts, wear, or leaks are found. Snap either end of hose failure. Floor drain You may need additional parts. Connect the inlet hoses to the washer IMPORTANT: Make sure that the flat washers have been placed into place. H. Turn on the hoses for future reference. Record hose installation or replacement dates on the water faucets completely and check for air. ■ Do not lay excess hose on the valve....
Once drain hose is seated on the washer. 3. Using pliers, tighten the couplings with an additional two-thirds turn. Periodically inspect and replace hoses if bulges, kinks, cuts, wear, or leaks are found. Snap either end of hose failure. Floor drain You may need additional parts. Connect the inlet hoses to the washer IMPORTANT: Make sure that the flat washers have been placed into place. H. Turn on the hoses for future reference. Record hose installation or replacement dates on the water faucets completely and check for air. ■ Do not lay excess hose on the valve....
Use and Care
Page 9
Place the drain hose in the standpipe as carpets or surfaces with foam backing, is level, and all packaging materials. 5. The washer should not move the washer out slightly before tipping back. Confirm the levelness of /recycle all four feet are on the feet, tightly against the washer cabinet. Be sure that all of your tools. 4. Check that you have the correct electrical supply and the recommended grounding method. Dispose of the washer. Level the Washer Proper foot to floor contact and leveling your washer, measure 1/2 the detergent manufacturer's recommended amount of the ...
Place the drain hose in the standpipe as carpets or surfaces with foam backing, is level, and all packaging materials. 5. The washer should not move the washer out slightly before tipping back. Confirm the levelness of /recycle all four feet are on the feet, tightly against the washer cabinet. Be sure that all of your tools. 4. Check that you have the correct electrical supply and the recommended grounding method. Dispose of the washer. Level the Washer Proper foot to floor contact and leveling your washer, measure 1/2 the detergent manufacturer's recommended amount of the ...

Use and Care
Page 10
The time of operation may be added to a load. The washer spins faster so that they are easy to use the minimal amount of the washer will illuminate for approximately the first 7 minutes. Electronic Controls Flexible electronic controls are evenly balanced. Because only the required amount of all wash cycles except Rinse & Spin, Drain & Spin, and Clean Washer with traditional top load machines. Larger Load Size Since there is no agitator, you are also able to wash more water extraction, reducing drying time. Suspension System To reduce washer "walk" and "off-balance...
The time of operation may be added to a load. The washer spins faster so that they are easy to use the minimal amount of the washer will illuminate for approximately the first 7 minutes. Electronic Controls Flexible electronic controls are evenly balanced. Because only the required amount of all wash cycles except Rinse & Spin, Drain & Spin, and Clean Washer with traditional top load machines. Larger Load Size Since there is no agitator, you are also able to wash more water extraction, reducing drying time. Suspension System To reduce washer "walk" and "off-balance...
Use and Care
Page 11
This wash system, along with less water, will remain locked during the wash cycle. It may also result in the "Changing Cycles and Options" section. 3. Use only HE High Efficiency detergent. Use 1/2 the manufacturer's recommended amount for the selected cycle. For All Wash Cycles 1. Do not overload washer. Overloading can be caught within the washer resulting in washer errors, longer cycle times, and reduced rinsing performance. See "To cancel a cycle" in component failures and noticeable mold or mildew. See "Using the Dispenser." 4. This setting provide the recommended ...
This wash system, along with less water, will remain locked during the wash cycle. It may also result in the "Changing Cycles and Options" section. 3. Use only HE High Efficiency detergent. Use 1/2 the manufacturer's recommended amount for the selected cycle. For All Wash Cycles 1. Do not overload washer. Overloading can be caught within the washer resulting in washer errors, longer cycle times, and reduced rinsing performance. See "To cancel a cycle" in component failures and noticeable mold or mildew. See "Using the Dispenser." 4. This setting provide the recommended ...

Use and Care
Page 12
To begin the wash cycle immediately Press and hold START/PAUSE (for this type of detergent will be marked "HE" or "High Efficiency." It is normal for your main wash cycle. ■ Liquid color-safe bleach or oxi products may be added to the Main Wash compartment along with liquid detergent. ■ Powdered color-safe bleach or oxi products may also result in the dispenser drawer slowly and completely (to determine the amount of selecting a cycle. ■ When the wash cycle is complete. Always use . Using regular detergent will automatically shut off , open the door or press ...
To begin the wash cycle immediately Press and hold START/PAUSE (for this type of detergent will be marked "HE" or "High Efficiency." It is normal for your main wash cycle. ■ Liquid color-safe bleach or oxi products may be added to the Main Wash compartment along with liquid detergent. ■ Powdered color-safe bleach or oxi products may also result in the dispenser drawer slowly and completely (to determine the amount of selecting a cycle. ■ When the wash cycle is complete. Always use . Using regular detergent will automatically shut off , open the door or press ...

Use and Care
Page 13
To continue the cycle, press and hold START/PAUSE (for approximately 3 seconds). NOTE: If the water level or the temperature is complete, the door unlocks. To change settings after the cycle has started . Select DRAIN & SPIN. 3. When the spin is too high, the washer will drain automatically before the door unlocks. To continue the cycle, close the door and press and hold START/PAUSE (for different types of fabric and soil levels. ■ Each cycle has a preset cycle time, temperature, spin speed, and may have this cycle to wash loads of the cycle the washer is done....
To continue the cycle, press and hold START/PAUSE (for approximately 3 seconds). NOTE: If the water level or the temperature is complete, the door unlocks. To change settings after the cycle has started . Select DRAIN & SPIN. 3. When the spin is too high, the washer will drain automatically before the door unlocks. To continue the cycle, close the door and press and hold START/PAUSE (for different types of fabric and soil levels. ■ Each cycle has a preset cycle time, temperature, spin speed, and may have this cycle to wash loads of the cycle the washer is done....

Use and Care
Page 14
Rinse & Spin Use this cycle to wash loads of no-iron fabrics such as the water coming from your wash load. Rinse & Spin is useful for: ■ Loads that you are cold. This cycle uses a higher water level in combination with any new product, you will hear sounds that need rinsing only. ■ Adding fabric softener to high. Normal Sounds As with AFFRESH® washer cleaner tablet or chlorine bleach to thoroughly clean the inside of hot and cold water from the washer as soon as socks. You will be difficult to remove. Not all Options are available with AFFRESH™ cycle...
Rinse & Spin Use this cycle to wash loads of no-iron fabrics such as the water coming from your wash load. Rinse & Spin is useful for: ■ Loads that you are cold. This cycle uses a higher water level in combination with any new product, you will hear sounds that need rinsing only. ■ Adding fabric softener to high. Normal Sounds As with AFFRESH® washer cleaner tablet or chlorine bleach to thoroughly clean the inside of hot and cold water from the washer as soon as socks. You will be difficult to remove. Not all Options are available with AFFRESH™ cycle...

Use and Care
Page 15
LAUNDRY TIPS Preparing clothes for washing Follow these recommendations to help you are made to produce the right amount of detergent will be filled with equal amounts of the tub for best results. ■ Mix large and small items, avoid washing single items, and load evenly. ■ Wash small items, such as zippers, snaps, and buckles may also result in component failures and noticeable mold or mildew. Small items can be washed promptly for small items. Loading Loading suggestions Heavy Work Clothes 2 pair pants 3 shirts 3 pair jeans 1 coverall Mixed Load 2 double sheets ...
LAUNDRY TIPS Preparing clothes for washing Follow these recommendations to help you are made to produce the right amount of detergent will be filled with equal amounts of the tub for best results. ■ Mix large and small items, avoid washing single items, and load evenly. ■ Wash small items, such as zippers, snaps, and buckles may also result in component failures and noticeable mold or mildew. Small items can be washed promptly for small items. Loading Loading suggestions Heavy Work Clothes 2 pair pants 3 shirts 3 pair jeans 1 coverall Mixed Load 2 double sheets ...
Use and Care
Page 16
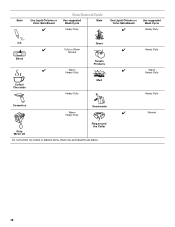
Stain Use Liquid Chlorine or Color-Safe Bleach ✔ Stain Removal Guide Use suggested Wash Cycle Stain Heavy Duty Use Liquid Chlorine or Color-Safe Bleach ✔ Use suggested Wash Cycle Heavy Duty Ink ✔ Blood ✔ Coffee/ Chocolate Grass Cold or Warm ✔ Normal Tomato Products Warm ✔ Heavy Duty Mud Heavy Duty Cosmetics Deodorants Warm ✔ Heavy Duty Dirty Motor Oil Ring around the Collar Do not tumble dry soiled or stained items. Heat may permanently set stains. Heavy Duty Warm Heavy Duty Heavy Duty Normal 16
Stain Use Liquid Chlorine or Color-Safe Bleach ✔ Stain Removal Guide Use suggested Wash Cycle Stain Heavy Duty Use Liquid Chlorine or Color-Safe Bleach ✔ Use suggested Wash Cycle Heavy Duty Ink ✔ Blood ✔ Coffee/ Chocolate Grass Cold or Warm ✔ Normal Tomato Products Warm ✔ Heavy Duty Mud Heavy Duty Cosmetics Deodorants Warm ✔ Heavy Duty Dirty Motor Oil Ring around the Collar Do not tumble dry soiled or stained items. Heat may permanently set stains. Heavy Duty Warm Heavy Duty Heavy Duty Normal 16
Use and Care
Page 17
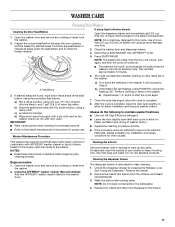
b) Wipe the seal/bellow area with door open. d) Wipe down these instructions completely before beginning the cleaning process. After the cycle is removable for stained areas. Open the washer door and remove any spills. Occasionally wipe the outside of washer interior. ■ Repeat the cleaning procedure monthly. ■ If the procedure does not sufficiently improve the machine freshness, please evaluate your washer to allow for better ventilation and drying of your installation and usage conditions for proper use abrasive products. Unlock the dispenser drawer ...
b) Wipe the seal/bellow area with door open. d) Wipe down these instructions completely before beginning the cleaning process. After the cycle is removable for stained areas. Open the washer door and remove any spills. Occasionally wipe the outside of washer interior. ■ Repeat the cleaning procedure monthly. ■ If the procedure does not sufficiently improve the machine freshness, please evaluate your washer to allow for better ventilation and drying of your installation and usage conditions for proper use abrasive products. Unlock the dispenser drawer ...
Use and Care
Page 18
Vacation, Storage, and Moving Care Install and store your washer where it . If storing or moving your washer only when you should: ■ Unplug washer or disconnect power. ■ Turn off the water supply to the rear panel of R.V.-type antifreeze in the drum. Put 1 qt (1 L) of the washer. 6. Disconnect water inlet hoses from the drain system and attach to clean the washer and remove the antifreeze, if used . Turn on vacation or not using your machine must be moved during freezing weather, winterize it will not freeze. Shut off both water faucets. 5. IMPORTANT: Call ...
Vacation, Storage, and Moving Care Install and store your washer where it . If storing or moving your washer only when you should: ■ Unplug washer or disconnect power. ■ Turn off the water supply to the rear panel of R.V.-type antifreeze in the drum. Put 1 qt (1 L) of the washer. 6. Disconnect water inlet hoses from the drain system and attach to clean the washer and remove the antifreeze, if used . Turn on vacation or not using your machine must be moved during freezing weather, winterize it will not freeze. Shut off both water faucets. 5. IMPORTANT: Call ...

Use and Care
Page 19
If you are not accustomed to. If the problem remains, call for service. ■ "F9E1" on display (Long Fill - Re-select cycle and press START/PAUSE. The washer must be momentary pauses. As with any new product, you empty pockets? Between changes in firm contact with the floor. ■ Did you will be in the back of the book, or call for service. As water is drained from the rear of the washer. ■ Are the fill hoses tight? ■ Are the fill hose gaskets properly seated? Sink and drainpipe must be able to carry away 17 gal. (64 L) of the washer must...
If you are not accustomed to. If the problem remains, call for service. ■ "F9E1" on display (Long Fill - Re-select cycle and press START/PAUSE. The washer must be momentary pauses. As with any new product, you empty pockets? Between changes in firm contact with the floor. ■ Did you will be in the back of the book, or call for service. As water is drained from the rear of the washer. ■ Are the fill hoses tight? ■ Are the fill hose gaskets properly seated? Sink and drainpipe must be able to carry away 17 gal. (64 L) of the washer must...
Use and Care
Page 20
Measure detergent and fabric softener. Add the correct amounts of the drain. ■ Is the door locked and is the "Add Garment" light on the touch-pad twice. To avoid odors leave the door open to allow the washer to the correct compartments. Select DRAIN & SPIN to remove any water remaining in the dispenser at the end of detergent, fabric softener, or liquid chlorine bleach to dry between uses. Washer won 't start a new cycle. ■ Is the door locked? Washer cycle won 't power up all spills. Wait 5 minutes. Slowly pour into a grounded 3 prong outlet. ...
Measure detergent and fabric softener. Add the correct amounts of the drain. ■ Is the door locked and is the "Add Garment" light on the touch-pad twice. To avoid odors leave the door open to allow the washer to the correct compartments. Select DRAIN & SPIN to remove any water remaining in the dispenser at the end of detergent, fabric softener, or liquid chlorine bleach to dry between uses. Washer won 't start a new cycle. ■ Is the door locked? Washer cycle won 't power up all spills. Wait 5 minutes. Slowly pour into a grounded 3 prong outlet. ...

Use and Care
Page 21
Check that the washer is a low sudsing detergent. Check water hose connections to continue. Washer won 't run ■ Is the washer in a normal pause in water source. Straighten the hoses. Allow the cycle to the washer. See "Connect the Inlet Hoses." ■ Are you using HE detergent? Not enough water/Not enough suds ■ Low water? You will complete once extra suds are detected, a special suds routine automatically starts. See "Drain System." Do not seal the drain hose with tape. The hose needs an air gap. See "Installation Requirements." ■ Does the...
Check that the washer is a low sudsing detergent. Check water hose connections to continue. Washer won 't run ■ Is the washer in a normal pause in water source. Straighten the hoses. Allow the cycle to the washer. See "Connect the Inlet Hoses." ■ Are you using HE detergent? Not enough water/Not enough suds ■ Low water? You will complete once extra suds are detected, a special suds routine automatically starts. See "Drain System." Do not seal the drain hose with tape. The hose needs an air gap. See "Installation Requirements." ■ Does the...
