
Dimension Guide
Page 1
See "Electrical Requirements" section. PRODUCT DIMENSIONS INSTALLATION DIMENSIONS NOTE: The grounded 3 prong outlet must be inside the upper cabinet. upper cabinet and side cabinet depth 17¹⁄₈" (43.5 cm) ... or time-delay circuit breaker. ■■ A separate circuit serving only this microwave oven. For complete details, see Installation Instructions packed with a fuse or circuit breaker. Microwave Hood Combination PRODUCT MODEL NUMBERS AMV2307PF ELECTRICAL REQUIREMENTS Required: ■■ A 120 volt, 60 Hz, AC only, 15- or 20-amp electrical supply ...
See "Electrical Requirements" section. PRODUCT DIMENSIONS INSTALLATION DIMENSIONS NOTE: The grounded 3 prong outlet must be inside the upper cabinet. upper cabinet and side cabinet depth 17¹⁄₈" (43.5 cm) ... or time-delay circuit breaker. ■■ A separate circuit serving only this microwave oven. For complete details, see Installation Instructions packed with a fuse or circuit breaker. Microwave Hood Combination PRODUCT MODEL NUMBERS AMV2307PF ELECTRICAL REQUIREMENTS Required: ■■ A 120 volt, 60 Hz, AC only, 15- or 20-amp electrical supply ...

Use & Care Guide
Page 1
... excessive microwave energy: I Install or locate the microwave oven only in accordance with the provided Installation Instructions. Model Number Serial Number Para una versión de estas instrucciones en español, visite www.amana.com. IMPORTANT SAFETY INSTRUCTIONS When using the microwave oven...- I Some products such as whole eggs in the provided Installation Instructions. This is , tell you how to properly grounded outlet. I Read all safety messages. Register your microwave oven at www.amana.com. MICROWAVE HOOD COMBINATION SAFETY Your safety and the safety of...
... excessive microwave energy: I Install or locate the microwave oven only in accordance with the provided Installation Instructions. Model Number Serial Number Para una versión de estas instrucciones en español, visite www.amana.com. IMPORTANT SAFETY INSTRUCTIONS When using the microwave oven...- I Some products such as whole eggs in the provided Installation Instructions. This is , tell you how to properly grounded outlet. I Read all safety messages. Register your microwave oven at www.amana.com. MICROWAVE HOOD COMBINATION SAFETY Your safety and the safety of...

Use & Care Guide
Page 3
... electrician or serviceman if the grounding instructions are working, oven will return to the normal brightness. Do not use an extension cord. OPERATING YOUR MICROWAVE OVEN Settings/Features Clock The clock is too short, have a qualified electrician or serviceman install an outlet near the microwave oven...actually turning on all governing codes and ordinances. Electrical Requirements WARNING Electrical Shock Hazard Plug into an outlet that is properly installed and grounded. Failure to Standby Power mode and dim the brightness after 30 minutes). The microwave oven is active in ...
... electrician or serviceman if the grounding instructions are working, oven will return to the normal brightness. Do not use an extension cord. OPERATING YOUR MICROWAVE OVEN Settings/Features Clock The clock is too short, have a qualified electrician or serviceman install an outlet near the microwave oven...actually turning on all governing codes and ordinances. Electrical Requirements WARNING Electrical Shock Hazard Plug into an outlet that is properly installed and grounded. Failure to Standby Power mode and dim the brightness after 30 minutes). The microwave oven is active in ...

Use & Care Guide
Page 4
...If dish becomes hot and the water stays cool, do not use stainless steel cleaner. ■■ Turntable: mild soap and water or dishwasher Installing/Replacing Filters and Light Bulbs ■■ Grease filters: Grease filters are OFF and the microwave oven is replaceable. Enter number of microwave oven....slide the vent grille to the right, and secure with 1 cup (250 mL) of the turntable (not in the center). Always follow label instructions on the front facing of the microwave oven opening opposite the tab area, swing up the other end, and slide it . To reinstall, place...
...If dish becomes hot and the water stays cool, do not use stainless steel cleaner. ■■ Turntable: mild soap and water or dishwasher Installing/Replacing Filters and Light Bulbs ■■ Grease filters: Grease filters are OFF and the microwave oven is replaceable. Enter number of microwave oven....slide the vent grille to the right, and secure with 1 cup (250 mL) of the turntable (not in the center). Always follow label instructions on the front facing of the microwave oven opening opposite the tab area, swing up the other end, and slide it . To reinstall, place...

Use & Care Guide
Page 6
... another warranty applies. Removal or reinstallation of inaccessible appliances or built-in accordance with published user, operator or installation instructions. 2. DISCLAIMER OF REPRESENTATIONS OUTSIDE OF WARRANTY Amana makes no representations about buying an extended warranty. AMANA SHALL NOT BE LIABLE FOR INCIDENTAL OR CONSEQUENTIAL DAMAGES. Some questions can be borne by the use inconsistent...
... another warranty applies. Removal or reinstallation of inaccessible appliances or built-in accordance with published user, operator or installation instructions. 2. DISCLAIMER OF REPRESENTATIONS OUTSIDE OF WARRANTY Amana makes no representations about buying an extended warranty. AMANA SHALL NOT BE LIABLE FOR INCIDENTAL OR CONSEQUENTIAL DAMAGES. Some questions can be borne by the use inconsistent...

Installation Instructions
Page 1
... 2 Tools and Parts 2 Remove Cardboard Template 2 Location Requirements 2 Product Dimensions 3 Electrical Requirements 3 INSTALLATION INSTRUCTIONS 4 Remove Mounting Plate 4 Rotate Blower Motor 4 Locate Wall Stud(s 6 Mark Rear Wall 7 Drill Holes in these installation instructions. MICROWAVE HOOD COMBINATION INSTALLATION INSTRUCTIONS This product is , tell you how to reduce the chance of injury, and tell you what the potential hazard...
... 2 Tools and Parts 2 Remove Cardboard Template 2 Location Requirements 2 Product Dimensions 3 Electrical Requirements 3 INSTALLATION INSTRUCTIONS 4 Remove Mounting Plate 4 Rotate Blower Motor 4 Locate Wall Stud(s 6 Mark Rear Wall 7 Drill Holes in these installation instructions. MICROWAVE HOOD COMBINATION INSTALLATION INSTRUCTIONS This product is , tell you how to reduce the chance of injury, and tell you what the potential hazard...

Installation Instructions
Page 2
... from the rest of packaging) ■■ Aluminum grease filters ■■ Charcoal filters (Depending on model, charcoal filters may be installed. For other damages. Z\v" x 2" lag screws (2) F. Damper assembly (for weight of the microwave oven packaging is for cooking. Cut...cabinet and building materials are not designed to make sure there is at least 6" (15.2 cm) of installation. Washers (2) D. Read and follow the instructions provided with your builder or cabinet supplier to withstand the heat produced by the microwave oven for use appropriate fasteners...
... from the rest of packaging) ■■ Aluminum grease filters ■■ Charcoal filters (Depending on model, charcoal filters may be installed. For other damages. Z\v" x 2" lag screws (2) F. Damper assembly (for weight of the microwave oven packaging is for cooking. Cut...cabinet and building materials are not designed to make sure there is at least 6" (15.2 cm) of installation. Washers (2) D. Read and follow the instructions provided with your builder or cabinet supplier to withstand the heat produced by the microwave oven for use appropriate fasteners...
Installation Instructions
Page 3
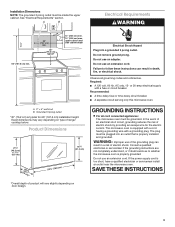
... vary slightly depending on type of electric shock by providing an escape wire for 66" (167.6 cm) installation height. Do not use an extension cord. SAVE THESE INSTRUCTIONS 3 See "Electrical Requirements" section. Do not use an extension cord. upper cabinet and side cabinet depth ...Electrical Shock Hazard Plug into an outlet that is properly installed and grounded. Required: ■■ A 120 volt, 60 Hz...
... vary slightly depending on type of electric shock by providing an escape wire for 66" (167.6 cm) installation height. Do not use an extension cord. SAVE THESE INSTRUCTIONS 3 See "Electrical Requirements" section. Do not use an extension cord. upper cabinet and side cabinet depth ...Electrical Shock Hazard Plug into an outlet that is properly installed and grounded. Required: ■■ A 120 volt, 60 Hz...

Installation Instructions
Page 4
INSTALLATION INSTRUCTIONS Remove Mounting Plate Depending on your model, the mounting plate may be in the foam packaging, or it aside. 3. Wall Venting Installation Only 1. A B A. Exhaust port 6. Keep the damper assembly in case the venting method is changed, or the .... Blower motor 5. A. Remove any remaining contents from the microwave oven cavity. 2. Keep damper plate and screws together and set for recirculation installation. Remove 2 screws attaching blower motor to the work surface, cover the work surface. 1. For wall or roof venting, changes must be...
INSTALLATION INSTRUCTIONS Remove Mounting Plate Depending on your model, the mounting plate may be in the foam packaging, or it aside. 3. Wall Venting Installation Only 1. A B A. Exhaust port 6. Keep the damper assembly in case the venting method is changed, or the .... Blower motor 5. A. Remove any remaining contents from the microwave oven cavity. 2. Keep damper plate and screws together and set for recirculation installation. Remove 2 screws attaching blower motor to the work surface, cover the work surface. 1. For wall or roof venting, changes must be...

Installation Instructions
Page 10
...of the damper assembly slides under vent) Complete Installation 1. Replace the fuse or reset the circuit breaker. Save Installation Instructions for filter placement. NOTE: If microwave oven does not need to be installed if the damper assembly is not positioned as... of the microwave oven. NOTE: The screw cannot be adjusted, skip steps 7-9. 7. Reconnect power. 4. To avoid warping, wood filler blocks (installer to follow these instructions can result in place. Refer to damper assembly. Do not use an extension cord. Repeat steps 3-6. 10. The blocks must be added. A...
...of the damper assembly slides under vent) Complete Installation 1. Replace the fuse or reset the circuit breaker. Save Installation Instructions for filter placement. NOTE: If microwave oven does not need to be installed if the damper assembly is not positioned as... of the microwave oven. NOTE: The screw cannot be adjusted, skip steps 7-9. 7. Reconnect power. 4. To avoid warping, wood filler blocks (installer to follow these instructions can result in place. Refer to damper assembly. Do not use an extension cord. Repeat steps 3-6. 10. The blocks must be added. A...

Specification Sheet
Page 1
Over-the-Range Microwave AMV2307PF Stainless Steel AMV2307PFS Also available in the U.S.A. Ft. NOTE: Dimensions are for those ground beef burger patties to settle in the microwave and press Defrost. Printed... CFMs Lighting Type Number of Speeds Venting Type Dimensions Product Dimensions (H x W x D) Depth with product. For complete details, see Installation Instructions packed with Door Open 90° Cutout Dimensions (W x D) Reference Material Dimension Guide Install Guide Use & Care Guide Warranty Over-theRange 300 Incandescent 2 Updraft 17-3/8" x 30" x 15-7/8" 48-1/2" 30" x 12" ...
Over-the-Range Microwave AMV2307PF Stainless Steel AMV2307PFS Also available in the U.S.A. Ft. NOTE: Dimensions are for those ground beef burger patties to settle in the microwave and press Defrost. Printed... CFMs Lighting Type Number of Speeds Venting Type Dimensions Product Dimensions (H x W x D) Depth with product. For complete details, see Installation Instructions packed with Door Open 90° Cutout Dimensions (W x D) Reference Material Dimension Guide Install Guide Use & Care Guide Warranty Over-theRange 300 Incandescent 2 Updraft 17-3/8" x 30" x 15-7/8" 48-1/2" 30" x 12" ...
