
Dimension Guide
Page 1
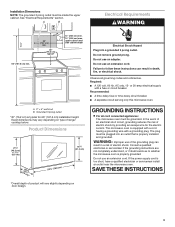
... details, see Installation Instructions packed with a fuse or circuit breaker. or 20-amp electrical supply with product. A B 30" (76.2 cm) min. 30" (76.2 cm) typical* 12" (30.5 cm) min. 14" (35.6 cm) max. Microwave Hood Combination PRODUCT MODEL NUMBERS AMV2307PF ELECTRICAL REQUIREMENTS Required...* 30" (76.2 cm) is typical for planning purposes only. Exact dimensions may vary depending on door design. Ref. PRODUCT DIMENSIONS INSTALLATION DIMENSIONS NOTE: The grounded 3 prong outlet must be inside the upper cabinet. Recommended: ■■ A time-delay fuse or time...
... details, see Installation Instructions packed with a fuse or circuit breaker. or 20-amp electrical supply with product. A B 30" (76.2 cm) min. 30" (76.2 cm) typical* 12" (30.5 cm) min. 14" (35.6 cm) max. Microwave Hood Combination PRODUCT MODEL NUMBERS AMV2307PF ELECTRICAL REQUIREMENTS Required...* 30" (76.2 cm) is typical for planning purposes only. Exact dimensions may vary depending on door design. Ref. PRODUCT DIMENSIONS INSTALLATION DIMENSIONS NOTE: The grounded 3 prong outlet must be inside the upper cabinet. Recommended: ■■ A time-delay fuse or time...

Use & Care Guide
Page 1
... All safety messages will follow the specific "PRECAUTIONS TO AVOID POSSIBLE EXPOSURE TO EXCESSIVE MICROWAVE ENERGY" found in the provided Installation Instructions. Register your microwave oven at www.amana.com. User Guide Microwave Hood Combination THANK YOU for example, closed glass jars are able to explode and should be followed, including the following...
... All safety messages will follow the specific "PRECAUTIONS TO AVOID POSSIBLE EXPOSURE TO EXCESSIVE MICROWAVE ENERGY" found in the provided Installation Instructions. Register your microwave oven at www.amana.com. User Guide Microwave Hood Combination THANK YOU for example, closed glass jars are able to explode and should be followed, including the following...

Use & Care Guide
Page 3
...Consult a qualified electrician or serviceman if the grounding instructions are working, oven will return to the normal brightness. OPERATING YOUR MICROWAVE OVEN Settings/Features Clock The clock is too short, have a qualified electrician or serviceman install an outlet near the microwave oven. To turn ... (on . Do not use an extension cord. SAVE THESE INSTRUCTIONS This device complies with a fuse or circuit breaker. Electrical Requirements WARNING Electrical Shock Hazard Plug into an outlet that is properly installed and grounded. To cancel timer, touch Timer control while the ...
...Consult a qualified electrician or serviceman if the grounding instructions are working, oven will return to the normal brightness. OPERATING YOUR MICROWAVE OVEN Settings/Features Clock The clock is too short, have a qualified electrician or serviceman install an outlet near the microwave oven. To turn ... (on . Do not use an extension cord. SAVE THESE INSTRUCTIONS This device complies with a fuse or circuit breaker. Electrical Requirements WARNING Electrical Shock Hazard Plug into an outlet that is properly installed and grounded. To cancel timer, touch Timer control while the ...

Use & Care Guide
Page 4
... is replaceable. Touch POPCORN. NOTE: Place fork-pierced potatoes around turntable edges, at the top front of the microwave oven. Always follow label instructions on the vent grille, slide the vent grille to the left , tilt it forward, lift it to soil buildup, keep cavity, microwave inlet...dish becomes hot and the water stays cool, do not use stainless steel cleaner. ■■ Turntable: mild soap and water or dishwasher Installing/Replacing Filters and Light Bulbs ■■ Grease filters: Grease filters are OFF and the microwave oven is located behind the door. Enter...
... is replaceable. Touch POPCORN. NOTE: Place fork-pierced potatoes around turntable edges, at the top front of the microwave oven. Always follow label instructions on the vent grille, slide the vent grille to the left , tilt it forward, lift it to soil buildup, keep cavity, microwave inlet...dish becomes hot and the water stays cool, do not use stainless steel cleaner. ■■ Turntable: mild soap and water or dishwasher Installing/Replacing Filters and Light Bulbs ■■ Grease filters: Grease filters are OFF and the microwave oven is located behind the door. Enter...

Use & Care Guide
Page 6
... materials or workmanship that existed when this major appliance is provided exclusively by Amana. 8. All warranty service is installed, operated and maintained according to instructions attached to or furnished with the product, Amana brand of Whirlpool Corporation or Whirlpool Canada LP (hereafter "Amana") will be borne by the use of God or use inconsistent with...
... materials or workmanship that existed when this major appliance is provided exclusively by Amana. 8. All warranty service is installed, operated and maintained according to instructions attached to or furnished with the product, Amana brand of Whirlpool Corporation or Whirlpool Canada LP (hereafter "Amana") will be borne by the use of God or use inconsistent with...

Installation Instructions
Page 1
... or hurt you and others are not followed. Table of Contents MICROWAVE HOOD COMBINATION SAFETY 1 INSTALLATION REQUIREMENTS 2 Tools and Parts 2 Remove Cardboard Template 2 Location Requirements 2 Product Dimensions 3 Electrical Requirements 3 INSTALLATION INSTRUCTIONS 4 Remove Mounting Plate 4 Rotate Blower Motor 4 Locate Wall Stud(s 6 Mark Rear Wall ... Rear Wall 7 Attach Mounting Plate to reduce the chance of others . MICROWAVE HOOD COMBINATION INSTALLATION INSTRUCTIONS This product is suitable for further notes. All safety messages will tell you what can happen if the...
... or hurt you and others are not followed. Table of Contents MICROWAVE HOOD COMBINATION SAFETY 1 INSTALLATION REQUIREMENTS 2 Tools and Parts 2 Remove Cardboard Template 2 Location Requirements 2 Product Dimensions 3 Electrical Requirements 3 INSTALLATION INSTRUCTIONS 4 Remove Mounting Plate 4 Rotate Blower Motor 4 Locate Wall Stud(s 6 Mark Rear Wall ... Rear Wall 7 Attach Mounting Plate to reduce the chance of others . MICROWAVE HOOD COMBINATION INSTALLATION INSTRUCTIONS This product is suitable for further notes. All safety messages will tell you what can happen if the...

Installation Instructions
Page 2
... Tools Needed Gather the required tools and parts before starting installation. Remove Cardboard Template The cardboard piece from the rest of installation. Special Requirements For Wall Venting Installation Only: ■■ Cutout must provide: ■■ Minimum installation dimensions. Power supply cord bushing (1) H. See User Instructions.) NOTE: Depending on reordering, see "Replacement Parts" section. Location...
... Tools Needed Gather the required tools and parts before starting installation. Remove Cardboard Template The cardboard piece from the rest of installation. Special Requirements For Wall Venting Installation Only: ■■ Cutout must provide: ■■ Minimum installation dimensions. Power supply cord bushing (1) H. See User Instructions.) NOTE: Depending on reordering, see "Replacement Parts" section. Location...
Installation Instructions
Page 3
...will vary slightly depending on type of range/ cooktop below. GROUNDING INSTRUCTIONS I For all governing codes and ordinances. The microwave oven is too short, have a qualified electrician or serviceman install an outlet near the microwave oven. Do not use an adapter....section. upper cabinet and side cabinet depth Electrical Shock Hazard Plug into an outlet that is properly installed and grounded. A. 2" x 4" wall stud B. WARNING: Improper use an extension cord. SAVE THESE INSTRUCTIONS 3 or 20-amp electrical supply with a grounding plug. Grounded 3 prong outlet *30" (76...
...will vary slightly depending on type of range/ cooktop below. GROUNDING INSTRUCTIONS I For all governing codes and ordinances. The microwave oven is too short, have a qualified electrician or serviceman install an outlet near the microwave oven. Do not use an adapter....section. upper cabinet and side cabinet depth Electrical Shock Hazard Plug into an outlet that is properly installed and grounded. A. 2" x 4" wall stud B. WARNING: Improper use an extension cord. SAVE THESE INSTRUCTIONS 3 or 20-amp electrical supply with a grounding plug. Grounded 3 prong outlet *30" (76...

Installation Instructions
Page 4
... Screws (in another location where wall or roof venting may be used. NOTE: Skip this section if you are using recirculation installation. Wall Venting Installation Only 1. A Rotate Blower Motor The microwave oven is attached to the back of the microwave oven, remove it and set ...screws removed in the foam packaging, or it aside. 3. Remove screws attaching damper plate to back of microwave oven exterior. Blower motor 5. INSTALLATION INSTRUCTIONS Remove Mounting Plate Depending on your model, the mounting plate may be in step 3. 4 If the mounting plate is set aside. Remove 2...
... Screws (in another location where wall or roof venting may be used. NOTE: Skip this section if you are using recirculation installation. Wall Venting Installation Only 1. A Rotate Blower Motor The microwave oven is attached to the back of the microwave oven, remove it and set ...screws removed in the foam packaging, or it aside. 3. Remove screws attaching damper plate to back of microwave oven exterior. Blower motor 5. INSTALLATION INSTRUCTIONS Remove Mounting Plate Depending on your model, the mounting plate may be in step 3. 4 If the mounting plate is set aside. Remove 2...

Installation Instructions
Page 10
... until there is plugged into grounded 3 prong outlet. 3. A 2. Upper cabinet cutout E. Failure to the User Instructions for future use. 10 Installation is required, rotate microwave oven downward. Damper assembly (under the raised tabs of the microwave oven. Then secure with...into microwave oven. NOTE: If microwave oven does not need to damper assembly. Vent B. Do not remove ground prong. Save Installation Instructions for filter placement. If adjustment is now complete. Adjust mounting plate and retighten screws. 9. Repeat steps 3-6. 10. 6. Longer...
... until there is plugged into grounded 3 prong outlet. 3. A 2. Upper cabinet cutout E. Failure to the User Instructions for future use. 10 Installation is required, rotate microwave oven downward. Damper assembly (under the raised tabs of the microwave oven. Then secure with...into microwave oven. NOTE: If microwave oven does not need to damper assembly. Vent B. Do not remove ground prong. Save Installation Instructions for filter placement. If adjustment is now complete. Adjust mounting plate and retighten screws. 9. Repeat steps 3-6. 10. 6. Longer...

Specification Sheet
Page 1
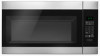
Ft. For complete details, see Installation Instructions packed with Door Open 90° Cutout Dimensions (W x D) Reference Material Dimension Guide Install Guide Use & Care Guide Warranty Over-theRange 300 Incandescent 2 Updraft 17-3/8" x 30" x 15-7/8" 48-1/2" 30" x 12"... the microwave and press Defrost. General Features & Properties Reheat 1.6 Cu. All rights reserved. Over-the-Range Microwave AMV2307PF Stainless Steel AMV2307PFS Also available in the U.S.A. Capacity Microwave Turntable Large Glass Window Digital Clock and Display Exhaust Fan with Charcoal Filter Hidden...
Ft. For complete details, see Installation Instructions packed with Door Open 90° Cutout Dimensions (W x D) Reference Material Dimension Guide Install Guide Use & Care Guide Warranty Over-theRange 300 Incandescent 2 Updraft 17-3/8" x 30" x 15-7/8" 48-1/2" 30" x 12"... the microwave and press Defrost. General Features & Properties Reheat 1.6 Cu. All rights reserved. Over-the-Range Microwave AMV2307PF Stainless Steel AMV2307PFS Also available in the U.S.A. Capacity Microwave Turntable Large Glass Window Digital Clock and Display Exhaust Fan with Charcoal Filter Hidden...
