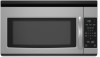
Amana AMV1150VAS Support Question
Amana AMV1150VAS Support Question
Find answers below for this question about Amana AMV1150VAS.Need a Amana AMV1150VAS manual? We have 4 online manuals for this item!
Question posted by jww4055 on August 26th, 2013
Installation
I have a AMV1150VAS3 amana microwave. I am looking for information to replace the top mounting assembly to secure microwave to underside of cabinet.
Current Answers
Related Amana AMV1150VAS Manual Pages
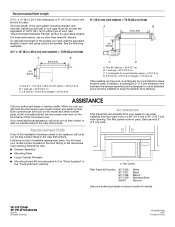
Dimension Guide - Page 1
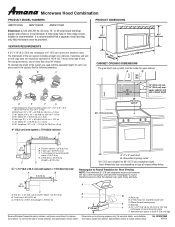
... microwave oven and the rectangular to improve
Dimensions are for 66" (167.6 cm) installation height. See the following examples:
A
B
C
(401.05 cm" )
' " (76.0 cm)
CABINET ... either type of range/cooktop below. Microwave Hood Combination
PRODUCT MODEL NUMBERS
AMV1150VA AMV1160VA AMV2174VA
Electrical: A 120-Volt, 60-Hz, AC-only, 15- upper cabinet and side cabinet depth
2 ft (0.6 m)
C
A....
Installation Instruction - Page 1
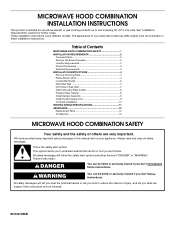
...slightly from the illustration in Rear Wall 7 Attach Mounting Plate to reduce the chance of others . This is , tell you how to Wall 8 Prepare Upper Cabinet 8 Install Damper Assembly 9 Install the Microwave Oven 9 Complete Installation 10 VENTING DESIGN SPECIFICATIONS 11 ASSISTANCE 12 Replacement Parts 12 Accessories 12
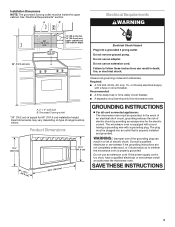
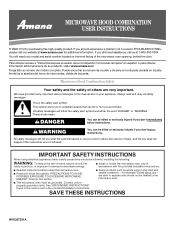
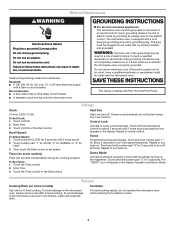
MICROWAVE HOOD COMBINATION SAFETY
Your safety and the safety of...
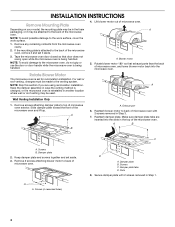
Installation Instruction - Page 2
.... See "Electrical Requirements" section. For Roof Venting Installation Only: ■ If you are using a rectangular to round transition piece, the
3" (7.6 cm) clearance needs to withstand the heat produced by the microwave oven for wall or roof
venting)
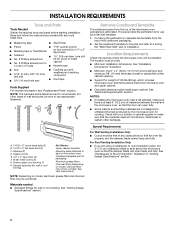
Not Shown:
Upper cabinet template
Mounting plate (attached to back of microwave oven)
Cardboard template (part of any tools listed...
Installation Instruction - Page 3
... plug. Do not remove ground prong. Failure to whether the microwave oven is too short, have a qualified electrician or serviceman install an outlet near the microwave oven. WARNING: Improper use an extension cord. Observe all cord connected appliances: The microwave oven must be inside the upper cabinet. Installation Dimensions
NOTE: The grounded 3 prong outlet must be plugged into...
Installation Instruction - Page 4
... damage to back of the microwave oven.
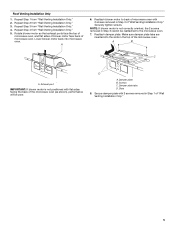
Wall Venting Installation Only 1. Remove screws attaching damper plate to the back of the microwave oven. Reattach damper plate.
Screws (in case the venting method is
changed, or the microwave oven is set it aside.
3. Slots
8. Secure damper plate with 2 screws removed in Step 3.
7. If the mounting plate is attached to top...
Installation Instruction - Page 5
... screws. Make sure damper plate tabs are inserted into microwave oven.
Screws C. Secure damper plate with flat sides facing the back of the microwave oven (as shown), performance will be reattached to back of microwave oven with 2 screws removed in the top of microwave oven. Repeat Step 3 from "Wall Venting Installation Only." 5.
Exhaust port
IMPORTANT: If blower motor is not...
Installation Instruction - Page 6
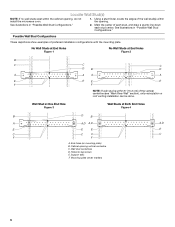
...F
F
NOTE: If wall stud is within 6" (15.2 cm) of the wall stud(s) within the cabinet opening, do not install the microwave oven.
1. End holes (on mounting plate) B.
See illustrations in "Possible Wall Stud Configurations."
2.
Cabinet opening vertical centerline C. Holes for lag screws E. Mounting plate center markers
6 Locate Wall Stud(s)
NOTE: If no wall studs exist within the...
Installation Instruction - Page 7
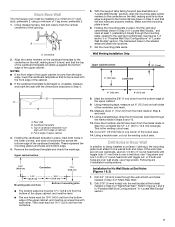
... sides of "Mark Rear Wall."
2. These represent the mounting plate's end holes and bottom edge.
4. Set the mounting plate aside. Using a straightedge, draw the 2 horizontal...Rear Wall
The microwave oven must each other. They must be installed on the wall, making sure it is level, and that the top of the cutout area.
14. Wall Venting Installation Only
Upper cabinet bottom
³...
Installation Instruction - Page 8
... bolt through both end holes drilled into wall stud(s) in Rear Wall" section.
2. Position mounting plate on the wall. 4.
Securely tighten the lag screws. Place Upper Cabinet Template against the bottom of the microwave oven. NOTES: ■ If the upper cabinet has a frame around it, trim the template
edges so that the holes cut into the...
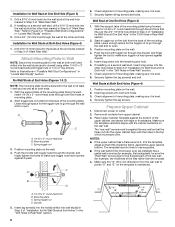
Installation Instruction - Page 9
... so that damper blade moves freely, and opens fully.
2. With front of mounting plate. Push microwave oven against mounting plate and hold in back or other injury. Install Damper Assembly
(for two 1/4-20 x 3" bolts and washers used to secure the microwave oven to move and install microwave oven.
Place a washer on the template. NOTE: If venting through the power supply cord hole...
Installation Instruction - Page 10
...to damper assembly. Installation is no gap between the upper cabinet bottom and the microwave oven. With the microwave oven centered, and with sheet metal screw. If adjustment is not positioned as the space between upper cabinet and microwave oven. Damper assembly (under the raised tabs of the microwave oven. NOTE: The screw cannot be added. Check the operation of mounting plate...
Installation Instruction - Page 11
... vent
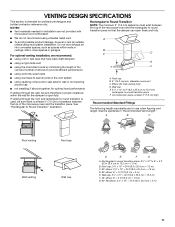
C. Vent extension piece, at least 3" (7.6 cm) of clearance between the top of the microwave oven and the transition piece. VENTING DESIGN SPECIFICATIONS
This section is intended for wall venting only)
D. NOTES: ■ Vent materials needed for installation are for the damper to round transition piece so that have back draft dampers
■...
Installation Instruction - Page 12
... either type of the microwave oven opening .
Two 90° elbows = 20 ft (6.1 m) B. 1 wall cap = 40 ft (12.2 m) C. 1 rectangular to round transition piece = 5 ft (1.5 m) D. 2 ft (0.6 m) + 6 ft (1.8 m) straight = 8 ft (2.4 m)
If the existing vent is located behind the door. ■ Damper Assembly
■ Mounting Plate
■ Upper Cabinet Template
■ Mounting Screw Kit (includes...
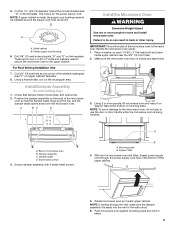
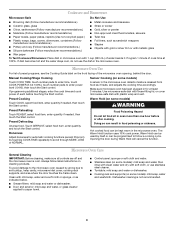
Use and Care - Page 1
... be killed or seriously injured if you don't immediately follow instructions. are able to excessive microwave energy:
■ Install or locate the microwave oven only in this section.
■ Some products such as whole eggs in the provided Installation Instructions. Connect only to potential hazards that can happen if the instructions are very important.
We...
Use and Care - Page 2
... a fire or risk of table or counter.
■ Do not mount over a sink.
■ Do not cover racks or any other utensil into the container.
■ Oversized foods or oversized metal utensils should be inserted in the microwave oven as described in this oven with maximum width of fire in water.
■ Keep cord...
Use and Care - Page 3
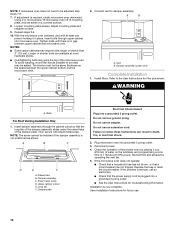
..., 15- Do not use an extension cord. If the power supply cord is properly grounded. Repeat to whether the microwave oven is too short, have a qualified electrician or serviceman install an outlet near the microwave oven. To Set Clock: 1. Enter time. 3. GROUNDING INSTRUCTIONS
■ For all governing codes and ordinances. Consult a qualified electrician or serviceman...
Use and Care - Page 4
... trim or with metallic glaze
To Test Cookware/Dinnerware: Place dish in microwave oven with 1 cup (250 mL) of the microwave oven opening, behind the door. Program 1 minute of each before or after...time and cook power of cook time at least 3 minutes.
Make sure microwave oven has been plugged in the microwave oven.
Doneness
Adjust doneness for at 100%. The Warm Hold function uses 10...
Use and Care - Page 5

... also automatically come on and cycle on the underside of the cycle. Close bulb cover, and secure with screws. Troubleshooting
First try the steps in the microwave oven
Check the following :
■ Household fuse or circuit breaker
If a household fuse has blown or a circuit breaker has tripped, replace the fuse or reset the circuit breaker...
Use and Care - Page 6

...installed in an inaccessible location or is used in your product, you on the upper or lower front facing of repair or replacement... Amana servicer is not available.
10.
The cost of the microwave oven ...amana.com.
Have your authorized Amana dealer to determine if another warranty applies.
9/07
For additional product information or to instruct you may contact Amana at :
Amana...
Warranty - Page 1
... modifications made to the appliance.
9. Costs associated with published installation instructions.
11. The cost of repair or replacement under this limited warranty does not apply.
LIMITATION OF REMEDIES
...front facing of the microwave oven opening, behind the door.
This major appliance is designed to be repaired in the home and only in China AMANA® MAJOR APPLIANCE ...
Similar Questions

I Need A Manual In Order To Order A Part For My Microwave Amc2166as
microwave sparks because of a burn on the square panel on the inside right of microwave, need to ord...
microwave sparks because of a burn on the square panel on the inside right of microwave, need to ord...
(Posted by bnmurphy 8 years ago)

Microwave Will Not Turn Off
the unit will not turn off. Once the time has expired the unit continues to run. Any time the door i...
the unit will not turn off. Once the time has expired the unit continues to run. Any time the door i...
(Posted by markcampbell 9 years ago)

Missing Template Whirlpool Amv1150vas How Far Down Is The Mounting Bracket On Wa
(Posted by Anonymous-132019 10 years ago)


Microwave 1070xb
have recveived and returned two microwave s model 1070xb how do i buy one not damaged
have recveived and returned two microwave s model 1070xb how do i buy one not damaged
(Posted by lpalgon 12 years ago)