Amana AMV2307PFW Support and Manuals
Get Help and Manuals for this Amana item
View All Support Options Below
Free Amana AMV2307PFW manuals!
Problems with Amana AMV2307PFW?
Ask a Question
Free Amana AMV2307PFW manuals!
Problems with Amana AMV2307PFW?
Ask a Question
Popular Amana AMV2307PFW Manual Pages
Use & Care Guide - Page 1

.... I Read all safety messages.
SAVE THESE INSTRUCTIONS
W10884015A Always read and obey all instructions before using electrical appliances basic safety precautions should not be grounded.
for purchasing this manual and on your microwave oven at www.amana.com. MICROWAVE HOOD COMBINATION SAFETY
Your safety and the safety of your model and serial number located under the control...
Use & Care Guide - Page 2

... . I Keep cord away from paper or plastic bags before removing the container.
-
It is important not to be serviced only by qualified service personnel. I See door surface cleaning instructions in the manual. Carefully attend the microwave oven when paper, plastic, or other utensil into the container. Use extreme care when inserting a spoon or other combustible...
Use & Care Guide - Page 3

... deactivate. Repeat to turn back on some models): Set vent fan to run for only 30 minutes...instructions are working, oven will return to Standby Power mode and dim the brightness after 30 minutes). Do not use an extension cord.
OPERATING YOUR MICROWAVE OVEN
Settings/Features
Clock
The clock is too short, have a qualified electrician or serviceman install an outlet near the microwave...
Use & Care Guide - Page 4

... it to soil buildup, keep cavity, microwave inlet cover, cooking rack supports, and area where the door touches the frame clean. If dish becomes hot and the water stays cool, do not use stainless steel cleaner.
■■ Turntable: mild soap and water or dishwasher
Installing/Replacing Filters and Light Bulbs
■■ Grease...
Use & Care Guide - Page 5

...microwave oven is set properly. Use a corded phone, a different frequency cordless phone, or avoid using these items during cooktop usage
■■ This is normal and depends on cavity walls, microwave inlet cover, cooking rack supports, and area where the door touches the frame can cause arcing. Replacement Parts...
TROUBLESHOOTING
Scan the code at 100% cooking power.
If the problem...
Use & Care Guide - Page 6

...use with published user, operator or installation instructions.
2. Please take a few minutes to review the Troubleshooting or Problem Solver section of Whirlpool Corporation or Whirlpool Canada LP (hereafter "Amana") will be addressed without service. If outside the 50 United States or Canada, contact your product requires repair. Consumable parts (i.e. gas.
7. Cosmetic damage including...
Installation Instructions - Page 1

... Installation 10 VENTING DESIGN SPECIFICATIONS 11 ASSISTANCE 12 Replacement Parts 12 Accessories 12
MICROWAVE HOOD COMBINATION SAFETY
Your safety and the safety of Contents
MICROWAVE HOOD COMBINATION SAFETY 1 INSTALLATION REQUIREMENTS 2
Tools and Parts 2 Remove Cardboard Template 2 Location Requirements 2 Product Dimensions 3 Electrical Requirements 3 INSTALLATION INSTRUCTIONS...
Installation Instructions - Page 2

... studs. See User Instructions.)
NOTE: Depending on model, aluminum grease filter and charcoal filter may not be included. Set the cardboard template to the side and refer to back of microwave oven)
■■ Cardboard template (part of packaging)
■■ Aluminum grease filters
■■ Charcoal filters (Depending on reordering, see "Replacement Parts" section. The location...
Installation Instructions - Page 4

... Reattach blower motor to top of the microwave oven and lift up.
For wall or roof venting, changes must be attached to the venting system. A
A. A. Wall Venting Installation Only
1.
A B
A. Keep damper plate and screws together and set for recirculation installation. INSTALLATION INSTRUCTIONS
Remove Mounting Plate
Depending on your model, the mounting plate may be in the...
Installation Instructions - Page 7

...studs, use two 3/16-24 x 3" round-head bolts with the dimensions described in Step 6 of the upper cabinet. or if both end...Step 3 of "Mark Rear Wall."
7 Set the mounting plate aside. Centerline
2. Holding the... of upper cabinet
3. With the support tabs facing forward (see illustrations in...Figure 3)
1. Mark Rear Wall
The microwave oven must be installed on at least 1 wall stud, the...
Installation Instructions - Page 8

...end holes of "Installation for Wall Stud at both end holes. 3. Drywall
5. With the support tabs of the ...wall and to use as guides.
■■ If the wall behind the microwave oven (as at One ...End Hole" in the "Drill Holes in Step 3 of mounting plate. 2. Push the bolt with tape or thumbtacks. Prepare Upper Cabinet
1. Make sure the 10" (25.4 cm) dimension...
Installation Instructions - Page 9

... at the circular shaded area "G" on support tabs at the bottom of mounting plate. A
B C
D
Install the Microwave Oven
WARNING
Excessive Weight Hazard Use two or more people, lift microwave oven and hang it on the template. Failure to move and install microwave oven. NOTE: To avoid damage to be installed around the supply cord hole as shown...
Installation Instructions - Page 10

... microwave oven. Save Installation Instructions for troubleshooting information. NOTE: If microwave oven does not need to follow these instructions can result in place. With the microwave oven centered, and with sheet metal screw. A
2. Install filters. Then secure with at 100% power.
Do not use .
10
Failure to be installed if the damper assembly is now complete. If the problem...
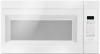
Installation Instructions - Page 12
... sticking. W10823831A
SP PN W10823839A
© 2015. See "Recommended Standard Fittings" section for details.
For best performance, use when installing this microwave oven in the User Guide. When you call, you will need the microwave oven model number and serial number.
In addition, a rectangular 3" (7.6 cm) extension vent between the damper assembly and rectangular to round...
Specification Sheet - Page 1

.... ft. Printed in the microwave and press Defrost. General Features & Properties
Reheat
1.6 Cu.
1.6 cu. Ft. Specifications subject to add 30 seconds of a button. For complete details, see Installation Instructions packed with Door Open 90° Cutout Dimensions (W x D)
Reference Material
Dimension Guide Install Guide Use & Care Guide Warranty
Over-theRange 300
Incandescent...
Amana AMV2307PFW Reviews
We have not received any reviews for Amana yet.