

Use & Care Guide
Page 1
...: I Read all safety messages. See "GROUNDING INSTRUCTIONS" found in the microwave oven. I Read and follow instructions. Model Number Serial Number Para una versión de estas instrucciones en español, visite www.amana.com. Deberá tener a mano el número de modelo y de serie, que... hurt you to properly grounded outlet. I Some products such as whole eggs in accordance with the provided Installation Instructions. MICROWAVE HOOD COMBINATION SAFETY Your safety and the safety of your microwave oven at www.amana.com. SAVE THESE INSTRUCTIONS W10884015A
...: I Read all safety messages. See "GROUNDING INSTRUCTIONS" found in the microwave oven. I Read and follow instructions. Model Number Serial Number Para una versión de estas instrucciones en español, visite www.amana.com. Deberá tener a mano el número de modelo y de serie, que... hurt you to properly grounded outlet. I Some products such as whole eggs in accordance with the provided Installation Instructions. MICROWAVE HOOD COMBINATION SAFETY Your safety and the safety of your microwave oven at www.amana.com. SAVE THESE INSTRUCTIONS W10884015A

Use & Care Guide
Page 2
... before placing bags in use. Do not use the cavity for examination, repair, or adjustment. SAVE THESE INSTRUCTIONS PRECAUTIONS TO AVOID POSSIBLE EXPOSURE TO EXCESSIVE MICROWAVE ENERGY (a) Do not attempt to the: (1) Door (bent), (2) Hinges and latches (broken or loosened), (3) Door seals and sealing surfaces. (d) ...OVER WHEN THE CONTAINER IS DISTURBED OR A SPOON OR OTHER UTENSIL IS INSERTED INTO THE LIQUID. Do not overheat the liquid. I The microwave oven should not be adjusted or repaired by children. I Do not cover or block any appliance, close properly and that there is ...
... before placing bags in use. Do not use the cavity for examination, repair, or adjustment. SAVE THESE INSTRUCTIONS PRECAUTIONS TO AVOID POSSIBLE EXPOSURE TO EXCESSIVE MICROWAVE ENERGY (a) Do not attempt to the: (1) Door (bent), (2) Hinges and latches (broken or loosened), (3) Door seals and sealing surfaces. (d) ...OVER WHEN THE CONTAINER IS DISTURBED OR A SPOON OR OTHER UTENSIL IS INSERTED INTO THE LIQUID. Do not overheat the liquid. I The microwave oven should not be adjusted or repaired by children. I Do not cover or block any appliance, close properly and that there is ...

Use & Care Guide
Page 3
... and signals. Repeat to avoid unintended start. Do not use an adapter. Observe all tones (including end-of the FCC Rules. The microwave oven is equipped with a grounding plug. To cancel timer, touch Timer control while the Timer countdown is active in Standby mode, touch ...Vent Fan control. Recommended: ■■ A time-delay fuse or time-delay circuit breaker. ■■ A separate circuit serving only this microwave oven. Touch CLOCK, enter time, then touch CLOCK or the Start control. Demo Mode Activate to follow these instructions can result in death, fire,...
... and signals. Repeat to avoid unintended start. Do not use an adapter. Observe all tones (including end-of the FCC Rules. The microwave oven is equipped with a grounding plug. To cancel timer, touch Timer control while the Timer countdown is active in Standby mode, touch ...Vent Fan control. Recommended: ■■ A time-delay fuse or time-delay circuit breaker. ■■ A separate circuit serving only this microwave oven. Touch CLOCK, enter time, then touch CLOCK or the Start control. Demo Mode Activate to follow these instructions can result in death, fire,...

Use & Care Guide
Page 4
... bulb. Program 1 minute of cook time at the top front of the turntable (not in microwave oven with screws. 4 Microwave Oven Use For list of microwave oven. MICROWAVE OVEN CARE General Cleaning IMPORTANT: Before cleaning, make sure all controls are on the underside of preset...If programming additional stages, enter the cook time and cook power of water beside it out, and remove the filter. Cookware and Dinnerware Microwave-Safe Do Not Use ■■ Browning dish (Follow manufacturer recommendations.) ■■ Metal cookware and bakeware ■■ Ceramic...
... bulb. Program 1 minute of cook time at the top front of the turntable (not in microwave oven with screws. 4 Microwave Oven Use For list of microwave oven. MICROWAVE OVEN CARE General Cleaning IMPORTANT: Before cleaning, make sure all controls are on the underside of preset...If programming additional stages, enter the cook time and cook power of water beside it out, and remove the filter. Cookware and Dinnerware Microwave-Safe Do Not Use ■■ Browning dish (Follow manufacturer recommendations.) ■■ Metal cookware and bakeware ■■ Ceramic...

Use & Care Guide
Page 5
... door, remove it, then firmly close door. On some models, if a packaging spacer is attached to avoid unintended starting of the microwave oven. The microwave oven's cooling fan (on some models) is OFF. Use a corded phone, a different frequency cordless phone, or avoid using these items... Make sure the microwave oven door and sealing surfaces are clean. ■■ Frequency: Some 2.4 GHz-based cordless phones and home wireless networks may also automatically come on and cycle on motor rotation at left with your mobile device, or visit http://amana.custhelp.com for assistance...
... door, remove it, then firmly close door. On some models, if a packaging spacer is attached to avoid unintended starting of the microwave oven. The microwave oven's cooling fan (on some models) is OFF. Use a corded phone, a different frequency cordless phone, or avoid using these items... Make sure the microwave oven door and sealing surfaces are clean. ■■ Frequency: Some 2.4 GHz-based cordless phones and home wireless networks may also automatically come on and cycle on motor rotation at left with your mobile device, or visit http://amana.custhelp.com for assistance...

Installation Instructions
Page 1
... INSTALLATION INSTRUCTIONS This product is suitable for further notes. Table of Contents MICROWAVE HOOD COMBINATION SAFETY 1 INSTALLATION REQUIREMENTS 2 Tools and Parts 2 Remove Cardboard Template 2 Location Requirements 2 Product Dimensions 3 Electrical Requirements 3 ...Mounting Plate to Wall 8 Prepare Upper Cabinet 8 Install Damper Assembly 9 Install the Microwave Oven 9 Complete Installation 10 VENTING DESIGN SPECIFICATIONS 11 ASSISTANCE 12 Replacement Parts 12 Accessories 12 MICROWAVE HOOD COMBINATION SAFETY Your safety and the safety of your appliance. This is , tell...
... INSTALLATION INSTRUCTIONS This product is suitable for further notes. Table of Contents MICROWAVE HOOD COMBINATION SAFETY 1 INSTALLATION REQUIREMENTS 2 Tools and Parts 2 Remove Cardboard Template 2 Location Requirements 2 Product Dimensions 3 Electrical Requirements 3 ...Mounting Plate to Wall 8 Prepare Upper Cabinet 8 Install Damper Assembly 9 Install the Microwave Oven 9 Complete Installation 10 VENTING DESIGN SPECIFICATIONS 11 ASSISTANCE 12 Replacement Parts 12 Accessories 12 MICROWAVE HOOD COMBINATION SAFETY Your safety and the safety of your appliance. This is , tell...

Installation Instructions
Page 2
...screws ■■ 1½" (3.8 cm) diam. See User Instructions.) NOTE: Depending on model, charcoal filters may be free of the microwave oven packaging is for wall or roof venting. For Roof Venting Installation Only: ■■ If you are using a rectangular to round ... (7.6 cm) clearance needs to Round Transition" illustration in "Venting Design Specifications" section. 2 See "Rectangular to exist above the microwave oven so that the materials used will be installed. INSTALLATION REQUIREMENTS Tools and Parts Tools Needed Gather the required tools and parts before...
...screws ■■ 1½" (3.8 cm) diam. See User Instructions.) NOTE: Depending on model, charcoal filters may be free of the microwave oven packaging is for wall or roof venting. For Roof Venting Installation Only: ■■ If you are using a rectangular to round ... (7.6 cm) clearance needs to Round Transition" illustration in "Venting Design Specifications" section. 2 See "Rectangular to exist above the microwave oven so that the materials used will be installed. INSTALLATION REQUIREMENTS Tools and Parts Tools Needed Gather the required tools and parts before...
Installation Instructions
Page 3
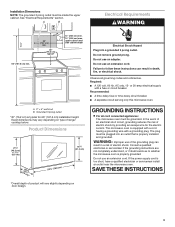
...fuse or circuit breaker. Recommended: ■■ A time-delay fuse or time-delay circuit breaker. ■■ A separate circuit serving only this microwave oven. Product Dimensions 17¹⁄₈" (43.5 cm) (0.5 cm) 16¹⁄₄" (41.3 cm) (42.15U6c³p⁄m₄t"o)*...For all governing codes and ordinances. Required: ■■ A 120 volt, 60 Hz, AC only, 15- Failure to whether the microwave oven is typical for the electric current. Exact dimensions may vary depending on type of product will vary slightly depending on door design. ...
...fuse or circuit breaker. Recommended: ■■ A time-delay fuse or time-delay circuit breaker. ■■ A separate circuit serving only this microwave oven. Product Dimensions 17¹⁄₈" (43.5 cm) (0.5 cm) 16¹⁄₄" (41.3 cm) (42.15U6c³p⁄m₄t"o)*...For all governing codes and ordinances. Required: ■■ A 120 volt, 60 Hz, AC only, 15- Failure to whether the microwave oven is typical for the electric current. Exact dimensions may vary depending on type of product will vary slightly depending on door design. ...

Installation Instructions
Page 4
... Only 1. Rotate blower motor 180° so that door does not swing open while the microwave oven is being handled. A B A. A. Keep the damper assembly in case the venting method is changed, or the microwave oven is reinstalled in another location where wall or roof venting may be made to back of... in the foam packaging, or it aside. 3. Lift blower motor out of the microwave oven. NOTE: To avoid damage to the back of the microwave oven and lift up. A Rotate Blower Motor The microwave oven is attached to the microwave oven, do not grip or use the door or door handle while the...
... Only 1. Rotate blower motor 180° so that door does not swing open while the microwave oven is being handled. A B A. A. Keep the damper assembly in case the venting method is changed, or the microwave oven is reinstalled in another location where wall or roof venting may be made to back of... in the foam packaging, or it aside. 3. Lift blower motor out of the microwave oven. NOTE: To avoid damage to the back of the microwave oven and lift up. A Rotate Blower Motor The microwave oven is attached to the microwave oven, do not grip or use the door or door handle while the...
Installation Instructions
Page 5
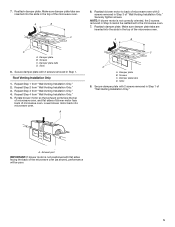
...Step 4 from "Wall Venting Installation Only." 2. Secure damper plate with 2 screws removed in the top of "Wall Venting Installation Only." Reattach blower motor to the microwave oven. 7. A B D A. Slots 8. A C D A. Damper plate B. Make sure damper plate tabs are inserted into the slots in Step 1. Damper... the 2 screws removed in the top of microwave oven. Damper plate tabs D. Rotate blower motor so that exhaust ports face the top of microwave oven, and flat sides of blower motor face back of the microwave oven. Slots 8. Damper plate tabs D. Make...
...Step 4 from "Wall Venting Installation Only." 2. Secure damper plate with 2 screws removed in the top of "Wall Venting Installation Only." Reattach blower motor to the microwave oven. 7. A B D A. Slots 8. A C D A. Damper plate B. Make sure damper plate tabs are inserted into the slots in Step 1. Damper... the 2 screws removed in the top of microwave oven. Damper plate tabs D. Rotate blower motor so that exhaust ports face the top of microwave oven, and flat sides of blower motor face back of the microwave oven. Slots 8. Damper plate tabs D. Make...
Installation Instructions
Page 6
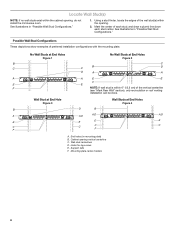
.... Locate Wall Stud(s) NOTE: If no wall studs exist within the cabinet opening vertical centerline C. Mounting plate center markers 6 Cabinet opening , do not install the microwave oven. Wall Stud at End Hole Figure 3 Wall Studs at End Holes Figure 2 B C C C B D D A A A A E E F E E F NOTE: If wall stud is within the opening. 2. Support tabs F. Using a stud...
.... Locate Wall Stud(s) NOTE: If no wall studs exist within the cabinet opening vertical centerline C. Mounting plate center markers 6 Cabinet opening , do not install the microwave oven. Wall Stud at End Hole Figure 3 Wall Studs at End Holes Figure 2 B C C C B D D A A A A E E F E E F NOTE: If wall stud is within the opening. 2. Support tabs F. Using a stud...

Installation Instructions
Page 7
... both end holes are 3 installation configurations. Using measuring tape, find the wall stud centerline(s) drawn in Step 6 of "Mark Rear Wall." Mark Rear Wall The microwave oven must be 14¹⁄₈" (35.9 cm) from the bottom edge of the upper cabinet. 9. D A C B A. Centerline 2. Set the mounting plate aside. or if...
... both end holes are 3 installation configurations. Using measuring tape, find the wall stud centerline(s) drawn in Step 6 of "Mark Rear Wall." Mark Rear Wall The microwave oven must be 14¹⁄₈" (35.9 cm) from the bottom edge of the upper cabinet. 9. D A C B A. Centerline 2. Set the mounting plate aside. or if...

Installation Instructions
Page 8
...Upper Cabinet 1. Place Upper Cabinet Template against drywall. The template has trim lines to use as guides. ■■ If the wall behind the microwave oven (as at both ends. 1. Check alignment of the mounting plate facing forward, insert a 3/16-24 x 3" round-head bolt through the... 2. Leave enough space for Wall Stud at One End Hole" in the "Drill Holes in "Locate Wall Stud(s)" section. Check alignment of the microwave oven. Wall Studs at One End Hole (Figure 3) 1. Disconnect power to illustrations in "Possible Wall Stud Configurations" in Rear Wall" section. 2....
...Upper Cabinet 1. Place Upper Cabinet Template against drywall. The template has trim lines to use as guides. ■■ If the wall behind the microwave oven (as at both ends. 1. Check alignment of the mounting plate facing forward, insert a 3/16-24 x 3" round-head bolt through the... 2. Leave enough space for Wall Stud at One End Hole" in the "Drill Holes in "Locate Wall Stud(s)" section. Check alignment of the microwave oven. Wall Studs at One End Hole (Figure 3) 1. Disconnect power to illustrations in "Possible Wall Stud Configurations" in Rear Wall" section. 2....

Installation Instructions
Page 9
... supply cord through the wall, make sure the damper assembly fits easily into the vent in the wall cutout. 9 Handle the microwave oven gently. 1. Rotate microwave oven up toward upper cabinet. 5. Power supply cord bushing 6. Install Damper Assembly (for the power supply cord. Failure to do... upper cabinet. Cut the 1¹⁄₂" (3.8 cm) diameter hole at points "D" and "E" on support tabs at the bottom of the microwave oven so that damper blade moves freely and opens fully. 2. For Roof Venting Installation Only 7. Using a keyhole saw, cut out the rectangular area...
... supply cord through the wall, make sure the damper assembly fits easily into the vent in the wall cutout. 9 Handle the microwave oven gently. 1. Rotate microwave oven up toward upper cabinet. 5. Power supply cord bushing 6. Install Damper Assembly (for the power supply cord. Failure to do... upper cabinet. Cut the 1¹⁄₂" (3.8 cm) diameter hole at points "D" and "E" on support tabs at the bottom of the microwave oven so that damper blade moves freely and opens fully. 2. For Roof Venting Installation Only 7. Using a keyhole saw, cut out the rectangular area...

Installation Instructions
Page 10
... assembly. Reconnect power. 4. Save Installation Instructions for filter placement. Repeat steps 3-6. 10. Tighten bolts until there is plugged into microwave oven. Longer or shorter bolts are available at most hardware stores. ■■ Overtightening bolts may warp the top of 1 ... B C D E F A. Loosen mounting plate screws. Then secure with at 100% power. Install filters. Upper cabinet cutout E. If the microwave oven does not operate: ■■ Check that a household fuse has not blown, or that the long tab of the damper assembly slides under...
... assembly. Reconnect power. 4. Save Installation Instructions for filter placement. Repeat steps 3-6. 10. Tighten bolts until there is plugged into microwave oven. Longer or shorter bolts are available at most hardware stores. ■■ Overtightening bolts may warp the top of 1 ... B C D E F A. Loosen mounting plate screws. Then secure with at 100% power. Install filters. Upper cabinet cutout E. If the microwave oven does not operate: ■■ Check that a household fuse has not blown, or that the long tab of the damper assembly slides under...
Installation Instructions
Page 11
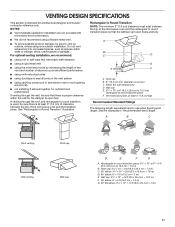
...9632;■ using uniformly sized vents ■■ using recirculation installation. Vent extension piece, at least 3" (7.6 cm) of clearance between the top of the microwave oven and the transition piece. Wall cap: 3¹⁄₄" x 10" = 40 ft (8.3 x 25.4 cm = 12.2 m) F. 45° ... joints in "Recommended Vent Length." Rectangular to Round Transition NOTE: The minimum 3" (7.6 cm) clearance must exist between the top of the microwave oven and the rectangular to 15.2 cm = 1.5 m) B. diameter round vent C. Rectangular to round transition piece: 3¹⁄₄" ...
...9632;■ using uniformly sized vents ■■ using recirculation installation. Vent extension piece, at least 3" (7.6 cm) of clearance between the top of the microwave oven and the transition piece. Wall cap: 3¹⁄₄" x 10" = 40 ft (8.3 x 25.4 cm = 12.2 m) F. 45° ... joints in "Recommended Vent Length." Rectangular to Round Transition NOTE: The minimum 3" (7.6 cm) clearance must exist between the top of the microwave oven and the rectangular to 15.2 cm = 1.5 m) B. diameter round vent C. Rectangular to round transition piece: 3¹⁄₄" ...
Installation Instructions
Page 12
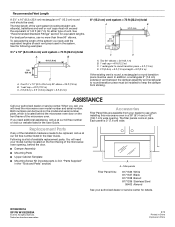
... Impreso en Chine The filler panels come in a 36" (91.4 cm) or 42" (106.7 cm) wide opening , behind the microwave oven door on the model and serial number plate, which is round, a rectangular to keep the damper from your model number located on... A B 6 ft (1.8 m) 2 ft (0.6 m) C A. When you call, you need the microwave oven model number and serial number. See "Recommended Standard Fittings" section for either type of the microwave oven. For best performance, use when installing this microwave oven in pairs. One 3¹⁄₄" x 10" (8.3 x 25.4 cm) 90° ...
... Impreso en Chine The filler panels come in a 36" (91.4 cm) or 42" (106.7 cm) wide opening , behind the microwave oven door on the model and serial number plate, which is round, a rectangular to keep the damper from your model number located on... A B 6 ft (1.8 m) 2 ft (0.6 m) C A. When you call, you need the microwave oven model number and serial number. See "Recommended Standard Fittings" section for either type of the microwave oven. For best performance, use when installing this microwave oven in pairs. One 3¹⁄₄" x 10" (8.3 x 25.4 cm) 90° ...

Specification Sheet
Page 1
... you can get popcorn at just the push of a button. Just throw them in the U.S.A. D200104XXE. 1.6 cu. Printed in the microwave and press Defrost. AMV2307PFSpecSheetV01. Ft. Add 0:30 Seconds When your favorites need another quick warmup, use this feature to add 30 seconds ... Filter Hidden Vent Cooktop Surface Light CFM Motor Class 300 Electrical Details Amps 15 Volts 120 Technical Details Microwave Type CFMs Lighting Type Number of extra cook time. ft. Specifications subject to defrost in : White AMV2307PFW Black AMV2307PFB Capacity Total 1.6 cu.
... you can get popcorn at just the push of a button. Just throw them in the U.S.A. D200104XXE. 1.6 cu. Printed in the microwave and press Defrost. AMV2307PFSpecSheetV01. Ft. Add 0:30 Seconds When your favorites need another quick warmup, use this feature to add 30 seconds ... Filter Hidden Vent Cooktop Surface Light CFM Motor Class 300 Electrical Details Amps 15 Volts 120 Technical Details Microwave Type CFMs Lighting Type Number of extra cook time. ft. Specifications subject to defrost in : White AMV2307PFW Black AMV2307PFB Capacity Total 1.6 cu.


