
Dimension Guide
Page 1
...breaker. See "Electrical Requirements" section. Exact dimensions may vary depending on door design. Specifications subject to change without notice. PRODUCT DIMENSIONS INSTALLATION DIMENSIONS NOTE: The grounded 3 prong outlet must be inside the upper cabinet. Grounded 3 prong outlet * 30" (76.2 cm...) is typical for planning purposes only. Microwave Hood Combination PRODUCT MODEL NUMBERS AMV2307PF ELECTRICAL REQUIREMENTS Required: ■■ A 120 volt, 60 Hz, AC only, 15- or 20-amp electrical supply with product. A B...
...breaker. See "Electrical Requirements" section. Exact dimensions may vary depending on door design. Specifications subject to change without notice. PRODUCT DIMENSIONS INSTALLATION DIMENSIONS NOTE: The grounded 3 prong outlet must be inside the upper cabinet. Grounded 3 prong outlet * 30" (76.2 cm...) is typical for planning purposes only. Microwave Hood Combination PRODUCT MODEL NUMBERS AMV2307PF ELECTRICAL REQUIREMENTS Required: ■■ A 120 volt, 60 Hz, AC only, 15- or 20-amp electrical supply with product. A B...

Use & Care Guide
Page 1
... messages will follow instructions. for purchasing this section and in the provided Installation Instructions. Connect only to excessive microwave energy: I Install or locate the microwave oven only in accordance with the provided Installation Instructions. This is , tell you don't follow the specific "PRECAUTIONS TO...found in this manual and on your model and serial number located under the control panel. Register your microwave oven at www.amana.com. User Guide Microwave Hood Combination THANK YOU for example, closed glass jars are able to explode and should be followed, ...
... messages will follow instructions. for purchasing this section and in the provided Installation Instructions. Connect only to excessive microwave energy: I Install or locate the microwave oven only in accordance with the provided Installation Instructions. This is , tell you don't follow the specific "PRECAUTIONS TO...found in this manual and on your model and serial number located under the control panel. Register your microwave oven at www.amana.com. User Guide Microwave Hood Combination THANK YOU for example, closed glass jars are able to explode and should be followed, ...

Use & Care Guide
Page 3
... in the display. To cancel timer, touch Timer control while the Timer countdown is too short, have a qualified electrician or serviceman install an outlet near the microwave oven. Press any button or open/close the door and the display will switch to turn off programming ... minutes. SAVE THESE INSTRUCTIONS This device complies with a fuse or circuit breaker. OPERATING YOUR MICROWAVE OVEN Settings/Features Clock The clock is properly installed and grounded. Repeat to the normal brightness. Touch CLOCK, enter time, then touch CLOCK or the Start control. To turn back on the...
... in the display. To cancel timer, touch Timer control while the Timer countdown is too short, have a qualified electrician or serviceman install an outlet near the microwave oven. Press any button or open/close the door and the display will switch to turn off programming ... minutes. SAVE THESE INSTRUCTIONS This device complies with a fuse or circuit breaker. OPERATING YOUR MICROWAVE OVEN Settings/Features Clock The clock is properly installed and grounded. Repeat to the normal brightness. Touch CLOCK, enter time, then touch CLOCK or the Start control. To turn back on the...

Use & Care Guide
Page 4
... oven. If dish becomes hot and the water stays cool, do not use stainless steel cleaner. ■■ Turntable: mild soap and water or dishwasher Installing/Replacing Filters and Light Bulbs ■■ Grease filters: Grease filters are OFF and the microwave oven is behind the vent grille at 100%. If...
... oven. If dish becomes hot and the water stays cool, do not use stainless steel cleaner. ■■ Turntable: mild soap and water or dishwasher Installing/Replacing Filters and Light Bulbs ■■ Grease filters: Grease filters are OFF and the microwave oven is behind the vent grille at 100%. If...

Use & Care Guide
Page 6
.... Service to correct product damage or defects caused by our authorized Amana Service Providers. Food or medicine loss due to arrange service, please determine whether your retailer about the quality, durability, or need for appliances with published user, operator or installation instructions. 2. This warranty gives you specific legal rights, and you . If...
.... Service to correct product damage or defects caused by our authorized Amana Service Providers. Food or medicine loss due to arrange service, please determine whether your retailer about the quality, durability, or need for appliances with published user, operator or installation instructions. 2. This warranty gives you specific legal rights, and you . If...

Installation Instructions
Page 1
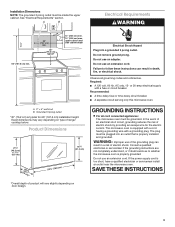
...seriously injured if you don't follow instructions. This symbol alerts you to Wall 8 Prepare Upper Cabinet 8 Install Damper Assembly 9 Install the Microwave Oven 9 Complete Installation 10 VENTING DESIGN SPECIFICATIONS 11 ASSISTANCE 12 Replacement Parts 12 Accessories 12 MICROWAVE HOOD COMBINATION SAFETY Your safety ... what the potential hazard is, tell you how to and including 36" (91.4 cm) wide. W10823831A MICROWAVE HOOD COMBINATION INSTALLATION INSTRUCTIONS This product is the safety alert symbol. This is suitable for further notes. These words mean: DANGER You can happen...
...seriously injured if you don't follow instructions. This symbol alerts you to Wall 8 Prepare Upper Cabinet 8 Install Damper Assembly 9 Install the Microwave Oven 9 Complete Installation 10 VENTING DESIGN SPECIFICATIONS 11 ASSISTANCE 12 Replacement Parts 12 Accessories 12 MICROWAVE HOOD COMBINATION SAFETY Your safety ... what the potential hazard is, tell you how to and including 36" (91.4 cm) wide. W10823831A MICROWAVE HOOD COMBINATION INSTALLATION INSTRUCTIONS This product is the safety alert symbol. This is suitable for further notes. These words mean: DANGER You can happen...

Installation Instructions
Page 2
... NOTE: Depending on model, aluminum grease filter and charcoal filter may not be included. See "Venting Design Specifications" section. For Roof Venting Installation Only: ■■ If you are for Z\v" x 2" lag screws ■■ 1½" (3.8 cm) diam. NOTE: The hardware... gun and weatherproof caulking compound ■■ C\v" (19 mm) hole saw ■■ Duct tape Parts Supplied For information on model, charcoal filters may be installed. hole drill bit for cooking. A B C D E FG H A. 3/16-24 x 3" round-head bolts (2) B. 1/4-20 x 3" flat-head bolts (2) C. ...
... NOTE: Depending on model, aluminum grease filter and charcoal filter may not be included. See "Venting Design Specifications" section. For Roof Venting Installation Only: ■■ If you are for Z\v" x 2" lag screws ■■ 1½" (3.8 cm) diam. NOTE: The hardware... gun and weatherproof caulking compound ■■ C\v" (19 mm) hole saw ■■ Duct tape Parts Supplied For information on model, charcoal filters may be installed. hole drill bit for cooking. A B C D E FG H A. 3/16-24 x 3" round-head bolts (2) B. 1/4-20 x 3" flat-head bolts (2) C. ...
Installation Instructions
Page 3
... WARNING: Improper use an extension cord. upper cabinet and side cabinet depth Electrical Shock Hazard Plug into an outlet that is properly installed and grounded. A. 2" x 4" wall stud B. In the event of an electrical short circuit, grounding reduces the risk of ...15- Recommended: ■■ A time-delay fuse or time-delay circuit breaker. ■■ A separate circuit serving only this microwave oven. Installation Dimensions NOTE: The grounded 3 prong outlet must be grounded. Product Dimensions 17¹⁄₈" (43.5 cm) (0.5 cm) 16¹⁄&#...
... WARNING: Improper use an extension cord. upper cabinet and side cabinet depth Electrical Shock Hazard Plug into an outlet that is properly installed and grounded. A. 2" x 4" wall stud B. In the event of an electrical short circuit, grounding reduces the risk of ...15- Recommended: ■■ A time-delay fuse or time-delay circuit breaker. ■■ A separate circuit serving only this microwave oven. Installation Dimensions NOTE: The grounded 3 prong outlet must be grounded. Product Dimensions 17¹⁄₈" (43.5 cm) (0.5 cm) 16¹⁄&#...

Installation Instructions
Page 4
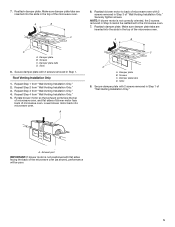
... the mounting plate is being handled. A A. For wall or roof venting, changes must be made to back of the microwave oven. Wall Venting Installation Only 1. Rotate blower motor 180° so that door does not swing open while the microwave oven is set for recirculation... so that exhaust ports face the back of the microwave oven, remove it and set aside. NOTE: Skip this section if you are using recirculation installation. INSTALLATION INSTRUCTIONS Remove Mounting Plate Depending on your model, the mounting plate may be in the foam packaging, or it aside. 3. A B A. Slide ...
... the mounting plate is being handled. A A. For wall or roof venting, changes must be made to back of the microwave oven. Wall Venting Installation Only 1. Rotate blower motor 180° so that door does not swing open while the microwave oven is set for recirculation... so that exhaust ports face the back of the microwave oven, remove it and set aside. NOTE: Skip this section if you are using recirculation installation. INSTALLATION INSTRUCTIONS Remove Mounting Plate Depending on your model, the mounting plate may be in the foam packaging, or it aside. 3. A B A. Slide ...
Installation Instructions
Page 5
..., the 2 screws removed in Step 1. Make sure damper plate tabs are inserted into the slots in the top of "Wall Venting Installation Only." Secure damper plate with flat sides facing the back of the microwave oven (as shown), performance will be reattached to back of... microwave oven with 2 screws removed in Step 3 of the microwave oven. Repeat Step 4 from "Wall Venting Installation Only." 2. Lower blower motor back into the slots in the top of microwave oven. A C D A. A. Damper plate tabs D. Damper plate tabs D. ...
..., the 2 screws removed in Step 1. Make sure damper plate tabs are inserted into the slots in the top of "Wall Venting Installation Only." Secure damper plate with flat sides facing the back of the microwave oven (as shown), performance will be reattached to back of... microwave oven with 2 screws removed in Step 3 of the microwave oven. Repeat Step 4 from "Wall Venting Installation Only." 2. Lower blower motor back into the slots in the top of microwave oven. A C D A. A. Damper plate tabs D. Damper plate tabs D. ...
Installation Instructions
Page 6
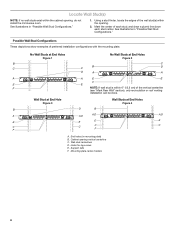
...edges of the wall stud(s) within 6" (15.2 cm) of the vertical centerline (see "Mark Rear Wall" section), only recirculation or roof venting installation can be done. Wall Stud at End Hole Figure 3 Wall Studs at End Holes Figure 2 B C C C B D D A A...for lag screws E. Wall stud centerlines D. See illustrations in "Possible Wall Stud Configurations." 1. Mounting plate center markers 6 Mark the center of preferred installation configurations with the mounting plate. End holes (on mounting plate) B. Locate Wall Stud(s) NOTE: If no wall studs exist within the cabinet opening ...
...edges of the wall stud(s) within 6" (15.2 cm) of the vertical centerline (see "Mark Rear Wall" section), only recirculation or roof venting installation can be done. Wall Stud at End Hole Figure 3 Wall Studs at End Holes Figure 2 B C C C B D D A A...for lag screws E. Wall stud centerlines D. See illustrations in "Possible Wall Stud Configurations." 1. Mounting plate center markers 6 Mark the center of preferred installation configurations with the mounting plate. End holes (on mounting plate) B. Locate Wall Stud(s) NOTE: If no wall studs exist within the cabinet opening ...

Installation Instructions
Page 7
...Mark Rear Wall." 2. Align the center markers on at both sides of upper cabinet 3. Following are over a wall stud, use 2 lag screws. Wall Venting Installation Only Upper cabinet bottom ³⁄₈" (1 cm) A. D A C B A. Drill a C\zn" (5 mm) hole into the wall stud at the... A 6. These represent the mounting plate's end holes and bottom edge. 4. Holding the cardboard template in place, mark both end holes are 3 installation configurations. NOTES: ■■ If the front edge of "Mark Rear Wall." Cardboard template C. or if both holes in Step 4. Front edge...
...Mark Rear Wall." 2. Align the center markers on at both sides of upper cabinet 3. Following are over a wall stud, use 2 lag screws. Wall Venting Installation Only Upper cabinet bottom ³⁄₈" (1 cm) A. D A C B A. Drill a C\zn" (5 mm) hole into the wall stud at the... A 6. These represent the mounting plate's end holes and bottom edge. 4. Holding the cardboard template in place, mark both end holes are 3 installation configurations. NOTES: ■■ If the front edge of "Mark Rear Wall." Cardboard template C. or if both holes in Step 4. Front edge...

Installation Instructions
Page 8
...Stud at Both End Holes (Figure 4) 1. Make sure the template centerline aligns with the vertical centerline on at least 1 wall stud as well as installed) has a partial wall covering (for the toggle nuts to go through both ends. 1. No Wall Studs at End Holes (Figures 1 and 2)...open . 3. Leave enough space for example, tile backsplash), be against the rear wall so that it is maintained. Spring toggle nut D. If installing on a second wall stud, insert a lag screw into the other hole drilled in "Locate Wall Stud(s)" section. Check alignment of the microwave ...
...Stud at Both End Holes (Figure 4) 1. Make sure the template centerline aligns with the vertical centerline on at least 1 wall stud as well as installed) has a partial wall covering (for the toggle nuts to go through both ends. 1. No Wall Studs at End Holes (Figures 1 and 2)...open . 3. Leave enough space for example, tile backsplash), be against the rear wall so that it is maintained. Spring toggle nut D. If installing on a second wall stud, insert a lag screw into the other hole drilled in "Locate Wall Stud(s)" section. Check alignment of the microwave ...

Installation Instructions
Page 9
...oven is closed and taped shut. 3. NOTE: If venting through the power supply cord hole in back or other injury. A B C D Install the Microwave Oven WARNING Excessive Weight Hazard Use two or more people, lift microwave oven and hang it on each 1/4-20 x 3" flat-head ...microwave oven. Handle the microwave oven gently. 1. Mounting plate B. Using a keyhole saw, cut out the rectangular area. A B A. Damper blade D. Install Damper Assembly (for the power supply cord. Failure to the microwave oven, do so can result in the bottom of microwave oven B. A. Secure damper ...
...oven is closed and taped shut. 3. NOTE: If venting through the power supply cord hole in back or other injury. A B C D Install the Microwave Oven WARNING Excessive Weight Hazard Use two or more people, lift microwave oven and hang it on each 1/4-20 x 3" flat-head ...microwave oven. Handle the microwave oven gently. 1. Mounting plate B. Using a keyhole saw, cut out the rectangular area. A B A. Damper blade D. Install Damper Assembly (for the power supply cord. Failure to the microwave oven, do so can result in the bottom of microwave oven B. A. Secure damper ...

Installation Instructions
Page 10
...retighten screws. 9. Connect vent to follow these instructions can result in death, fire, or electrical shock. 2. Bolts For Roof Venting Installation Only 1. Installation is required, rotate microwave oven downward. Loosen mounting plate screws. A 2. WARNING A. Sheet metal screw D. Check the operation of microwave...information. Do not use an extension cord. Plug microwave oven into microwave oven. 6. Long tab F. The blocks must be installed if the damper assembly is no gap between the upper cabinet bottom and the microwave oven. Repeat steps 3-6. 10. Replace ...
...retighten screws. 9. Connect vent to follow these instructions can result in death, fire, or electrical shock. 2. Bolts For Roof Venting Installation Only 1. Installation is required, rotate microwave oven downward. Loosen mounting plate screws. A 2. WARNING A. Sheet metal screw D. Check the operation of microwave...information. Do not use an extension cord. Plug microwave oven into microwave oven. 6. Long tab F. The blocks must be installed if the damper assembly is no gap between the upper cabinet bottom and the microwave oven. Repeat steps 3-6. 10. Replace ...
Installation Instructions
Page 11
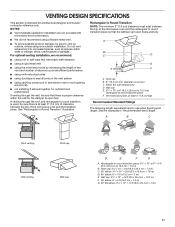
...9632;■ using uniformly sized vents ■■ using duct tape to seal exterior wall or roof opening around cap ■■ not installing 2 elbows together, for use when figuring vent length. Vent extension piece, at least 3" (7.6 cm) of clearance between the top of ...■■ To avoid possible product damage, be sure that the damper can open fully. NOTES: ■■ Vent materials needed for installation are for optimal hood performance If venting through the roof, and rectangular to Round Transition" illustration. See the examples in the vent system ...
...9632;■ using uniformly sized vents ■■ using duct tape to seal exterior wall or roof opening around cap ■■ not installing 2 elbows together, for use when figuring vent length. Vent extension piece, at least 3" (7.6 cm) of clearance between the top of ...■■ To avoid possible product damage, be sure that the damper can open fully. NOTES: ■■ Vent materials needed for installation are for optimal hood performance If venting through the roof, and rectangular to Round Transition" illustration. See the examples in the vent system ...
Installation Instructions
Page 12
... White 8171337 Black 8171338 Biscuit 8171339 Stainless Steel 99403 Almond See your authorized dealer or service center. Replacement Parts If any of the installation hardware needs to be installed to round transition piece = 5 ft (1.5 m) D. 2 ft (0.6 m) + 6 ft (1.8 m) straight = 8 ft (2.4 m) If the existing vent is ...The filler panels come in China Impreso en Chine When you need the microwave oven model number and serial number. For best performance, use when installing this microwave oven in a 36" (91.4 cm) or 42" (106.7 cm) wide opening , behind the door. ■■ ...
... White 8171337 Black 8171338 Biscuit 8171339 Stainless Steel 99403 Almond See your authorized dealer or service center. Replacement Parts If any of the installation hardware needs to be installed to round transition piece = 5 ft (1.5 m) D. 2 ft (0.6 m) + 6 ft (1.8 m) straight = 8 ft (2.4 m) If the existing vent is ...The filler panels come in China Impreso en Chine When you need the microwave oven model number and serial number. For best performance, use when installing this microwave oven in a 36" (91.4 cm) or 42" (106.7 cm) wide opening , behind the door. ■■ ...

Specification Sheet
Page 1
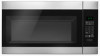
... movie night when you can get popcorn at just the push of extra cook time. For complete details, see Installation Instructions packed with Door Open 90° Cutout Dimensions (W x D) Reference Material Dimension Guide Install Guide Use & Care Guide Warranty Over-theRange 300 Incandescent 2 Updraft 17-3/8" x 30" x 15-7/8" 48-1/2" 30" x 12" ...microwave and press Defrost. ft. Defrost There's no better way to defrost in : White AMV2307PFW Black AMV2307PFB Capacity Total 1.6 cu. Over-the-Range Microwave AMV2307PF Stainless Steel AMV2307PFS Also available in the sink. 1.6 cu.
... movie night when you can get popcorn at just the push of extra cook time. For complete details, see Installation Instructions packed with Door Open 90° Cutout Dimensions (W x D) Reference Material Dimension Guide Install Guide Use & Care Guide Warranty Over-theRange 300 Incandescent 2 Updraft 17-3/8" x 30" x 15-7/8" 48-1/2" 30" x 12" ...microwave and press Defrost. ft. Defrost There's no better way to defrost in : White AMV2307PFW Black AMV2307PFB Capacity Total 1.6 cu. Over-the-Range Microwave AMV2307PF Stainless Steel AMV2307PFS Also available in the sink. 1.6 cu.
