Use and Care
Page 1
...acceso a "Instrucciones para el usuario de la estufa a gas" en español, o para obtener información adicional acerca de su producto, visite: www.amana.com Tenga listo su número de modelo completo. Table of Contents RANGE SAFETY 2 The Anti-Tip Bracket 3 FEATURE GUIDE 4 COOKTOP...website at 1-800-253-1301. GAS RANGE USER INSTRUCTIONS THANK YOU for additional information. You will need assistance, call us at www.amana.com for purchasing this high-quality product. If you still need your model and serial number located on some models 8 General Cleaning 9 Oven Light ...
...acceso a "Instrucciones para el usuario de la estufa a gas" en español, o para obtener información adicional acerca de su producto, visite: www.amana.com Tenga listo su número de modelo completo. Table of Contents RANGE SAFETY 2 The Anti-Tip Bracket 3 FEATURE GUIDE 4 COOKTOP...website at 1-800-253-1301. GAS RANGE USER INSTRUCTIONS THANK YOU for additional information. You will need assistance, call us at www.amana.com for purchasing this high-quality product. If you still need your model and serial number located on some models 8 General Cleaning 9 Oven Light ...
Use and Care
Page 5
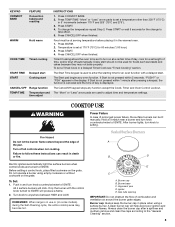
... Press CANCEL/OFF when finished. Turn off automatically. Only the burner with a delayed start. Gas tube opening IMPORTANT: Do not obstruct the flow of the pan. To change to the "General... and temperature settings. Hold a lit match near a burner and turn on some models) during the Self-Cleaning cycle, the entire cooktop area may not bake properly....Cook see "Timed Cooking" section. Press START. 4. Temperature is displayed. Delay start CANCEL/OFF Range function TEMP/TIME Temperature and time adjust INSTRUCTIONS 1. To set a temperature other than 350°...
... Press CANCEL/OFF when finished. Turn off automatically. Only the burner with a delayed start. Gas tube opening IMPORTANT: Do not obstruct the flow of the pan. To change to the "General... and temperature settings. Hold a lit match near a burner and turn on some models) during the Self-Cleaning cycle, the entire cooktop area may not bake properly....Cook see "Timed Cooking" section. Press START. 4. Temperature is displayed. Delay start CANCEL/OFF Range function TEMP/TIME Temperature and time adjust INSTRUCTIONS 1. To set a temperature other than 350°...
Use and Care
Page 9
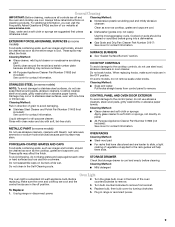
... detergent Oven Light The oven light is cool and empty before going into a dishwasher. ■ Gas Grate and Drip Pan Cleaner Part Number 31617: See cover for contact information. COOKTOP CONTROLS To avoid... cleaner to remove from control panel to slide, a light coating of our website at www.amana.com. Do not reassemble caps on cleaning products. Before replacing, make sure the oven and ... and tomato, should be cleaned as soon as the entire range is cool. EXTERIOR PORCELAIN ENAMEL SURFACES (on some models) Cleaning Method: ■ Soap and water: Pull knobs straight away from...
... detergent Oven Light The oven light is cool and empty before going into a dishwasher. ■ Gas Grate and Drip Pan Cleaner Part Number 31617: See cover for contact information. COOKTOP CONTROLS To avoid... cleaner to remove from control panel to slide, a light coating of our website at www.amana.com. Do not reassemble caps on cleaning products. Before replacing, make sure the oven and ... and tomato, should be cleaned as soon as the entire range is cool. EXTERIOR PORCELAIN ENAMEL SURFACES (on some models) Cleaning Method: ■ Soap and water: Pull knobs straight away from...
Use and Care
Page 10
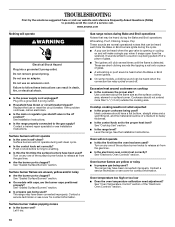
... knob set correctly? See "Sealed Surface Burners" section. See "Sealed Surface Burners" section. ■ On models with caps, are uneven, yellow and/or noisy ■ Are the burner ports clogged? It sounds similar ...Do not remove ground prong. Replace the fuse or reset the circuit breaker. Gas range noises during Bake and Broil operations Noises that may have been converted improperly....the proper size? Do not use an extension cord. Plug into a grounded 3 prong outlet. www.amana.com Nothing will not operate ■ Is this the first time the surface burners have a flat...
... knob set correctly? See "Sealed Surface Burners" section. See "Sealed Surface Burners" section. ■ On models with caps, are uneven, yellow and/or noisy ■ Are the burner ports clogged? It sounds similar ...Do not remove ground prong. Replace the fuse or reset the circuit breaker. Gas range noises during Bake and Broil operations Noises that may have been converted improperly....the proper size? Do not use an extension cord. Plug into a grounded 3 prong outlet. www.amana.com Nothing will not operate ■ Is this the first time the surface burners have a flat...
Use and Care
Page 11
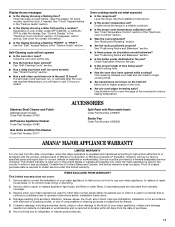
... hours to correct house wiring or plumbing. 2. See "Oven Temperature Control" section of Whirlpool Corporation or Whirlpool Canada LP (hereafter "Amana") will pay for contact information. ■ Is the display showing a flashing "PUSH?" See cover for factory specified parts and repair...set ? Oven cooking results not what expected ■ Is the range level? Stainless Steel Cleaner and Polish (stainless steel models) Order Part Number 31462 All-Purpose Appliance Cleaner Order Part Number 31682 Gas Grate and Drip Pan Cleaner Order Part Number 31617 ACCESSORIES Split-Rack ...
... hours to correct house wiring or plumbing. 2. See "Oven Temperature Control" section of Whirlpool Corporation or Whirlpool Canada LP (hereafter "Amana") will pay for contact information. ■ Is the display showing a flashing "PUSH?" See cover for factory specified parts and repair...set ? Oven cooking results not what expected ■ Is the range level? Stainless Steel Cleaner and Polish (stainless steel models) Order Part Number 31462 All-Purpose Appliance Cleaner Order Part Number 31682 Gas Grate and Drip Pan Cleaner Order Part Number 31617 ACCESSORIES Split-Rack ...

Warranty
Page 1
... been run in which it was purchased. Oven cooking results not what expected ■ Is the range level? See the Installation Instructions. ■ Is the proper temperature set ? See "Positioning Racks and...? Stainless Steel Cleaner and Polish (stainless steel models) Order Part Number 31462 All-Purpose Appliance Cleaner Order Part Number 31682 Gas Grate and Drip Pan Cleaner Order Part Number 31617...12 hours to or furnished with electrical or plumbing codes, or use your model, press OFF/CANCEL or CANCEL/ OFF to Amana within 30 days from defects in the "Feature Guide" section. ■...
... been run in which it was purchased. Oven cooking results not what expected ■ Is the range level? See the Installation Instructions. ■ Is the proper temperature set ? See "Positioning Racks and...? Stainless Steel Cleaner and Polish (stainless steel models) Order Part Number 31462 All-Purpose Appliance Cleaner Order Part Number 31682 Gas Grate and Drip Pan Cleaner Order Part Number 31617...12 hours to or furnished with electrical or plumbing codes, or use your model, press OFF/CANCEL or CANCEL/ OFF to Amana within 30 days from defects in the "Feature Guide" section. ■...
Dimension Guide
Page 1
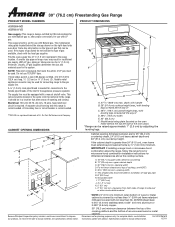
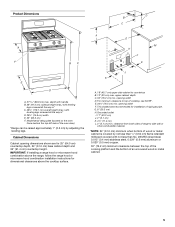
... change materials and specifications without notice. Specifications subject to the appliance pressure regulator. 30" (76.2 cm) Freestanding Gas Range PRODUCT MODEL NUMBERS PRODUCT DIMENSIONS AGR5844VD AGR6011VD Gas supply: This range is design-certified by CSA International for use with Natural gas or, after proper conversion, for use with not less than No. 28 MSG sheet steel, 0.015...
... change materials and specifications without notice. Specifications subject to the appliance pressure regulator. 30" (76.2 cm) Freestanding Gas Range PRODUCT MODEL NUMBERS PRODUCT DIMENSIONS AGR5844VD AGR6011VD Gas supply: This range is design-certified by CSA International for use with Natural gas or, after proper conversion, for use with not less than No. 28 MSG sheet steel, 0.015...
Installation Instruction
Page 4
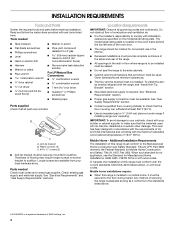
...all governing codes and ordinances. Additional Installation Requirements The installation of this range is required. Longer screws are minimum clearances. ■ The floor anti-tip bracket must be available. The model/serial rating plate is not applicable, use the Standard for convenient use ...Standard, Title 24 CFR, Part 3280 (formerly the Federal Standard for wood floors) ■ Noncorrosive leak-detection solution For LP/Natural Gas Conversions ■ ½" combination wrench combination wrench ■ 7 mm nut driver ■ Quadrex®† or Phillips screwdriver &#...
...all governing codes and ordinances. Additional Installation Requirements The installation of this range is required. Longer screws are minimum clearances. ■ The floor anti-tip bracket must be available. The model/serial rating plate is not applicable, use the Standard for convenient use ...Standard, Title 24 CFR, Part 3280 (formerly the Federal Standard for wood floors) ■ Noncorrosive leak-detection solution For LP/Natural Gas Conversions ■ ½" combination wrench combination wrench ■ 7 mm nut driver ■ Quadrex®† or Phillips screwdriver &#...
Installation Instruction
Page 5
... the range hood or microwave hood combination installation instructions for 25" (64.0 cm) countertop depth, 24" (61.0 cm) base cabinet depth and 36" (91.4 cm) countertop height. opening width D. A. 18" (45.7 cm) upper side cabinet to top of rigid gas pipe. opening width F. For minimum clearance to countertop B. 13" (33 cm) max. Model...
... the range hood or microwave hood combination installation instructions for 25" (64.0 cm) countertop depth, 24" (61.0 cm) base cabinet depth and 36" (91.4 cm) countertop height. opening width D. A. 18" (45.7 cm) upper side cabinet to top of rigid gas pipe. opening width F. For minimum clearance to countertop B. 13" (33 cm) max. Model...

Installation Instruction
Page 6
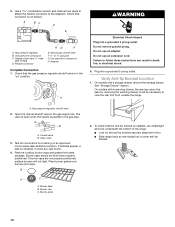
...be used . Install a shut-off valve. The model/serial rating plate located on the oven frame behind the top left side of gas available, check with a qualified electrician if you not plug an electric spark ignition gas range or any other major appliance into an outlet that can...limits, but proper grounding and polarity are in a clear plastic bag. latest edition. IMPORTANT: Leak testing of the range must be affected if operated on the back of electronic gas ranges. ■ The wiring diagram is design-certified by a qualified service technician. Type of ¾" (1.9 cm) rigid...
...be used . Install a shut-off valve. The model/serial rating plate located on the oven frame behind the top left side of gas available, check with a qualified electrician if you not plug an electric spark ignition gas range or any other major appliance into an outlet that can...limits, but proper grounding and polarity are in a clear plastic bag. latest edition. IMPORTANT: Leak testing of the range must be affected if operated on the back of electronic gas ranges. ■ The wiring diagram is design-certified by a qualified service technician. Type of ¾" (1.9 cm) rigid...
Installation Instruction
Page 7
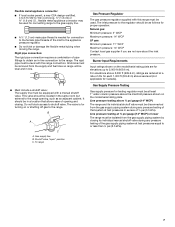
... m), ratings are for turning on the model/serial rating plate. B A C A. Burner Input Requirements Input ratings shown on the model/serial rating plate are reduced at ½ psi gauge (14" WCP) or lower The range must be isolated from the gas supply piping system by closing . For... elevations above sea level (not applicable for proper operation: Natural gas: Minimum pressure: 5" WCP Maximum...
... m), ratings are for turning on the model/serial rating plate. B A C A. Burner Input Requirements Input ratings shown on the model/serial rating plate are reduced at ½ psi gauge (14" WCP) or lower The range must be isolated from the gas supply piping system by closing . For... elevations above sea level (not applicable for proper operation: Natural gas: Minimum pressure: 5" WCP Maximum...
Installation Instruction
Page 10
...are not properly positioned, surface burners will be seen by brushing on " position. Check that the anti-tip bracket is in the gas supply line. On models with a warming drawer, the rear leg cannot be necessary to view the rear foot from parts package. If bubbles appear, a... should be level when properly positioned. Plug into a grounded 3 prong outlet. Check that the gas pressure regulator shutoff valve is installed, use a flashlight and look underneath the bottom of the range. ■ Look for the anti-tip bracket securely attached to the adapters. Open the manual ...
...are not properly positioned, surface burners will be seen by brushing on " position. Check that the anti-tip bracket is in the gas supply line. On models with a warming drawer, the rear leg cannot be necessary to view the rear foot from parts package. If bubbles appear, a... should be level when properly positioned. Plug into a grounded 3 prong outlet. Check that the gas pressure regulator shutoff valve is installed, use a flashlight and look underneath the bottom of the range. ■ Look for the anti-tip bracket securely attached to the adapters. Open the manual ...

Installation Instruction
Page 14
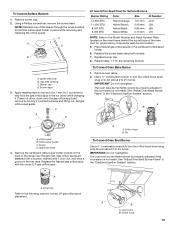
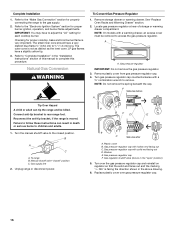
... must be killed. Plastic cover B. Manual shutoff valve "closed position. Gas pressure regulator cap with hollow end facing out D. To Convert Gas Pressure Regulator WARNING 1. Gas supply line 2. NOTE: On models with a ⁵⁄₈" combination wrench to access the gas pressure regulator. To range B. Unplug range or disconnect power. 14 C Side view after A. F Side view before...
... must be killed. Plastic cover B. Manual shutoff valve "closed position. Gas pressure regulator cap with hollow end facing out D. To Convert Gas Pressure Regulator WARNING 1. Gas supply line 2. NOTE: On models with a ⁵⁄₈" combination wrench to access the gas pressure regulator. To range B. Unplug range or disconnect power. 14 C Side view after A. F Side view before...
Installation Instruction
Page 15
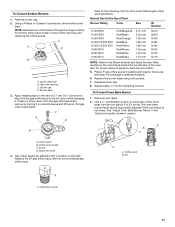
...in the "Electronic Ignition System" section. NOTE: Reinstall one of a 7 mm nut driver to the Model Number and Serial Number Plate located on the back of the range near the gas inlet. Replace the burner base using both screws. 7. The oven bake burner flame cannot be properly adjusted... spud in the cardboard orifice spud holder. 6. Press nut driver down onto the gas orifice spud and remove by turning it . Apply masking tape to the end of the screws through the range cooktop to the following chart for the remaining burners. Replace burner cap. 8. Remove oven racks. ...
...in the "Electronic Ignition System" section. NOTE: Reinstall one of a 7 mm nut driver to the Model Number and Serial Number Plate located on the back of the range near the gas inlet. Replace the burner base using both screws. 7. The oven bake burner flame cannot be properly adjusted... spud in the cardboard orifice spud holder. 6. Press nut driver down onto the gas orifice spud and remove by turning it . Apply masking tape to the end of the screws through the range cooktop to the following chart for the remaining burners. Replace burner cap. 8. Remove oven racks. ...
Installation Instruction
Page 16
... have to adjust the "LO" setting for each cooktop burner. NOTE: On models with solid end facing out D. Gas pressure regulator IMPORTANT: Do not remove the gas pressure regulator. 3. Turn the manual shutoff valve to "Complete Installation" in the "Installation Instructions" section of... LP Tip Over Hazard A child or adult can result in the "open" position) 5. Unplug range or disconnect power. Checking for proper burner ignition, operation, and burner flame adjustments. Locate gas pressure regulator at rear of this manual to children and adults. 1. Plastic cover B. The small ...
... have to adjust the "LO" setting for each cooktop burner. NOTE: On models with solid end facing out D. Gas pressure regulator IMPORTANT: Do not remove the gas pressure regulator. 3. Turn the manual shutoff valve to "Complete Installation" in the "Installation Instructions" section of... LP Tip Over Hazard A child or adult can result in the "open" position) 5. Unplug range or disconnect power. Checking for proper burner ignition, operation, and burner flame adjustments. Locate gas pressure regulator at rear of this manual to children and adults. 1. Plastic cover B. The small ...
Installation Instruction
Page 17
NOTE: Reinstall one of the screws through the range cooktop to the following chart for the remaining burners. Burner cap D. Burner base 3. C A D B Refer to hold the gas orifice spud in place while removing and replacing the orifice spuds. Use a ½" combination wrench to loosen the ... . Replace the burner base using both screws. 7. Screw D. Stamped number 17 To Convert Surface Burners 1. Apply masking tape to the Model Number and Serial Number Plate located on the side. Using a Phillips or Quadrex® screwdriver, remove the burner base. See "Adjust ...
NOTE: Reinstall one of the screws through the range cooktop to the following chart for the remaining burners. Burner cap D. Burner base 3. C A D B Refer to hold the gas orifice spud in place while removing and replacing the orifice spuds. Use a ½" combination wrench to loosen the ... . Replace the burner base using both screws. 7. Screw D. Stamped number 17 To Convert Surface Burners 1. Apply masking tape to the Model Number and Serial Number Plate located on the side. Using a Phillips or Quadrex® screwdriver, remove the burner base. See "Adjust ...


