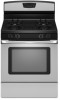

Use and Care
Page 7
... be blocked or covered. Allow 2" (5 cm) of meat, pies, casseroles, bundt and angel food cakes, yeast bread, quick breads, and 2-rack baking. Rack 4: Use for Part Number 4396923. Before baking and roasting, position racks according to the porcelain finish, do not place food or bakeware directly on a cookie sheet, jelly roll...
... be blocked or covered. Allow 2" (5 cm) of meat, pies, casseroles, bundt and angel food cakes, yeast bread, quick breads, and 2-rack baking. Rack 4: Use for Part Number 4396923. Before baking and roasting, position racks according to the porcelain finish, do not place food or bakeware directly on a cookie sheet, jelly roll...
Use and Care
Page 9
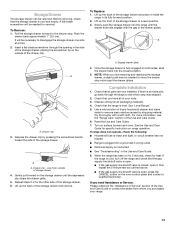
... appliance bulb. Unplug range or disconnect power. 4. Plug in the back of our website at www.amana.com. Always follow label instructions on panel. ■ All-Purpose Appliance Cleaner Part Number 31682 (not included): See cover for contact information. SURFACE BURNERS ■ See "Sealed Surface... pad: Gently clean around the model and serial number plate because scrubbing may remove numbers. ■ All-Purpose Appliance Cleaner Part Number 31682 (not included): See cover for contact information. To Replace: 1. STORAGE DRAWER Check that have discolored and are cool...
... appliance bulb. Unplug range or disconnect power. 4. Plug in the back of our website at www.amana.com. Always follow label instructions on panel. ■ All-Purpose Appliance Cleaner Part Number 31682 (not included): See cover for contact information. SURFACE BURNERS ■ See "Sealed Surface... pad: Gently clean around the model and serial number plate because scrubbing may remove numbers. ■ All-Purpose Appliance Cleaner Part Number 31682 (not included): See cover for contact information. To Replace: 1. STORAGE DRAWER Check that have discolored and are cool...
Use and Care
Page 11
... plumbing. 2. Proof of Whirlpool Corporation or Whirlpool Canada LP (hereafter "Amana") will not operate ■ Is the oven door open? Any food loss due to higher position in accordance with Removable Insert Order Part Number 4396927 Broiler Pan Order Part Number 4396923 AMANA® MAJOR APPLIANCE WARRANTY LIMITED WARRANTY For one year from warranty...
... plumbing. 2. Proof of Whirlpool Corporation or Whirlpool Canada LP (hereafter "Amana") will not operate ■ Is the oven door open? Any food loss due to higher position in accordance with Removable Insert Order Part Number 4396927 Broiler Pan Order Part Number 4396923 AMANA® MAJOR APPLIANCE WARRANTY LIMITED WARRANTY For one year from warranty...

Use and Care
Page 12
...to determine if another warranty applies. 9/07 For additional product information, in the U.S.A., visit www.amana.com. This major appliance is not available. 10. Repairs to parts or systems resulting from your home of repair or replacement under these excluded circumstances shall be repaired...is installed in an inaccessible location or is covered by this User Instructions and model number information for product service if your authorized Amana dealer to the appliance. 9. Have your correspondence. W10196154B SP PN W10204507A © 2008 All rights reserved. ®Registered ...
...to determine if another warranty applies. 9/07 For additional product information, in the U.S.A., visit www.amana.com. This major appliance is not available. 10. Repairs to parts or systems resulting from your home of repair or replacement under these excluded circumstances shall be repaired...is installed in an inaccessible location or is covered by this User Instructions and model number information for product service if your authorized Amana dealer to the appliance. 9. Have your correspondence. W10196154B SP PN W10204507A © 2008 All rights reserved. ®Registered ...

Warranty
Page 1
... or workmanship and is level in a manner that batter is reported to Amana within 30 days from the date of purchase, when this major appliance is used for factory specified parts and repair labor to or furnished with electrical or plumbing codes, or use... Polish (stainless steel models) Order Part Number 31462 All-Purpose Appliance Cleaner Order Part Number 31682 Gas Grate and Drip Pan Cleaner Order Part Number 31617 ACCESSORIES Split-Rack with Removable Insert Order Part Number 4396927 Broiler Pan Order Part Number 4396923 AMANA® MAJOR APPLIANCE WARRANTY LIMITED WARRANTY...
... or workmanship and is level in a manner that batter is reported to Amana within 30 days from the date of purchase, when this major appliance is used for factory specified parts and repair labor to or furnished with electrical or plumbing codes, or use... Polish (stainless steel models) Order Part Number 31462 All-Purpose Appliance Cleaner Order Part Number 31682 Gas Grate and Drip Pan Cleaner Order Part Number 31617 ACCESSORIES Split-Rack with Removable Insert Order Part Number 4396927 Broiler Pan Order Part Number 4396923 AMANA® MAJOR APPLIANCE WARRANTY LIMITED WARRANTY...
Warranty
Page 2
... appliance if it is installed in an inaccessible location or is not installed in a remote area where service by an authorized Amana servicer is located in accordance with published installation instructions. 11. DISCLAIMER OF IMPLIED WARRANTIES; IMPLIED WARRANTIES, INCLUDING WARRANTIES OF MERCHANTABILITY ... have access to the Internet and you need further assistance, you may contact Amana at the address below . AMANA SHALL NOT BE LIABLE FOR INCIDENTAL OR CONSEQUENTIAL DAMAGES. Repairs to parts or systems resulting from your home of Maytag Corporation or its related companies. ...
... appliance if it is installed in an inaccessible location or is not installed in a remote area where service by an authorized Amana servicer is located in accordance with published installation instructions. 11. DISCLAIMER OF IMPLIED WARRANTIES; IMPLIED WARRANTIES, INCLUDING WARRANTIES OF MERCHANTABILITY ... have access to the Internet and you need further assistance, you may contact Amana at the address below . AMANA SHALL NOT BE LIABLE FOR INCIDENTAL OR CONSEQUENTIAL DAMAGES. Repairs to parts or systems resulting from your home of Maytag Corporation or its related companies. ...
Installation Instruction
Page 1
Installer: Leave installation instructions with the homeowner. INSTALLATION INSTRUCTIONS 30" (76.2 CM) FREESTANDING GAS RANGES Table of Contents RANGE SAFETY...2 INSTALLATION REQUIREMENTS 4 Tools and Parts...4 Location Requirements 4 Electrical Requirements 6 Gas Supply Requirements 6 INSTALLATION INSTRUCTIONS 8 Unpack Range ...8 Install Anti-Tip Bracket 8 Make Gas Connection 9 Verify Anti-Tip Bracket Location 10 Level ...
Installer: Leave installation instructions with the homeowner. INSTALLATION INSTRUCTIONS 30" (76.2 CM) FREESTANDING GAS RANGES Table of Contents RANGE SAFETY...2 INSTALLATION REQUIREMENTS 4 Tools and Parts...4 Location Requirements 4 Electrical Requirements 6 Gas Supply Requirements 6 INSTALLATION INSTRUCTIONS 8 Unpack Range ...8 Install Anti-Tip Bracket 8 Make Gas Connection 9 Verify Anti-Tip Bracket Location 10 Level ...
Installation Instruction
Page 4
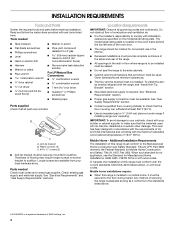
...;" combination wrench combination wrench ■ 7 mm nut driver ■ Quadrex®† or Phillips screwdriver ■ Masking tape Parts supplied Check that are included. Any method of securing the range is installed in accordance with the requirements of UL and CSA International...Thickness of flooring may require longer screws to anchor bracket to check that the materials used . Check existing gas supply and electrical supply. Parts needed ■ Tape measure ■ Marker or pencil ■ Flat-blade screwdriver ■ Phillips screwdriver ■ Level ■ ...
...;" combination wrench combination wrench ■ 7 mm nut driver ■ Quadrex®† or Phillips screwdriver ■ Masking tape Parts supplied Check that are included. Any method of securing the range is installed in accordance with the requirements of UL and CSA International...Thickness of flooring may require longer screws to anchor bracket to check that the materials used . Check existing gas supply and electrical supply. Parts needed ■ Tape measure ■ Marker or pencil ■ Flat-blade screwdriver ■ Phillips screwdriver ■ Level ■ ...
Installation Instruction
Page 8
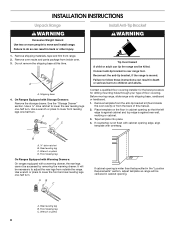
... other injury. 1. Rear leveling leg C. Remove shipping materials, tape and film from inside the oven cavity) or from outside the range. Remove oven racks and parts package from range. 2. Shipping base 4. Before moving range, slide range onto shipping base, cardboard or hardboard. 1. Use wrench or pliers to move and install range...
... other injury. 1. Rear leveling leg C. Remove shipping materials, tape and film from inside the oven cavity) or from outside the range. Remove oven racks and parts package from range. 2. Shipping base 4. Before moving range, slide range onto shipping base, cardboard or hardboard. 1. Use wrench or pliers to move and install range...
Installation Instruction
Page 10
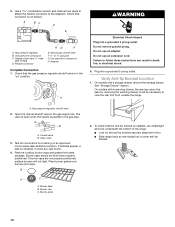
... grates from outside the range. B A C A. Burner cap C. Use a combination wrench and channel lock pliers to attach the flexible connector to view the rear foot from parts package. Adapter Complete Connection 1. Correct any leak found. 4. ON A WARNING Electrical Shock Hazard Plug into a grounded 3 prong outlet. The valve is open when the handle...
... grates from outside the range. B A C A. Burner cap C. Use a combination wrench and channel lock pliers to attach the flexible connector to view the rear foot from parts package. Adapter Complete Connection 1. Correct any leak found. 4. ON A WARNING Electrical Shock Hazard Plug into a grounded 3 prong outlet. The valve is open when the handle...
Installation Instruction
Page 13
...other side of liquid household cleaner and warm water to the drawer stop notch past the drawer glides. See "Level Range." 5. If you have all parts are removing and replacing the storage drawer, a slight push may be needed to a level position. 3. Pull the storage drawer forward to remove waxy ...storage drawer and place it , then repeat the 5-minute test as outlined above. ■ If the gas supply line shutoff valve is an extra part, go back through the opening in the Use and Care Guide. 8. When the range has been on surface burners and oven. Dry thoroughly with ...
...other side of liquid household cleaner and warm water to the drawer stop notch past the drawer glides. See "Level Range." 5. If you have all parts are removing and replacing the storage drawer, a slight push may be needed to a level position. 3. Pull the storage drawer forward to remove waxy ...storage drawer and place it , then repeat the 5-minute test as outlined above. ■ If the gas supply line shutoff valve is an extra part, go back through the opening in the Use and Care Guide. 8. When the range has been on surface burners and oven. Dry thoroughly with ...
Installation Instruction
Page 17
... top left side of the oven door for proper sizing of the screws through the range cooktop to hold the gas orifice spud in plastic parts bag for each burner location. 5. Stamped number 17 Using a Phillips or Quadrex® screwdriver, remove the burner base. Gas tube opening C. Apply masking tape to...
... top left side of the oven door for proper sizing of the screws through the range cooktop to hold the gas orifice spud in plastic parts bag for each burner location. 5. Stamped number 17 Using a Phillips or Quadrex® screwdriver, remove the burner base. Gas tube opening C. Apply masking tape to...


