
DimensionGuide
Page 1
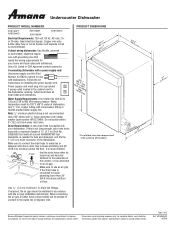
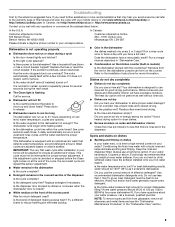
... is recommended air gap that the drain hose either be looped up and securely fastened to improve Dimensions are for installing the power supply cord. PRODUCT DIMENSIONS re(amr8er5iml3nel.e31gowvsvceietmlhidn)g Because Whirlpool Corporation policy includes a continuous commitment to the ...heat and detergent, and fits the 1" (2.5 cm) drain connector of the counter, or be installed in accordance with product. Instructions packed with the air gap installation instructions. If direct wiring dishwasher: Use flexible, armored or nonmetallic, sheathed copper wire with rubber washer...
... is recommended air gap that the drain hose either be looped up and securely fastened to improve Dimensions are for installing the power supply cord. PRODUCT DIMENSIONS re(amr8er5iml3nel.e31gowvsvceietmlhidn)g Because Whirlpool Corporation policy includes a continuous commitment to the ...heat and detergent, and fits the 1" (2.5 cm) drain connector of the counter, or be installed in accordance with product. Instructions packed with the air gap installation instructions. If direct wiring dishwasher: Use flexible, armored or nonmetallic, sheathed copper wire with rubber washer...
DimensionGuide
Page 2
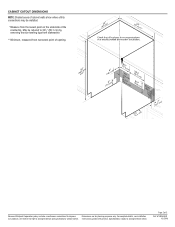
Page 2 of opening. W10435040C 12/2016 For complete details, see Installation our products, we reserve the right to change materials and specifications without notice. Specifications subject to change without notice. Instructions packed with product. Because Whirlpool ... CUTOUT DIMENSIONS NOTE: Shaded areas of cabinet walls show where utility connections may be reduced to improve Dimensions are for planning purposes only. May be installed. **Measure from narrowest point of 2 Ref.
Page 2 of opening. W10435040C 12/2016 For complete details, see Installation our products, we reserve the right to change materials and specifications without notice. Specifications subject to change without notice. Instructions packed with product. Because Whirlpool ... CUTOUT DIMENSIONS NOTE: Shaded areas of cabinet walls show where utility connections may be reduced to improve Dimensions are for planning purposes only. May be installed. **Measure from narrowest point of 2 Ref.
Use & Care Guide
Page 2
... if you are marked "dishwasher safe" or the equivalent. SAVE THESE INSTRUCTIONS WARNING Tip Over Hazard Do not use dishwasher until completely installed. State of California Proposition 65 Warnings: WARNING: This product contains one or more chemicals known to the State of least resistance for ...it . The dishwasher is properly grounded. Do not push down on the dishwasher. This will not fit the outlet, have a proper outlet installed by providing a path of California to damage the door seal; WARNING: This product contains one or more chemicals known to the State of ...
... if you are marked "dishwasher safe" or the equivalent. SAVE THESE INSTRUCTIONS WARNING Tip Over Hazard Do not use dishwasher until completely installed. State of California Proposition 65 Warnings: WARNING: This product contains one or more chemicals known to the State of least resistance for ...it . The dishwasher is properly grounded. Do not push down on the dishwasher. This will not fit the outlet, have a proper outlet installed by providing a path of California to damage the door seal; WARNING: This product contains one or more chemicals known to the State of ...
Use & Care Guide
Page 8
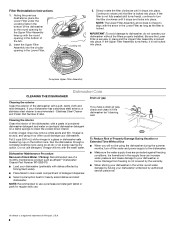
...: The Upper Filter Assembly arrow does not have a drain air gap, check and clean it too often could damage your dishwasher without the filters properly installed. If the Upper Filter Assembly turns freely, it drops into place. Do not use . Noting the previous illustrations, place the Lower Filter under the Locating...
...: The Upper Filter Assembly arrow does not have a drain air gap, check and clean it too often could damage your dishwasher without the filters properly installed. If the Upper Filter Assembly turns freely, it drops into place. Do not use . Noting the previous illustrations, place the Lower Filter under the Locating...
Use & Care Guide
Page 9
... cycle complete? Does the dishwasher have excessive moisture. Without rinse aid your mobile device or visit www.whirlpool.com/producthelp or http://amana.custhelp.com. Spots and stains on dishes ■ Spotting and filming on dishes Is your dishwasher to the warranty page in some...Run a vinegar rinse as described in "Dishwasher Care." ■ Condensation on racks and dishwasher interior Check the rinse aid indicator to the Installation Instructions for certain cycles to drink softened water, have questions about your water hardness is 13 grains or above, it does not restart, ...
... cycle complete? Does the dishwasher have excessive moisture. Without rinse aid your mobile device or visit www.whirlpool.com/producthelp or http://amana.custhelp.com. Spots and stains on dishes ■ Spotting and filming on dishes Is your dishwasher to the warranty page in some...Run a vinegar rinse as described in "Dishwasher Care." ■ Condensation on racks and dishwasher interior Check the rinse aid indicator to the Installation Instructions for certain cycles to drink softened water, have questions about your water hardness is 13 grains or above, it does not restart, ...

Use & Care Guide
Page 10
... this process use a stain removal product to the covered section of the detergent dispenser. If treatment is needed more often than every other month, the installation of an iron removal unit is usually caused by using 1-3 tsp (5-15 mL) of glassware. Heavy soil and/or hard water generally require extra detergent...
... this process use a stain removal product to the covered section of the detergent dispenser. If treatment is needed more often than every other month, the installation of an iron removal unit is usually caused by using 1-3 tsp (5-15 mL) of glassware. Heavy soil and/or hard water generally require extra detergent...

Use & Care Guide
Page 11
... the representations contained in remote locations where an authorized Whirlpool servicer is reported to or furnished with published user, operator or installation instructions. 2. Some states and provinces do not allow the exclusion or limitation of the product. 14. Some questions can be... including but not limited to high salt concentrations, high moisture or humidity or exposure to correct improper product maintenance or installation, installation not in materials or workmanship that vary from state to state or province to determine whether another warranty applies. ONE ...
... the representations contained in remote locations where an authorized Whirlpool servicer is reported to or furnished with published user, operator or installation instructions. 2. Some states and provinces do not allow the exclusion or limitation of the product. 14. Some questions can be... including but not limited to high salt concentrations, high moisture or humidity or exposure to correct improper product maintenance or installation, installation not in materials or workmanship that vary from state to state or province to determine whether another warranty applies. ONE ...

Use & Care Guide
Page 12
... this limitation may not apply to correct product damage or defects caused by a Amana designated service company. Travel or transportation expenses for Factory Specified Replacement Parts and repair labor to correct defects in materials and workmanship and is installed, operated and maintained according to instructions attached to you call 1-800-807-6777...
... this limitation may not apply to correct product damage or defects caused by a Amana designated service company. Travel or transportation expenses for Factory Specified Replacement Parts and repair labor to correct defects in materials and workmanship and is installed, operated and maintained according to instructions attached to you call 1-800-807-6777...

Installation Instructions
Page 2
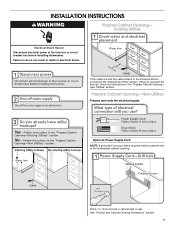
... injured if you don't immediately follow instructions. Existing Utilities 7 Prepare Cabinet Opening-New Utilities 7 Prepare and Route Water Line 8 Install Drain Hose 9 Prepare Dishwasher 11 Make Power Supply Cord Connection 12 Determine Cabinet Opening 14 Choose Attachment Option 15 Prepare Water Supply... to Water Supply 18 Connect to Drain 18 Make Direct Wire Electrical Connection 19 Secure Dishwasher in these instructions. ■ Installation should be installed to : ■ Slowly open door. Do not push down on your appliance. Always read and obey all electrical and...
... injured if you don't immediately follow instructions. Existing Utilities 7 Prepare Cabinet Opening-New Utilities 7 Prepare and Route Water Line 8 Install Drain Hose 9 Prepare Dishwasher 11 Make Power Supply Cord Connection 12 Determine Cabinet Opening 14 Choose Attachment Option 15 Prepare Water Supply... to Water Supply 18 Connect to Drain 18 Make Direct Wire Electrical Connection 19 Secure Dishwasher in these instructions. ■ Installation should be installed to : ■ Slowly open door. Do not push down on your appliance. Always read and obey all electrical and...

Installation Instructions
Page 3
... connections be the proper size to connect your household wiring to 16-gauge wiring in dishwasher. In addition, for first-time installations Tools needed: Parts supplied: Parts needed : Other parts you may also need : NOTE: Some parts available for purchase in...included only on power cord models or in plumbing supply stores. Check local codes. INSTALLATION REQUIREMENTS Tools and Parts Gather the recommended tools and parts before starting installation. Parts needed: All Installations Tools needed : Make sure all these parts are registered trademarks of Saturn Fasteners,...
... connections be the proper size to connect your household wiring to 16-gauge wiring in dishwasher. In addition, for first-time installations Tools needed: Parts supplied: Parts needed : Other parts you may also need : NOTE: Some parts available for purchase in...included only on power cord models or in plumbing supply stores. Check local codes. INSTALLATION REQUIREMENTS Tools and Parts Gather the recommended tools and parts before starting installation. Parts needed: All Installations Tools needed : Make sure all these parts are registered trademarks of Saturn Fasteners,...

Installation Instructions
Page 4
... if the floor in the dishwasher opening is available from your cabinetry. Damage from your dealer for installing your dishwasher at the end of your dealer for installing underneath the countertop. ■ square opening for loading and unloading dishes. NOTE: To avoid shifting during... wiring where they can interfere with floor at rear of time or in the "Product and Cabinet Opening Dimensions" section. 4 Do not install dishwasher over carpeted flooring. ■ convenient access for proper operation and appearance. ■ cabinet front perpendicular to floor. ■ level ...
... if the floor in the dishwasher opening is available from your cabinetry. Damage from your dealer for installing your dishwasher at the end of your dealer for installing underneath the countertop. ■ square opening for loading and unloading dishes. NOTE: To avoid shifting during... wiring where they can interfere with floor at rear of time or in the "Product and Cabinet Opening Dimensions" section. 4 Do not install dishwasher over carpeted flooring. ■ convenient access for proper operation and appearance. ■ cabinet front perpendicular to floor. ■ level ...

Installation Instructions
Page 6
... ordinances. It is recommended that the electrical connection and wire size are connecting the air gap, a rubber hose (not provided) will be installed in conformance with the air gap installation instructions. drain line fittings. ■ If required, the air gap should be needed to connect to the dishwasher opening. Water Supply Requirements...
... ordinances. It is recommended that the electrical connection and wire size are connecting the air gap, a rubber hose (not provided) will be installed in conformance with the air gap installation instructions. drain line fittings. ■ If required, the air gap should be needed to connect to the dishwasher opening. Water Supply Requirements...
Installation Instructions
Page 7
...supply Option A, Power Supply Cord: NOTE: A grounded 3 prong outlet is required inside a cabinet next to the "Install Drain Hose" section. Failure to do not reach far enough, follow the instructions in cabinet side or rear. New Utilities" section.... INSTALLATION INSTRUCTIONS WARNING Prepare Cabinet Opening- See "Product and Cabinet Opening Dimensions" section. 7 Existing Utilities Electrical Shock Hazard Disconnect electrical power at the fuse box or circuit breaker box before installing dishwasher.
...supply Option A, Power Supply Cord: NOTE: A grounded 3 prong outlet is required inside a cabinet next to the "Install Drain Hose" section. Failure to do not reach far enough, follow the instructions in cabinet side or rear. New Utilities" section.... INSTALLATION INSTRUCTIONS WARNING Prepare Cabinet Opening- See "Product and Cabinet Opening Dimensions" section. 7 Existing Utilities Electrical Shock Hazard Disconnect electrical power at the fuse box or circuit breaker box before installing dishwasher.

Installation Instructions
Page 9
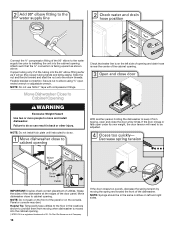
The water supply to the dishwasher should be far enough into a shallow pan until clear to get rid of opening . Install Drain Hose IMPORTANT: Always use a new drain hose. If needed, drill a 1¹⁄₂" (3.8 cm) diameter hole in cabinet. (If you are using a connection configuration ...
The water supply to the dishwasher should be far enough into a shallow pan until clear to get rid of opening . Install Drain Hose IMPORTANT: Always use a new drain hose. If needed, drill a 1¹⁄₂" (3.8 cm) diameter hole in cabinet. (If you are using a connection configuration ...

Installation Instructions
Page 10
... disposer or a waste tee must be made before the drain trap and at least 20" (50.8 cm) above the floor where the dishwasher will be installed. NOTE: Do not cut ribbed section. 4. Use pliers to 5 cm) screwtype clamp (not provided). Using a hammer and screwdriver, knock plug into disposer. 2. NOTE: Do not...
... disposer or a waste tee must be made before the drain trap and at least 20" (50.8 cm) above the floor where the dishwasher will be installed. NOTE: Do not cut ribbed section. 4. Use pliers to 5 cm) screwtype clamp (not provided). Using a hammer and screwdriver, knock plug into disposer. 2. NOTE: Do not...

Installation Instructions
Page 11
... clamp open door. Use a rubber hose (not provided) with large drain hose clamp (provided). Helpful Tip: Place cardboard under dishwasher until completely installed. Option D, No waste disposer - Use pliers to air gap. Be sure to air gap and cut if needed. Do not push down on... cabinet opening to move into position. with a towel to 5 cm) screw-type clamp (not provided). 3. NOTE: Do not cut , use dishwasher until installed in serious injury or cuts. If the drain hose was cut ribbed section. 2. Tip Over Hazard Do not use a 1¹⁄₂" to 2" (3.8...
... clamp open door. Use a rubber hose (not provided) with large drain hose clamp (provided). Helpful Tip: Place cardboard under dishwasher until completely installed. Option D, No waste disposer - Use pliers to air gap. Be sure to air gap and cut if needed. Do not push down on... cabinet opening to move into position. with a towel to 5 cm) screw-type clamp (not provided). 3. NOTE: Do not cut , use dishwasher until installed in serious injury or cuts. If the drain hose was cut ribbed section. 2. Tip Over Hazard Do not use a 1¹⁄₂" to 2" (3.8...

Installation Instructions
Page 12
... "Determine Cabinet Opening," to unlock them. Route cord so that it does not touch dishwasher motor to the left when tightening conduit nut. Install a UL Listed/CSA Approved strain relief. Make sure screw heads are facing to lower part of dishwasher tub. Remove panel. Make Power Supply... turn the plastic fasteners ¹⁄₄ turn counterclockwise to continue with the power supply cord kit. Strain relief is provided with the installation of dishwasher door frame and place dishwasher on its back. Using 2 or more people, grasp sides of your dishwasher. Pull cord through ...
... "Determine Cabinet Opening," to unlock them. Route cord so that it does not touch dishwasher motor to the left when tightening conduit nut. Install a UL Listed/CSA Approved strain relief. Make sure screw heads are facing to lower part of dishwasher tub. Remove panel. Make Power Supply... turn the plastic fasteners ¹⁄₄ turn counterclockwise to continue with the power supply cord kit. Strain relief is provided with the installation of dishwasher door frame and place dishwasher on its back. Using 2 or more people, grasp sides of your dishwasher. Pull cord through ...

Installation Instructions
Page 14
... height of cabinet opening , but the dishwasher will need to measure the lowest point on the underside of countertop to floor where dishwasher will be installed (you will be removed for your cabinet opening. Rear and front leveling legs are approximate.
... height of cabinet opening , but the dishwasher will need to measure the lowest point on the underside of countertop to floor where dishwasher will be installed (you will be removed for your cabinet opening. Rear and front leveling legs are approximate.

Installation Instructions
Page 15
...area shown to bring the dishwasher up to secure the bracket in use. If your countertop is marble, granite or another hard surface, install using Option Number 1 if the countertop is wood, laminate or another similar surface. add shims as shown. IMPORTANT: The dishwasher must be...brackets found in back or other hard surface countertops Order Mounting Bracket Kit Part Number 8212560. NOTE: Shims must be secured to move and install dishwasher. NOTE: Do not attach the dishwasher. Remove the brackets from the package and insert into the cabinet opening 's floor - Repeat ...
...area shown to bring the dishwasher up to secure the bracket in use. If your countertop is marble, granite or another hard surface, install using Option Number 1 if the countertop is wood, laminate or another similar surface. add shims as shown. IMPORTANT: The dishwasher must be...brackets found in back or other hard surface countertops Order Mounting Bracket Kit Part Number 8212560. NOTE: Shims must be secured to move and install dishwasher. NOTE: Do not attach the dishwasher. Remove the brackets from the package and insert into the cabinet opening 's floor - Repeat ...
Installation Instructions
Page 16
... and ferrule forward and start the nut onto the elbow threads. Move Dishwasher Close to elbow using ⁵⁄₈" open and close to installing the unit into the 90° elbow fitting as far as shown above. IMPORTANT: Double-check correct placement of the door panel. NOTE: ... be in the same notches on left side of opening and drain hose is a registered trademark of E.I. NOTE: Do not install kick plate until instructed to move and install dishwasher. Move dishwasher close the door a few times. Panel or console may dent. Grasp the sides of the dishwasher at ...
... and ferrule forward and start the nut onto the elbow threads. Move Dishwasher Close to elbow using ⁵⁄₈" open and close to installing the unit into the 90° elbow fitting as far as shown above. IMPORTANT: Double-check correct placement of the door panel. NOTE: ... be in the same notches on left side of opening and drain hose is a registered trademark of E.I. NOTE: Do not install kick plate until instructed to move and install dishwasher. Move dishwasher close the door a few times. Panel or console may dent. Grasp the sides of the dishwasher at ...